Heroes of the Storm is the newest Blizzard title to hit PCs and takes pride in being much more objective-based than its fellow MOBA counterparts.
The game consists of 7 different maps, all containing a different set of missions that competitors will have to team up with other players to take on.
Strategizing with the random map you’ve been assigned to play on is the key to victory in Heroes of the Storm. Here we will explore the Haunted Mines map, including general tips and tricks, then diving further into specific champions, builds, and strategies to wipe the floor with your opponents.
Step 1: A General Understanding of the Map
Map Objective

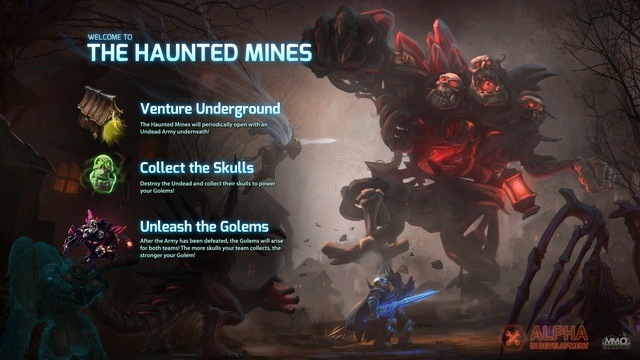
The main objective of the Haunted Mines map is to enter the mines and collect the skulls. The mines have an entrance at the top and the bottom of the map, and are only open for a limited amount of time. Players collect skulls by defeating the minions and the boss inside the mines.
There are also a limited amount of skulls (100), so grabbing more than your opponent is imperative. The more skulls you collect, the stronger your golem becomes, which will push bottom if you are on the blue team, and top if you’re on the red team.
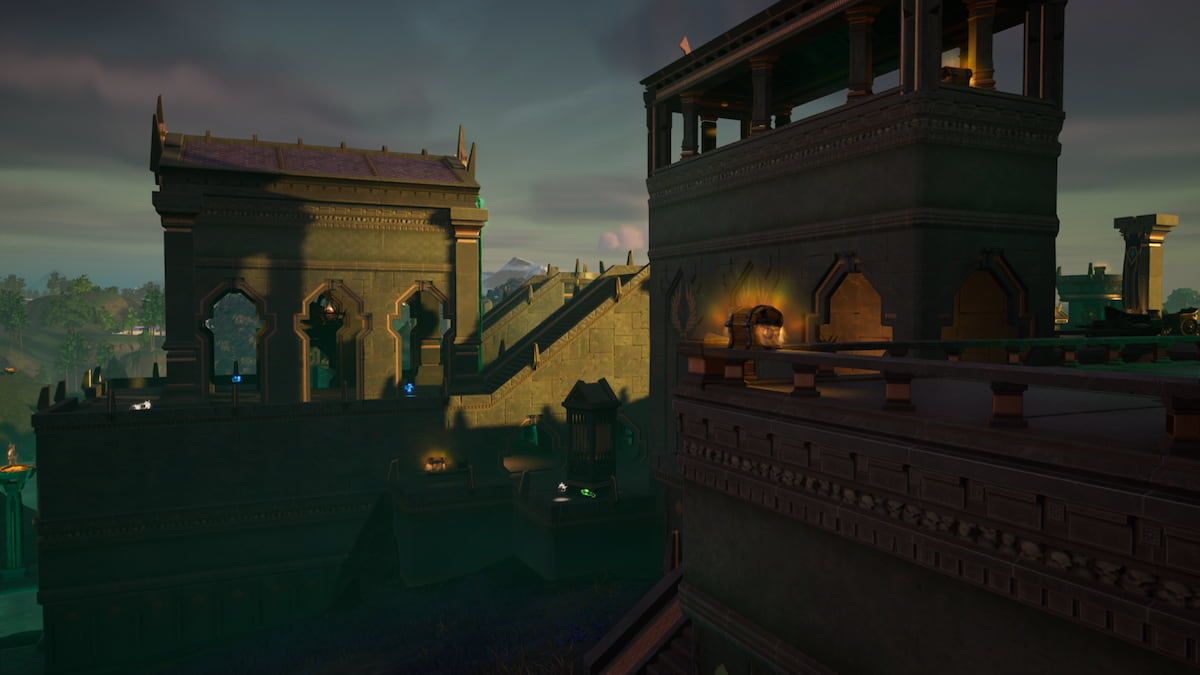
Map Layout

The Haunted Mines is currently the smallest map in Heroes of the Storm, and therefore is much faster paced. There are only 2 lanes in this map, which are both very short, so players will have to capitalize on the space given.
The blue tower icons indicate the watch towers, or points you can capture to increase your sight on the map, which helps in such a small space. However, these are not a priority, so only cap these if it’s convenient.
The 3 purple skull icons indicate minion camps that can be beaten and captured to fight on the side of your team. The minion camps on this map don’t hold too much value, but it can be a nice boost to push with your golem if you’re in the correct position. If your team is bound to lose the fight in the mines, it’s a good idea to quit while you’re ahead and go up to capture the minion camps instead.
The center minion camp is a Knights camp, which impacts the game a lot more than the 2 Siege camps. A general strategy is to head straight for the Knights camp as soon as the last skull is collected, if you’re the team that ran the other out of the mines. If you’re the team that got ran out, you should try capping the point before he other team has a chance to exit the mines.
The 2 orange markers are in the picture above indicate the entrances to the mines, a separate portion of this map that players can enter for a limited amount of time every few minutes.
While players push or hold lanes, it is your largest concern to enter the mines as soon as you are able. It’s basically a race between your team and the enemy team to defeat the minions in the mines and collect the most skulls. After all the skulls are picked up, both golems will spawn.
The number of skulls your team gathered directly correlates to your golem’s power level. Once it spawns, you’ll be faced with the decision to push with your golem or defend against your opponent’s golem.
Current Team Structure Meta
As of now, players generally will go into a 1-4 or 4-1 formation on this map. The object of this strategy is to send 4 players into the lane that your golem spawns in order to push against it as hard as possible.
This requires the other team to stop what they’re doing to come stop you, halting all pushing on their side. If they continue to push on their side as well, it’ll come down to team composition to see which team has the better 1 hero in the solo lane stopping the push and which set of 4 heroes can push harder.
See the “Team Composition and Powerful Heroes” section to decide which heroes are the best choices for this map in the current meta.
Step 2: Playing the Map Correctly
When playing the Haunted Mines, timing is everything. Knowing when the mine phases are going to begin and setting up accordingly is the key to success.

Early Game
When you first spawn in the Haunted Mines, you’ll first split up into your 4-1 or 1-4 lanes. The mine phase will begin shortly (about 2 minutes into the game), so setting up for it will be the biggest priority.
Once the game begins, you should first capture your team’s watch tower to grant your team extra vision to protect from ganks. Since the other team is probably going to do the same, you won’t be far from each other. However, you should avoid a teamfight, since the mine phase will begin soon and dying will be detrimental to your team.
On the other hand, if you catch a member of the opposite team out, capitalize on it and kill the hero. Just as dying will be the nail in the coffin for your team during the mine phase, the other team having a man down will be unfavorable for them as well.
About 30 second before the mine spawns (you should see the timer on the right side of the screen) your team should head into the mines to set up for the incoming fight.
It’s important to note that there are more skulls dropped from the minion camps in the middle of the mines than on the sides. Because of this fact, players should set up in the dead center of the mines to start the phase, this will automatically start your team with an advantage. Players should then make their way around the mines, strategically attempting to catch a member of the enemy team out of position.
Since the boss inside the mines should always be left for last, and there will almost always be a deciding teamfight before fighting him, picking off a member of the opposing team is always the best bet. Traveling as a team will ensure that you don’t fall victim to the same fate. Don’t be too hasty though, because chances are that there are some enemies lurking behind the corner. Therefore, you should always be careful about chasing.
Rinse and repeat.
Mid Game
Gameplay should continue as outlined in the early game. While the mine phase is not up, the 4 heroes should be pushing with their golem, and the 1 that is supposed to defend should be doing just that.
When your golem dies, players should be focusing on setting up for the next phase, which includes capturing minion camps whenever necessary, and making sure to stay alive prior to the mine phase starting again.
Once your team is strong enough to take down minion camps quickly, another aspect should be added to the mine phase that includes the minion camps.
If you’re the “winning” team coming out of the mining phase, meaning that you fought off the enemy team and captured the boss, it is customary to exit the mines right away and head for the Knight camp in the center of the top layer of the map. While your golem spawns you and your team should be able to capture the Knight camp easily, which will give your team a huge damage increase to your golem’s push.
If the other team is controlling the mines, and it’s your team that has been chased out, you can even the playing field by capturing all the minion camps, starting with the Knights, while the other team is killing the boss. This will take away any advantage the other team may have, while preventing them from capturing the points themselves.
Late Game
Since the longer the game goes on, the longer the death timers become, it’s incredibly important to pay attention to the map, and make sure that your hero stays alive.
In the late game it is also very important to stay as a 4-man group while in lane and a 5-man group while entering and always while inside the mines. If you are separate it is much easier to die or be ambushed by your opponents.
As the game progresses, the less effective the golem and minion camps will be, so teams that are push heavy should attempt to end the game before late game is reached.
Step 3: Assessing the Golem Strength and Adapting Accordingly

Throughout this article I have been continuously promoting the idea of 4-1 and 1-4 lanes. However, sometimes this is not possible and I’d like to discuss when you should stray from this composition to something safer.
When Your Team Has the Stronger Golem
If you won the fight in the mines, and have a stronger golem to show for it, the 4-1 strategy is highly recommended. Your opponents will already be at a disadvantage, and will be coming to defend, rather than push.
If the enemy team tries to out-push you, they will lose.
When the Golems are Basically Tied
It’s up to you to decide what to do in this situation, since the right thing to do varies based on your team composition and which team (if any) captured any minion camps on the surface level. If they have a few more skulls than you, but you captured Knights, then a 4-1 is still recommended, especially if your team has a faster push comp.
However, if you’re at all worried that the other team will be pushing faster, it’s safer to send 2 players to defend instead of just 1. When this is the case, 1 DPS and the original solo lane hero should go to defend, since 1 player can wave clear while the damage-dealer can kill the golem. This means the healer, the other DPS, and the tank with CC should push with their golem.
When the Enemy Golem is Stronger
If your team significantly lost the mine fight, then it’s worth considering sending 3 or more teammates to defend.
When this is the case, 1 DPS and the CC tank or healer should go with your golem, and the others should all go to defend. In more dire situations, only 1 player should push with your golem, which would normally be your DPS but can be substituted with the tank. Sometimes you’ll need all your damage to kill the golem as fast as possible.
If the enemy golem has 80 skulls or more, your entire team should go to kill the golem and defend against the dangerous incoming assault. Especially in the late game, not having every one of your teammates defending can mean defeat.
Step 4: Choosing Your Hero Effectively

In the Haunted Mines, the 4-1 or 1-4 strategy is used, so particular heroes are required in order for it to work out in your favor.
The solo lane should be a stable hero that does not die easily, that can survive ganks and pushing from the other team, and has effective wave clear to keep the enemy’s golem at bay.
The lane with 4 heroes is often composed of 2 damage-heavy heroes that are great at pushing lanes, 1 healer, and 1 tank with lots of crowd control (stuns, silences, etc.).
Team Composition and Powerful Heroes
Powerful heroes for the solo lane are Tassadar, Raynor, or even Valla.
The DPS should be high-damage dealing heroes like Sergeant Hammer, Zagara, Azmodan, Illidan, etc. If you have assassins, it will be easier and faster to collect skulls. They will also be safer in the mines because they can take on any 1v1 encounter if they do happen to have to fight over a skull camp.
A tank with a lot of CC can be Uther, Tyrael, Muradin, Diablo, E.T.C., etc.
The healer can be Brightwing, Malfurion, Tyrande, or whichever healer is the most powerful in the meta at the time.
Let the Battle Begin!
Now that you’re a Haunted Mines expert, it’s time to decimate your opponents on the field of battle. If there’s anything this Haunted Mines Guide is missing, feel free to let us know and we’ll be happy to expand.
Players looking for further HoTS content can find more guides, tips, news and more in the Heroes of the Storm section of GameSkinny here.