Heroes of the Storm is the newest Blizzard title to hit PCs and takes pride in being much more objective-based than its fellow MOBA counterparts.
The game consists of 7 different maps, all containing a different set of missions that competitors will have to team up with other players to take on.
Strategizing with the random map you’ve been assigned to play on is the key to victory in Heroes of the Storm. Here we will explore the Sky Temple map, including general tips and tricks, then diving further into specific champions, builds, and strategies to wipe the floor with your opponents.
Step 1: A General Understanding of the Map

Map Layout
There are 3 lanes in the Sky Temple map, the general top, middle, and bottom. However, unlike the norm, the bottom lane is slightly longer than the other two, and there’s a vision watchtower near the top lane that your team can control to gain a significant amount of vision.
In between the lanes, there are substantially large jungle areas, with a lot of twists, turns, and places to hide. This means there are a lot of opportunities to gank or be ganked, so it’s better to scout out the objective in advance and travel as a pack. Vision is paramount.
There are two Mercenary camps in the jungle near the top lane, that will both push the aforementioned path. The two Siege Giant camps are located in the bottom jungle, and will also push the bottom lane. The boss is located directly in the center of the map, meaning it is very dangerous to attempt to take it, and on the other hand very easy to ambush.
Map Objective
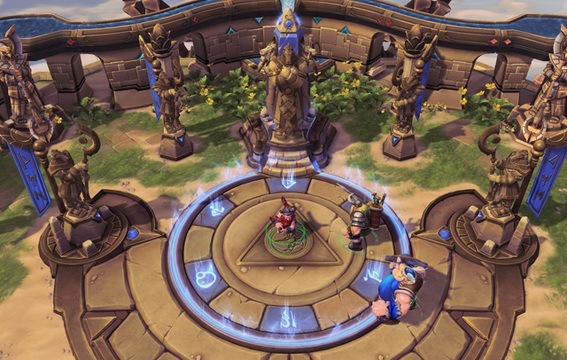
The main objective to the Sky Temple is to basically play king of the hill on 1 of 3 points across the map. There are 3 total temples on the map, one at the top, one in the middle, and one at the bottom. All of them are in the center.
Right before one of the temple platforms are about to activate, the game will notify you, giving you and your team ample time to go set up to capture it, or fight for it. Any of the temples may activate at any time, and one, two, or three may activate at the same time.
The temples are the main focus, and should be basically your only concern throughout the entire game. They’re important because of the devastating damage they do to structures, starting with the structures closest to them and working their way up or down, depending on the starting location.
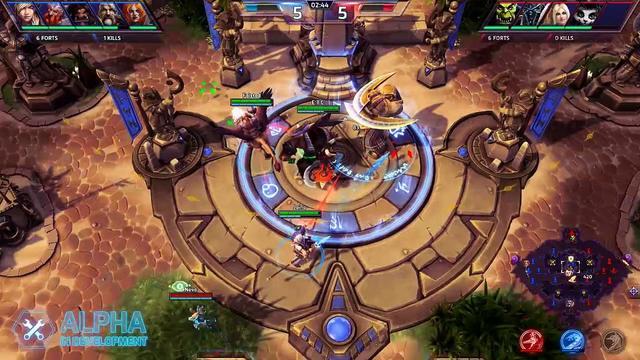
Each temple has 45 shots total, so using all of these on your enemies would wreak absolute havoc. While your capturing the point the platform will send neutral minions to attack you, and will then attack whoever is winning the point. They’re easy to kill, so they shouldn’t pose much of a threat, but killing them is completely irrelevant to capturing the temple, so your priority should be the enemy team, should they arrive.
Last, but also important, the final 5 shots fired off by the temple will be given to whichever team control it at the time, so your team doesn’t need to be there for it to happen. This is vital because this time can be valuably used to run over to the other temple (if there is one) or capturing minion camps.
Current Team Structure Meta
There is no particular number of heroes you should send in any lane, since no one will know where the next temple to be captured will be. Because of that, it’s said to place just 1 person bottom (whoever is the fastest, so he/she can make it back for fights easily, or completely immobile heroes like Abathur).
The bottom lane is the furthest away from most of the action because it’s so much longer than the others, that’s why it gets the least attention.
Soaking up experience in each lane is still important, so it’s not suggested to forget about it altogether, but to use your best judgement based on the situation to do so. For example, if the top tower has just finished, it’s a safer bet to say that you can leave 1 person top because chances are the top temple isn’t going to activate twice in a row.
Other than that, your team should move as a unit together, it’s the safest option in such a complicated jungle and large map.
Step 2: Playing the Map Correctly
Early Game
The first temple will be activated at 1:30, and it will always be the top and middle temple. Therefore, the first minute should be spent setting up for this. One player should be going bottom to soak up experience, so your team will have an advantage when fighting for the temple.
The other members of your team should split between mid and top to gather experience as well. While getting a pick on the other team is alright, it’s important not to engage in any teamfights since being a player down for the first temple is detrimental.
Games in the Sky Temple quickly swing in favor of one team or the other, so the first temple round is extremely important to win. Like I mentioned previously, your fastest hero should be at the bottom, since it’s the furthest away.
If you can capture the watchtower at the top of the map before the temples activate then do so, but only if it’s safe and if you have your whole team to back you up. If not, then it’s not the end of the world. Don’t make it a priority, and definitely don’t die for it.
Since the top and mid temples will both be activated, your team needs to make a decision where to go. If you want to be safe, pick one temple to capture and go together as 5. If your team is ahead and wants to try for both, then you should head where your opponents are first and contest the temple they’re at. Afterwards, you can safely go capture the other temple if you successfully kill off your enemies.

Mid Game
The second phase will always be the bottom lane, and it will always happen 2 minutes after the 1st round ended, so your team should be heading there as soon as it’s about to activate.
In between the 1st and 2nd phase, your team should look to capture the Bruiser camps at the bottom lane, so they will be pushing while the bottom temple is zapping the structures at the same time.
After the 2nd activation round, the temples will be completely random, so it’s important that the slower heroes make their way to the temple before it starts.
As the game progresses one team will be ahead, while the other trails behind. If you’re the team that’s pulling ahead, you should capitalize on this fact since it’s very easy to snowball on Sky Temple. Whenever your enemy goes to capture a temple, fight them off of it so that you can capture both. If you’re the team that’s behind, always peel off the temple you’re on if you’re attacked and rotate to the other.
Late Game
The later the game goes, generally the game will become more and more one-sided. However, this map is all about reading your situation, so it’s possible to capitalize on an opportunity if it’s presented.
If your team is behind, you should ignore the towers altogether and make your way through the jungle for support from the various camps. If you’re going to take this route, be careful not to approach the boss unless you know exactly where the other team is and that they’re not coming for you. Since it’s right in the middle, it’s very easy to get to and is also very easy to steal.

If your team is ahead, focus on capturing temple points and picking off the enemy team. If you can successfully capture minions camps and temples, the game will be easy, so taking the minion camps away from the other team will be in your best interest. Even if you’re in the lead, you should also be careful about taking the Boss. If your team is starting to get low by fighting it, it’s very possible for the other team to come in and kill you off, so taking the Boss should be held off on unless the other team is mostly dead.
Step 3: Using MULE to Give You a Competitive Edge
Differing from game mechanics or gameplay, there are other factors that are in play that could give your team a bit of an edge during the game.
One is the MULE talent that repairs structures. Choose a hero with the MULE talent is a good idea, since this map is structure and objective based, and the MULE can repair structures during the 2 minute down time in between temple phases.
Step 4: Choosing Your Hero Effectively
On the Sky Temple map, mobility is of the highest concern. Moving in between the temples is the most important factor, since your team can be rushing to get to the other after fighting off the enemy and capping one point, or running away from the other team to the other point.
Any heroes with increased mobility will shine in this game, especially since only 1 hero is needed to capture a temple, and every shot counts.

Team Composition and Powerful Heroes
Teams should always have a standard healer for teamfights and survivability, a beefy tank to absorb damage and CC if necessary, and 3 high mobility damage dealers to burst down anyone in your way.
Because of the importance of speed and movement, Zagara, Valla, Tychus, Sgt. Hammer, and Illidan are all excellent choices for DPS on this map. The healers are always generally the same and include whoever is in cycle in the meta at the moment, like Malfurion. The tanks should have a lot of CC in their kit, so Uther, ETC, and Tyrael are all great choice.
One other hero that shines on Sky Temple is Abathur, and he can be great for a number of different reasons. While buffing your teammates, you generally will know where all the action is happening on this map– the temples. Abathur can sneak away from wherever the fight is going on and give his team an advantage by soaking XP in the lane furthest away from the fight.
Let the Battle Begin!
Now that you’re a Sky Temple expert, it’s time to decimate your opponents on the field of battle. If there’s anything this Sky Temple Guide is missing, feel free to let us know and we’ll be happy to expand.
Players looking for further HoTS content can find more guides, tips, news and more in the Heroes of the Storm section of GameSkinny here.