World of Final Fantasy‘s Mirage-collecting, transfiguring, and stacking mechanics are the game’s lifeblood. While none of those systems are too complicated, they add a certain depth to the game it simply couldn’t have otherwise. Unfortunately a lot of it can be hard to keep track of or keep in mind.
This tips guide is for those new to the game who are having trouble surviving and adjusting to their enemies.
Unlike most other Final Fantasy games, WoFF demands you change your line ups around frequently. Not only because you get new Mirages to add to your ranks, but also because of the game’s super-reliance on elemental strengths and weaknesses. If you can’t adjust, you can’t progress.
There are some minor gameplay-oriented spoilers in these tips but nothing major — no storyline spoilers, but a slight spoiling of the “newness” of playing. But in a game that so readily stomps your butt in for simply having the wrong Mirages in a stack, you may need a little help getting on your way.
Defending only takes half a turn
This is an important aspect of combat the game never mentions, but is a huge boon. When you defend your character only uses half a turn, which you can see on the ATB bar as their icon will pop up in the middle instead of the bottom like usual. Since it’s still counted as a turn and you gain 1 AP, you can accumulate AP more efficiently than just attacking a turn.
Defending at the right times is something you need to get used to in order to survive.
This is useful to:
- Defend twice in a row to prepare for an enemy’s strong attack(s)
- Regenerate extra health via Regen
- Get an extra AP before a boss attacks or to use a skill
I really can’t emphasize enough how important abusing Defend is.
The best time to unstack
The game makes sure to tell you that you can unstack in battle but the uses of doing so aren’t that obvious. What seems to be the primary use of unstacking is quite useful.
If you come across a Mirage in battle that’s much weaker than you and you want to Imprism it but have to deal elemental damage, unstacking can usually keep you from killing it in one hit. You can either do this or carry around small elemental damage items Chocolatte sells to deal elemental damage without killing.
Keep an eye out for mirajewels on Mirage boards
Mirajewels can be equipped to give Reynn or Lann an ability not tied to their stack. It goes without saying they are pretty valuable.
Look for mirajewels on your new Mirage’s boards and if they’re something you want/need, work towards them.
Early game protip: Get a Moogle the first chance you get and rush its Cure mirajewel. This way you don’t have to stress about keeping a Mirage with a healing skill in your stacks early in the game.
Reynn is geared toward magic and Lann toward physical attacks
In typical RPG fashion, Reynn’s base stats are better suited to magic attacks and defense and Lann’s are better suited to physical attacks and defense.
The differences are rather small and you can choose to do their stacks however you want, but I chose to go with the flow and have Reynn on magic and Lann on physical once I noticed their stats.
Don’t get too attached to your stacks
Stacking is a huge part of World of Final Fantasy, so much so that you have to change them up on the fly often to suit the situation you’re in.
You can certainly have a set of your favorite Mirages, but don’t get too upset when you have to swap them all out for Mirages with skills and elemental strengths better suited to the enemies you’re dealing with. It’s pretty much guaranteed you’re going to have to change your stacks up before big boss fights as well.
Visit dungeons after you’ve cleared them
The game may be pretty linear, but there’s still plenty to be found in returning to areas you’ve already finished. Secret side areas and rare hidden Mirages (with strange Imprism requirements) can be found if you have patience and a keen enough eye.
When in doubt while going back to an area you’ve finished, look for highlighted paths you weren’t able to enter the first time around on the map.
If you want to see if there are any rare Mirages you’ve missed in an area, go back to Nine Wood Hills, use the gate, and choose to travel. Press the Triangle button on a dungeon and you will be able to see which Mirages are there you’ve seen, and whether there are any you’ve missed.
Always have weak elemental damage and status ailment-inflicting items on-hand
You never know what sort of Imprism requirements a Mirage is going to have and it’s simply not feasible to have every type of element and every status ailment at your disposal at all times.. without some very special items you can buy from Chocolatte.
Always have two or three of these items on hand at all times, just in case you run into some special rare Mirages you don’t want to miss out on and because the game call for stack-swapping so often. Items like the Gaia Drum (small Earth damage) and Dream Power (induces sleep) are invaluable in World of Final Fantasy.
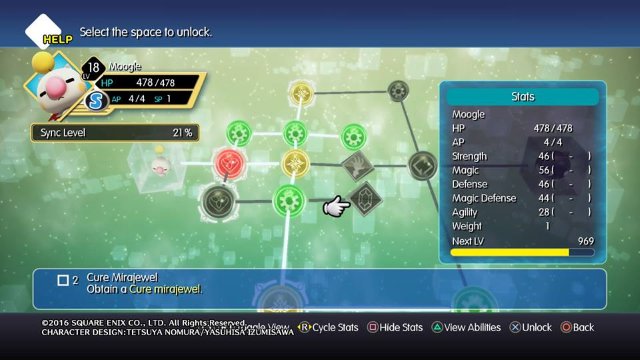
If you’re close to transfiguring a Mirage, you may want to hold onto some SP before you do
If you’re excited to transfigure one of your Mirages to gain access to better skills than the prior transfiguration had, consider holding onto some SP before you transfigure.
In the image below you can see my Magic Jar sitting at level 21 with 5 SP. At level 22 I can open a new transfiguration — so I have to choose whether to spend my SP on the Magic Jar’s Mirage board or on its transfiguration’s.
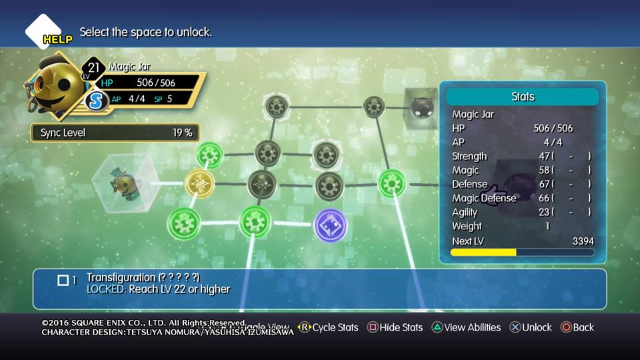
I chose to hold onto them for its transfiguration and didn’t regret it.
Sometimes transfiguring to “weaker” or smaller Mirages from the bigger and stronger ones is worth it
Sometimes you’ve just got to make a Mirage fit in your stack, due to either their skills, stats, or elemental strengths.
Still, there’s no shame in going backwards with their transfiguration for a while to make them fit with your lineup. You can even change them to a different type entirely once you meet the requirements (as you can see the Skull Eater/Mu below can be transfigged into a Reaver Mu, which is separate from the Mu transfiguration chain entirely).
Often defensive stats are what take the biggest hit when reverse-transfiguring but it does vary. One thing to keep in mind is the fact that a Mirage that is lower on the transfiguration chain can not use skills from higher tiers.
![]()
Just so you know: The Mu’s (and Skull Eater’s) Strength is higher than almost any other’s early in the game. If you want one of your characters to hit things like a truck early on, give the Mu a shot.
Subdue is a great friend for toppling enemy stacks
Speaking of the above Mu, he brings the skill Subdue fairly early. What does Subdue do? Non-lethal damage to an enemy.
Sometimes toppling an enemy stack is hard — okay, usually toppling an enemy stack is hard, especially early in the game. Subdue makes it a lot easier.
While skills that have topple strength themselves are great to use at the start of trying to topple a stack over, once an enemy stack gets to low health you should start whacking on it with Subdue until it topples. Often with my lineups that means defending with one character and using Subdue on the other.
Subdue will never kill an enemy. If there’s a Mirage you want in an enemy stack, use the above strategy then heal the Mirage before using Libra and then hitting it with its Imprism requirement.
These tips aren’t all that exciting, but if you’re having trouble you’d probably do well to keep them in mind. World of Final Fantasy is certainly a more complex game than it looks and you have to use all of its mechanics to survive through the game’s strict boss battles and less-than-friendly random battles. You can do it! And hopefully these tips help you out.