Guerilla games themselves have put out detailed pictures and cosplay specific character information. Check out their collection here.
Hold on to your brown breeches folks, this is going to be a difficult one for beginner cosplayers to pull off.
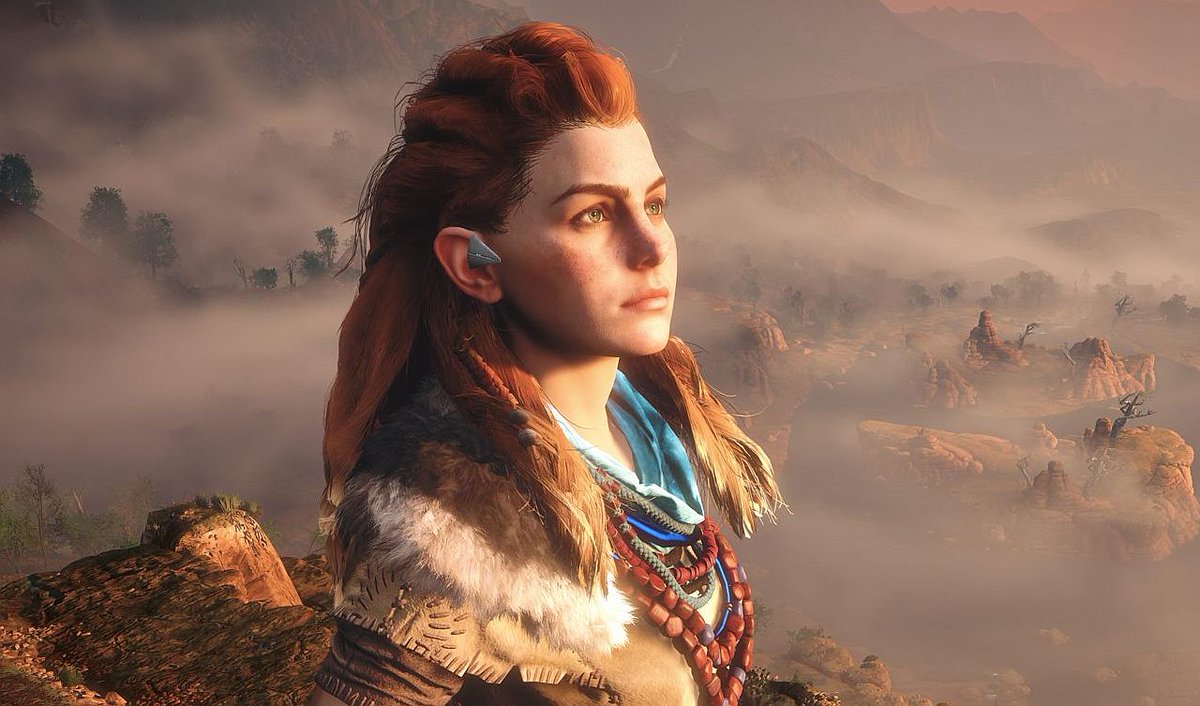
For the sake of not falling into our own black hole, we’re going to focus on Aloy’s most publicly featured outfit: The Nora Brave.
Alright, it’s a lot. Don’t get intimidated though, cosplaying always gets an A for effort and an A+ for attitude, at least in my book.
Under The Armor
We gotta start with our base layer. As everything is going to get more complicated from here on, I’d suggest some brown leggings, top and brown boots to get this part out of the way.
There is a short scene not far into the game that shows that the garments under her armor are far more complicated than that — and if that kind of thing is important to you — I suggest a quick google search for it. I can’t post here for spoiler reasons, and also because I’m suggesting (as a beginner) you skip it anyway.
Leather Daddy
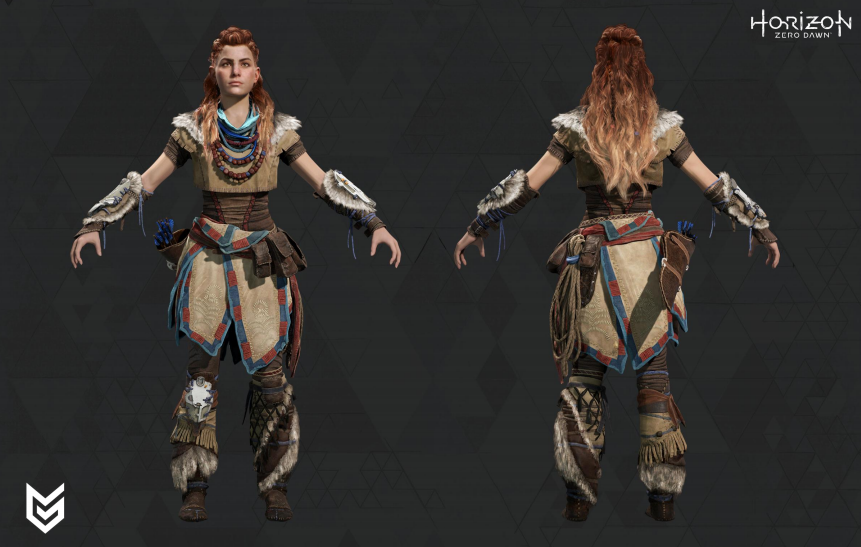
Did you think you’d be searching “discount leather hide” today? Neither did I, but it exists and is relatively easy to order. For about $20 you can get enough light tan thin leather hide to make Aloy’s top and bottom. Don’t panic, Aloy didn’t have access to sewing machines, just giant terrible killing machines.
You’ll be sewing your top by hand, and the bottom leather straps simply loop through her belt. The key to very simple leather sewing is a leather needle, some big, ancient looking thread (twine or leather straps can even work) and pre-punched holes.
 The leather pictured is even thicker than what you’ll likely pick up, and thicker is more difficult.
The coarse linen around her armor skirt will provide the most challenge. The components themselves are inexpensive, and I suggest you pick up more blue and red linen than you think you need.
It appears there are four identical flaps and one smaller side flap that goes under her quiver. Once your skirt flaps are cut properly, wrap your linen around the edges and sew in place. The border should be a couple inches wide, rotating red and blue. Everything looks better when you sew folded edges instead of just raw cut edges. It will probably make sense to use a smaller thread for attaching the linen, and if your hide is thin enough you can skip pre-punching holes here. Pre-punching is not just for convenience, it makes things look very tidy. The linen will be covering your leather here so may as well skip it if you can.
Provided you went with real leather and not faux, I’ll tell you right now I’d rather brand the rest of her designs on than stitch them. This is a little against character, as it’s obvious she stitched the embroidery, but it is quite a lot quicker to accomplish.
Branding is a simple affair, and you should have plenty of scraps left to practice on. A soldering iron is probably what I should recommend, but there’s something really satisfying about heating up your own iron and doing it the old fashioned way. Anything steel that can be heated on one end will do, but I am not responsible for your burned thumb!
Silk and Fur
Aloy has scrounged up some beautiful accouterments for her armor. Faux fur is inexpensive, but so is the real deal (as long as it’s rabbit). As with her armor, it should be simple to go the animal-friendly route. In any case, you’ll need enough to attach at her shoulders and for under her bracers and boots.
Though the official cosplay word is that her shoulder fur is fastened to one of her necklaces, it’s going to be a lot easier to just stitch it directly to her should armor. Keep in mind that it is meant to appear attached to your necklaces, so close around the back of your neck. If you are able to find some thin enough, you’ll be able to run it completely through the braces and boot straps, giving it a more natural look than simply attaching it at the ends.
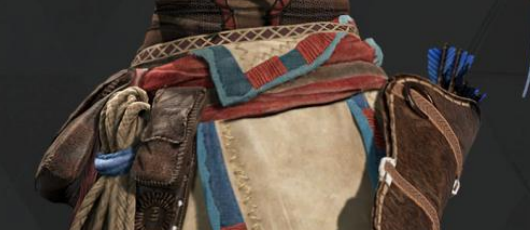
The belt itself is meant to be silk, with simple pouches hanging off your side. This creates a complicated weight issue, and it would be far easier to pick up a leather belt at your thrift store to wrap the silk around. This will leave you a little more structure to fold your armor skirt over and attach your quiver, rope, and pouches.
Don’t get too caught up in the pouches, by now your costume is readable and you could spend months sewing those from scratch. If you’re like me you probably already have some drawstring pouches or coin purses laying around the house that can be repurposed. If not, simple versions are really inexpensive.
Bow and Quiver
Check out my Link cosplay article where I have some instructions on how to just go ahead and buy a bow and quiver. You’ll use a good bow for so many things, just buy one.
The bracers, bootstraps and even quiver can all be fashioned from leather by even the most amateur cosplayer. You’ll just need some thick dark brown hide and scraps – plenty of scraps. I’ll be so impressed if you sink a lot of time into her quiver (what is that, a shower curtain ring?), but a basic wrap and sew will get the look across.
Worbla
Machine parts for the bow, bracers, and boots will need to be crafted and painted from Worbla. This can be as complicated or as simple as you think you have the talent for, and everything appears to be just wrapped on with blue bungee cords and leather. 100 points to Gryffindor if you find actual machine parts to supplement your armor.
Machine Chique
 I know you’ve seen these types of necklaces at the thrift store. Don’t forget the business lady belt section, as some of those leather wraps look pretty identical. The interesting piece here (besides the silk scarf) is her component cable. I really think this is the piece you should spend your time on. Shouldn’t take much to hunt down a blue cable and clamp some copper connectors on it, but I think it really pulls the look together. You’ll notice copper accents on the rest of her outfit as well if you have any left over. Don’t be afraid to pick up odd wood bead colors, they can always be painted later.
We All Love Redheads

Unless you have the most exceptional head of hair in all of the post-apocalyptic land, you’ll need either a wig or extensions to pull off this look.
Once you decide on your wig (don’t forget that Aloy has quite a bit of blonde in her hair), it’ll need to be styled with three large french braids that tuck under themselves for volume. Several long braids come off the back and sides, and everything appears to be clasped with pastel bands. These look almost identical to the ones you find on produce, so I would start there when you’re completing the look. It’s always easier to fasten your work with small black rubber bands and see to the details later.
Shew! If you pull this look off, I don’t think you can call yourself a beginner anymore. Do you have any beginner tips or tricks that I missed? I would love to see your process or finished cosplay, so link it in the comment section below!