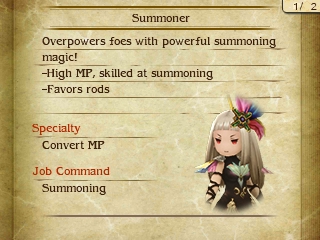
The Summoner Job in Bravely Second uses power summons to deal massive magic damage on all enemies. There are 2 new summons in Bravely Second that don’t deal damage, and one of the summons from last game was changed a bit.
You start with the wind summon, but you must find the rest of them throughout the game before you can use them. In this guide, I’ll tell you the locations as well as give info and tips on using the summoner Job.
This guide will go over everything about Summoner in Bravely Second including:
- Unlocking Summoner – How to unlock the Job.
- Summon Locations – Where each summon is located and when you can get them.
- Equipment Guide – The optimal equips for this Job.
- Ability List – Each ability and when you get them.
- Cross Job Tips – Which Jobs work well with this one.
- Combat Tips – How to use this in battles.
Unlocking Summoner
You can unlock Summoner in either chapter 1 by fighting Mephilia in the second side-quest, or in chapter 5 if you picked Swordmaster in chapter 1.
When you unlock the Job, you get Mephilia’s Memo in Yew’s Diary which provides clues to the summon locations.
Summon Locations
Hresvelgr (Wind)
- You automatically get this when you unlock the Job.
Deus Ex (Lightning)
- Ba’al Crater – Depths. Available in all chapters.
- Talk to the NPC and survive the Lightning summon attack.
- Equip an accessory or ability that reduces or nullifies Lightning damage to make it easier.
Ziusudra’s Sin (Water)
- Harena Sea Caves – West. Available in all chapters.
- Talk to the NPC and survive the Water summon attack.
- Equip an accessory or ability that reduces or nullifies Water damage to make it easier.
Promethean Fire (Fire)
- Old Aqueduct – East. Available in chapter 2 and later.
- Talk to the NPC and survive the Fire summon attack.
- Equip an accessory or ability that reduces or nullifies Fire damage to make it easier.
Girtablulu (Earth)
- Everlast Tower – 4f. Available in chapter 3 and later.
- You don’t need to go here until late in the game, but you can go here to get the summon when you are in your 40’s and in chapter 3.
- It is to the east of Eternia Central Command. Go to a cave to the east, and you’ll enter the tower.
- Talk to the NPC and survive the Earth summon attack.
- Equip an accessory or ability that reduces or nullifies Earth damage to make it easier.
Charybdis (Attack Decrease)
- Grandship Engine Room – B29. Available in chapter 3 and later.
- Unlike most summons, you have to actually defeat this one and not just survive an attack.
- This summon will lower P.Atk and M.Atk by 50%, so bringing a way to increase both helps a lot.
Susano-o (Dark)
- Geneolgia Crypts – North. Available in chapter 5 and later.
- Talk to the NPC and survive the Dark summon attack. In this last game, this summon did non-elemental damage
- Equip an accessory or ability that reduces or nullifies Dark damage to make it easier.
Amaterasu (Heal)

- Ice island farthest northeast of Eternia. Above is a picture of what the location looks like. Just walk forward to trigger the cut scene.
- Available in chapter 4 or later.
- Like Charybdis, you must defeat this summon and not just survive the attack.
- The summon heals, so just keep fighting until you beat it. It doesn’t heal as much as it does when you use it.
Equipment Guide
Summoner only has S rank in Rods and all other weapons are C or lower, so no need to use anything else.
Armor
- They have no proficiency in armor, so just use the light armor that increases magic attack.
- Equip a shield in your off-hand if you want more defense.
- Accessories that increase INT are very useful
Weapons
- Just use Rods. Equipping 2 gives more magic attack
- Triple Wield can also be good since Rods increase magic more than hats.
Ability List
The specialty for Summoner is Convert MP.
- Convert MP – Restore MP equal to 5% of the damage taken. Does not work with poison or freezing.
Level 1
- Summoning Lv 1 – Gives access to Hresvelgr and Deus Ex summons.
- Hresvelgr does massive Wind damage to all enemies.
- Deus Ex does massive Lightning damage to all enemies.
Level 2
- Summoning Lv 2 – Gives access to Ziusudra’s Sin and Promethean Fire summons.
- Ziusudra’s Sin does massive Water damage to all enemies.
- Promethean Fire does massive Fire damage to all enemies.
Level 3
- Summon Substitute (Support Skill. Cost: 1) – Uses a random summon that you learned when you suffer a K.O. and does not use any MP.
- Does not trigger if you die from poison or freezing damage.
Level 4
- MP 20% Up (Support Skill. Cost: 1) – Raises max MP by 20%.
Level 5
- Summoning Lv 3 – Gives access to Girtablulu and Charybdis summons.
- Girtablulu does massive Earth damage to all enemies.
- Charybdis decreases physical and magic attack of all enemies by 50%.
Level 6
- Convert MP (Support Skill. Cost: 1) – Lets you use the Summon specialty when you select other Jobs.
Level 7
- Summon in Pinch (Support Skill. Cost: 1) – Uses a random summon that you learned when HP falls to critical and does not use any MP.
Level 8
- Summoning Amp (Support Skill. Cost: 2) – Increases both the MP cost and damage dealt by summoning spells by a factor of x1.25.
Level 9
- Summoning Lv 4 – Gives access to Amaterasu and Susano-o summons.
- Amaterasu fully heals all party members or does massive damage to undead enemies.
- Susano-o does massive Dark damage to all enemies.
Level 10
- Summoning Surge (Support Skill. Cost: 2) – Each time a summon is used in combat, damage dealt is increased by a factor of x1.1. Can be different summons and still increase damage.
Level 11
- Summoning Lv 5 – Enables you to invoke the strength of your summons to augment your own powers. Only affects the caster.
- Hresvelgr – Raise your Speed and Evasion to the max for 10 turns.
- Deus Ex – Raise your Magic Attack to the max for 10 turns.
- Ziusudra’s Sin – Raise your Magic Defense to the max for 10 turns.
- Promethean Fire – Raise your Physical Attack to the max for 10 turns.
- Girtablulu – Raise your Physical Defense to the max for 10 turns.
- Charybdis – Raise your hit count to the max for 10 turns.
- Susano-o – Raise critical hit rate to the max for 10 turns.
- Amaterasu – Raise recovery magic potency to the max for 10 turns.
Cross Job Tips

- Wizard for their Spellcraft ability. Every magic Job should level a Wizard just for this.
- It lets you power up your summon to do more damage by hitting single targets, hitting multiple times, or being used at the start of the turn.
- You can set the spellcraft ability and use another Job as you sub job.
- Astrologian is great if you want to use buffs at the start of your turn and nullify elements and stats effects.
- Time Mage for the Magic Attack 20% Up support ability to make your summon even stronger.
- Charioteer if you want to Triple or even Quad wield Rods for more damage.
Combat Tips
Summoner is great for taking out groups of enemies that are weak to elements. Since the summons hit all targets for their full damage, this Job is ideal for taking out groups even if they have different weaknesses.
The new summons to decrease enemy attack and heal your party to full health make this an even more versatile Job and my favorite magic Job. You can easily keep your party at full health, as long as you have enough MP.
Save up BP if you are using spellcraft and need to do a lot of damage in one turn so you can use the spellcraft versions of your summons.
That ends this Bravely Second Summon Locations and Summoner Job guide. Let me know if you have any questions and be sure to visit my Beginner Tips and Tricks for more help with the game!