It’s no secret that the Batman: Arkham games made comic book video game history when it brought us Batman games that were gritty, story-driven and just hella fun to play. (They also taught us that we should never play an Arkham game without backing up our save files, and Arkham Knight taught PC gamers what a godsend Steam refunds would prove to be. Nobody’s perfect.)
Since Arkham Asylum hit the market, the series has branched out as quickly and widely as possible, hitting multiple platforms — including the handheld market (several different mobile games and Blackgate on PS Vita). But it’s Warner Bros’ brand new Batman: Arkham Underworld that really gives us an entire game (and not just a DLC) devoted utterly to the cause of being the bad guys.
Unfortunately, it’s hard to get your hands on it if you don’t have fairly up-to-date iOS gadgets — at present the game is only compatible with the iPhone 5 or later, iPad Mini 2 or later, and 3rd generation iPad or later. An Android release is planned, but there’s no current timeline in sight.
For those of you who’ve already got it installed and gotten the ball rolling, here are a few things you need to know about getting started.
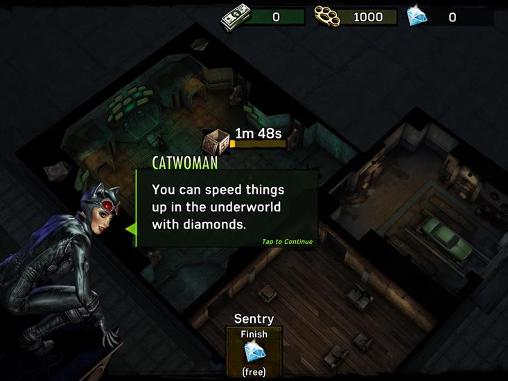
1. Listen to Catwoman
Despite a notable history of playing both sides, Catwoman knows an up-and-comer when she sees one, and she’ll be the one giving you the best pointers. Arkham Underworld starts out pretty slow and plays a little like a pared-down Grand Theft Auto in its map and mission setup, but she’ll show you the ropes when it comes to getting started on missions, and also when it comes to upgrading your hideout.
2. Check in at least once a day with all your super villains for daily XP bonus
The game makes it easy to keep on playing without relying on game-stopping energy caps (yay!) but it’s not completely exempt from the leveling grind. So while you may find yourself growing attached to a particular super villain, the first time every day you finish a raid with each super villain earns you extra XP. At the very least, you’ll learn to get good at using every one of them.

3. Unlocking your other super villains
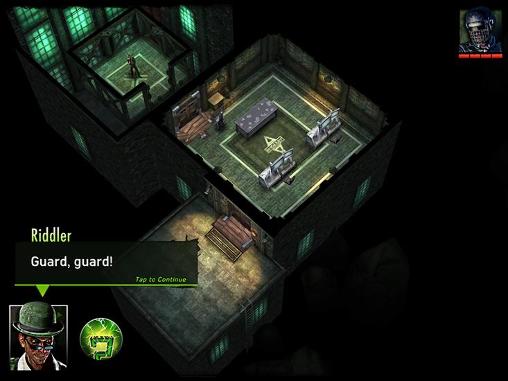
Speaking of daily XP, first you’re going to need to rack up more than just the Riddler. Here are some of the familiar faces you’re going to start seeing around here. (Fun fact: This is the first Arkham game in which Joker doesn’t get to be a star in the show.)
Harley Quinn
- Unlocks at: Gang Level 2
- Prerequisite: Must complete the mission Stay Right or Go Wrong
- Mission to complete to Unlock: Presents
Mr. Freeze
- Unlocks at: Gang Level 5
- Prerequisite: Must have unlocked Harley Quinn
- Mission to complete to Unlock: Cold Times
Killer Croc
- Unlocks at: Gang Level 12
- Prerequisite: Mission for Killer Croc unlocks after you’ve unlocked The Industry District
- Mission to complete to Unlock: Don’t Feed the Croc
Scarecrow
- Unlocks at Gang Level 28
- Prerequisite: Mission for Scarecrow unlocks after you’ve unlocked Chinatown
- Mission to complete to Unlock: A Test of Fear
(Note: Remember that with both your super villains and your grunts, they’ll start off weak, and they’ll only get stronger as you continue to upgrade your lab and buy up new additions from the Black Market.)
4. Unlocking Professor Milo’s tactics

You’re going to need more than just your super villains to keep your dumb-as-post grunts in line and making it into the big leagues. Thankfully you can unlock a number of different tactics by completing missions and upgrading your lab. They’ll give you more options to plan out your attacks during missions.
New Orders
- Appears at Gang Level 3
- Prerequisite: Harley Quinn Unlocked, Lab level 2
- Mission to complete to Unlock: Tactic: Setting Direction
Gas Bomb
- Appears at Gang Level 5
- Prerequisite: Lab Level 4, Industry District Unlocked
- Mission to complete to Unlock: Tactic: Clearing Rooms
RC Explosive
- Appears at Gang Level 9
- Prerequisite: Lab Level 7, Industry District Unlocked
- Mission to complete to Unlock: Tactic: Opening Doors
(Note: These will help you strategize your plan of attack. You can redirect your grunts by giving them new orders or cover a room with a gas bomb damaging all your enemies – but if your guys are in there too, they’ll take damage just the same.)
5. Unlocking New Neighborhoods
As you get bigger, so does your map – you can expand your area of mayhem into neighboring territories, unlocking access to more missions.
Second Unlocked Neighborhood: Industry District
- Unlocks at: Gang Level 7
- Prerequisite: Must have unlocked Harley Quinn
- Mission to complete to Unlock: Falcone Imports
Third Unlocked Neighborhood: Gotham Docks
- Unlocks at: Gang Level 18
- Prerequisite: Must have Unlocked the Industry District
- Mission to complete to Unlock: The Snake Pit
Fourth Unlocked Neighborhood: Chinatown
- Unlocks at: Gang Level 27
- Prerequisite: Must have Unlocked Gotham Docks
- Mission to complete to Unlock: Bleake Island Bank
(Note: You don’t need to get 100% control of an area in order to unlock new neighborhoods, but in order to do so, you must complete all the missions in that region. The number of neighborhoods you unlock will also determine how big your hideout will be allowed to expand. That’ll only help you upgrade the kind of grunts you hire, and how strong they’ll be.)
6. Lead with your Super Villians
When starting your missions, it’s best to take charge with your super villains to set the stage for your grunts. If they die, it’ll take skulls, time, or diamonds to get them all back up to full strength for missions – plus, they have a tendency to run into roomfuls of cops at the least provocation when they don’t even need to.
(Note: One thing that some of your grunts will do that your super villains won’t is to shoot from behind cover automatically. That’ll keep them alive longer against ranged attacks. You’ll need to do this on your own for your super villains.)
Take advantage of empty rooms and pathways to the objective when you can. Be very careful about where you direct your grunts because you can only control them up to a certain point.
7. Don’t fall for Arkham Underworld hacks
While the rest of the world may be falling all over themselves rooting their phones so that they can play Pokemon Go with fake GPS locations on PC, it has never been a good idea to go hunting for cheats for mobile games, giving 3rd party programs access to your phones.
That doesn’t stop people from trying it of course, and sites like this one promise everything from unlimited Diamonds to Unlimited Super Villain Ability Points and Unlocks. This particular one also boast a log-cleaner script, undetectable proxies, a remove ads script, and an anti-ban script… but their opinions section is also a sea of copy-pasta. It’s really up to you whether or not you’re willing to trust it.
Other Tips:
- Be strategic about how you deploy your thugs! Send in your heavies before your glass cannons. Learn which grunts are best against certain super villains) and which are better against player-controlled games compared to regular AI.
- Utilize the Slum Lord to keep your enterprise rolling in cash. Every time you control 85% or more of a new neighborhood, he’ll start generation cash for you. The more of it under your control, they more he can make.
- Save your money! And your resources. Don’t spend Diamonds on something 30 seconds will take care of easily enough. Arkham Asylum is not immune to micro-transactions and you will be tempted to drop some cash to unlock certain super villains early, but try and remember that in all honesty… you’ve got nothing else but time.
Do you know of any other tips or tricks to getting started? Have any ideas how you should start laying out your hideout? Let us know!