I’ve played through many clicker/tapper games, like Slash Mobs, and I can confidently say that Crusaders of the Lost Idols is my favorite. It’s got a level of depth and strategy that other games in the same class don’t, and perfecting each playthrough is something that you’ll find rewarding and fulfilling. It’s also something that’s incredibly difficult to get used to through your first run, but that’s why I’m here!
In this guide, I’m going to explain to you how you can get through your very first reset of Crusaders of the Lost Idols in an optimal and efficient way.
What’s my “first reset?”
Let me start by explaining this phrase so that there’s no confusion. In Crusaders of the Lost Idols, there’s a prestige system that allows players to experience infinite progression. You’ll reach a point in playing the game where you won’t be able to achieve or unlock much else, and that’s when you’ll do something called “resetting the world.”
You can reset the world when you unlock the very last character in Crusaders of the Lost Idols, Nate. He’s the 20th character in the game and at character level 150 you unlock this ability. This is how you prestige in Crusaders of the Lost Idols.
In short, this guide will cover strategies from the moment you start playing up until that point when you get Nate to level 150.
Playing passively is the way to go
If you have experience with other clicker/tapper games, you know that most offer the functionality of building up your character or team’s DPS and effectively idling through the game (as opposed to clicking 24/7). This is the approach that I’m taking in this guide, for two reasons:
- It’s just a more realistic and effective approach. You don’t want to be actively clicking in this game for hours a day, right?
- Although it does come with some perks, clicking is very underpowered in Crusaders of the Lost Idols. Your stats from one character modify your clicking power. The other characters generally have much stronger modifiers and multipliers.
I’m going to show you how to set the game up to do all the work for you. If you’re interested in optimizing your clicking DPS, this guide isn’t for you.
Leveling and unlocking Crusaders
When you can afford to unlock a new Crusader, do it. The DPS increase you’ll achieve from having an additional character in the formation will far exceed the upgrade you can get on an existing character for the same price. You can have up to 10 Crusaders in your formation, so up until 10 you can go ahead and unlock any new ones without even thinking on it.
Each Crusader can be leveled up to 125 to achieve special passive skills. Starting at level 200 for each character, every additional 25 levels will multiply the Crusader’s DPS by 4 (which stacks).
I’ve created a list of every important upgrade that you need to get for each Crusader that has an important upgrade available. You need to upgrade the Crusader to this level or you’re missing out on major gold or DPS efficiency. Leveling them further is up to you.
Crusader #2: Jim the Lumberjack
Level 25: Sharpen Party (5K) — Increase the Base DPS of Crusaders in the same column as Jim the Lumberjack by 50%
This allows you to boost three other Crusaders up to a total of 150% DPS if you optimize your formation properly and place Jim in the back column.
Crusader #4: Sasha the Fierce Warrior
Level 5: Bulwark (10K) — Increase the Base DPS of Crusaders in the column behind Sasha the Fierce Warrior by 30%
Placing Sasha in the second column is optimal, boosting the DPS of four Crusaders behind her to a total of 120%.
Crusader #6: Detective Kaine
Level 50: A-Hah! (20M) — Increase all Gold found by 20% for each Crusader in the same column as Detective Kaine
Gold is so important. With Kaine in your back column, that’s an 80% increase in gold.
Crusader #7: The Princess
Level 75: Incinerate (100M) — Increases the DPS of all Crusaders by 10%
On your way to Incinerate, you pick up this same exact upgrade three other times making it a total of a 40% increase to all Crusaders when you reach Incinerate.
Crusader #8: Natalie Dragon
Level 75: Daggerfall (500M) — Increases the DPS of all Crusaders by 15%
You may eventually want to level her to 100 when you unlock Nate Dragon, but he’s the very last Crusader you’ll unlock. At 100, having both of them in your formation increases her DPS by 200%.
Crusader #10: Artaxes, the Lion
Level 25: Roar! (400M) — Increase the Base DPS of the Crusaders in the column in front of Artaxes, the Lion by 50%
Putting Artaxes in the back column is optimal, boosting the three Crusaders in the column in front of him to a total of 150%.
Crusader #11: Khouri, the Witch Doctor
Level 50: Koffee Potion (6.2B) — Increase the Base DPS of Crusaders next to Khouri, the Witch Doctor by 30%
Putting Khouri in the very center of your formation will connect him to six other Crusaders for a total of an 180% DPS increase.
Crusader #12: Dark Gryphon
Level 100: Heart Brimming Bravery (25.6t) — Increases the DPS of all Crusaders by 15%
Crusader #14: Gold Panda
Level 75: Order of the Holy Coin (6.4q) — Increase all Gold found by 50%
Like The Princess, Gold Panda gives you the same type of benefit for the three level milestones before 75. However, at 10, 25, and 50, the gold increase is 25%. At 75, it bumps to 50%. That’s a total of 125% (which is huge).
Crusader #15: Prince Sal, the Merman
Level 25: Salt Water Taffy (50t) — Increases the DPS of all Crusaders by 10%
Crusader #17: King Reginald IV
Level 100: Royal Grail (400q) — Increases the base DPS of all Royal Crusaders by 200%
The Royal Crusaders you’ll have unlocked by now are Prince Sal, the Merman and The Princess. A 200% increase is absolutely massive, and this alone will be reason enough to keep the Royal Crusaders (and King Reginald IV) in any DPS formation.
Crusader #18: Thalia, the Thunder King
Level 100: Lightning Ore (800q) — Increases the DPS of all Crusaders by 15%
Crusader #19: Merci, the Mad Wizard
Level 75: Deflect Evil (1Q) — Deal 2.5% of your DPS to all Monsters for each monster on the screen
Crusader #20: Nate Dragon
Level 75: Desecration (50Q) — Increases the DPS of all Crusaders by 10%
Naturally, you’ll want to eventually reach level 150 to complete your first reset.
Optimizing your formation
There are a lot of people out there who will tell you it’s best to have two formations: one for gold generation, when you aren’t playing the game, and another for maximizing your DPS against bosses. In all of my experience playing Crusaders of the Lost Idols, I feel that the latter formation isn’t necessary.
If you want to immediately blow through bosses the second you have the slightest chance of defeating them, then a formation that spares gold for DPS can help. However, I find that having one formation that’s balanced between gold generation and DPS output is the best way to grind as a passive player.
Be aware that there is no cookie-cutter “best” formation due to the unique equipment and trinkets you’re going to find through chests along the way. Only you can know what your most optimal formation is. However, as noted in the previous section, there are ideal formation positions. Here is what you need to consider:
- If Jim is in your party, it’s best to have him in the back (first) column and upgraded to level 25 so that he can boost the Crusaders’ DPS in his column by a total of 150%.
- If Sasha is in your party, she should be in the second column (in front of the back column) at level 5. That will allow her to boost the Crusaders’ DPS in the back by a total of 120%.
- If Kaine is in your party, he should be in the back column. This isn’t always optimal from a DPS perspective, but the gold increase stat is so uncommon compared to the DPS increase stat that this is completely worth it. It’ll give you a total of an 80% gold increase.
- If Artaxes is in your party, place him in the back column so that the second column can benefit from a 150% DPS increase.
- If Khouri is in your party, place him in the very center of your formation. That would be in the second column, second row. This will allow him to connect to six other Crusaders and give you a DPS boost of 180%.
With these five Crusaders taken into consideration, and assuming you are using all at once, that occupies three back column spots and two second column spots. The last remaining spot in the back column should go to whoever else has the highest DPS in your formation. The last remaining spot in the second column should go to your character with the second highest DPS. The two spots in the third column should go to the characters with your third and fourth highest DPS.
This will give you optimal DPS, through the DPS percentage upgrades from Jim, Sasha, Artaxes, and Khouri. Your DPS could be slightly higher with Kaine not in the back row, but the gold increase you get is so significant that it’s completely worth it.
The last remaining spot, the single one in the fourth column, can go to either your Crusader with the best gold increase stat (which is almost always Gold Panda) or your tankiest Crusader.
Again, keep in mind that this is just rule of thumb. Only you know what equipment and trinkets you’re using, so only you know if one Crusader has been modified to the point that they’d be more beneficial in a certain position. However, what I’ve outlined are inherently the best positions if we’re assuming all characters are naked of extra equipment.
Here’s my formation at the end of my first reset, demonstrating this setup:
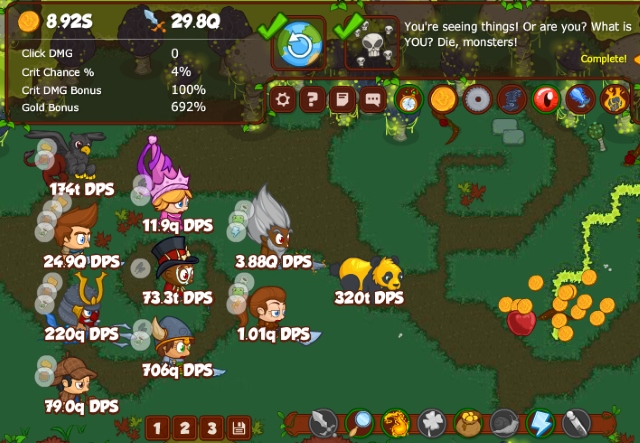
As you can see, my Gold Bonus is at 700% without significantly sparing my DPS. The DPS you give up to get a huge increase in gold is so negligible that I find it really unnecessary to create a separate formation just for extra damage. If you’re patient, it won’t matter.
Preparing to reset
You should be around Stage 90 when you’re ready to reset. That’s about where I was in the screenshot from above. Resetting the world with Nate Dragon is basically like resetting the game and doing it all over again through a prestige system where you’re awarded Idols for your previous world’s performance.
You are given 1 Idol per every 500 character levels you have. I highly recommend that you get up to at least 7000 character levels before performing a reset. This will give you 14 Idols, which a lot of community members cite as the “sweet spot” for Idols. You can see your total character levels on the Information screen (the graph icon). It’s shown in the top-right corner of this screenshot:

I’ve only got 5.36k there, so I’d need to work towards more before I decide to reset.
In your fresh new world, each Idol gives you an additive boost of 3% DPS and 1% gold. Idols can also unlock Campaign Objectives and can be spent on talents. In short, resetting with more Idols will mean your next run will cause you to be even stronger and richer. Assuming you check in on a daily basis, it shouldn’t take you longer than a week to complete your first reset.
Feel free to leave a comment below if you have any questions or other feedback. I’ll get back to you and try to help out the best I can!