To say that mining is weird in Gleaner Heights might be a bit of an understatement. As someone who has been playing the Harvest Moon series since the SNES game and dumped a whole bucket of hours into Stardew Valley, the mining system here was completely confounding.
Because so much of the game hinges on stamina management, delving into the mines can be a difficult foray. When should you head down there, and what do you even do? The mines are as cryptic as the history of the town itself.
Delving into the mines is a requirement for getting the materials you need for upgrading your tools and a number of crafting recipes. Plus, many of the resources you find can also be used as gifts for Gleaner Height‘s villagers.
There are a few mechanics to the mines you need to be aware of to start mining:
- You don’t just leave the mines when you go up a ladder; a whole new floor is spawned (say, going up from floor 5 to 4 spawns a new floor on which you need to find the next ladder up)
- You obtain gems, ores, and minerals from destroying walls rather than nodes on the ground
- You will run out of stamina, but you can still break walls and kill monsters (with no drops or XP gains)
- You will be spending a lot of time going up and down the same ladder to get better floors
- You can find stamina-restoring Green Herbs in the mines, but once you’re exhausted, you stay that way (though you can have stamina and be exhausted)
- Time stands still in the mines, and using its mechanics, you can stay in there for ages
Those are good starter pieces of information for those who are familiar with the genre, but there’s far more than the above to consider. We’re going to go over a number of them in this guide.
Finding the ladder down
This was the part that confused me the most to start, and it’s going to be trouble for you until you know the ins and outs of the mining system.
Finding the ladder isn’t too hard once you know how to do it, and it gets even easier with perks.
Surrounding both ladders on every floor is red dirt, as seen in the image below.
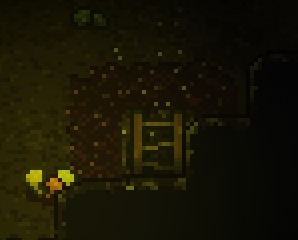
You can see this dirt if a ladder is covered by a wall, but not if the entirety of the red dirt itself seems to be covered by walls. And that is where things get tricky.
There are some instances where you can see the sparkle of a ladder deep within walls, but getting to these (at least with a lowly basic hammer) is a timesink.
If you cannot find the ladder down (or up), go and use the ladder you entered the floor from to go back to the previous floor, then use it again to return to the same floor with a totally different layout. I personally prefer to just do this until I get a floor with a readily available ladder, or one that’s easy to spot and get to.
You can also look for green mushrooms to indicate the location of a ladder. A single green mushroom indicates that the ladder is near.
And lastly, if you’re still having ladder troubles, be aware that one block of the red dirt will always be visible on a floor — which aids in finding the ladder, but often it’s obscured.
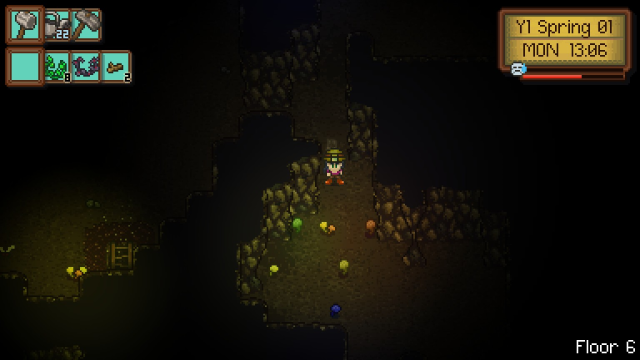
Finding ore, minerals, and gems
Surprise surprise: Mushrooms indicate the locations of these as well!
I am not sure of what the mushrooms indicate, but they do seem to show that there are resources nearby to be mined. Mushroom clusters in particular seem to be the best to focus on.
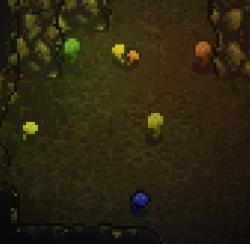
Other than mushrooms, there are no indicators for where resources are located. Save your time and stick to mushroom-rich sections of a floor.
The stamina conundrum — When to go into the mines, and how to use your stamina
I recommend having at least one stack of Green Herbs before going into the mines, and you will be finding even more inside the mines themselves.
Additionally, I recommend going into them on a day before a rainy day, as you don’t have to burn your stamina on watering crops on rainy days.
Your stamina is going to drain to 0 in the mines, and it’s going to do it quickly. There is no problem with that whatsoever, as you can eat a Green Herb and get a little stamina back to get resources from walls when you’ve reached eligible floors.
At the start, it will take 5 swings of your hammer to break a wall. You may as well use your stamina with reckless abandon until you get to the floor you’re aiming for, since there is no benefit to holding onto it if you have Green Herbs on-hand.
I’m going to tell you my step-by-step process for getting resources on an individual floor:
- Enter floor
- Locate mushrooms
- Hit walls around mushrooms 4 times each, as many walls as you would like
- Eat a Green Herb (or more, if you whacked on a lot of walls)
- As you now have stamina, hit each of the walls one more time to destroy them and potentially reap their sweet, sweet resources
Using this method, you can gather several resources on a single trip without going through the entirety of your Green Herb reserves. I highly recommend getting as much as you can bear in a single trip to save you time in the long run.
Resource floors
Not all resources are equal! Below are the minimal floors you can find each resource within, though there are some I’m not so sure about:
- Iron: Floor 1+
- Copper: Floor 4+
- Saltpetre: Floor 5+
- Lithium: Floor 6+
- Quartz: Floor 8+
- Silver: Floor 8+
- Gold: Floor 9?
- Malachite: Floor 15+
- Sulfur: Floor 18?
- Silicon: Floor 16?
- Zircon: Floor 22+
- Emerald: Floor 27+
- Fire Opal: Floor 29+
- Octotinium: Floor 32?
- Ruby: Floor 35+
- Diamond: Floor 39?
Miscellaneous mining tips
Yep, it’s not over yet! Here are a few extra tips to help make mining less of a headache:
- You can seriously make bank via mining, if you know how it all works and you take the time to delve in there. Even Silver, which is found on floor 8, is worth 180 each
- The perks Stone Sense and Mine Cleave are well worth picking up on most playthroughs and can make your time in the mines much easier
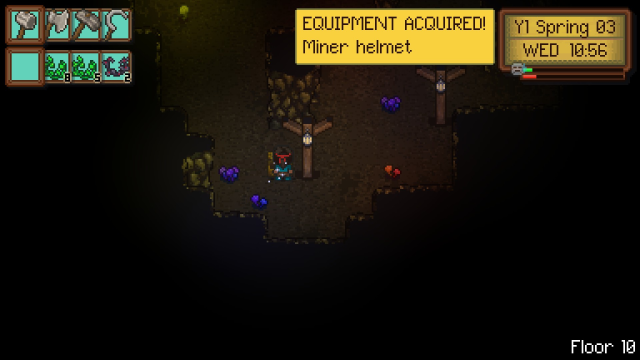
- You can get a Miner Helmet from a chest on floor 10 — if you don’t see it, go up and then back down until you can find it
- A permanent ladder to the surface can be found on floor 20
- A boss can be found on floor 40
- When in doubt, just refresh a floor
There’s certainly more to be said about the mining system in Gleaner Heights, but these bits and pieces are enough to get you started on the right foot. I don’t think I’ve ever had so much trouble mining in a farming RPG before, but the rewards are so worth it that there is no excuse for avoiding it completely. You have to mine, and you have to get good at it. It’s that simple. Let this advice be your guide.