Star Wars Battlefront uses a feature called Star Cards to customize your gameplay. These cards do many things ranging from grenades and special weapons to abilities that boost you for a short time. There are different categories of star cards, so it is important to know what you are buying.
I’m going to help by explaining each star cards and separating them into their 3 categories. If you are looking for other ways to customize your character, look at me Star Wars Battlefront Blaster Guide and Tips.
This guide will go over everything about Star Cards and Traits in Star Wars Battlefront including:
- Star Cards Info – A list of every Star Card, separated into 3 categories.
- Star Cards Tips – Info on when it is useful to use certain Star Cards.
Star Cards Info
Star Cards are set to a “Hand”, which consists of 2 Star Cards and 1 Charged Star Card. Charged Star Cards have a limited number of uses, but you can buy more with credits or find them during battle.
Once you buy a card, you can spend credits to upgrade it. This can reduce cooldowns, increase the duration of the effect, or provide new bonuses.
Star Cards
Thermal Detonator (Rank 2, 500 Credits)
- Grenade that explodes after a short time.
Standard grenade and useful at any time. Definitely pick this up as soon as you get to Rank 2.
Scout Pistol (Rank 3, 500 Credits)
- Pistol good for killing at short range.
This is an okay card to use at low ranks, but if you are high enough to get other cards, replace this one.
Ion Torpedo (Rank 4, 1,700 Credits)
- Homing torpedo that deals heavy damage to vehicles and stationary weapons.
Ion is effective against shields, droids, and vehicles. This is great when playing a mode with vehicles, such as Walker Assault.
Pulse Cannon (Rank 4, 1,700 Credits)
- Long-range rifle that deals damage based on how long you charge it.
This is a great card for those that like to shoot long range. If you fully charge it, it does a lot of damage. You can also cancel the charge by pressing the melee button.
Impact Grenade (Rank 6, 1,700 Credits)
- Smaller blast radius than a Thermal Detonator, but it explodes on impact.
If you can aim well when throwing, this is better than the Thermal Detonator because there is no delay in the explosion.
Ion Grenade (Rank 9, 2,300 Credits)

- Grenade that deals massive damage to shields, droids, and vehicles.
If you want to take down vehicles fast, this is the grenade of choice. It is very effective to use this, Ion Torpedo, and Ion Shot when playing as Rebels during Walker Assault.
Homing Shot (Rank 11, 3,100 Credits)
- Long-range rifle that shots a homing explosive.
Like the Pulse Cannon, this is great for long range. You have to zoom in and lock-on before you can fire, but it instantly kills most soldiers if it hits.
Jump Pack (Rank 13, 3,100 Credits)
- Allows you jump higher and over large distances.
The jump pack is very helpful for getting to higher places that you can’t normally reach. This is useful for getting into a sniper position, or escaping enemies.
Smoke Grenade (Rank 16, 3,100 Credits)
- Grenade that blocks visibility and lock-on weapons.
Smoke Grenades are good when you want to stop people from locking-on to you. It can also provide a distraction for you to attack or escape.
Flash Grenade (Rank 20, 3,100 Credits)
- Provides a bright flash and loud noise to disorient opponents.
This does not deal any damage, but it can stun enemies so you they can be killed by other weapons. Also good for making escapes, similar to the smoke grenade.
Barrage (Rank 24, 3,100 Credits)
- Grenade launcher that fires a volley of 3 grenades that explode after a short time.
This is fantastic for taking out groups of enemies are pushing them out of an area. Even if you don’t kill anyone, they can make themselves vulnerable by leaving the area.
Cycler Rifle (Rank 28, 3,100 Credits)
- Long-range rifle that deals kinetic damage.
Unlike blasters, the Cycler rifle does not deal energy damage. That makes this gun ideal for killing enemies with shields. It also does massive damage and at long-range, making this the perfect card for snipers.
Bowcaster (Rank 32, 3,100 Credits)
- Weapon that shoots 1 or more explosive bolts, depending on how long you charge it.
The bowcaster is like shooting multiple explosives at once in an arc in front of you. You can hit multiple people, or focus on one enemy when using this card.
Charged Star Cards
Cooling Cell (Rank 7, 1,700 Credits)

- When activated, vents heat from your main weapons and prevent further heat build-up for a short time.
This is great when you need to keep firing and don’t want to worry about overheating.
Focus Fire (Rank 7, 1,700 Credits)
- Stabilizes weapon accuracy for a short time.
This helps keep your weapon stable if you are having trouble aiming.
Ion Shot (Rank 7, 1,700 Credits)
- Causes your primary weapon to fire ion bolts for a short time.
Ion is effective against shields, droids, and vehicles. This is great when playing a mode with vehicles, such as Walker Assault.
Scan Pulse (Rank 13, 1,700 Credits)
- Reveals enemy soldiers in a 360-degree radius for a short time.
If you don’t want enemies to hide from you, this is the Charged Star Card to use.
Explosive Shot (Rank 18, 1,700 Credits)
- Causes your primary weapon to fire explosive bolts for a short time.
This is good for doing extra area damage to take out multiple enemies.
Personal Shield (Rank 22, 1,700 Credits)
- Provides protection from energy weapons, but no defense against kinetic weapons like grenades and Cycler Rifles.
If you need some extra defense against blasters, this card helps a lot. Just remember grenades and Cycler Rifles will still hurt.
Traits
Traits are a special star card. You don’t put this in your hand and instead choose only one. These give kill streak rewards every 3 kills. You start at level 1 every match and can go up to level 3. If you die, you only go down one level. For example, if you are level 3 and die, you go down to level 2. This way, you don’t need to start from level 1 again.
Bodyguard (Rank 15, 7,000 Credits)
- Level 1 – Decreases explosive damage by a small amount.
- Level 2 – Decreases explosive damage by a medium amount.
- Level 3 – Decreases explosive damage by a large amount and blaster damage by a small amount.
Scout (Rank 15, 7,000 Credits)
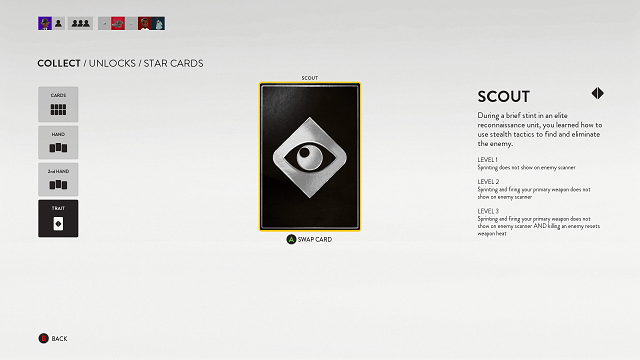
- Level 1 – Sprinting does not show on enemy scanner.
- Level 2 – Sprinting and firing your primary weapon does not show on enemy scanner.
- Level 3 – Sprinting and firing your primary weapon does not show on enemy scanner and killing an enemy resets weapon heat.
Survivalist (Rank 15, 7,000 Credits)
- Level 1 – Health regeneration starts a bit faster.
- Level 2 – Health regeneration starts faster
- Level 3 – Health regeneration starts much faster and replenish a small amount of health with each kill.
Bounty Hunter (Rank 26, 7,000 Credits)
- Level 1 – Low chance to get a Power-up with each kill.
- Level 2 – Medium chance to get a power-up with each kill.
- Level 3 – High chance to get a power-up with each kill and resets cooldown with each kill.
Sharpshooter (Rank 26, 7,000 Credits)
- Level 1 – Headshot kills reduce cooldowns by a small amount.
- Level 2 – Headshot kill reduce current cooldowns by a medium amount.
- Level 3 – Headshot kills reduce current cooldowns by a large amount.
I think that Scout and Bounty Hunter are the Traits to focus on. The enemy not seeing you on radar is huge and lets you sneak up on them with ease. This is helpful in all game modes and can turn the tide of battle.
Bounty Hunter is great as well because you have a chance to get a power-up with every kill. You can get some good power-ups without the need to look for them on the map.
That’s it for my Star Wars Battlefront Star Cards and Traits guide. Let me know if you have any questions! Be sure to visit my Beginner’s guide for more tips.