Tower of Zot is the first dungeon in Final Fantasy XIV: Endwalker and has plenty of surprises for those of us who have gotten tired grinding on Matoya’s Relict and Phlegethon over these past few months. Read on to learn how to take on the fearsome Magus Sisters and best the Tower of Zot.
FFXIV Endwalker Tower of Zot Walkthrough
The good news is that Tower of Zot doesn’t really have any unique gimmicks or challenging mobs outside of the boss battles. You can simply continue like normal, with the tank pulling as much or as little as they want.
The boss battles are where things really get tricky, however. The first two have you going up against a single Magus Sister, with the final battle pitting you against all three.
Make sure to take note of the attacks and patterns of the first two battles, as they’ll be appearing again in the last one. A few minutes into the tower you’ll run into the small red sister, Minduruva.
Minduruva
Minduruva can be a wake-up call with its difficulty, but as long as the party is paying attention it shouldn’t be too much of a problem. Here’s an overview of the boss’ attacks to start with.
- Manusya Bio – Tankbuster attack that also inflicts poison. If you’re healing the poison should be removed ASAP.
- Manusya Blizzard III – Boss fires blizzard attacks in twelve cones from the center of the room. You need to stand in the gaps to dodge.
- Manusya Fire III – Large donut AoE. Avoid by standing next to boss in the safe zone.
- Manusya Thunder III – Boss fire multiple AoEs that move across the room and along the edge. You’ll need to move away from the boss and dodge.
- Manusya Bio III – Boss uses a massive AoE that covers the entire stage in front of it. You need to move to the unmarked side behind it to avoid the attack.
- Dhrupad – Applies a damage-over-time debuff to all non-tank players, used after each Transmute spell (explained below).
On top of all these attacks, the boss has two different variations it can use as well. Occasionally, the boss will use a single-target version that’s unavoidable, so you’ll need to buff and heal through it.
Finally, Minduruva will throw out Transmute orbs, which will then fire the above spells from that location. The first transmute spell is always Transmute Blizzard III, but the best way to check which attack is launching is by seeing what buffs the boss has, which will denote the attack coming.
The big problem with the Transmute spells is that the boss can use other spells on top of them, or even other Transmute spells, meaning you’ll need to dodge multiple attacks at once.
Essentially you’ll need to stay on the move this entire battle, and the healer should make sure to keep barriers or regen on to mitigate any damage.
Sanduruva
Sanduruva is likely a bit easier than the first boss, as long as you know how to deal with its status effect attacks. Again, here’s an overview of all of the boss’ attacks.
- Isitva Siddhi – High damage tankbuster. Need to mitigate and heal.
- Prapti Siddhi – Boss fires a large AoE in a line straight ahead at a specific player.
- Manusya Berserk – Boss spawns five orbs around the arena that explode in a small AoE. If a player is hit by the explosion they get the Berserk status, which makes you lose control of your character and run right up to the boss.
- Prakamya Siddhi – AoE that damages the immediate area around the boss. Often used after Manusya Berserk to hit status-affected players.
- Manusya Stop – Boss teleports to center of the arena and hits each player with Stop one by one. You can’t heal or avoid stop, so the team should spread out to mitigate damage from the attacks launched after stop. Heal after.
- Manusya Confuse – The boss leaps off of the arena and five copies of here come down in a circle. Four of these are actually an orb that will explode and cause Berserk. Each of the version will be performing an emote, except for the real version of the boss, who will be standing still. After finding the one standing still run behind it to the very edge of the arena, which is where the safe zone will appear.
Sanduruva typically alternates between Stop and Confuse later in the battle, but will occasionally throw in another attack.
If you know what to look for none of them are particularly difficult to dodge, so just keep chipping away at the boss’ health and you’ll bring her down without too much issue. Now on to the real battle.
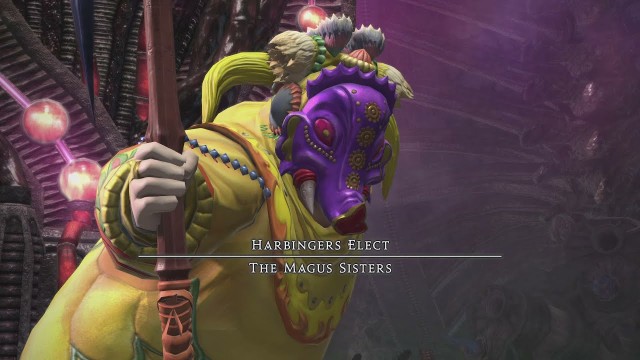
Final Boss – The Magus Sisters
The final battle will start out with just Cinduruva, who launches one attack before the other bosses join.
- Samsara – Unavoidable room-wide AoE that you’ll need to mitigate and dodge.
Now the other two bosses join and together they use the Magus Sisters’ signature move, Delta Attack. This move will be cast multiple times throughout the battle and has three different variations, which you can see below.
You’ll know which move the sisters are going to use as they’ll say a line beforehand that references ice, fire, or thunder.
- Blizzard III – You’ll need to dodge and weave between the AoE attacks, while also watching out for markers that signify where a massive piece of ice will fall on the field.
- Fire III – Three different attacks; various donot AoEs will spread across the field, while Sanduruva’s line AoE will also target players. On top of this, markers will tag random players for attack, so they’ll need to spread out.
- Thunder III – All three posses launch a cross-pattern of AoE attacks, and they also vary in size. Line AoE’s will launch across the arena, while stack markers will also appear. When the markers appear make sure the party stacks to reduce the amount of damage.
When the Magus Sisters aren’t using Delta Attacks they’ll each be using their standard attacks. Make sure you heal the status effects and keep the party’s health high, as Cinduruva will again use Samsara to cause unavoidable damage.
Your party should focus all of your attacks on Cinduruva, as if you kill either of the other sisters first they’ll just be revived by Cinduruva. Just keep in mind the attack patterns of Delta Attack and the normal attacks, and keep hacking away at Cinduruva.
Luckily, once she’s down you won’t have to worry about Delta Attack or Samsara anymore, and taking down the other two should be a piece of cake.
Related Guides
- How to Play Summoner in FFXIV: Endwalker
- FFXIV: Endwalker Training Dummy Locations
- FFXIV Emote Unlocks Guide
If you have to retry the battle a few times don’t feel bad, as it can be a real doozy. For even more tips and walkthroughs on Endwalker, make sure to check out our FFXIV guides hub.