
As with all the Call Of Duty titles, there’s a host of secret collectibles to pick up throughout the dystopian future beautifully rendered in Black Ops 3. Unlike with the Modern Warfare series, these aren’t just laptop intel objects. Instead you’ll have to find a wider range of collectibles to pick up, varying from hookahs to broken robot parts.
You don’t have to nab these in any particular order, and you can pop back into a mission after finishing it to grab anything you missed, but with this guide you won’t have to, as you’ll be able to easily grab all 56 Black Ops 3 collectibles while playing through the campaign from beginning to end.
For you achievement hunters, the Walking Encyclopedia achievement pops when you nab all the collectibles in a single mission, followed by the Curator achievement when you pick up all the collectibles across the entire game. Can’t find one specific collectible? Just hit “Ctrl” and “F” and type in either the name of the collectible, the name of the mission, or even the name of a mission objective to go straight to the right place.
Mission: Black Ops
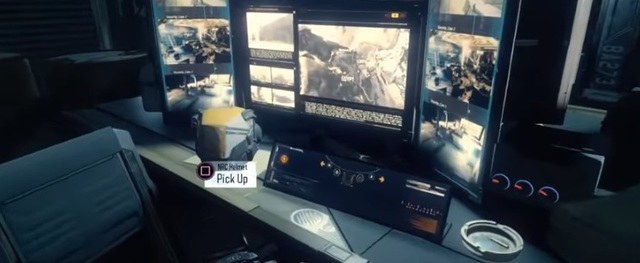
Collectible 1: NRC Comms Earpiece
During the “Infiltrate The Security Station” objective, while the alarms are going off in the air control tower, head down the stairs and past the small flaming area on the floor. Turn left to find the NRC Comms Earpiece collectible on the desk next to the blue keyboard.
 NRC Comms Earpiece
Collectible 2: Dud RPG
On the same objective as before, when Hendricks opens a door and then shoots an enemy sitting at a control panel, turn around and locate the dud RPG collectible in the corner next to the window.
 Dud RPG
Collectible 3 Egyptian Army Cap
During the objective “Go To The Interrogation Room,” breach the door and immediately turn left when you hear the minister speaking to find the Egyptian Army Cap collectible sitting in the shelves.
 Egyptian Army Cap
Collectible 4: Replica Nano Drone
On the “Go To The Extraction Point” objective, after shooting the missiles on the side of the VTOL, head inside the main room and run into the smaller chamber to the left next to the stairs. On a tool chest next to the door you’ll find the Replica Nano Drone collectible.
 Replica Nano Drone
Collectible 5: VTOL Panel
Near the end of the mission during the “Go To The Secondary Extraction Point” objective, run past the APC Hendricks jumped in to find the VTOL Panel collectible on a table at the end of the hallway.
 VTOL Panel
Mission: New World
Collectible 6: Defective Robot Hand
In the “Locate the Generator” objective, move through the open room containing the drones across a courtyard to an open doorway on the left. Head past the fire on the ground to find the Defective Robot Hand collectible in front of a pipe.
 Defective Robot Hand
Collectible 7: Bomb Detonator Core
In the area filled with cement rubble and the four large cover points during the “Locate the Explosives” objective, head up the stairs to find the Bomb Detonator Core collectible in an overturned trash can.
 Bomb Detonator Core
Collectible 8: Model Maglev Train
While in the same objective as the previous collectible, when you enter the room with the yellow strips across the ground, head downstairs past the barrels to find the Model Maglev Train collectible in the shelving at the back of the room.
 Model Maglev Train
Collectible 9: Premium Liquor
Still in the same objective as the previous two collectibles, while on the Maglev train, grab the Premium Liquor collectible by looking at the front edge of the bar with the bartender that curiously doesn’t seem upset by all the gunfire going on.
 Premium Liquor
Collectible 10: Train Pass
After grabbing the Premium Liquor collectible run into the next car where the robotic enemies crash through the windows and then head up the stairs to the right. The Train Pass collectible is sitting on the empty seat to the left of a male passenger.
 Train Pass
Mission: In Darkness
Collectible 11: Broken Respirator
While playing the “Go To The Docks” objective, go inside the run down shop at the end of the open area after your first major fight. The Broken Respirator collectible is behind the counter.
 Broken Respirator
Collectible 12: Urn With Incense Sticks
After passing the submerged cars in the flooded street, head over to the pathway on the right, next to the building to find the Urn With Incense Sticks collectible lying on the ground next to the boarded up window.
 Urn With Incense Sticks
Collectible 13: Child’s Toy
In the “Go To The 54i Communications Hub” objective, swim down the submerged escalator area, but rather than heading right towards your objective, instead keep going straight through the plants to find the Child’s Toy collectible in a clearing on a gray bench.
 Child’s Toy
Collectible 14: Warlord Helmet
After leaving the submerged area and going inside the office building, don’t go upstairs but instead run to the back of the building into a separate room. On the left side near some candles you’ll find the Warlord Helmet collectible.
 Warlord Helmet
Collectible 15: Fu Dog Figurine
Later in the mission during the same objective you’ll walk through a hole in a building’s wall and see a series of open window areas on the building across from you. Turn right and head up the broken stairs until you see a billboard. Jump across the open area to the other building and head through the hole in the wall to find the Fu Dog Figurine collectible on an empty shelf.
 Fu Dog Figurine
Collectible 16: Therapy Session Recording
This mission’s final collectible is found during the “Go To The Black Station Operation Center” objective. Head inside the building with the yellow “Electronics” sign and run all the way to the back and outside. Run up the two flights of stairs to find the Therapy Session Recording collectible on the table at the back of the room.
 Therapy Session Recording
Mission: Provocation
Collectible 17: Gangster Bling
During the “Get To Cloud Mountain” objective, jump down the ledge to the right of the street vendor cart and head inside the garage to find the Gangster Bling collectible sitting on a red generator (despite what it’s called, this collectible is clearly a pair of brass knuckles and not a necklace or any other jewelry).
 Gangster Bling
Collectible 18: Supertree Souvenir
Turn around and leave the garage where the last collectible was found and go down the street to the right. Head past the large palm tree to find the Supertree Souvenir sitting on a table in the corner with several cases.
 Supertree Souvenir
Collectible 19: Dud Slave Collar
While still in the same objective you’ll come across an area where you jump over a small broken bridge. Head left into a building with several couches and run up the stairs. Immediately to your right is sitting the Dud Slave Collar collectible on the kitchen shelf.
 Dud Slave Collar
Collectible 20: Antique Vase
In the same objective you’ll come across an area with a bunch of cargo containers stacked on top of each other. Run down the right path just after the first set of containers and then hang a left when the path dead ends. Jump up the red container blocking your way and you’ll find the Antique Vase container sitting there at the edge of the blue cargo container.
 Antique Vase
Collectible 21: Mineral
Later in the “Get To 54i Servers” objective, you’ll head through an area covered in foliage into a fake cave. On the back side of the first lit up column you’ll find the Mineral collectible waiting to be picked up.
 Mineral
Collectible 22: Bullet Shell Necklace
To finish off the Provocation collectibles, play through to the “Go To The Far Super Tree” objective and cross the rickety bridges until you reach the flaming building. Head up the stairs to the left of the building’s entrance and use the Z-Trak to zipline across. Head up the first set of stairs and run across the bridge to the right to find a tree with red columns. Run down the stairs to the right and you’ll find the Bullet Shell Necklace collectible sitting on a large gray container.
 Bullet Shell Necklace
Mission: Hypnocenter
Collectible 23: 54i Data-Pad
To start off this mission’s collectibles, run through the main path in the jungle during the “Go To The Facility Entrance” objective until you see the area covered by a yellow tarp. Underneath the tarp is the 54i Data-Pad collectible.
 54i Data-Pad
Collectible 24: Contamination Test Kit
This collectible is found during the “Hack The Datapad” objective. In the lobby area with all the flickering screens, head down the left path and run to the end to find the Contamination Test Kit collectible on a tray near the wall.
 Contamination Test Kit
Collectible 25: Coalescence Marketing Material
While playing the “Descend Into The Core” objective, you’ll find an open circular excavation area with several standing lights set up. Jump down and head into the small building on the right to find the Coalescence Marketing Material collectible lying on the ground.
 Coalescence Marketing Material
Collectible 26: Bio-Contaminant Canister
Later in this mission, during the “Go To The Original Source” objective, head down a set of stairs through a large hole in a wall to find the area with a desk with Hendricks is standing to its right. Move through the doors that automatically open and head into the room to the left to find the Bio-Contaminant Canister sitting on the floor at the back of the room.
 Bio-Contaminant Canister
Collectible 27: E-Ink White-Board
During the “Go To The Server Room” objective, head to the far right of the room with the pods lined up around two pillars to find the E-Ink White-Board collectible sitting on the counter.
 E-Ink White-Board
Collectible 28: Prototype DNI Implant
In the same objective you’ll walk through a room partially submerged in water and go up a short set of stairs. Walk through the hallway (ignoring the first set of doors on either side) and then go through the door immediately to the right after the hallway ends. On the right hand side underneath the glitching monitor you’ll find the Prototype DNI Implact collectible.
 Prototype DNI Implant
Mission: Vengeance
Collectible 29: Damaged Optical Camo Cloak
During the “Go To The Safe House” objective, on a damaged street the main character will say he should cut through the area. Turn to the left and head down the alleyway. At the end of the alley in front of a door covered by a sheet you’ll find the Damaged Optical Camo Cloak collectible.
 Damaged Optical Camo Cloak
Collectible 30: Bio-Luminescent Orchid
While looking down on the burning section of town in the area with the mobile armory, turn to the right and go down the stairs and then jump onto the street. Cut through the building on the left side of the street and run forward through all three circular holes in the walls. On the ground to the right just after the third hole you’ll find the Bio-Luminescent Orchid.
 Bio-Luminescent Orchid
Collectible 31: HCXD Bomb Sniffer Robot
During the same objective you’ll come across a large multi-level structure with several destroyed vehicles outside. Run inside and go through the massive hole, then turn left. The HCXD Bomb Sniffer Robot collectible is on the ground at the end of the room.
 HCXD Bomb Sniffer Robot
Collectible 32: Dragon Necklace
This mission’s last collectible is found during the “Go To The Safehouse Panic Room” objective. When you move through a large hole in the side of a burning building, turn right to find a couch and chair sitting at the side of the room. The Dragon Necklace collectible is sitting on the table right next to the chair.
 Dragon Necklace
Mission: Rise and Fall
Collectible 33: NRC Helmet
The first collectible in this mission is found during the “Enter The Holding Room” objective. At the beginning after your team walks through the two sets of double doors, go forward instead of following them and locate the NRC Helmet collectible sitting on the desk in front of the large monitor.
 NRC Helmet
Collectible 34: Broken Stained Glass
This collectible is found during the “Clear Debris From Station Exit” objective. When you go up some stairs into a large open room with a hole in the roof, turn left, go up the escalator and then turn right. Sitting on a desk near the wall you’ll find the Broken Stained Glass collectible.
 Broken Stained Glass
Collectible 35: Propaganda Poster
While attempting the “Plant A Spike At The Weak Point” objective, turn left at the large gate and go through the door to the side. To the left on the wall is located the Propaganda Poster collectible waiting to be taken down.
 Propaganda Poster
Collectible 36: Military Officer’s Sword
This one is found during the “Go To Safiya Square” objective later in the mission. Go through a house with a destroyed wall and you’ll see a devastated area of the street with several destroyed buildings. Instead of jumping down onto the main path, go the right, head inside the building and move down the dark stairway. At the end of the hallway is a damaged living room where you can find the Military Officer’s Sword sitting on a short bookcase.
 Military Officer’s Sword
Collectible 37: Piece Of Broken Statue
During the “Open The VTOL Hatch” objective, rather than going towards the hatch, turn right and run to the side of the room with a couch and table. The Piece Of Broken Statue collectible is sitting on the table.
 Piece Of Broken Statue
Collectible 38: Etched Glass Bottle
When fighting the giant robot during the “Destroy The A.S.P.-ML” objective, go into the building on the right side of the area and run up the yellow staircase with the glass sides. Turn right and then left and you’ll see the Etched Glass Bottle collectible nestled between two couches.
 Etched Glass Bottle
Mission: Demon Within
Collectible 39: Shell Casing
While playing the “Pursue Sarah Hall” objective you’ll find several ammo crates to the right, go past them into the wooden bunker to find the Shell Casing collectible on top of a table.
 Shell Casing
Collectible 40: WWII US Field Radio
After picking up the Shell Casing, turn around and run past the tree stumps and the large crashed object. Keep going past the tank and hug the left side of the map. You’ll run by stacked logs and a small structure covered in leaves, eventually going by a small stream. Inside another camo covered structure you’ll find the WWII US Field Radio collectible.
 WWII US Field Radio
Collectible 41: Field Binoculars
While still in the same objective you’ll have to shoot some dire wolves and you’ll find an area with an ammo crate. Just beyond the crate is the Field Binoculars collectible sitting on a wood crate.
 Field Binoculars
Collectible 42: Russian Field Compass
When you cross a small stone fence into an area with several snow covered buildings, go past the stacked logs and inside the hole in the back of the brown house. Run up the stairs to find the Russian Field Compass collectible sitting on another wood crate.
 Russian Field Compass
Collectible 43: Russian Hat
After you pick up the Russian Field Compass, jump down the doorway and run forward — down the stairs into the area with the tank on your right side. Turn left and run by another tank to go inside a stone building. At the back of the building next to a lamp sits the Russian Hat collectible.
 Russian Hat
Collectible 44: Wagner Gramophone Record
Later in the mission you’ll find a large destroyed building to the right with a dirt patch you can walk up. Head into the second floor and turn right to find the Wagner Gramophone Record collectible sitting to the right of a painting.
 Wagner Gramophone Record
Mission: Sand Castle
Collectible 45: Postcard
There are only two collectibles in this mission, with the first found during the “Land On The Mobile Refinery” objective. After landing at the blue objective point, run forward past the large metal shelves and up the stairs to the right. Inside the control room with the broken glass you’ll find the Postcard collectible sitting on the desk.
 Postcard
Collectible 46: Industrial Drillbit Parts
After flying and landing during the “Go To The Communications Array” objective, run forward and go down the large open pathway to the left. To the right of the metal pipes you will find the Industrial Dribill Parts collectible sitting on the ground.
 Industrial Drillbit Parts
Mission: Lotus Towers
Collectible 47: Hamsa
This mission’s first collectible is found during the “Go To The Security Station” objective. When you head inside the room with the large television screen on the wall to the left, go inside the room underneath the screen and you’ll find the Hamsa collectible on the wall at the back of the room.
 Hamsa
Hamsa
Collectible 48: Taylor’s Insignia
After jumping down from the vent during the “Breach The Air Vent” objective, kill the enemies in the room and then head to the lockers on the left side of the room to find the Taylor’s Insignia collectible.
 Taylor’s Insignia
Collectible 49: Hookah
When you go up the concrete ramp and jump up into the open room where a firefight is taking place during the “Go To Taylor’s Holding Cell” objective, head to the left and run up the blue stairs. At the end of the hallway on a desk is sitting the Hookah collectible. Hopefully you can find some time in between all that shooting and grenade dodging to have a nice relaxing smoke break.
 Hookah
Collectible 50: Wall Hung Carpet
During the “Go To Tower Two” objective, while running through the long tunnel with the open ceiling, jump up the large gray crate and turn to the right and walk up the broken pieces of concrete. Turn around and go across the area with the broken floor. Slightly ahead and to the left you can find the Wall Hung Carpet collectible.
 Wall Hung Carpet
Collectible 51: Decorative Lantern
This collectible is located during the “Hack The Terminal, Go To The Mobile Shop” objective. While you are inside a burning building, run up the ramp of broken concrete to the left and then immediately turn left to find the Decorative Lantern sitting on the floor next to a large crate.
 Decorative Lantern
Collectible 52: Melted Robot Part
During the “Bring Down The VTOL Leviathan” objective, while inside a room looking out at an aircraft lifting off, turn to the right and run into a destroyed room. Inside this room you’ll find the Melted Robot Part on the ground in front of a computer console.
 Melted Robot Part
Mission: Life
Collectible 53: Promo Poster
The final set of Black Ops 3 collectibles can be found during the “Go To The Coalescence Building Plaza” objective. When you’re on the street with the VTOLs and the fleeing civilians, go to the Zurich Coffee House building behind you to find the Promo Poster on the outside wall.
 Promo Poster
Collectible 54: Prototype Robot Part
While performing the “Hack The Terminal” objective, go to the left of the broken terminal and find the Prototype Robot Part collectible sitting in front of a monitor.
 Prototype Robot Part
Collectible 55: Fulgurite
This one will test your parkour skills: when walking through the very bright area with the broken buildings, jump up a pile of rocks on the right side of one building, then turn around (while still standing on the rocks) and jump up onto the ledge facing you. Don’t go forward onto the balcony, but instead jump up again immediately to get on the roof. Turn left and go forward and then jump up again on the tiny ridge of broken cement. Go forward to the edge of the building to find the Fulgurite collectible.
 Fulgurite
Collectible 56: Raven Feather
Woo-hoo, we’re finally almost done! While in one of the final areas where the “Purging” message is displayed on the screen after Taylor yells at you to “fight it,” go through the door and head towards the desk at the end of the room. Sitting on the desk next to a mug is Black Ops 3 collectible #56 – the Raven Feather! Pick it up and enjoy nabbing the Curator achievement!
 Raven Feather


Published: Nov 6, 2015 01:48 pm