RR-sama here! Last week I covered the Campaign Mode for Starcraft II: Legacy of the Void. However, after finishing the story I felt like I missed my favorite characters a little too much. So I decided that the best way to fill the void was to start playing the game’s Allied Commanders mode!
Co-Op Mode – or Allied Commanders for those who refuse to use Blizzard’s rebranding – is an online multiplayer component of Starcraft II that allows players to take the seat of one of six commanders from the Starcraft universe. While this mode plays out similar to regular campaign missions, each commander’s unique skills and units can make missions easier or harder depending on the circumstances. This guide will – hopefully – make this mode a little easier to understand, and help make it more enjoyable overall!
Contents
Missions
- Void Launch
- Void Thrashing
- Temple of the Past
- Rifts to Korhal
- Oblivion Express
Commanders
- Jim Raynor
- Sarah Kerrigan
- Artanis
- Rory Swann
- Zagara
- Vorazun
Missions
Void Launch
For anyone who has played the Heart of the Swarm campaign, this co-op mission may look a bit familiar. In Void Launch, players must prevent the enemy Protoss Shuttles from escaping through any of the three Warp Conduits on the map. Players will have to destroy the shuttles to do so, as well as fend off both air and ground assaults by the enemy. As such, not only are anti-air units and structures necessary to completing the main objective, they are key to your survival.
As the mission progresses there will be multiple waves of shuttles defended by various air units. Sometimes the enemy will also send ground support to attack your base, meaning that you and your ally will have to divide your forces to defend and attack at the same time. This can become much more difficult on harder settings – particularly near the end of the game – where several shuttles will travel to different Warp Conduits at the same time.
Your best bet is to have one player focus primarily on anti-air tactics, while the other builds a ground based army. Each commander has his or her own anti-air capabilities, so decide amongst yourselves which player would be best suited to taking down swarms of enemy aircraft.
Void Thrashing
For bonus experience, players can defend the three Hercules Dropships (right) that head out to Xel’naga Shrines. Make sure to push these out whenever available, since they will be flying behind enemy lines to accomplish their goals. Remember, this is completely optional so don’t bother doing this bonus objective if you can’t spare the forces to do so.
Void Thrashing is a fairly simple map, and is perhaps the easiest out of the bunch. Build an army, and kill the void thrashers before they destroy Sgt. Hammer’s Fortress. The recommended strategy here is to build as many ground troops as possible, with maybe some slight anti-air support, as the enemy doesn’t typically use air units on this map.
Players should also be mindful of the bonus objective. If you have the chance, try to take out the Archangel mech (above). This will grant you a hefty amount of bonus experience that will help you level up your commander faster. Be careful though. On harder difficulties this should only be attempted if you have the forces to spare. The Archangel has some pretty powerful mortars that can take out weaker units without much hassle.
Temple of the Past
Temple of the Past takes its inspiration from the two missions in which players had to defend the Xel’naga Temple on Shakuras over the course of Starcraft‘s history. While this would seem like a simple “turtle” mission, players will be disheartened to know that they cannot block the stairwells and pray for the best.
While setting up a number of tower structures may not guarantee your victory, set up enough to defend your flanks while your troops run around the map to defend the heavier waves. Void Thrashers will be spawning every 8 minutes or so, and as such you will want to keep some space between structures to allow you and your allies to reach them.
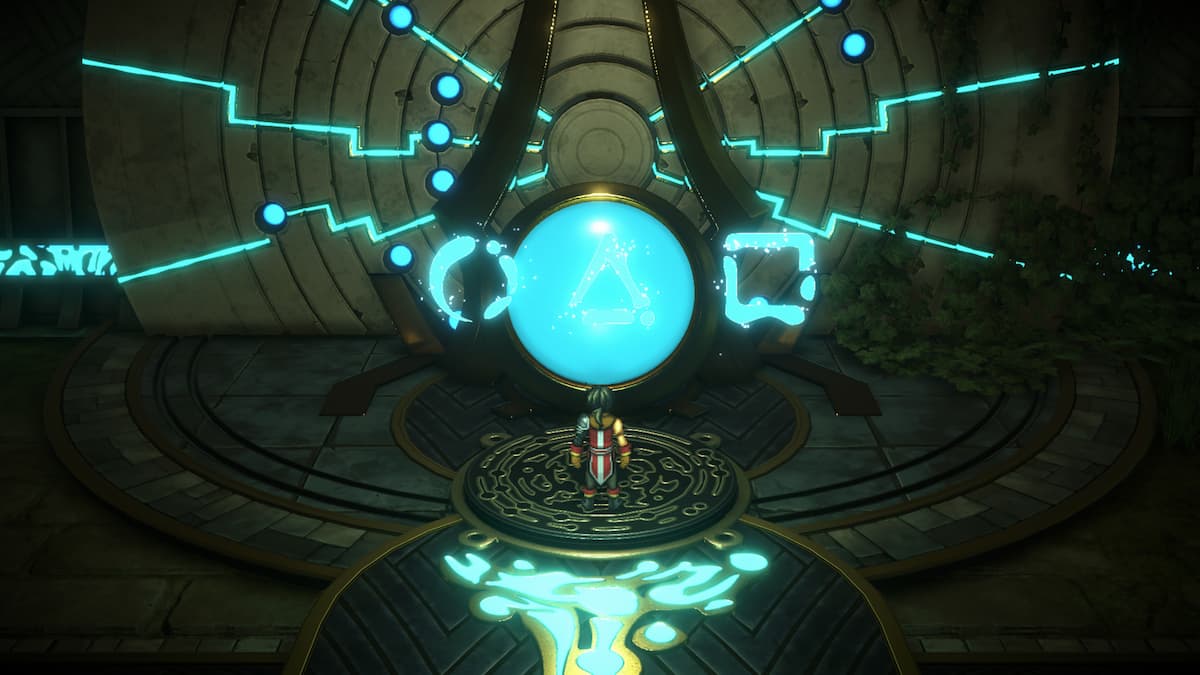
In between Void Thrashers and enemy waves you should try to take out the bonus objectives marked by yellow triangles on the minimap. This will yield bonus experience for your commander which will make future co-op games much easier in the long run.
Rifts to Korhal
Rifts to Korhal is another fairly simple mission: defend against enemy waves while simultaneously destroying enemy void shards. This mission is rarely difficult if you are a Starcraft veteran of any sort, so I’ll spare you the details. However, I should mention that Goliaths make this map a breeze. Since the Void Shards are considered to be both ground and aerial, Goliaths can use their missile packs to do extra damage. If you are a Swann devotee, this map is for you!
The bonus objective in this mission is to destroy the pirate ships located north of Player 2’s expansion (that’s the orange player), and on the south-east corner of the map. Both are fairly easy to find, and once you’re in a decent range of them they will be visible on the minimap as yellow triangles.
Oblivion Express
No, this isn’t a screencap of the Engine of Destruction mission from Wings of Liberty, but it might as well be. The map layout, purpose, and general strategy of this mission are very much the same as the single-player campaign mission. This time, however, you are standing against hybrids and with a friend at your side.
Mobility is your friend in this mission, as is a hard-hitting army. The army that guards the trains will vary depending on which race Amon is controlling in your current playthrough; however, the general strategy to go with is a mix of siege and anti-air since you’ll see plenty of ground and air troops in this mission.
Between trains it might be wise to attack the base on the western plateau – provided you have enough troops to handle a full base assault. Doing so will severely lower the threat that enemy escorts will have during the next run. However, doing so also poses a risk, as careless attacks can lead to a great disadvantage in the next wave if you fail.
Commanders
The bonus mission for this map is to attack the enemy fast-trains found on the third rail at the southernmost part of the map. Doing so will grant you extra experience, and that’s always good. Just remember that the bonus trains will be rocket-propelled (right) so they are faster than the regular objective. Mobile units will take these out easily, or any horde of mass-produced units since these trains are typically undefended on any difficulty other than Brutal.
James “Jim” Raynor
“This is Jimmy!”
Jim Raynor is a fan-favorite character, and he returns once again to commandeer the Hyperion in Allied Commanders. Raynor’s primary ability is to call down the Hyperion briefly to the battlefield, wreaking havoc on enemy lines. His secondary ability summons a Banshee Airstrike, which will provide area-of-effect damage during the calldown, as well as putting several Dusk Wing mercenaries on the field temporarily.
Raynor focuses primarily on infantry units in his army, with some minor factory and air support. While Blizzard has suggested that Raynor is suitable for players of all skill levels, I found that personally the infantry-only leader of the Terran lacks significant firepower, especially during lower levels. This can make playing Raynor a daunting task in harder difficulties.
(Jim Raynor is available in Starcraft II: Starter Edition)
Units
With the exception of the Siege Tank, all of Raynor’s units are exclusive to him. Marines and Marauders are a classic pairing alongside medics, while Firebats can be added to the mix to make short work of light ground units. Vultures are virtually useless in this mode since there is no time where strafe runs or spider mines are useful (at least with the current maps).
Siege Tanks are particularly useful in Temple of the Past in combination with supply depots, missile turrets, and Marines. However, outside of this mission you will find little use for them unless you efficiently micro them between siege mode and tank mode.
As for Starport units, Vikings can be useful in certain situations. Unfortunately, those situations are few and far between, as few maps have significant air threats, and their mech mode is rarely useful. Banshees suffer greatly from the AI, almost always carrying detectors, and Battlecruisers are pretty much all the air support you’ll ever need.
Strategy
Since Jim can build infantry units 20% faster than any other commander, I can almost guarantee you that the best strategy is to just create a massive army of foot soldiers. Aside from the occasional air threat, there’s rarely a reason to make any other units when playing as Raynor. Just make sure to back up your units with plenty of medics and you’ll be good for the long run.
Remember: Medics can heal ally organic units from any race!
As for Raynor’s abilities, use the Hyperion whenever you can’t reach a certain part of the map in time, and use Banshee Airstrike to support it. Other than that, there’s very little to know about playing as the ex-Marshall in Allied Commanders.
Sarah Kerrigan
“The Swarm hungers…”
The self-dubbed “Queen of Blades” is the first Zerg commander at your disposal. Recommended for players of all skill levels, Kerrigan controls some of the fiercest of Zerg creatures. What makes Kerrigan – and the Zerg commanders – unique, however, is that Kerrigan will be available to control after a 300 second delay.
Kerrigan has a number of abilities, all of them taken from Heart of the Swarm‘s campaign. One extra ability is taken from Heroes of the Swarm, which allows Kerrigan to gain bonus “shields” depending on how much damage she has done to enemies. Kerrigan can also get her chain lightning, ability efficiency, and fury abilities at later levels.
(Kerrigan is available in Starcraft II: Starter Edition)
Units
Kerrigan shares many of her units with Zagara, including Zerglings, Queens, Overseers, Spine Crawlers, and Spore Crawlers. Unique to her, however, are many of the stronger units in the Zerg army — such as Mutalisks, Brood Lords, Ultralisks, and Lurkers. Unlike Raynor, the only unit unavailable is the Lurker, and these are relatively useless in the long run.
In true Zerg fashion, Kerrigan can make short work of any enemy by simply swarming any unit(s) in any combination you can think of. However, in harder difficulties I would recommend using Ultralisks backed up by Hydralisks if possible. This is particularly true when Kerrigan reaches level 14 and gets the Torrasque strain, which is near invincible in this mode in tandem with Artanis’s Guardian Shell ability.
Strategy
Swarm and rush. It may sound cliche, but there’s little strategy to Kerrigan other than a focus on macro-management of your base and resources. Kerrigan can take out many of the enemy forces out by herself if you upgrade all of her skills, so don’t worry if you need to send her solo while your army deals with another objective.
What I would advise against – however – is separating Kerrigan from her brood for too long. One of her abilities (assimilation) allows Kerrigan to create an aura that turns all defeated enemy units into gas and minerals. This can be useful in harder modes to get a bigger army up in no time.
Hierarch Artanis
“This is not Warcraft in space! It’s much more sophisticated!”
Hierarch Artanis is the protagonist of Legacy of the Void, and many of his abilities are taken straight out of the campaign. Pylon Power projects a single power field into any visible area every 60 seconds; Orbital Strike fires five lasers upon any targeted area; Shield Overcharge protects all units and structures with 100 shield points for 20 seconds; and Guardian Shell protects ally units from death every 60 seconds. Lastly, Artanis’s ultimate ability – Solar Onslaught – can completely bulldoze an enemy army in seconds.
Artanis’ focus on ground units is similar to that of Raynor’s, but Artanis – like Kerrigan – has the benefit of having access to all units that matter from the start.
(Artanis is available in Starcraft II: Starter Edition)
Units
Okay, so admittedly I haven’t unlocked the Tempest yet. However, I can safely say that every single mission is completable once you get Artanis to level 6 without the need for either the Reaver or the Tempest. Why? Because there aren’t any targets worth training them for!
Fans of Brood War will be glad to know Artanis pulls all the stops. Just about every single unit from the old game is here (minus air units) so feel free to build any of them to your heart’s desire!
Strategy
I lied a little bit. Artanis is not a Brood War fanatic’s free-for-all. While Dragoons remain a fan favorite, they are actually fairly underpowered in Allied Commanders. In fact, you are better off saving the gas to make Archons or Immortals depending on the mission. Reavers can sometimes be useful in missions involving attacking an enemy base, but a horde of Immortals is much more effective – and they are unlocked from the start.
A Zealot-Immortal army is a guaranteed win in most scenarios. When supported by a squad of Phoenix fighters, you’re near invincible. Just remember to use your Spear of Adun abilities to support your troops – and your ally’s – sparingly. Later waves are always stronger, and it is best to save those shields and orbital strikes for when you need it.
Tempests can be useful, but they are best suited to the Void Launch mission on hard difficulty or higher where their bonus damage can make a big difference. With their bonus damage, Tempests can make short work of the enemy base and their air units. Since the Shuttles and most stronger hybrids are considered massive units, Tempests can demolish their waves pretty quickly.
Rory Swann
“What’s up cowboy? I got some new gear!”
Swann – in short – is all about factory units. In fact, Swann doesn’t need a barracks in order to build a factory! Centered around building as many mechanical units as possible, Swann mixes up the old and the new with a variety of vespene-guzzling soldiers. To top it off, Swann also has access to the Drakken Laser Drill from the Wings of Liberty campaign after 300 seconds of (completely free of charge) build time.
Units
Similar to Jim, Swann has access to a variety of Brood War and Starcraft II units. While a majority of them are virtually useless in Allied Commanders, Swann’s arsenal is thankfully a lot more useful on paper than Raynor’s.
One unit I am particularly fond of in this mode is the Goliath. A Brood War staple for anti-air, Goliaths are an indispensable unit in Allied Commanders since they can deal a fair amount of damage to both ground and air units. What’s more, at level 7 Swann can upgrade Goliaths to fire at both air and ground units simultaneously, which makes them doubly useful on most co-op missions.
I have yet to find one situation where the Hercules Dropship, Wraith, or Cyclones have been useful. While Cyclones may seem useful on the Oblivion Express mission, their damage output simply does not warrant their supply cost.
Strategy
Build goliaths, upgrade the drill, and have fun. Honestly, there’s very few reasons to build anything else. In Temple of the Past you might want to make use of the three turrets in Swann’s arsenal, but otherwise Goliaths can make short work of any mission when you have 20 or more in an army.
Thor mechs can be useful at times, but their slow movement and attack speed is outclassed in just about every way by the Goliaths. Goliaths are easily replaceable, cheaper to build, and take little time to train. There’s virtually no situation where anything other than Goliaths are necessary (at least until Brutal difficulty where Thors and turrets are a must). In these harder difficulties, however, you should also consider pairing your units with Science Vessels for healing.
Seriously, Blizzard… I’m still not buying the lore that Goliaths were replaced by “much more efficient Viking fighters.” I don’t see it, and you have yet to convince me otherwise. If anything I’ll throw in some Wraiths for air support.
Zagara
“The Swarm shall prevail!”
Zagara is Kerrigan’s second in command. A Brood Mother who made her nest on Char, Zagara is capable of raising an entire army in a matter of seconds. The catch? She can only have up to 100 supply’s worth of units at any time.
As for Zagara herself, she tends to play a bit like she does in Heroes of the Storm. Her first ability sends a wave of Banelings toward a target, her second summons Hunter Killers, and her third allows Zagara to summon drop pods full of roaches to any part of the map.
Units
Zagara’s units are limited to mostly ground troops, however, she has access to the Brood War Scourge unit and Corruptors to compensate for the lack of anti-air capabilities. That said, Zagara’s ground presence is all about morphing units the second that your supply dips below maximum.
My only grievance about Zagara’s unit palette (other than the lack of diversity) is the Bile Launcher. This turret wannabe is about as useful as sticking a needle in your eye. While I can imagine some higher APM players could possibly use it effectively, the fact remains that the Bile Launcher is a manual-use cannon. As such, players must target the area they want to strike each time it reloads. Since it has a one second delay before launching (without considering air-time) it quite simply is not worth constructing.
Strategy
Morph units constantly, and try to get your mineral and vespene gas collectors out as soon as possible. Morphing Overlords early game is a good idea as well, since Zagara’s units are both cheap and quick to morph. I strongly suggest that only experienced players try to use Zagara in higher difficulties, as her talents are virtually useless to someone who cannot micro-manage the entire swarm effectively.
You have been warned.
Vorazun
“The Nerazim stand ready…”
Matriarch of the Nerazim, Vorazun has access to all sorts of Dark Templar goodies. Unlike Artanis, Vorazun’s Spear of Adun abilities are all about manipulating the battlefield as opposed to simply erasing the enemy from the map.
Units
Out of all of the “recommended for experienced players” commanders available, Vorazun is certainly the most deserving of the title. Almost all of her units require micro-management, and few of them are capable of a simple “attack and forget” strategy.
That said, she is also the only commander that I have played thus far of which every single unit is useful at all times. Centurions are necessary early game to defend and attack, Stalkers are required for early anti-air, and Dark Templar are your bread-and-butter for damage. Corsairs are impractical for players who do not want to micro their units since stasis web’s auto-cast is about as well designed as the Goliath’s pathing AI in Brood War.
But let’s face it…you’re all here for the Dark Archon and its mind control anyway.
Strategy
Vorazun needs a lot of vespene gas to succeed. Luckily, one of her passive abilities is to gather vespene gas without the need for probes. Players should also take advantage of Dark Pylons to hide their base from the enemy, and to hide that of their allies as well. Placing cannons around a Dark Pylon can have disastrous effects on the AI players as well, since they will need either detection or ranged units to destroy them.
I would try to give you a blanket strategy for Vorazun, but there really isn’t one since her units are fairly impractical for general use. Master her units carefully, however, and you will have one of the best commanders in the game at your disposal.
That’s it folks!
Blizzard has already made it clear that they are planning to add more commanders and missions in the future. When that time comes I’ll be sure to set up a new guide explaining those maps and characters. Until then, get together with a friend and enjoy Allied Commanders to its fullest!