Like in any survival game, Chernobylite players will live and die according to how crafty they are, and not just in a figurative sense. Sure, it helps to be quick-thinking, but using traps in Chernobylite is one way for players to plan ahead and stop the enemy dead in their tracks before they’re overwhelmed.
In this guide, we’ll walk you through how to place traps in Chernobylite, what each one does, and what you’ll need to be able to build them.
How to Use Traps in Chernobylite
There are six kinds of traps in Chernobylite, and each one performs a unique function that you’ll want to master to gain the upper hand.
Traps can only be built during missions. That’s no issue, though, as your base is safe from harm anyway. When you’re on a mission, open your crafting menu (B on keyboard, back button on controller) and you’ll see the traps menu right away.
Open that to find six different traps, each of which can be built provided you have to resources. Here’s what each trap is named, what it does, and what it will cost you.
Fireworks
- 1 Electronic Part
- 1 Flammable Part
Fireworks are used as a distraction tool, either to lure enemies away from an area or perhaps to an area. They go off 10 seconds after deployment. Fireworks are effective against humans and monsters.
Laser Explosive Trap
- 1 Electronic Part
- 1 Flammable Part
The Laser Explosive Trap operates like a tripwire, exploding and doing serious damage to anything that sets it off. It’s effective against humans and monsters.
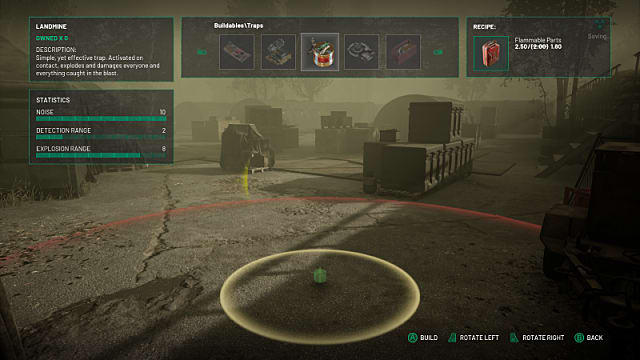
Landmine
- 2 Flammable Parts
The Landmine probably needs no introduction. Just place it where you want things to go boom and wait for an enemy to step on it. Like most other traps, the Landmine is effective against humans and monsters alike.
Electroshocking Trap
- 1 Electronic Part
- 1 Flammable Part
The name sort of gives this one away, yes? Capturing its detonator in a small radius, the Electroshocking Trap will deliver electrifying damage to anyone that sets it off. It’s effective against humans only.
Assimilating Trap
- 1 Herb
- 1 Chemical
The Assimilating Trap is like a life-draining device, stealing the energy of lifeforms inside its radius for its duration once activated. It’s also the only trap that is exclusively effective against monsters.
Directional Trap
- 1 Mechanical Part
- 1 Electronic Part
- 1 Flammable Part
You likely know the Directional Trap as its more common name: the turret gun. Propping up this weapon down a bottleneck will wipe out all who come into its crosshairs without you lifting a finger. It’s effective against humans and monsters.
Take note that all traps reveal their areas of effect before you place them, allowing you to place them most strategically. If you’re in stealth mode, also be aware that placing traps seems to alert enemies who are very close, so it’s best to not get right up near the NAR or monsters when trying to bait them into one of your contraptions.
With some preparation and a good Pied Piper routine, you can find yourself using traps to wipe maps of enemies without ever equipping a gun or utilizing a chokehold. Good luck, stalkers!


Published: Jul 28, 2021 03:28 pm