
The day the “zompocalypse” started, the people in L.A. had a lot to say. Dead Island 2‘s collectible Journals store all the stories of zero-day under the It Begins tab. Here’s where to find them all.
Recommended Videos
If you’re looking for other Journal collectibles in Dead Island 2, follow the links to our other mini-guides, generally broken up by category:
- Main Quest Collectible Journal Locations
- Side Quest Collectible Journal Locations
- Beforetimes Collectible Journal Locations
- Life in Hell-A Collectible Journal Locations
- The Truth Collectible Journal Locations
All It Begins File Locations in Dead Island 2
Day 1: 13
- #1: Emma’s Note: Steal this from Emma Jaunt’s closet.
- #2: You Won’t Believe This Crazy Rumor!: Use the microphone on the desk in the podcast studio in the Goat Pen house. You’ll have to break in through a window.
- #3: Speak Now: This is on one of the side tables in the small bridal pavilion in the Halperin Hotel.
- #4: Hot Feet: When you drop out of the ducts on the third floor of the Halperin Hotel, go through the open door between suites and take the phone off the bathroom counter.
- #5: #Spacefox2250 Live Feed: Grab this off the autograph table outside Sound Stage 7 on the Monarch Studios lot.
- #6: Close Shave: Go to the military checkpoint on the northwest end of Venice Beach and take this phone off one of the tables.
- #7: Deadlift: Read the clipboard on the stack of military crates in the Strongman stage in western Venice Beach.
- #8: You Made A Mistake: Check out the bathroom in Luigi’s Pizzeria on the north end of the Santa Monica Pier.
- #9: Just Venting: If you’re on the north side of the big blue tunnel on the Pier, next to the crashed Army helicopter, check the open shipping container to the west. It leads to a small alcove with a locked safe and this note.
- #10: Scamper the Dolphin: Go down the utility tunnel under the Santa Monica Pier and hop over the concrete divider on the left. If you turn left, you’ll spot a door marked Aquarium Storage. Enter Aquarium Storage and smash the boards on its back wall.
- #11: Commuting: As you’re going east through the Metro, you’ll come to a large tunnel where a subway car has partially broken through the ceiling. There’s an abandoned phone underneath it with this text exchange on it.
- #12: Portapotty Poltergeist: There’s a well-hidden concession stand underneath the glitchy Omen to Kill billboard on Hollywood Boulevard. Grab the phone off its counter.
- #13: Colt’s Swansong: Take the tape reel off the bed in Colt Swanson’s panic room in Bel-Air.
Containment: 4
- #1: Chump Dump Check: This is taped to the wall by the Halperin Hotel’s pool, next to the poolside restaurant.
- #2: Major Malfunction: Once you’ve reached Major Booker’s outpost in Room 307 at the Halperin Hotel, take this off the desk.
- #3: Back Soon: Go into the alley next to the Long Pork Grill in Ocean Avenue and open the utility room on the right. You should spot this note taped to a piece of machinery.
- #4: Shutter It Down: Once you’ve reached Hollywood Boulevard, keep an eye out for this file in the subway station’s ticket booth.
Dear Moms: 3
- #1: Dear Moms: When you reach the broken fence that’ll let you into the Halperin Hotel, check the short path across from the gap in the fence. Pick up the phone in front of the gate.
- #2: The Dirtiest Job: Watch for an abandoned phone on the path between the Halperin Hotel’s lobby and pool.
- #3: Shattered: In central Beverly Hills, look for the house that’s been turned into a military base. It’s dangerous to get anywhere near this building on your first trip through the zone, but you can find this file taped to a glass wall on its first floor.
GTFO: 9
- #1: Other Arrangements: Circle around Emma’s house in Bel-Air to her tennis court. You’ll find this file on the nearby loungers.
- #2: Children’s Letters: If you’re facing the entrance to the Halperin Hotel from outside, turn right and look for this on one of the tables in the evacuation point’s baggage check area.
- #3: Martial Law Incident Report: In Beverly Hills, follow the road past the Monarch Studios exit to the northwest until you reach the wreckage at its end. This file is at that blockade, on top of a stack of beige storage crates.
- #4: Priority Evac: West of Francesca’s house in Beverly Hills, behind the burning barricade, there’s a red paramedic van in the middle of the street with a bicycle crushed beneath its front wheel. Check the phone next to the bicycle.
- #5: Happy Trails: As you enter Beverly Hills from Bel-Air, look to your right for the classic car parked in the little cul-de-sac. Read the note taped to its window.
- #6: Chris Chat: At the checkpoint that separates Beverly Hills from Monarch Studios, read the tablet on top of the stack of big blue plastic crates.
- #7: Breakdown: On the southeast side of Venice Beach, look for the car that’s plowed through the chain-link fence above the canal. Grab the phone from near the wreck.
- #8: Slippery When Wet: On the Pier, look for an abandoned phone across from the Burger ‘66 stand, on the ground by the dented steel shutter. This is slightly easier to spot during “Boardwalking Dead,” or at night.
- #9: The Final Sprint: Return to the Metro after you’ve cleared the last main quest. You can now access a CDC airlock that was closed to you during “The End of the Line,” west from the fast-travel point on the far side of the tunnel. Enter that airlock to find a phone on the floor in front of the graffitied wall. For ease of reference, here are its map coordinates, as seen in the post-game, during “The Art of War.”
 Screenshot by GameSkinny
Zombies Are Real?!: 13
- #1: Just a Prank: The master bedroom in the Goat Pen house in Bel-Air is locked on your first visit. Theoretically, you need the Goat Pen Master Keys to enter, but you can also drop down to its balcony from the roof and break a window. Once you’re inside, read the file on the side table by the computer desk.
- #2: Red Spider: There’s a bus stop on one side of the giant sinkhole outside the Halperin Hotel. If you knock the zombies off that stop’s bench, you can pick up one of their phones and read this exchange.
- #3: Updated Guidance for Security: Read the note on the corkboard in the southern security station in the Halperin Hotel parking lot.
- #4: Crimson Penthouse: While you’re at Nikki Gutte’s house in Beverly Hills during “Justifiable Zombicide,” grab this off the dresser on the second floor landing.
- #5: Escaped By a Whisker: Use the microphone on the computer desk in the Goat Pen house’s master bedroom.
- #6: In These Challenging Times: Read the memo on the counter in the control room above the septic tank in the Brentwood Sewers.
 Screenshot by GameSkinny
- #7: Fresh Delivery: As you’re leaving the Brentwood Sewers, you’ll find a few people, both dead and undead, wearing big food-delivery backpacks. Check the discarded phone near one of the dead ones.
- #8: Alaska on My Mind: A block southeast from the Blue Crab Grill in Venice Beach, you’ll find Marla’s Tapas and Tacos, which is sealed up tight. There’s a tablet on the ground directly across from it with this note on it.
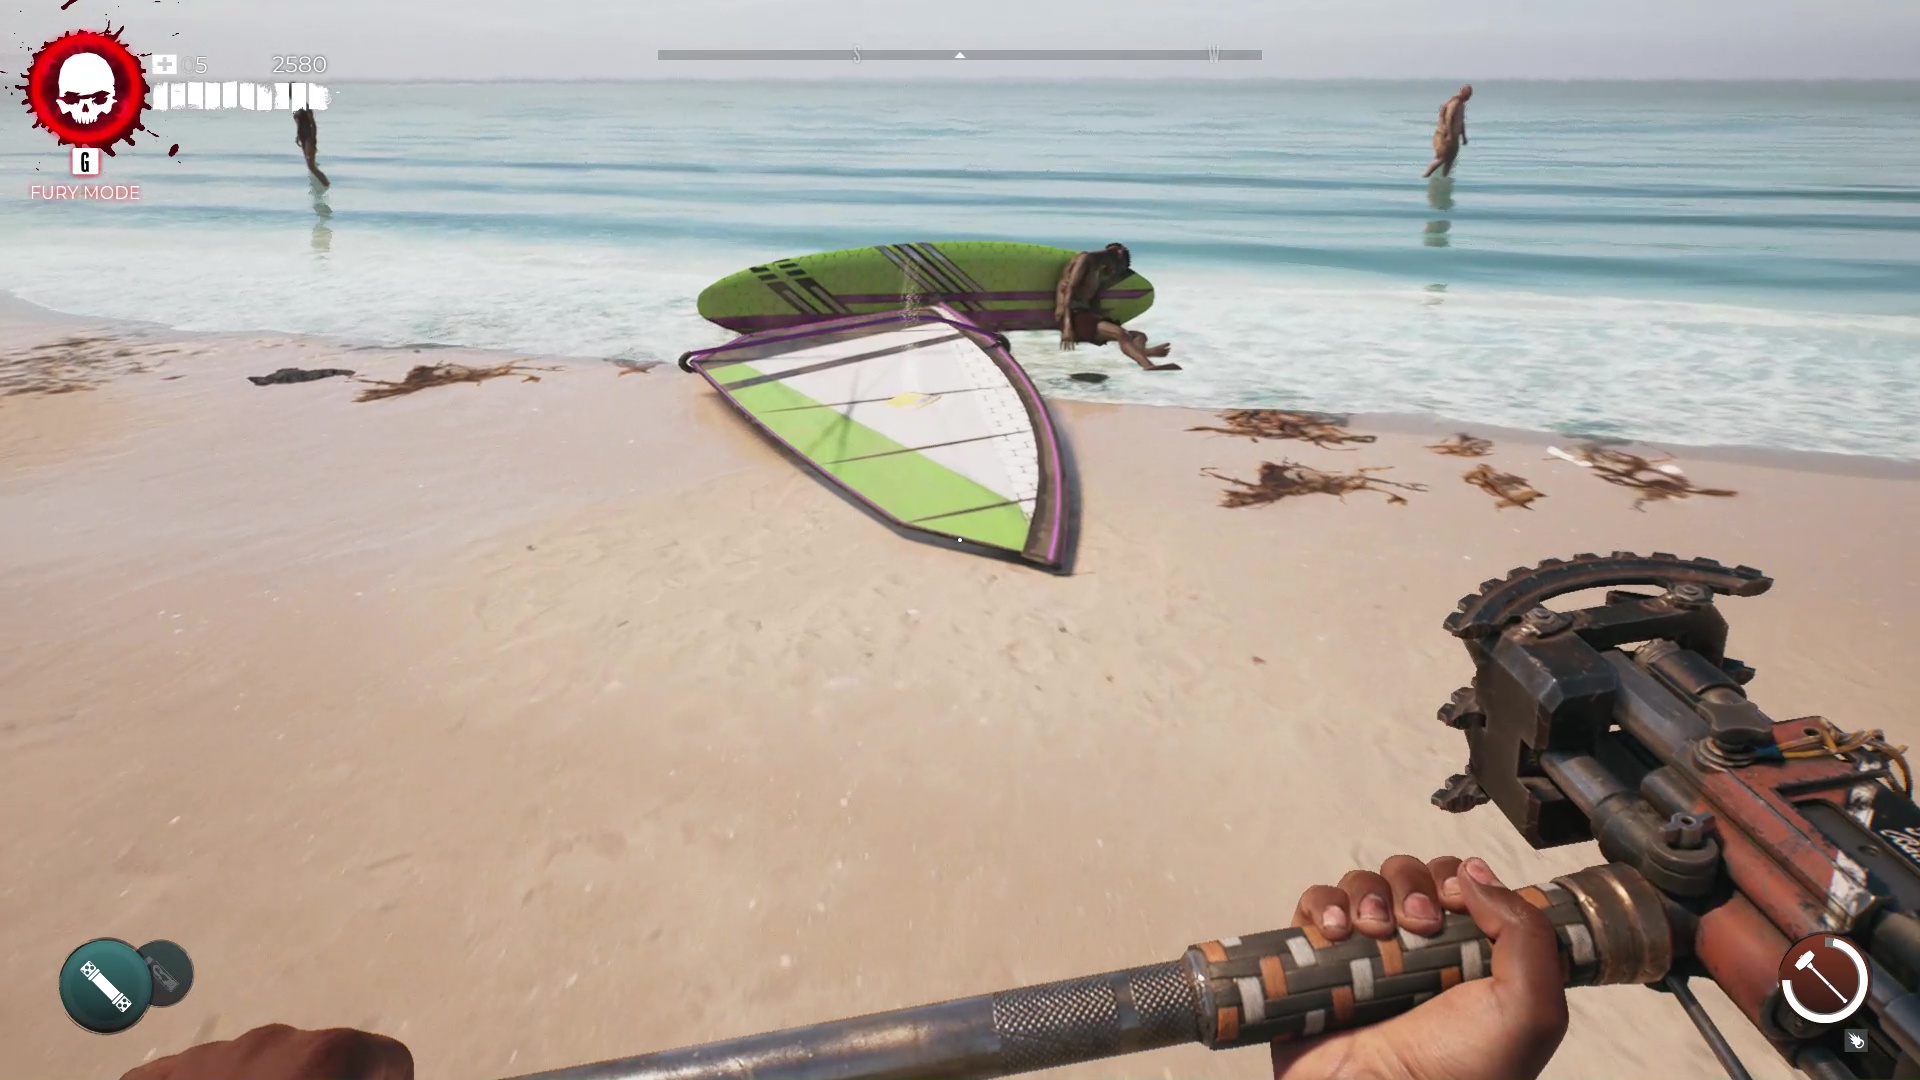
- #9: Terrors of the Deep: Go to the shoreline near the police station on Venice Beach and look for the abandoned windsurfing board. It’s difficult to spot during the day, but there’s a yellow piece of paper on the board that you can read for this Journal.
 Screenshot by GameSkinny
- #10: Patton’s Kingdom: Drop into the sinkhole on the northwest end of Ocean Avenue and go north to find a hidden tunnel that’ll take you back to the Brentwood Sewers. This note is taped to a stack of crates right in front of the zone exit.
- #11: Note to All Employees: In the Hotel Serling, open the white door just down the hall from Bob the janitor’s office and grab this clipboard off the shelf.
- #12: Romance is Dead: Grab the phone off one of the tables outside the Long Pork Grill on Ocean Avenue.
- #13: Gathering the Crew: After you solve the pressure puzzle in the Metro at the start of “End of the Line,” go forward into the tunnel, then turn right and circle around the subway car in front of you. You’ll find a metal shelf full of goods, including somebody’s discarded phone.
That’s how to find all of the collectible Journals in the It Begins tab in DI2. If you need any more tips or tricks, stop by our dedicated Dead Island 2 guides hub.
Featured image by GameSkinny.
GameSkinny is supported by our audience. When you purchase through links on our site, we may earn a small affiliate commission. Learn more about our Affiliate Policy


Published: Apr 23, 2023 10:53 pm