Dissidia Final Fantasy NT is out, and so the team battles have begun. Regardless of whether you choose some of your all-time favorite characters in the franchise or those you have no clue about because you skipped a title in the series, one thing that’s guaranteed is that you’ll end up using the summoning mechanic.
Summoning gods/monsters is not a new feature to the Final Fantasy franchise, and, as in the many games before Dissidia FF NT, whatever you choose to summon has specific traits and benefits designed to help you battle your enemies one way or another. This guide aims to help you decide what monster you want to summon by explaining their strengths and specifically how they will help you battle your opponents.
The Basics
In addition to the basic controls, the summoning mechanic in Dissidia FF NT is a straightforward one: You need to fill up that meter that appears on the top left of the screen (aka Summon Gauge). The meter, which is shared across the team can be filled up by doing two things:
- Hitting your enemies with any kind of attack, be it Bravery or HP attacks.
- Destroying the crystals that occasionally appear in battle. The crystals (also called Summon Cores) have a HP bar of their own which, once shattered, will reward the player’s team that did so with a substantial amount of summoning energy. Nonetheless, even if fully filled, a normal attack is still necessary to trigger the bar as “completed” so that the summoning option becomes available. Messages about the status of the crystals will appear on screen shortly before they appear.
Once you have your Summon Gauge fully charged, you’ll need to touch (and hold) the touch pad on your controller. The more players summoning at the same time, the faster the summoning is completed. The downside to this is that it leaves your characters open to attacks while the process is being completed, so at least some teamwork is highly advisable.

God’s/Monster’s Perks and Buffs
Each summonable monster differs in three areas:
- Pre-Summon Effect: Effect that provides a party-wide buff that will last the entirety of the battle, even before you do the summon at all.
- Post-Summon Effect: Effect that also affects the entire party, but will only be applied once the god/monster has been summoned. Will persist even after it has vanished from the battlefield.
- Abilties: Once summoned, they enter the battle and will automatically attack your enemies with their own personal attacks. Each has at least one attack, while others have up to three. The general rule is that they remain on the battlefield long enough to perform three attacks. Since all summon creatures’ attacks are AI controlled, and they all roughly do the same amount of damage, we’re going to exclude the specifics of each ability.
What to Summon?
Because it is a team-based game, team-based decisions are in order. Each player of the team can choose what monster/god to summon. If there is dissent among the team over what monster to bring into battle, the game will follow a majority rule (i.e., if two players opt for monster A, then monster A will be summoned in spite of the third player’s different preference). If none of the players agree on what to summon, one of the three choices by the players will be randomly picked.
That latter scenario should be avoided at all costs due to the important differences that exist between the perks. Each one offers different benefits:
- Alexander: Increases survivability.
- Pre-summoning effect: Increases max HP by 100.
- Post-summoning effect:Increases defense by 20%.
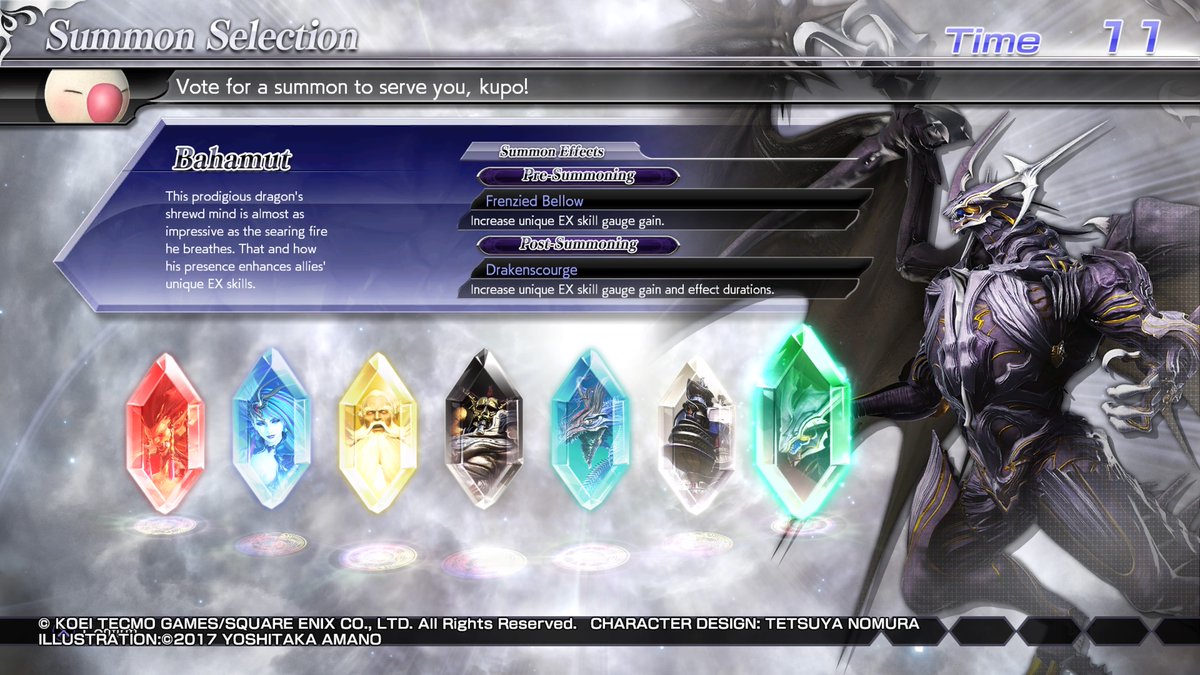
- Bahamut: Enhances EX Skills
- Pre-summoning effect: Increases unique EX skill gauge gain.
- Post-summoning effect: Increases unique EX skill effect duration.
- Ifrit: Enhances offensive power
- Pre-summoning effect: Enhances guard break capability by 50%.
- Post-summoning effect: Bravery damage attacks increased by 20%.
- Leviathan: Enhances debuffs
- Pre-summoning effect: Debuff duration increased by 10%.
- Post-summoning effect: Lowers debuff EX skills cooldown every 4 hits, but only to non-exclusive EX skills.
- Odin: Enhances dodging
- Pre-summoning effect: Dash gauge recovery is 25% faster.
- Post-summoning effect: Dash gauge capability increased by 25%.
- Ramuh: Enhances buffs
- Pre-summoning effect: Buff duration increased by 10% (only non-exclusives).
- Post-summoning effect: Lowers buff EX skills cooldown every 4 hits, but only to non-exclusive EX skills.
- Shiva: Enhances bravery
- Pre-summoning effect: Bravery recovery is 500% faster.
- Post-summoning effect: Base bravery increased by 300.
Your Playstyle Matters
Besides taking into account the classes you pick for your team, you’ll also want to stop and think of the playstyle that suits you best. If you’ve got the reflexes and can usually dodge attacks and are only hampered down by the dash gauge meter, you should try going for Odin.
If you prefer to dish out larger amounts of damage and are also willing to take more hits in the process, well then perhaps Alexander or Ifrit are better, depending on the class you choose.
The point is that game guides can only help you get so far. Most players have specific preferences and playstyles they’re better at or simply prefer. Rather than taking this guide or any other as the definitive way of doing things, I would advise you to think of it of as complementary information to what only you can know about your playstyle. Take the couple of minutes it takes to think about what you’re best at, and use this guide and others to figure out how to best maximize that potential.
Hopefully this has been of some use. If you’d like to comment or share your thoughts on it, sound off in the the comments section below.


Published: Feb 5, 2018 09:34 am