There are nine Relic Ruins in Horizon Forbidden West. Eight are found by exploring the world; one is part of an errand for Stimmur in Hidden Ember. Finding all of their locations is only half the task: each Relic Ruin acts as a large puzzle box that must be solved.
This Horizon Forbidden West guide walks you through the solution for each of the Relic Ruins puzzles and lays out their rewards. You’ll get sizable amounts of XP and skill points, as well as some good loot. Finishing Stimmur’s quest gives you a Legendary Shredder Gauntlet.
What’s more, you’ll get a bronze trophy for completing three Relic Ruins, as well as gain progress for the trophy that asks you to find five different collectibles.
All Relic Ruin Locations and Puzzle Solutions in Horizon Forbidden West
The Daunt Relic Ruins
- Relic Ruin Difficulty: Level 5
- Relic Ruin Rewards: 5,000XP, 2 Skill Points, Ornament: Let’s Get This Started!
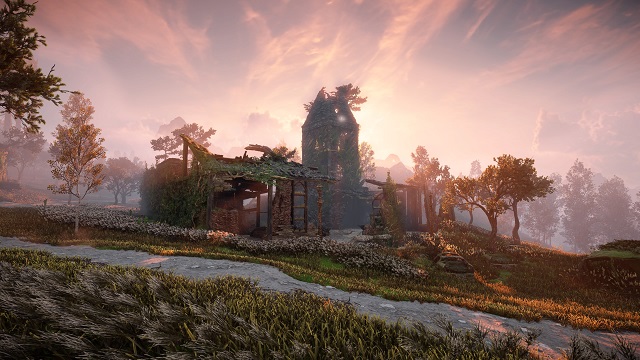
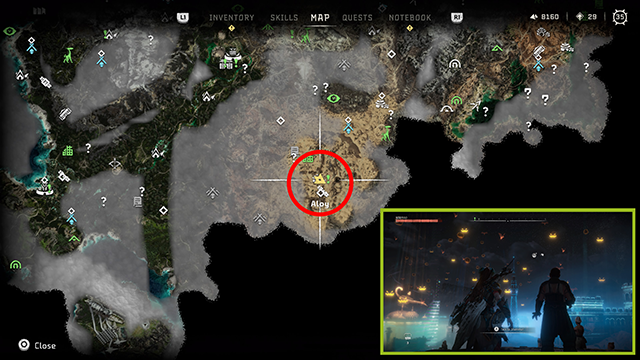
The first Relic Ruin you’ll come across is in The Daunt. It’s located 205 meters south of Chainscrape on the eastern side of the river.
Facing the Relic Ruins, enter on the left side, where you’ll find a crate. Pull the crate south with your Pullcaster. Climb to the second story, and turn left after the locked red door. Jump over to the next building, and drop down inside. Pull the crate that’s up and to the left down, then jump to the second story for the loot behind the broken door.
From the second story, use your Pullcaster to open the vent across the room, then pull down the beam to its right. Jump down, and use the crate to get to the beam. Crawl through the vent, and drop down. Turn around, and use your Pullcaster on the wall.
Turn back around, grab the loot, and jump down into the hole. Go to the end, and pull down the floor above you.
Return to the crate above, and drop it through the hole. Grab the crate, and place it against the wall with the yellow handholds (near the exit leading up). Climb up, grab the loot, and jump down to the balcony for the key module. Continue down the path, pick up the loot, and climb up.
Return to the locked door. Input the door code 1705. Grab the loot and the Ornament to complete the Relic Ruin.
No Man’s Land Relic Ruins
- Relic Ruin Level: 10
- Relic Ruin Rewards: 5,000XP, 2 Skill Points, Ornament: Energy Pit Stop.
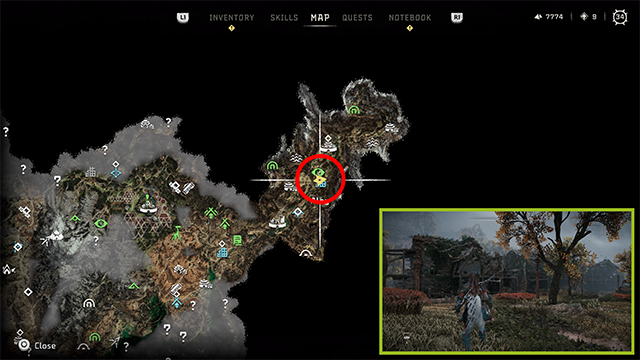
The No Man’s Land Relic Ruin is 483 meters southwest of Barren Light and 722 meters southeast of Plainsong. You’ll need the Igniter to complete this Relic Ruin, which you receive during the fifth story mission, Death’s Door.
Facing the locked door at the front of the building, turn left and go through the Relic Ruins to the southwest. When you exit, turn right. You’ll see a crate and a vent cover. Pull the crate to you, and use it to climb onto the roof of the section you just passed through. Ignite the Firegleam, pick up the loot, and drop down.
As soon as you do, look left. Use the Pullcaster on the wall, then go through it, and turn right. Continue right, and ignite the next Firegleam on the right. Then go inside the hole to pick up the empty Energy Cell from the shelf. Carry the Energy Cell back into the room you just broke out of, and place it in the charging terminal on the right side of the room.
Climb the ledge above you (where you originally entered) via the grapple point on the right side. Face the locked red door, and position yourself directly in front of it, between the tree branches and vines coming from the roof. Use your glider to get to the other side.
Go into the room on the left, and grab the crate. Push it down to the floor below, then over to the charging terminal. Remove the Energy Cell, and place it on the crate. Use the crate to move the Energy Cell across the water.
Place the Energy Cell into the power terminal. Use the crate to climb back up to the locked door using the ledges on the right side of the room. Enter the door code: 2204 to get the Ornament and complete this Relic Ruin.
Restless Weald Relic Ruins
- Relic Ruin Level: 15
- Relic Ruin Rewards: 5,000XP, 2 Skill Points, Ornament: Weekend Getaway.
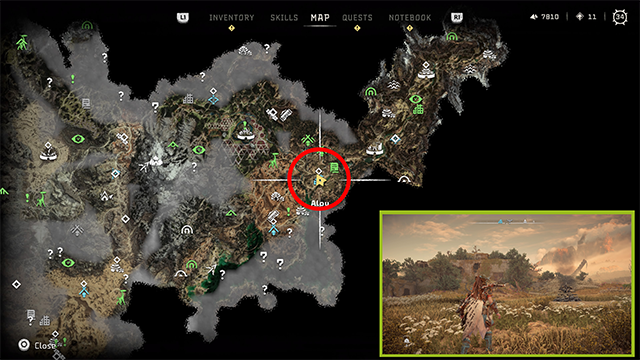
The Restless Weald Hotel Relic Ruins is 487 meters northwest of Plainsong and 444 meters north of the Plainsong Vista Point.
Facing the Relic Ruins looking northwest, with the Campfire to your back, go to the northeastern side of the Relic Ruins to find an old train car. Go to the northeastern side of the train car, pulling it away from the Relic Ruins until it stops.
Use the yellow switcher next to the tracks to make them straight. Pull the train car along the northern side of the Relic Ruins until it stops. Use it to jump up to the second floor.
Grab the supplies, then cross the yellow rope to grab the Depot Office key. Look left and down; shoot the ladder to lower it, then jump down. Use the handholds and ladder to get up to the locked red door.
Use the key, and enter the door code: 1923. It’s the year the building was constructed and written across the southern side of the Relic Ruin. Jump through the door to use the zipline. Turn left to pick up the loot when you land, then ignite the Firegleam on the back wall.
Exit, and pull the train car all the way back, switch the track, and pull it into the Relic Ruins (stop outside to grab the Greenshine on the roof). Use it to get to the second floor, grabbing the loot on one side and the Ornament on the other, completing this Relic Ruin.
Dry Yearn Relic Ruins
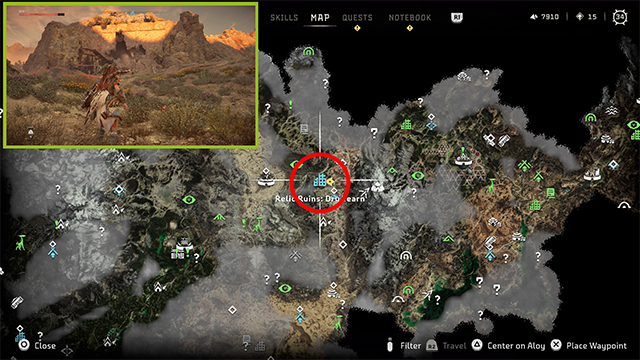
- Relic Ruin Level: Level 15
- Relic Ruin Rewards: 5,000Xp, 2 Skill Point, Ornament: Stanfort Days.
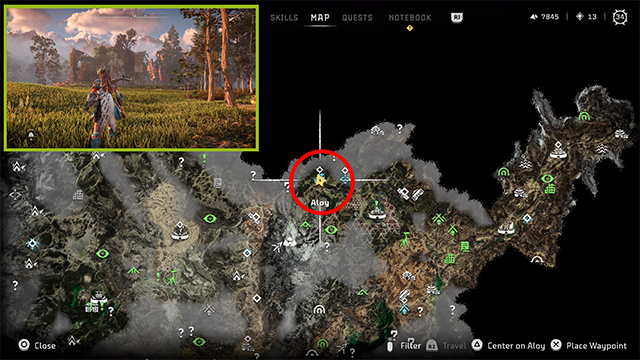
The Dry Yearn Relic Ruin is 463 meters west of The Base, 309 meters north of Arrowhand, or 437 meters east of Scalding Spear. You’ll need to have first completed the Seeds of the Past story quest.
You can find the entrance to the Relic Ruins on the eastern side by the Campfire. Enter and use your Vine Cutter on the Metal Flower on the left. Go through the opening, and pull the crate out. Push it to the far end of the corridor under the platform, then jump up and use the crank to open the blast door.
Go through the blast door before it closes. Turn right, and pull down the three beams on the wall. Now go to the end of the area to break open the rubble wall; grab the loot on the right just before the rubble. Pull the train car to the blast door, then climb up the blast door using the handholds. Jump back across the beams to grab the Repository Maintenance key.
Open the locked red door (no code this time). Inside, turn left and open the air vent. Ignite the Firegleam, then open the blast door again. Pull the train car halfway through to hold up the blast door. Climb the car, then the handholds. Aim for the beams on the right wall, jump backward and activate your glider to reach them. Hop over and grab the Ornament to complete this Relic Ruin.
Open the blast door again and pull the train car to the end if you want to get the Greenshine near the entrance.
The Stillsands Relic Ruins
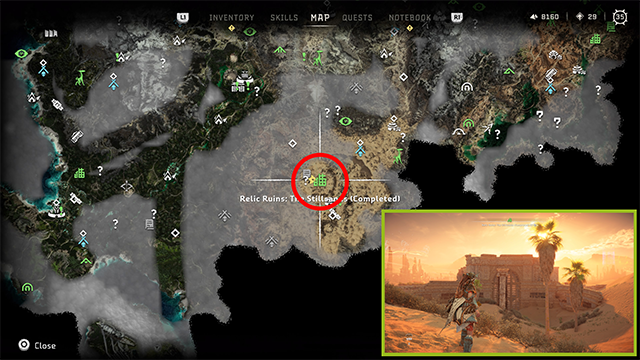
- Relic Ruin Level: 20
- Relic Ruin Rewards: 5,000XP, 2 Skill Points, Ornament: Go Big
The Still Sands Relic Ruin is 170 meters northeast of Hidden Ember or 1,072 meters southeast of The Memorial Grove.
Climb to the roof on the southeast side, then go to the north side to find an open section of the building. Repel down. go up the curved staircase in front of you, just to the left. At the top, go past the crate, and pull down the loot container up and to the left. Then follow the path right to get the loot and Greenshine on the back wall. Return to the crate, and push it down.
Push it back toward the repel point, then activate the Firegleam in front of you. Push the crate through the new opening, and use it to climb up to the metal platform. Grab the loot, and then turn the valve.
Jump down, and put the crate in the drain hole so the water rises. Now swim back out into the main area and to the eastern side, where you can pick up the Store Key module. Continue up to grab some loot and scan a Data Point. Go to the locked red door, and use the key (again, no door code this time).
Pull the new crate out, and push it into the water; use it to get to the level above the door for some loot. Jump into the water, and swim back to the drain room. Turn off the valve, and pull the crate out of the drain hole using the Pullcaster.
Go back out into the Relic Ruin’s main area, and push the other crate all the way to the end (south side). Return to the drain room, turn on the water, and plug the drain. Then swim all the back to the south end. Use it to climb up the wall and through a crack in the ceiling to get the Ornament and complete this Relic Ruin location.
Runner’s Wild Relic Ruins
- Relic Ruin Level: 20
- Relic Ruin Rewards: 5,000XP, 2 Skill Points, Ornament: A Church? Really?
The Runner’s Wild Relic Ruin is in the valley 884 meters northwest of Scalding Spear and 858 meters southeast of The Bulwark.
Enter the Relic Ruin via the open western side. Use your Pullcaster on wall on the left. Go through the opening, then turn left to climb over the wall to the locked red door. Turn right, and jump down into the area to the right of the ramp leading up. Turn back toward the door, and pull down another wall. Turn around, and ignite the Firegleam.
Pull the crate down on the other side, then move down the corridor you’ve just created. Stop at the end (don’t push it left), and use it to climb the wall with the yellow handholds on the right to reach the roof. Grab the loot and Greenshine here, then push the crate down, through the gap forward and right. Now drop down, and put one crate on the lowest floor and the other crate on top of it.
If your crate gets stuck here, reload from your last save to reset them.
Push the crates to the northeast corner, inside the tower to the left of the broken ladder. Use them to reach the handholds leading up. Get the Altar Room key to open the locked red door. Grab the loot on the right side, and pull the wall down on the left. Push the crate stack to the new hole in the wall, and pull the top one off. Push it up the ramp to the tower, then climb the tower here to get the Ornament in this Relic Ruin.
The Long Coast Relic Ruins
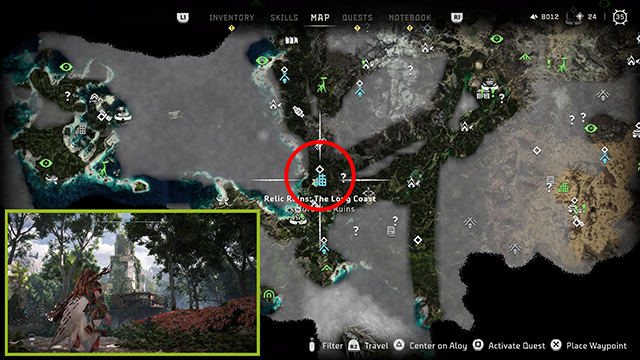
- Relic Ruin Level: 25
- Relic Ruin Rewards: 5,000XP, 2 Skill Points, Ornament: The Bill
The Long Coast Relic Ruin is 310 meters northeast of Thornmarsh and 884 meters south of The Stand of the Sentinels Tallneck.
Enter the Relic Ruin through a hole in the western side. Pass the power terminal, and turn around. Use the grapple point to get to the ledge, and open the loot crate to the left. Climb up the tower to the top. Open the loot crate, and go around to the north side. You’ll see two yellow beams sticking out over the main area below and a crate down in the distance. There’s a Greenshine on the lower roof to the left, but you’ll have to climb back up if you get it.
Glide over to the crate. Turn around when you land to ignite the Firegleam. Grab the loot in the container opposite the crate, then push the crate through the hole and down to the main area with the power terminal. Don’t jump down. Instead, turn right to follow the path across to an Energy Cell in a charging terminal. Take it out, and put it in the power terminal.
Push the crate into the elevator, and remove the vent in the ceiling. Go back to the auditorium where you got the first crate. Use the grapple point on the lights across the water to reach the other side. Drop down, and go up to the metal platform on the left side. Grab the loot, then use the yellow handholds on the red trusses to go right and drop into a room with a Firegleam.
Go through the hole, and turn around. Through the lower crack in the wall in front of you, you’ll see a switch sparking. Use the Pullcaster to pull the switch. A light truss will move around to you, above and to the left. Use the grapple hook quickly to latch onto it, then jump back to the platform behind you. Push the crate down, then across the water and into the elevator.
Take the elevator up, and pull one of the crates out. Then take the elevator back down. Climb through the hole in the roof and back up to the second floor; push the crate you left there on top of the elevator. Now, take the elevator back up. Use the crate on top of the elevator to reach the handholds in the shaft and the Ornament at the top of the Relic Ruin.
Isle of Spires Relic Ruins

- Relic Ruin Level: 30
- Relic Ruin Rewards: 5,000XP, 2 Skill Points, Ornament: Golden Toucans
The Isle of Spires Relic Ruin is 346 meters southwest of The Digsite and 414 meters southwest of Legacy’s Landfall.
Start by climbing the Relic Ruins on the north side (across from the Widemaw site); there are dozens of handholds and a few grapple points leading you up several stories. Once on the metal platform, follow it around the right side of the building.
Go inside and past the elevators with the power terminal. Wrap all the way around (going right), passing the room with the Energy Cell. Turn left at the end with the desks and chairs, and go past the room with the charging terminal. In the next room, turn left, and look up. Pull down the vent before crawling through. You’ll drop down into a room with a Firegleam; ignite it.
Now get the Energy Cell from the rack, and charge it in this terminal before placing it in the power terminal at the elevators (make sure you run with it). Take the elevator down, and ignite the Firegleam to make a quick exit to the Campfire if you want.
Otherwise, pull the crate opposite the Firegleam out of the water. Move it to the right side (by the elevators), and push it in the water. Swim across to the Metal Flower, and destroy it. Then pull the crate toward you. Jump on the crate, and turn right. Shoot through the gap in the wall to drop the ladder on the other side. Exit through the gap opened by the Metal Flower.
Swim to the ladder, and climb a short way. Jump to the room behind you to get the Main Office Key module. Aloy will mention she needs the two-part code for the door, but we have it (it’s higher up above the door if you want to get it yourself). Go over to the bottom red door in the Relic Ruin lobby and enter the door code: 2109109. You’re finished with all but one Relic Ruin.
Night of Lights Relic Ruins
- Relic Ruin Level: 22
- Relic Ruin Rewards: 4,771XP, 1 Skill Point, Ornament: Gizmo, Ancestor’s Return (Legendary Shredder Gauntlet)
At the end of each Relic Ruin, Aloy mentions going back to Las Vegas to learn more about the Ornaments she finds. Now that you have all of them, it’s time to return to Hidden Ember and speak with Stemmur to receive the Night of Lights Errand. You could take this Errand earlier and return with more ornaments later, as well.
Use the elevator in Hidden Ember (on the second story) back down into Dunehollow, where you fought the Tideripper during the Sea of Sands story quest. If you haven’t already, you can also get the Dunehollow Vista Point while you’re here.
When you reach the Relic Ruin, go to the locked red door, and enter the door code: 739135.
If you decide to climb higher in the building, use the grapple point to the left of the door, then jump to the landing to the left. Go up the stairs, grab the loot at the top, and scan the Data Point to your left. Then hop through the open cage to the right of it.
Drop down, and go right. Jump into the cage by the door, turn left, and pull the top crate in front of you toward you. Then hop down, and pull the bottom crate out of the same cage, moving it to the left side of the ramp and against the ledge. Now go back to the same cage on the left side, and pull the other crate down. Pull it up the ramp and put it on the other crate, then move both to the cage in front of the ramp.
Jump up, and then down on the right side. Move the next crate to the left so it falls down to make a path. Open the vent cover on the floor. Drop down, and go through the vent, grabbing the loot along the way. Open the vent at the end, and turn right. Break down the wall, then scan the Data Point in the next room, grabbing the loot on the back shelf.
Go back outside, and jump over the edge. You’ll be back in front of the building. Use the door code, grab the Ornament, and return to Stemmur to complete this Relic Ruin.
When you return to Stemmur, the quest will be complete. Choose a light show to mark one of nine holidays:
- Bodhi Day
- Eid al-Fitr
- Christmas, St. Patrick’s Day
- Easter
- Valentine’s Day
- Halloween
- Chinese New Year
- New Year’s Eve
And those are all of the Relic Ruins in Horizon Forbidden West and how to solve their puzzles. For more guides, head over to our HFW tips hub.


Published: Feb 23, 2022 02:59 pm