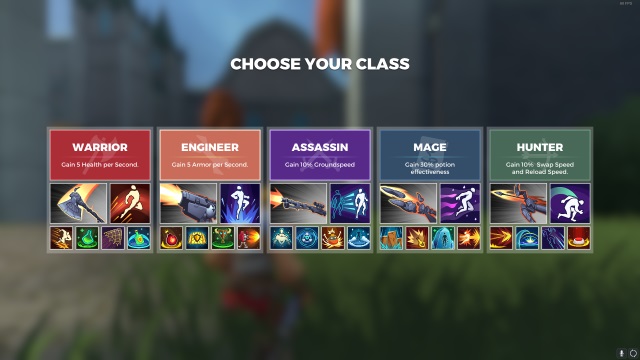
Realm Royale stands out from other battle royale games with the introduction of classes. These classes vary from one another, not only from their passives, but how they play with their unique legendary weapons and abilities.
Before you land into the Realm with your partner, you should know what classes work best together and how to get the most from your abilities. While a good build in Realm Royale can make the world of difference, a pair of teammates communicating together can change the outcome of any fight. Here’s a series of builds you and your partner can use to claim the Crown Royale!
Hunter and Warrior
Hunter
- Weapons
- Shotgun
- Longbow
- Abilities
- Proximity Mine
- Flare
Warrior
- Weapons
- Heirloom Rifle
- Throwing Axe
- Abilities
- Charge
- Shielding Potion
This build focuses on getting the Warrior as close to your enemies as possible to deliver devastating damage, quickly. The one problem about this strategy lies in the fact that the Warrior lacks a considerable amount of range. While their Throwing Axe does a great deal of damage, it doesn’t have the best range and they need to switch to their other weapon in order to remain vital. But, because they’re charging in immediately they won’t have time.
To make up for it, the Hunter keeps the Warrior protected with their Longbow from a good distance away. As the Hunter highlights enemies using their flare, they can position their Proximity Mine close to the fighting. If you and your partner communicate fast enough, you two can use the Warrior’s aggressive charge to lead enemies towards a well-placed mine to soften them up.
The Hunter’s ranged barrage can keep them occupied, and the Warrior’s shielding potion can keep them alive as they charge in to meet the enemy head on.
Warrior and Engineer
Warrior
- Weapons
- Rifle
- Heirloom Rifle
- Abilities
- Flask of Healing
- Net Shot
Engineer
- Weapons
- Plasma Launcher
- Heirloom Rifle
- Abilities
- Barricade
- Deploy Turret
If close range doesn’t suit your needs, this build should allow you and your partner to stay a safe distance away from your enemies. When things start to go south the Engineer can place down use their Barricade ability to protect you. The great benefit of this ability is you’re still capable of firing past the shield to pepper your enemies while their shots get absorbed by the shield. This ability also gives your team the opportunity to replenish your armor or health.
That’s also a problem with this build: you don’t want to remain in a single location for too long. You and your partner have to keep moving. To help with that, the Warrior can throw their Flask of Healing down behind the Barricade to give you both a rush of health. This means you can make recovering your armor a higher priority.
Both classes will need to have a long range rifle equipped to get the most of this build, preferably the Heirloom Rifle. If your enemies get too close, the Engineer can always spawn a turret to supply some extra firepower and the Warrior can pull out the traditional rifle for some medium range engagements.
Assassin and Hunter
Assassin
- Weapons
- Crossbow
- Sniper Rifle
- Abilities
- Concussion Bomb
- Smoke Screen
Hunter
- Weapons
- Hierloom Rifle
- Long Bow
- Abilities
- Withdraw
- Flare
When you trust your ally to have your back, you two can confidently dominant the competition from a safe distance.
This devastating combo features the Assassin’s Sniper Rifle starting every engagement. Because this weapon features the only scope in the game, enemies won’t know your location until its too late. The one downside is the Sniper Rifle takes a great deal of time to reload. As a result, the Hunter’s Long Bow can keep up the consistent barrage while the Assassin reloads their rifle to deal crippling damage to anyone they hit with it. The Assassin better know how to aim!
And if your enemies do make their way over to you, both classes feature a great getaway ability, Withdraw and Smoke Screen. These abilities will confuse your adversaries for a time, but not for long. In order to make sure they don’t sneak up on you, the Hunter’s Flare ability will highlight anyone attempting to ambush you. Additionally, the Assassin’s Concussion Bomb can push back any foe attempting to get in close.

Engineer and Mage
Engineer
- Weapons
- Shotgun
- Hierloom Rifle
- Abilities
- Deploy Turret
- Fire Bomb
Mage
- Weapons
- Stone Spear
- Poison Pistol
- Abilities
- Ice Block
- Explosive Flask
You may be surprised to learn the Engineer and Mage classes work well in close range engagements, especially when they use their abilities in sync with each other.
Any good engagement should start off with the Engineer throwing down a Fire Bomb to distract the enemy. The goal isn’t to rely on this damage, but scare your foes enough to where they disperse and pull away from each other. Once they’re separated, the Mage can use their Explosive Flask on a single target and slow them down. The Engineer can finish them off with some well-timed shotgun blasts, and their turret. Because the Explosive Flask slows down your enemies, the turret can make short work of them as they struggle to get away.
You’ll have to be aggressive with this build. Because the Engineer can heal armor progressively out of combat, they can serve as the front line. If the Mage ever runs low on health, they can always pop their Ice Block ability and regain it back. But they’re vulnerable once they pop out of this state. The Engineer will have to use their turret to compensate for the lost firepower during this time.
Assassin and Warrior
Assassin
- Weapons
- Sniper Rifle
- Hierloom Rifle
- Abilities
- Smoke Screen
- Sensor Drone
Warrior
- Weapons
- Shotgun
- Throwing Axe
- Abilities
- Net Shot
- Charge
This build works much like the Warrior and Hunter build, however the hard damage dealer in this build, the Assassin, needs a little bit more assistance with their long range weapon. Unlike the Hunter’s unique weapon, the Sniper Rifle takes quite a bit time to reload. As a result the Assassin needs to make sure their shots count every time. The Warrior can make this less of a challenge.
During an engagement, the Warrior should rush into a fight using the ability Charge. When you’ve chosen a specific enemy to target, the Warrior hits them with their Net Shot ability, which slows them down by 50 percent for a short amount of time. This is where the Assassin takes advantage of that slow movement speed and hits them with their powerful Sniper Rifle. From there, the Assassin can switch to their Heirloom Rifle and continue to fire at anyone still alive.
The Assassin can use their Sensor Drone ability before entering a building to pinpoint all of the enemy locations. The Warrior can use this knowledge to plan their strategy before flushing them out. If things get hot, the Assassin can toss down their Smoke Screen to pull away. This ability always works great if you need to do a quickly reload any of your weapons.
—
These builds should serve you well as you work your way up the ranks in Realm Royale and continue to claim the precious crown!
If you haven’t already, check out our first impressions of Realm Royale, along with our beginner’s guide if you’re still trying to learn about the game. For more information on Realm Royale, keep it here at GameSkinny.


Published: Jun 11, 2018 07:53 pm