Hellfire Citadel is a five wing instance that allows World of Warcraft players to face bosses in a somewhat non-linear order. Unlike previous guides, we cannot provide the most optimal order raid teams should encounter these 13 bosses. Refer to the in-game raid journal (shift J) determining which order to face them depending on team composition and skill.
Bastion of Shadows is the third wing of the encounter and has two bosses that could be faced before the final one. Tyrant Velhari is the final boss of this wing and cannot be accessed until players have defeated Socrethar the Eternal.
The other wings for Hellfire Citadel includes: Hell Breach, Halls of Blood, Destructor’s Rise, and The Black Gate. The following ratings are based on a first impression and defeat of each boss.
Shadow-Lord Iskar

Shadow-Lord Iskar is a two-phase, multi-target encounter that will require heavy raid coordination and movement. At 80%, 55%, and 30% health, he’ll switch to the second phase for 40 seconds. To successfully defeat this boss, players will need to toss around a large ball to see through his shadow illusions.
Grounded
 Shadow-Lord Iskar will begin the encounter grounded and players can deal damage to the boss. This boss has 4 abilities he will use during this phase: Fel Chakram, Fel Incineration Phantasmal Winds, and Phantasmal Wounds.
The boss will mark three targets—a range/healer, a melee, and the current tank—as he begins to cast Fel Chakram. He will then hurl a Chakram at the end of his cast that will travel to each marked target before returning to the boss dealing major Fire damage to them based on proximity. Any players standing in the path of the Fel Chakram will have the same Fire damage inflected upon them as well.
 Periodically, a beam of fel corrupted light will fixate on a range/healer target. Fel Incineration will ignite the ground under the target leaving Fel Fire patches and deal heavy Fire damage every 1.5 seconds.
The remaining two abilities for Iskar will require interaction with the Eye of Anzu. Those holding the Eye will need to be raid aware and ready to action quickly.
 Phantasmal Winds are illusionary winds that will surround 5 raid members and begin to push them towards the edge of the platform. The winds will grow in strength the longer a player is affected by the debuff. If a player receives the Eye of Anzu, the winds will be dispelled on that single player.
 Iskar will also apply Phantasmal Wounds to 5 players, causing them to bleed profusely until healed pat 90% of their maximum health. The initial cast will cause moderate Shadow damage and apply a ticking DOT that deals minor Shadow damage every 2 seconds. Players holding the Eye of Anzu will remove the illusion.
This Ground phase will repeat with zero change in abilities after the Flight phase completes.
Flight
 At 80%, 55%, and 20% health, Shadow-Lord Iskar will cast his Shadow Escape and take to the skies and begin channeling Focused Blast towards the holder of the Eye of Anzu. This beam will inflict heavy Fire damage that is split among players between it and the target. He will also continue to cast Fel Incineration during Flight phases. Raid teams will want to stand in the beam and group especially close to the Eye holder.
During the Flight phase, different adds will spawn at these percentages. The boss cannot maintain flight forever and will be forced to land and start the Ground phase again with any remaining adds.
 When the boss reaches 80% health, a Corrupted Priest of Terokk and Illusionary Outcasts will be summoned. The Priests will cast Phantasmal Obliteration on 5 raid members that will place a Phantasmal Fel Bomb on them. These bombs will detonate after 5seconds major Fire damage to nearby players, but can be dispelled by any holding the Eye of Anzu.
Illusionary Outcasts do not have any abilities and will only deal melee damage.
 When Iskar reaches 55% health, he’ll summon an additional add, Shadowfel Warden along with Corrupted Talonpriest and Illusionary Outcasts. The Wardens will frequently cast Fel Conduit that will increase Nature damage by 25% for each successful cast. Fel Conduit can only be interrupted by an Eye holder. If the cast succeeds, it will channel Fel Chain Lightning that inflicts heavy Nature damage, jumping to a total of 5 additional targets.
 At 20% health, a Fel Raven, Shadowfel Warden, Corrupted Talon Priest, and Illusionary Outcasts will spawn. The Raven will infect its current threatening target with Phantasmal Corruption. This corruption will explode inflicting major Fire damage to all nearby enemies and increase Fire damage taken by 100% for 10 seconds. Holders of the Eye of Anzu will be immune to Phantasmal Corruption.
Eye of Anzu
 At the beginning of the fight, the Eye of Anzu will need to be picked up by an assigned player. This object allows the holder to see through Iskar’s illusions. If it is not possessed by a player it will deal increasing Fire damage tot he entire raid with Uncontrolled Radiance. But when a player is holding the eye they will be inflicted with moderate Fire damage every 2.5 seconds from Radiance of Anzu.
Tips
-
For easy Eye of Anzu passing, download Iskar Assist from Curse or use the following Macro:
/target [@mouseover]
/click ExtraActionButton1
/targetlasttarget - Save Bloodlust/Heroism/Time Warp for the start of the third Flight phase when Iskar hits 20% health.
- DPS Legendary ring should be used during each Flight phase.
- Healer Legendary ring should be used during Flight phase.
- Tank Legendary ring should be used during emergencies.
- This encounter can be single tanked since the boss and adds do not apply debuffs that will require swap. However, prepare for damage loss for raiders to remain stationary for Chakrams.
- An Eye of Anzu team will need to be assigned. Make sure to include healers, both tanks, and any DPS that can interrupt.
- Throw the Eye to players with Phantasmal Wounds if their health dips dangerously low.
- Assign raid location with 3 markers 20 yards apart for Fel Chakrams away from Fel Incineration and Fel Fire.
- At the 3rd Flight phase (20% health), start with the tank holding the Eye of Anzu.
- Priority kill order during Flight phases is Corrupted Talonpriests > Shadowfel Wardens = Fel Ravens.
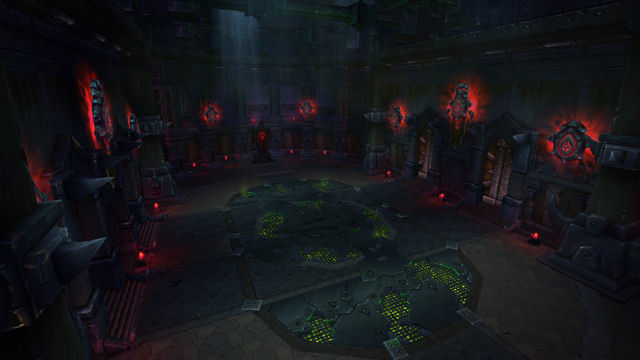
Socrethar the Eternal

This encounter is considered a two-phase fight. The first phase is primarily a single-target encounter while the second is multi-target with vehicular control. However, the second phase can be extended with proper execution.
Phase 1: Soulbound Construct

At the beginning of the fight, players will not be able to inflict any damage on Socrethar the Eternal as he will be inside his Soulbound Construct. Instead, the raid will need to kill the Construct to force him to be ejected. Players will want to begin by stacking together and either moving out when targeted by one of the Soulbound Construct’s 5 abilities or moving as a pack away from them.

While Socrethar is inside the Construct, he will cast Reverberating Blow frequently. This will inflict major Physical damage to all enemies in front of it and apply Shattered Defenses, a stacking debuff that will increase damage taken from Reverberating Blow by 200% for 45 seconds. Tanks will want to swap every 3 stacks while other players will need to move out to avoid being stuck by additional Blows.
 A player will be targeted with Volatile Fel Orb, launching a ball of felfire energy at them that will detonate when it reaches them. It will explode with Volatile Felblast that will deal moderate to heavy Fire damage to any within 10 yards.

The Construct will also target a player for Felblaze Charge and rush at them before returning to the tank. It will leave a trail of Felblaze Residue behind that deals heavy Fire damage and slows by 75%.
 Roughly every minute, the Soulbound Construct will summon a Fel Prison. This fel energy ring will trigger fro any that steps inside and coalesces into a Crystalline Fel Prison, stunning targets within 8 yards. The Crystalline Fel Prison is targetable and will need to be destroyed to free any trapped.

Finally, the Construct will need to bleed off its excess energy by afflicting a random target with Overwhelming Power from the power of Socrethar’s soul. It will hurl bolts of fel to temporarily burn players for moderate damage every second for 3 seconds.
Phase 2: Socrethar and the Sargerei

When the Soulbound Construct has been defeated, it will cast Eject Soul and can be piloted by a tank. The raid will want to be stacked in the middle of the encounter area to maximize healing and damage.
During this phase, the Soul of Socrethar will be target-able for damage as he’ll have only two abilities. He will cast Exert Dominance to reduce the health of the now-friendly Soulbound Construct. If the Construct reaches 0 health, he will be able to repossess it, restarting the Soulbound Construct phase.
 Roughly every minute, he will cast Apocalypse that will deal heavy Shadow raid-wide damage. Raiders will want to remain stacked to maximize healing.
Once Socrethar appears, he will create three portals about the room to summon Sargerei reinforcements. These portals are color-coded for each add type.
 The red portal will summon a Sargerei Dominator. It will buff Socrethar with a Fel Barrier that will make him immune to interrupts and damage. This will allow him to freely cast Dominance until the Dominator add is destroyed.
 The Sargerei Dominator is immune to all CC effects and interrupts, including the Fel Prison from the Soulbound Construct. He will also cast Gift of the Man’ari on a random target that will inflict moderate damage to it and any within 10 yards every 3 seconds for 2 minutes.

A blue portal will appear for 6 Haunting Souls. These ghosts will concentrate on a random target with Ghastly Fixation. If they reach their target, they’ll cast Virulent Haunt, dealing major damage to all nearby players and fearing them for 8 seconds. Should the Haunting Souls come near the Soulbound Construct, the soul will detonate and deal heavy damage to it with Soul Dispersion.
 The Sargerei Shadowcaller will appear through the purple portal. The Shadowcaller has no threat table but its casts can be interrupted. It will begin by casting Shadow Bolt Volley inflicting light to moderate damage to the entire raid. It will also apply Shadow Word: Agony to two players every 10 seconds dealing moderate damage every second for 15 seconds.
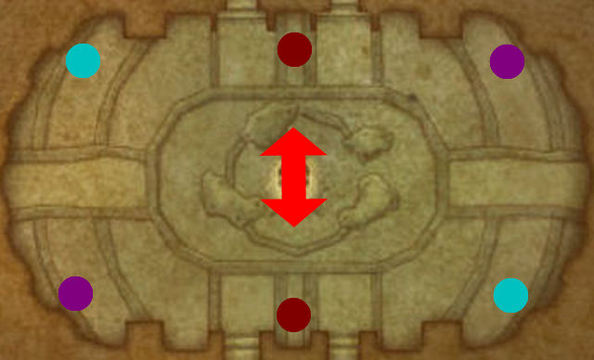
Roughly every 2 minutes, the portals will switch sides of the encounter area. The red portal will always be near the center of the room while the blue and purple may switch room ends. Be aware of when and where they will be.
Piloting the Soulbound Construct
When Socrethar has been ejected from the Construct, a tank will be able to pilot it and use its abilities. The player will need to execute these well to assist the raid in managing the adds so they can focus on defeating the boss. These abilities can affect fellow raiders, however the Soulbound Construct will have 50% reduced damage of all of its abilities from Incomplete Binding.
Before the Haunting Souls spawn from the blue portal, use Felblaze Charge from the raid’s position towards it. Then drop a Fel Prison in front of it. Cast Reverberating Blow on the Sargerei Dominator and the Soul of Socrethar between Dominator spawns. The Volatile Fel Orb should be used on the Sargerei Dominator and Shadowcallers. Keep freshing the Fel Prisons and Felblaze Residue to avoid taking damage from Haunting Souls. And deal melee damage to Socrethar whenever possible.
Tips
- Bloodlust/Heroism/Timewarp either at the start of Phase 1 with Socrethar in the Soulbound Construct or Phase 2 when Socrethar has 5 stacks of Shattered Defenses after Sargerei Dominator is killed.
- DPS Legendary ring should be use for each Sargerei Dominator spawn along with DPS CDs.
- Healer Legendary ring used during Apocalypse with healing CDs.
- Tank Legendary ring used during Soulbound Construct (phase 1) to split Reverberating Blow during high Shattered Defenses stacks. It is uncertain how the tank ring will work during phase 2 for the one inside the Construct.
- Assign groups for Shattered Defenses to rotate for each debuff application.
- Place Felblaze Residue along outer area during Felblaze Charge.
- Move out of stack when targeted with Volatile Fel Orbs.
- Dominators > Shadowcallers = Souls; Ranged should switch to Souls as they are locked in prisons.
- Assign interrupt rotation for Exert Dominance.
- Move out of stack when affected by Gift of the Man’ari.
Tyrant Velhari

Tyrant Velhari is a three-phase fight that will require high raid awareness and quick reactions. The next phase will be triggered when the boss reach 70% and 40% health. Velhari will use a Corrupt Power generating ability to gain 3 charges of Corrupt Power to spend them on a powerful spell that is different for each phase. However, there are three abilities she has that will remain the same: Edict of Condemnation, Touch of Harm, and Seal of Decay.
 She will choose a random player and summon a shadowy hammer from above (similar to Paladin’s Execution Sentence) with Edict of Condemnation. This will deal major Shadow damage split between all players within its radius every 3 seconds for 9 seconds.
She will cast Touch of Harm on a random player that will place a shell of Shadow magic around them. This shell will absorb major healing and will jump to another player if it is dispelled.
Velhari’s melee attacks have a chance to debuff her target with Seal of Decay. This is a stacking debuff that will reducing healing and absorbs by 10% for 18 seconds. Tanks will want to swap between 2-3 stacks.
Stage One: Oppression
 The boss will begin the fight with Aura of Oppression active. This is a cursed aura that causes players to suffer increasing Shadow damage when moving. This damage will increase by 10% for every 5 seconds of this phase. Use damage-reduction cooldowns during large amounts of movements at higher Oppression percentages.
 At 90% health, Velhari will call for an Ancient Enforcer to assist. It should be picked up by a tank and aimed away from the rest of the raid. This is because of its ability, Enforcer’s Onslaught that will summon a ball of Roaring Flames a few yards in front of the add. This fiery ball will move in whatever direction the Enforcer is facing. When it reaches the end of its path, Roaring Flames will return to the Enforcer’s original position.
 Any caught in the path of Roaring Flames will have heavy Fire damage dealt. Those hit with the ball will create a Searing Blaze patch at their location that will explode 3 seconds later with major Fire damage to those within 3 yards, knocking them in the air.

While Aura of Oppression is active, Velhari will slash out at a player with Annihilating Strike. This is her Corrupt Power generating ability that will deal heavy Fire damage to any standing in the cone area of effect. The targeted player should move to a clear space as Searing Blaze will appear under any who are hit.

Once she has stocked up 3 Corrupt Power, she will be able to use Infernal Tempest on the entire raid. Players will burst into flame periodically, burning themselves as well as any within 2 yard radius for moderate Fire damage. Those engulfed in Infernal Tempest will create a Searing Blaze at their feet.
Stage Two: Contempt
 Once Tyrant Velhari reaches 70% health, she will apply Aura of Contempt that will prevent players from being healed above 80% health that will decrease by 5% over time (75%, 70%, etc.). Absorption effects and damage reduction cooldowns are not affected by this Aura.
At 60% health, she’ll summon an Ancient Harbinger that will unleash a shadow mending. Harbinger’s Mending will heal Velhari instantly for 2% of her maximum health plus an additional HoT that heals 1% every 3 seconds for 9 seconds. This cast is interruptible, but in Heroic and Mythic difficulty the Harbinger will have Impatient Mind that will increase cast speed by 10% per stack.
 To gain Corrupt Power, the boss will crush a player with Tainted Shadows. This dark magic will inflict moderate Shadow damage and will radiate additional Shadow damage to players within 5 yards with Corrupted Blast.
At the cost of 3 Corrupt Power, Velhari will curse random players with Font of Corruption. This causes casts of Tainted Shadows to hit those afflicted by the curse as well. However, it provides immunity to Corrupted Blast.
Stage Three: Malice
 At 40% health, Velhari will switch to Aura of Malice to the entire raid. This Aura increases 20% damage each player deals, but also increase damage taken by 10%. This effect increases by 10% over time.
Tyrant Velhari will call forth an Ancient Sovereign at 30% health. This add will cast Sovereign’s Ward that reduces damage taken by 90% for 20 seconds. This effect will be removed once the Sovereign dies.

This phase is particularly dangerous for tanks since the boss will inflict Bulwark of the Tyrant on her current target only. This will deal moderate Shadow damage to the tank and additional random players while gaining Corrupt Power. Those hit with the Bulwark will have Despoiled Ground form at their feet that will inflict additional minor Shadow damage every second for those caught in it that will remain until the encounter is finished.
 Velhari will fling her Gavel of the Tyrant at the raid once she has 3 Corrupt Power. This will deal moderate Fire damage to all and knocks them away. The entire raid will also have additional Fire damage tick every 2 seconds for 8 seconds.
Tips
- Bloodlust/Heroism/Time Warp should be used during Malice phase to quickly kill Ancient Sovereign.
- DPS Legendary ring should be used at the start of the fight, then for Harbinger and Sovereign spawns.
- Healer Legendary ring should be used during Edict of Condemnation.
- Tank Legendary ring should be used to mitigate damage from Infernal Tempest, Tainted Shadows, and Bulwark of the Tyrant.
- Assign a location in melee range Edict of Condemnation to split damage and use healing CDs during it.
- During Oppression phase, ignore the Ancient Enforcer. Try to push Velhari to Contempt phase before approx 2 mins into the fight.
- Players should spread out roughly 3-4 yards apart for Infernal Tempest.
- Players can allow up to 2 Searing Blazes spawn on top of each other before moving out of them.
- During Contempt phase, interrupt Harbinger healers while focusing on killing it quickly.
- Designate an area for players affected by Font of Corruption for AoE healing that is 5 yards away from Edict of Condemnation.
- During Malice phase, burn the Sovereign add as quickly as possible to remove the protective buff.
- Malice is a burn phase that will require maximizing raid area, group in one section of the room and gradually move with each Despoiled Ground effect.
Halls of Blood | Halls of Blood | Destructor’s Rise | The Black Gate


Published: Jun 30, 2015 05:13 pm