Aliens: Fireteam Elite throws you into the fray without much basic training. Sure, point guns at things and shoot is the core of the game, but there are some tips and tricks that may make your time in the game’s 12-mission campaign and horde mode easier.
This guide goes over a few things I wish I’d known or paid more attention to at the beginning of Aliens: Fireteam Elite. Of course, avoid the acid.
Experiment with Classes and Loadout Kits Early
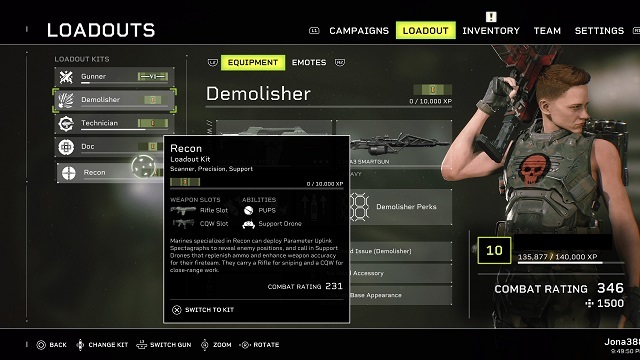
There are five classes in Fireteam Elite: Gunner, Demolisher, Technician, Doc, and Recon. Each Loadout Kit, as they’re called, has its own set of experience levels that increase the more you use them and unlock class-specific Core Perks and Modifiers.
But using any kit increases your overall player level, which adds a bit to your Combat Rating. So even if you’re experimenting with a new class, you’re progressing your character level and ability to take on tougher missions.
If you’re playing solo, the Gunner and Demolisher are by far the best classes to start with.
The Gunner‘s Overclock ability “increases fire rate for you and nearby allies,” as well as your reload speed, making it the perfect ability to take down armored enemies like Warriors. The Frage Grenade is great for taking out swarming groups. You can’t go wrong with the shotgun, either.
The Demolisher‘s Micro Rockets ability “launches three rockets that detonate on impact, creating a large shockwave that damages and stumbles your foes,” another great choice for crowd control. Blastwave “unleashes a concussion blast around you, damaging enemies and knocking them back,” which is great for when swarms overwhelm you. Lastly, the L56A3 Smartgun tracks enemies, acting as an auto-aim.
Oh, and don’t underestimate the power of pistols, because the Technician isn’t far behind with their Sentry Turret.
Understand Combat Rating
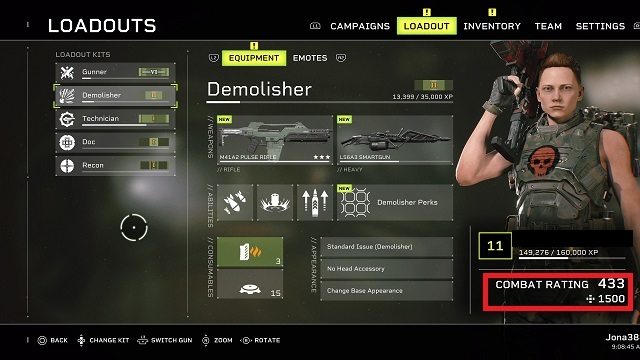
Combat Rating is an indication of how powerful your character is. It’s mostly tied to weapon attachments, perks, and modifiers. Each campaign section and difficulty has a recommended Combat Rating level, with the later campaign levels and higher difficulties requiring, of course, higher Combat Ratings.
You can see each recommended Combat Rating in yellow text to the right of the objective text for each level, and you can see your current combat rating in the bottom right corner of the Loadout screen.
All attachments have a 20 Combat Rating; the only real difference in attachments is their modifiers. Perks and Modifiers have Combat Ratings between 10 and 20.
At the end of the campaign, you’ll easily have a Combat Rating over 500 if you focus on a single class, and you’ll be able to move leveled weapons between classes to level other Loadout Kits quickly.
Use Challenge Cards
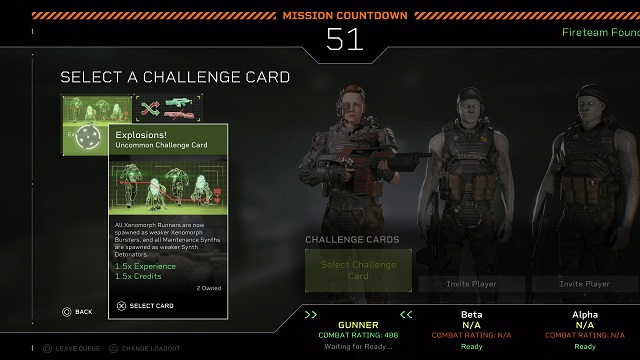
Challenge Cards add specific modifiers to campaign missions (they can’t be used in Horde Mode). You can enable/disable them after choosing a mission by clicking the box to the right of the difficulty selection box. You can then choose a Card after joining the queue by choosing the green “Select Challenge Card” box underneath your character.
Challenge Cards either boost XP or currency, though some can provide a random bonus reward. They come in three rarities — Uncommon (green), Rare (blue), and Exotic (purple) — and can be obtained from hidden caches or in packs of three from the Armory’s “Special Stock” section for 150 Rep Scrip.
You have a limited number of Challenge Cards at any given time, and you can see how many you have by highlighting the cards and looking in the bottom right corner of the card. They’re used up whether you complete a mission or fail; that includes if you die or get disconnected.
Take Advantage of Tactical Opportunities
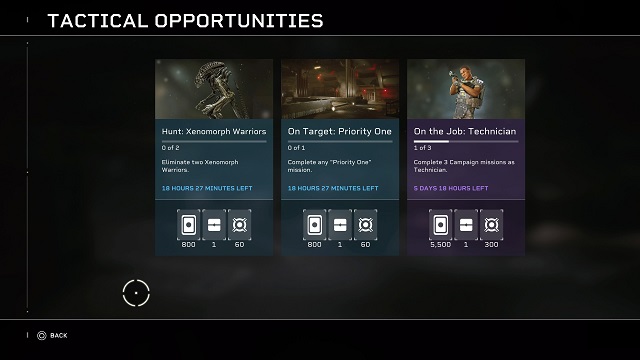
You’ll get XP, Requisition Credits, and Rep Scrip for completing missions, but you can supplement that with Tactical Opportunities. While these daily and weekly challenges don’t give you XP, they do give you RC and RS, alongside an Opportunities Pack, which typically includes a Challenge Card.
Most of these challenges task you with killing a certain number of enemies or completing campaign missions as a certain class. You can find them in the Campaigns menu by clicking the blue “Tactical Opportunities” banner in the bottom left corner.
Understand How Perks and Modifiers Work
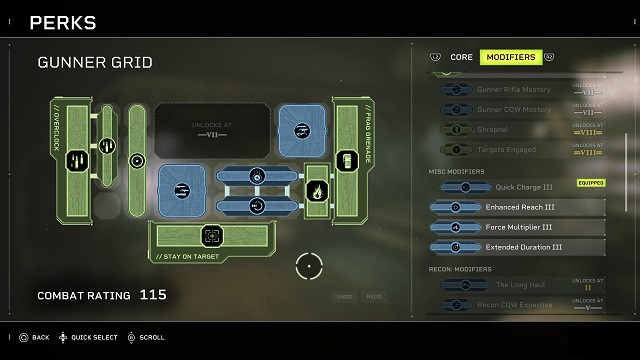
There are two types of Perks and Modifiers: class-specific and general. Class-specific are green, while general/universal are blue. You can access your Loadout Kit’s Perks by clicking the box underneath your CQW (secondary) weapon slot in the Loadout screen.
Your skill tree grid is broken up into octagonal nodes. Certain sections are locked behind Loadout Kit levels, which you increase by using the Loadout Kit; each locked section tells you at which level it unlocks.
Each Perk and Modifier takes up a certain number of nodes either in a square or in a line. Some Perks and Modifiers can only be attached to certain abilities, denoted by white lines extending from the ability when you choose the Perk or Modifier.
Further, and perhaps most importantly, some Perks and Modifiers unlocked in one class can be used for other classes, even though they have a Loadout Kit name attached to them. For example, the Demolisher’s Rifle Training Core Perk can be used for any class, while the Gunner’s CQW Mastery Modifier can be used universally as well.
Watch for Sneak Attacks (and Listen for Clues)
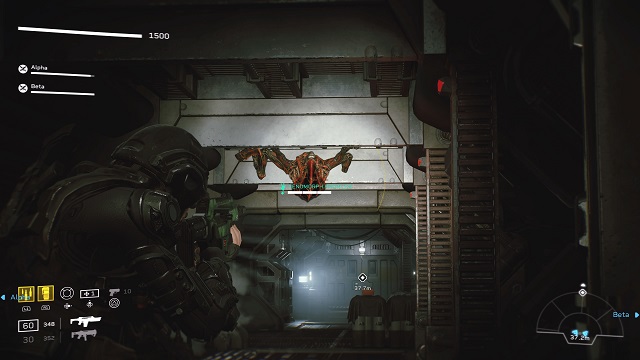
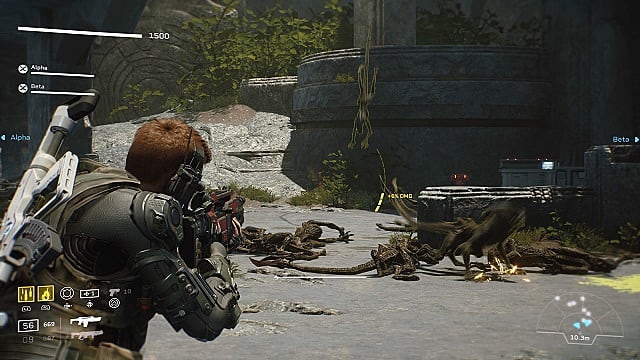
Almost every level in Aliens: Fireteam Elite has an enemy called a Prowler. It lies in wait around corners and on ceilings, pouncing on you for a grapple attack if you’re not careful. They don’t show up on the scanner before they attack, either. Sometimes you can see them waiting, other times you can’t. On higher difficulties, a grapple attack can one-shot you.
This is one of those tips and tricks that took me a while to find out, but if you listen carefully, though, your character will sometimes warn you that a Prowler is nearby. Listen for “You hear that?”, “Ones nearby,” “Prowler,” and “Ambush.”
In bigger swarm attacks, Warriors will pop in and out of the fray to attack you at random, but things are often so frenetic I’ve not been able to hear any auditory warnings or cues, though there may be.
Don’t Pause the Game or Idle If You Don’t Have to
Aliens: Fireteam Elite doesn’t pause the action when you pull up the menu during gameplay. This is especially important if you’re playing solo with AI bots because even if you’ve cleared a room, the game constantly spawns ads to push you forward, and the AI won’t kill them if you don’t shoot first.
It also sucks for your teammates if you’re AFK.
Difficulty Settings are Campaign Wide
Each campaign mission allows you to change the difficulty setting before you launch it. While it may seem the difficulty is tied to a single mission, difficulty is actually tied to the entire campaign.
Since difficulty increases the recommended Combat Rating for each mission, make sure to check the difficulty setting for each mission before you begin it if you’re having trouble, especially if you’ve changed it previously.
Special Ammo is Tied to Equipped Weapons
As you play, you’ll get special ammo consumables that either confer fire or electric damage to your bullets. It’s important to know that these consumables are tied to the weapon you have equipped when you select them from your consumable window.
Each special ammo consumable “reloads 25% of your current weapon’s ammunition.” You cannot switch back to normal ammo until you’ve used all of the special ammo.
Roll or Switch Weapons to Cancel Reloading
Sometimes you might reload a partial magazine right when a Xeno is charging you or enemies pour out of a side room. Rolling and switching weapons cancels your reload animation, giving you the chance to either evade or kill/damage what’s coming at you.
This is a good tactic for weapons like shotguns, which reload one bullet at a time.
Each Weapon Has Its Own Perks
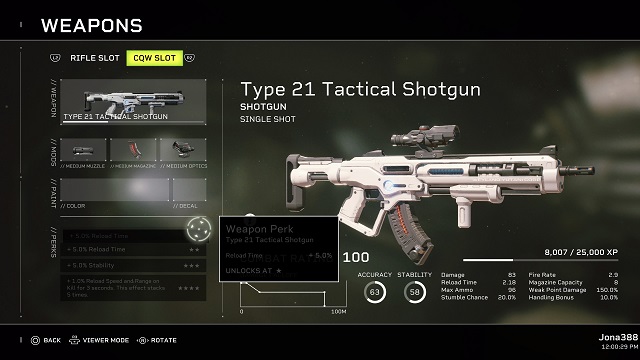
Each weapon has four perks you can unlock by using it in battle. The ranking system ranges from 1-4 stars, and every weapon starts with no stars. Whether you complete the mission or die, you gain weapon XP for each rank at the end of each mission.
These perks range from decreased reload time to increased stability. Many of the 4-star-level perks confer a stacking buff, such as the M41A2’s buff that increases stability accuracy by 0.5% on hit, which stacks 10 times and resets when you reload.
You’ll also get two trophies/achievements for leveling weapons:
- A Personal Friend of Mine: Level a weapon to four stars
- All My Personal Friends: Level 30 weapons to four stars
If you’re going after these trophies/achievements, it’s best to focus on two guns at a time and then switch.
You can see any gun’s perks by selecting the weapon in your Inventory (or Loadout screen) and looking in the bottom left corner. A gun’s current XP and Rank can be found underneath the image of the gun in either menu.
Save Aid Kits to Heal at Low Health
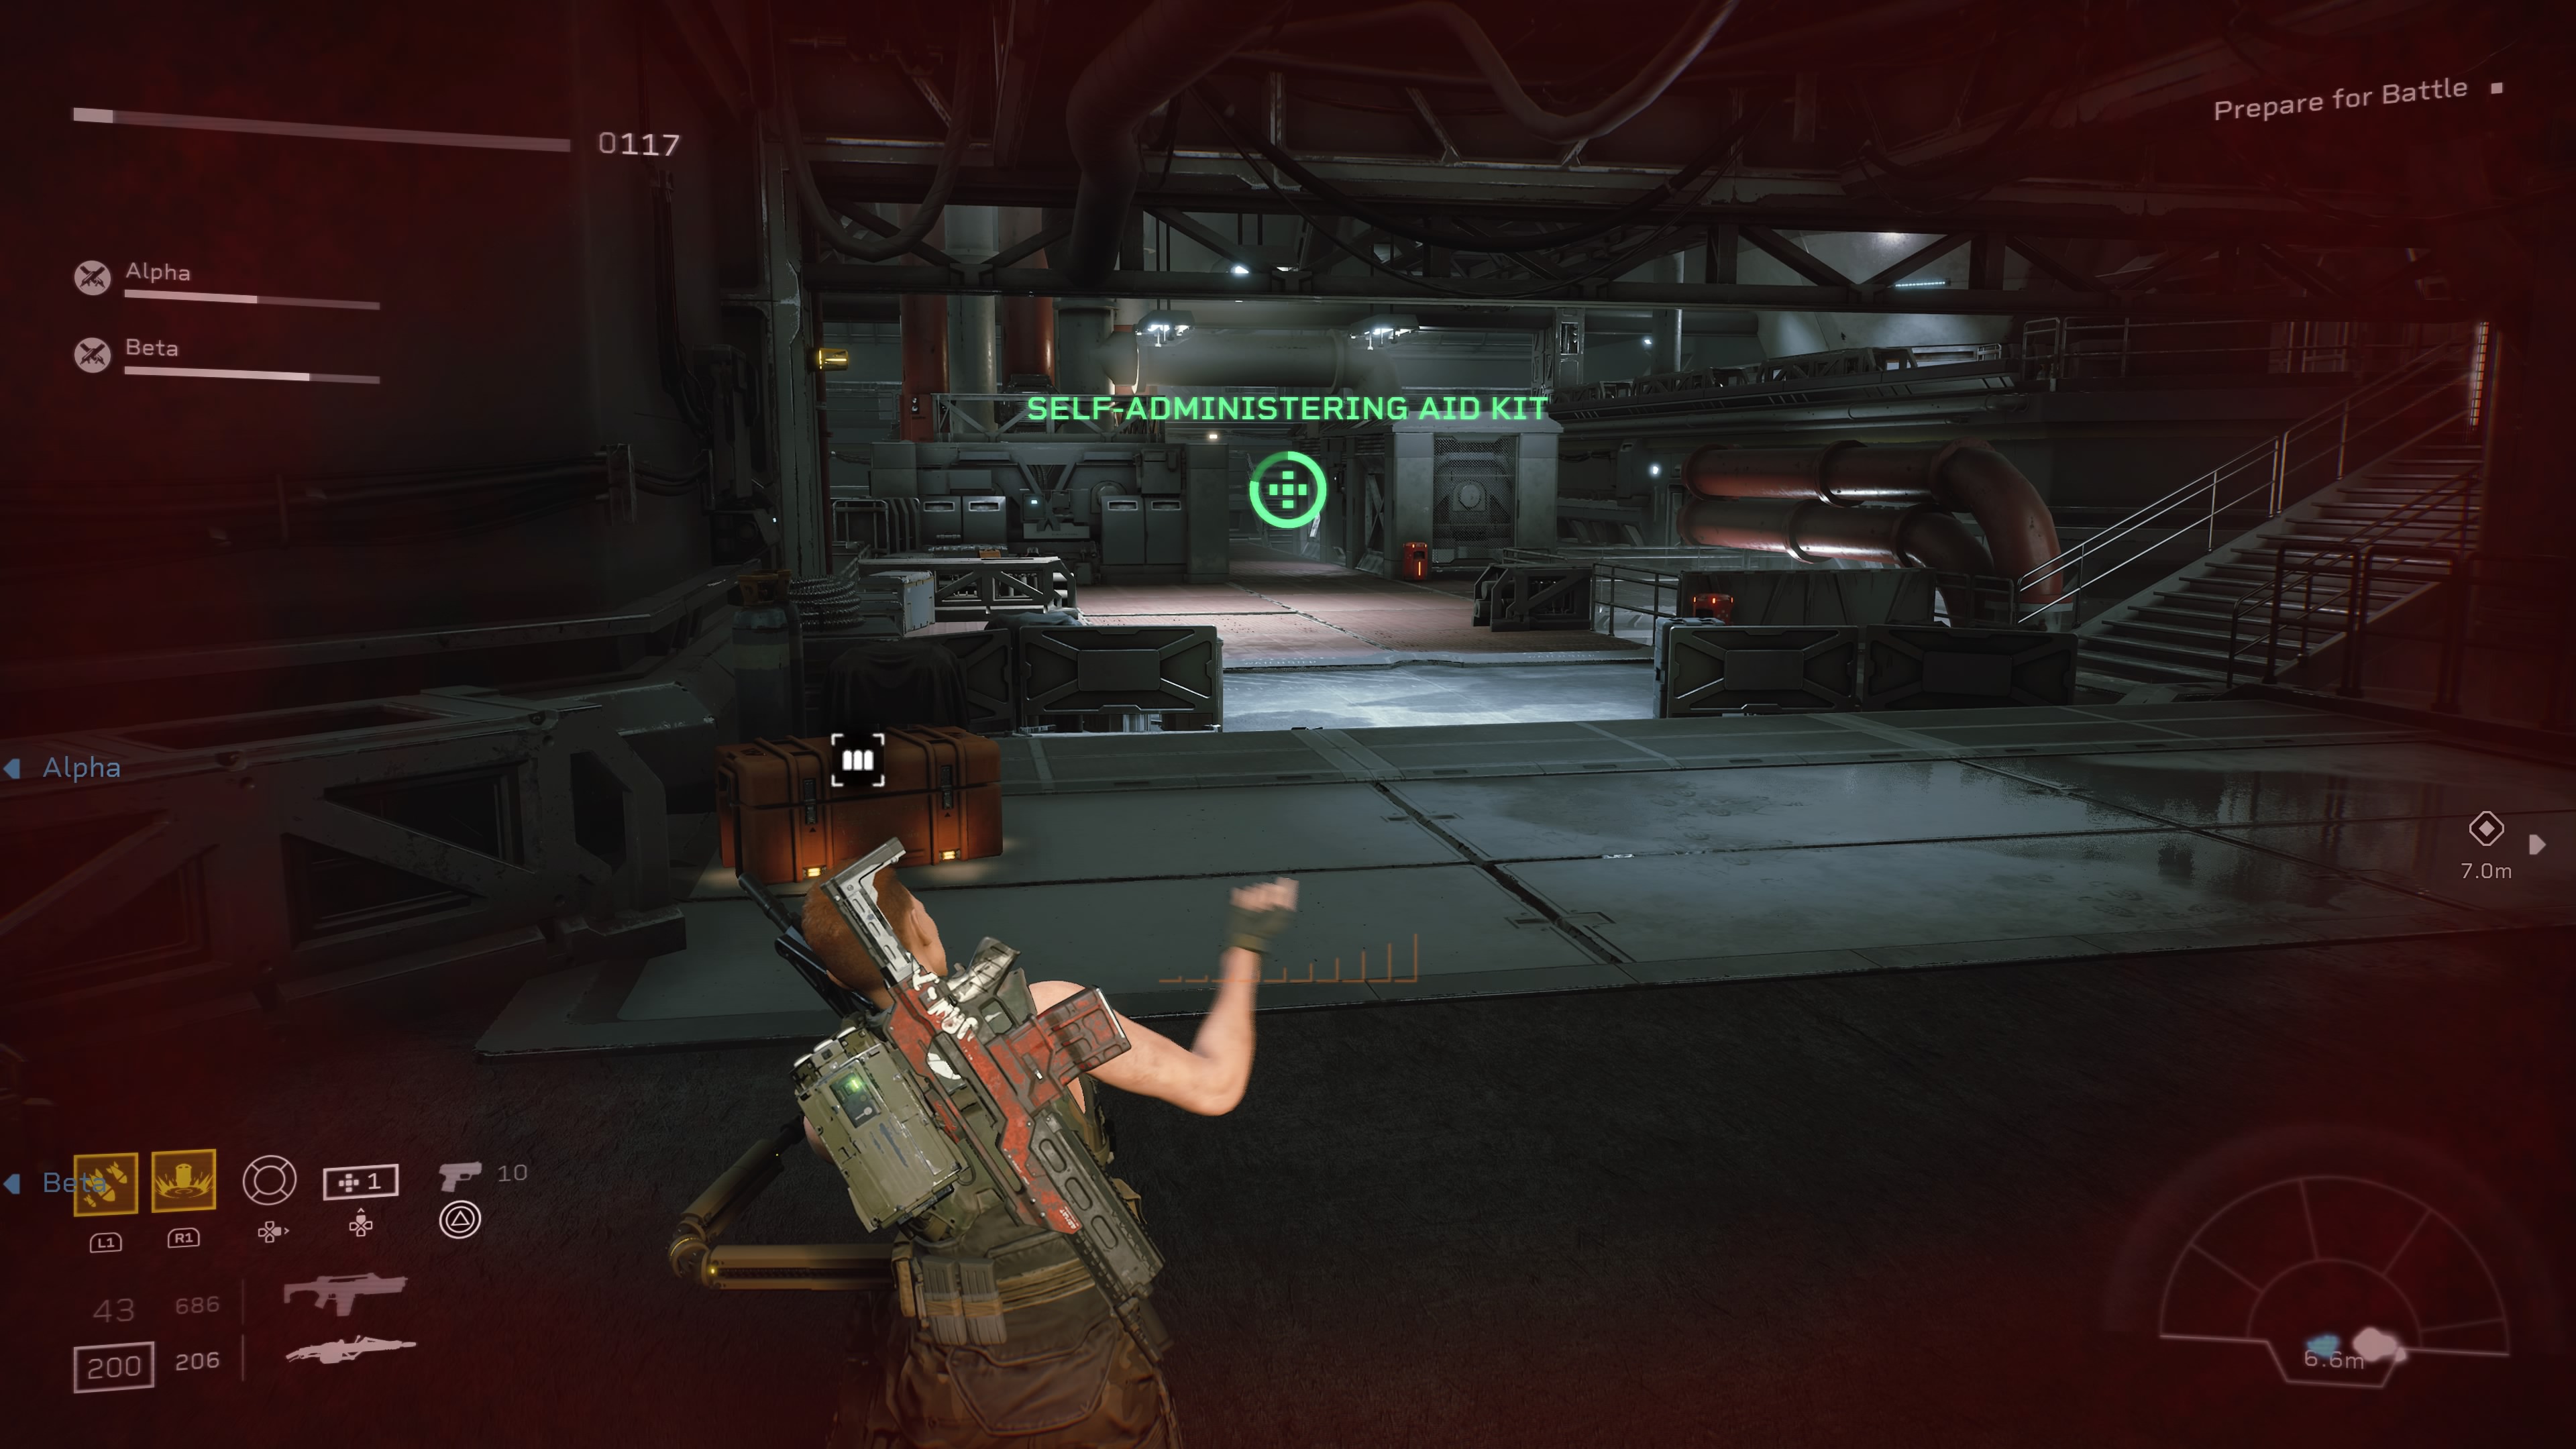
Your character has 1,500 hit points no matter which Load Kit you choose; the number is tied to your overall character level.
In both the campaign and Horde Mode, you begin with 1 Aid Kit. Each large encounter area (where it says “Prepare for Battle”) will have 1 Aid Kit to pick up during campaign missions, usually next to the ammo crate. In Horde Mode, Aid Kits can be found on the ground or dropped by enemies.
Each Aid Kit restores roughly 1,250 HP (it’s sometimes 1,251 for some reason). Even though it’s dangerous, you should ideally wait until your health is around 250 before using an Aid Kit to maximize its use. Of course, if you’ve lost some health and can pick up another Aid Kit, go ahead and heal.
For what it’s worth, revives give you 750 HP.
Spam Turrets (Sentry Guns)
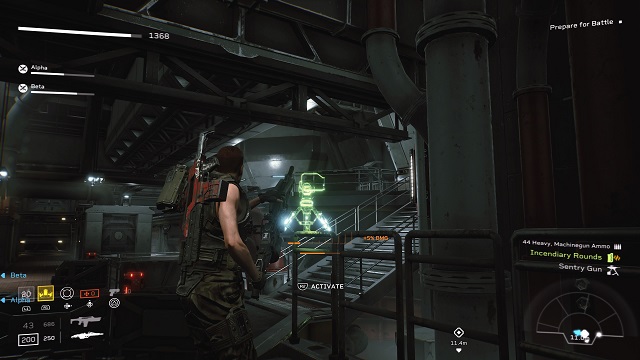
Turrets are great for creating kill zones — especially when playing solo with bots — and should be used in every major encounter. If you can save three or even more until the final encounter of each level, you’ll have much smoother sailing.
Some fire generic bullets, while others shoot incendiary or electrified rounds. They also come in two rarities: normal and hardened. Both explode in an AoE when they run out of bullets, though the hardened variety has armor.
Sentry Guns can be placed up high on railing or crates to give them protection against melee attacks, too, so take advantage of elevation whenever possible.
Turrets can be picked up from the regular (beige) caches found near ammo resupply crates and hidden (red) caches in any mission. They can also be purchased from the Armory through the Requisition Store for 200 Requisition Credits (regular Sentry Gun) and 400 Requisition Credits (Hardened Electroshock/Incendiary Sentry Gun).
The Technician Class/Loadout Kit also starts with the Sentry Turret ability.
Hopefully, the tips and tricks in this guide will help you survive longer and level up faster. Do you have any tips that weren’t covered here? Let us know in the comments below!


Published: Aug 24, 2021 12:28 pm