Sick of getting scored on? Tired of having the puck stolen from you when you try to deke? Sounds like you need a little bit of help getting started with EA Sports’ NHL 18.
This fast-paced hockey experience can be a little difficult to get a feel for when you’re just starting out, so we’ve collected some tips and tricks for NHL 18 beginners that are sure to increase your chances of having a better season on the ice.
Faceoff Techniques in NHL 18
A faceoff occurs at the start of a period or after a player makes a goal. These are crucial moments in NHL 18 as it determines who has the puck. There are four main ways to get the puck in a faceoff.
Faceoff Draw
This is the most straightforward faceoff technique in NHL 18. All you have to do is press down on the right stick when the referee drops the puck. You can choose which one of your teammates gets the puck by pressing either down left or down right on the left stick.
Be careful of pressing forward with the left stick, though, as that is a different technique entirely — and if you do it too early, you’re handing the faceoff to your opponent.
Faceoff Grip
If you want more power in for your faceoff, you can change your grip by pressing left on the right stick for a forehand grip or right on the right stick for a backhand one. Hold the stick in that position until the puck is dropped, then you press down on the right stick to pass the puck.
Faceoff Tie Up
This is the perfect way to annoy your opponent at the start of the game in NHL 18. By pressing up on the left stick when the ref drops the puck, you’ll get in a tie-up with your opponent, denying both you and your opponent the puck. This gives your teammate a chance to come in and take control of the puck instead. This is a great counter to an opponent using a backhand grip.
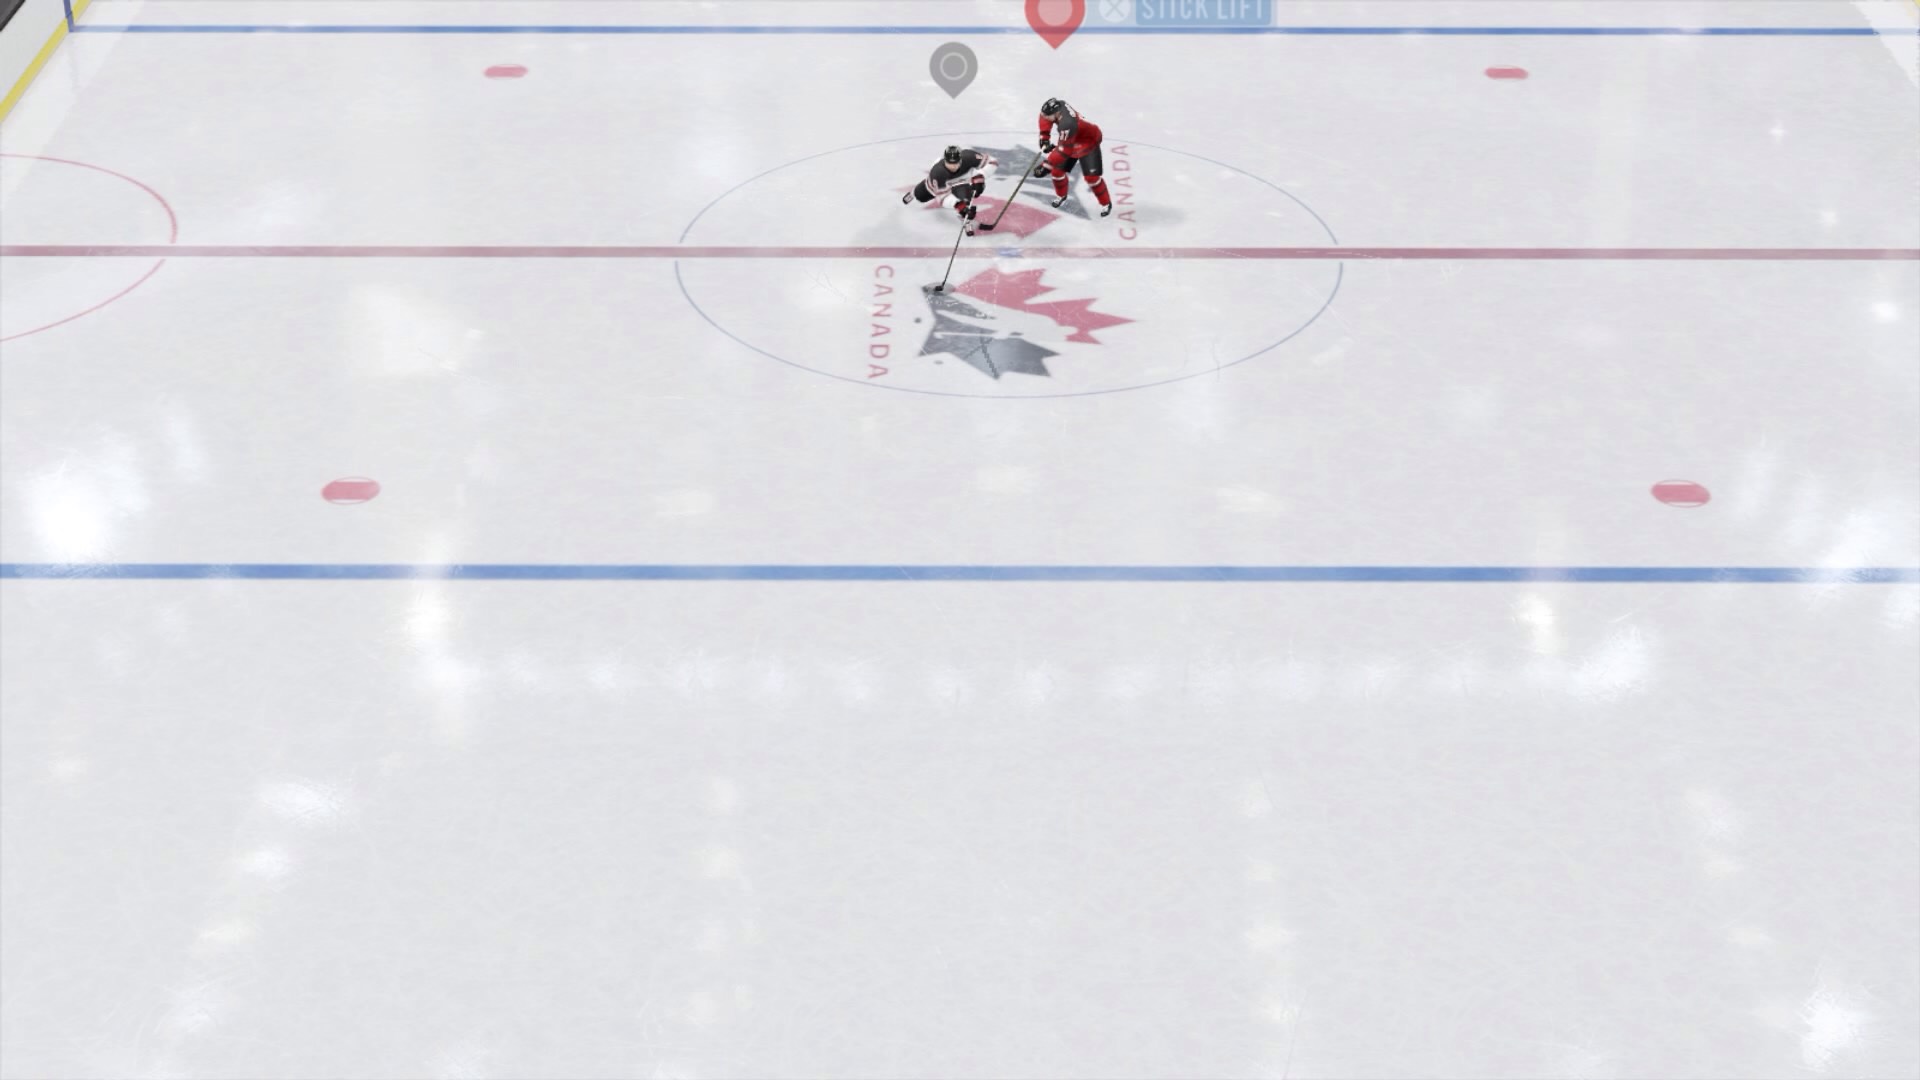
Faceoff Stick Lift
Choose a grip by going to either side on the right stick then press up on the right stick when the referee drops the puck. This will cause your player to lift the opponent’s stick, turn around, and pass the puck to a teammate.
Shooting the Puck
If you press up on the right stick when the referee drops the puck, this will shoot the puck into the opposing team’s zone. This isn’t the best faceoff strategy in NHL 18 — but if you have a fast team or are playing with human teammates who are expecting this, your team can try to skate as fast as they can to recover the puck and already be positioned close to the goalie.

Offensive Tips for NHL 18
Whether you got control of the puck from the first faceoff or managed to swipe it from the other team when they had it, these offensive tips and tricks will make sure all your NHL 18 seasons go swimmingly! (Or more accurately, skating-ly.)
Shooting
The main goal in hockey is to score goals (pun intended). You obviously can’t win a game if you don’t score more than your opponent’s team. That’s why knowing the kind of shots you can make in NHL 18 is so important to having a successful playthrough. If you know how and when to make the right shots, you’ll have more accuracy and score more goals.
Shooting: To shoot a no-frills shot, all you have to do is press up on the right stick. This is a good shot to make when you’re pressured and want to get rid of the puck quickly or are in a position where the goalie has left the net wide open for you.
Wrist Shots: This is one of the two main special shots you’ll be using in NHL 18. A wrist shot is more powerful and accurate than a normal shot. It’s also more accurate, but less powerful, than a slap shot. It’s faster than a slap shot and great for when you are close to the net.
To perform a wrist shot, you press the right stick to the left or right (depending on which side your player uses their stick) to get in position, then slide to up to shoot it.
Slap Shots: The other of the two main special shots you’ll use in NHL 18. The slap shot is sort of the opposite of the wrist shot — it is more powerful, but less accurate. and it’s something you should use when you’re further away from the net. These are especially effective when you’re in the breakaway (with no defenders between you and the opposing goalie). It is less effective when defenders are near the net, because it has a long wind-up time, it’s more obvious where you’re aiming to shoot, and it’s less accurate — meaning there’s a chance of a turnover if the opposing team’s players recover the puck before one of your own can.
To perform a slap shot, press down on the right stick to wind-up then press up to shoot. Be careful winding up because, when in motion, it’s easy to lose control of the puck if you’re not careful.
Rebound Shots: This isn’t a special kind of shot in NHL 18, but it’s a setup. When your currently selected player is on one side of the goalie and another player is on the opposite side, you can try to shoot low to see if the goalie will block the puck, causing it to rebound towards your teammate. If timed right, the goalie will leave the net wide open for your other player to gain possession of the puck and wrist shot it into the net.
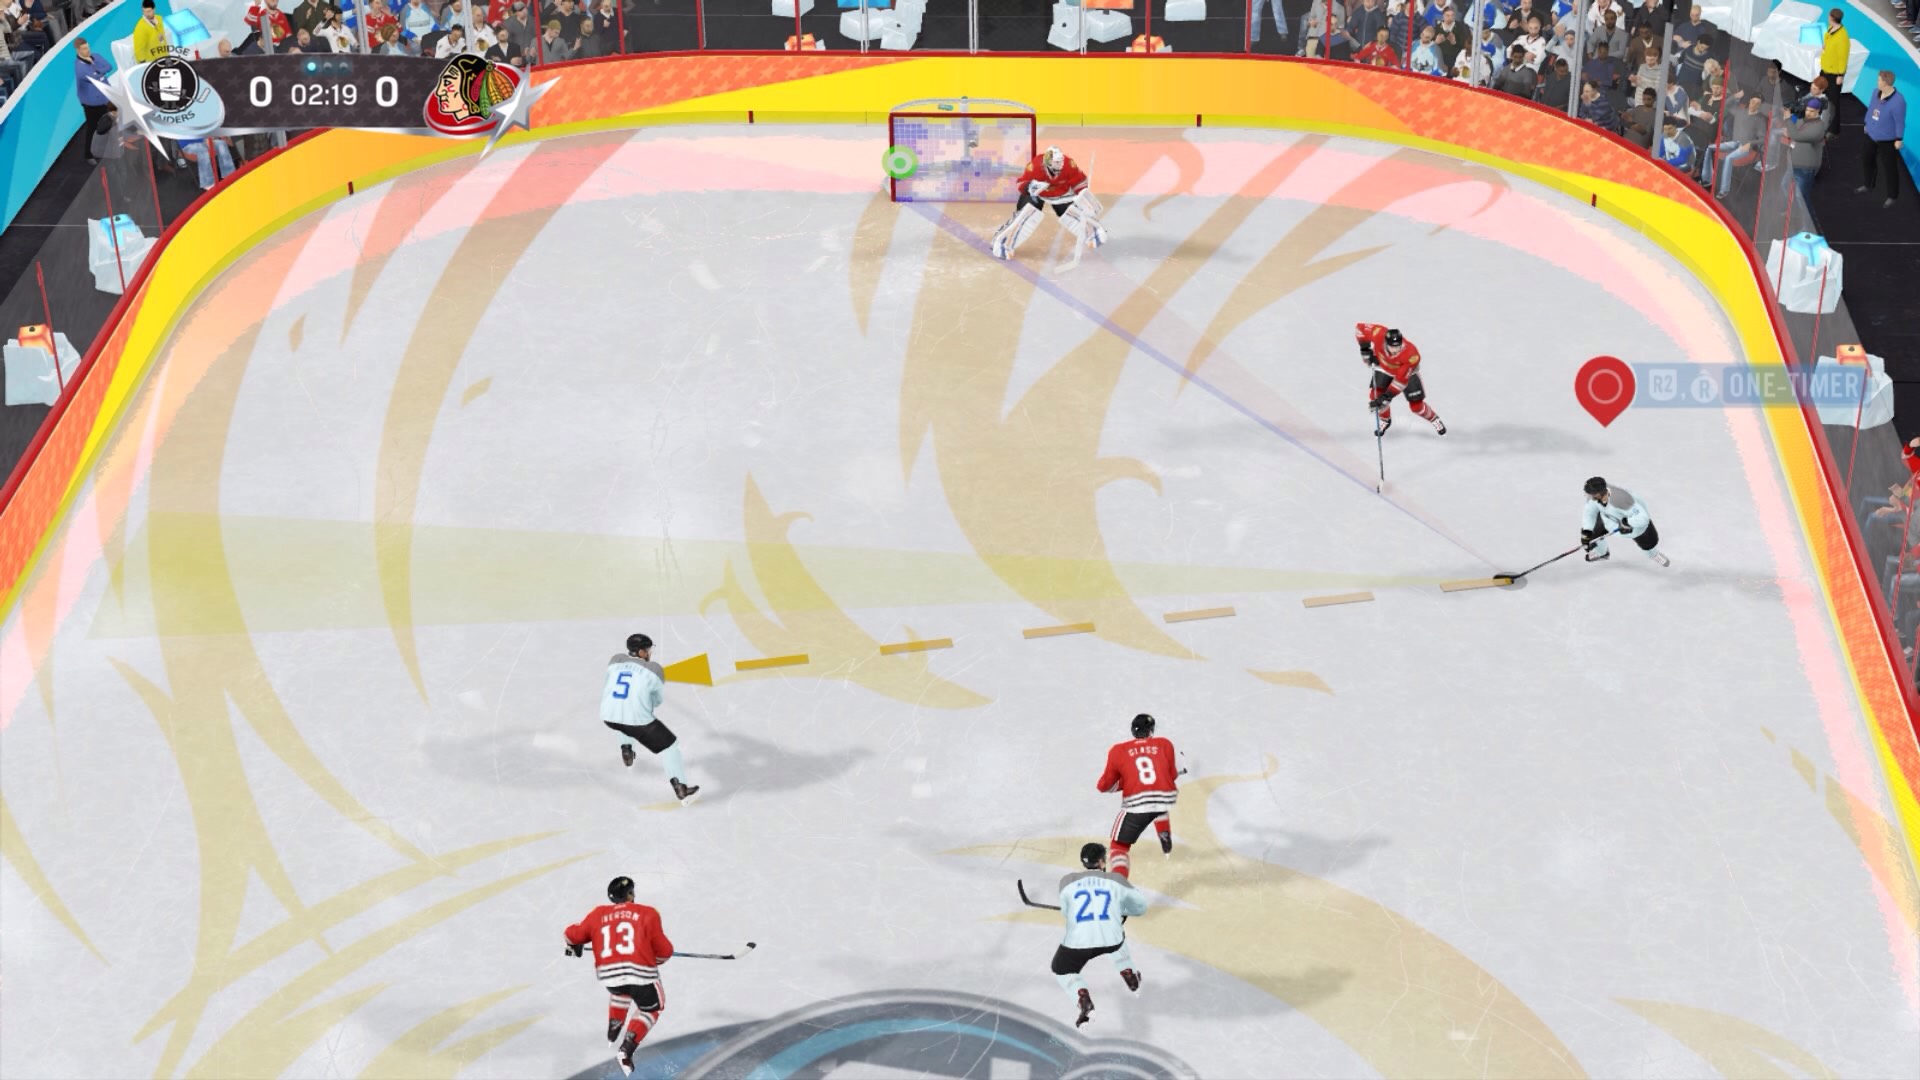
One-Timers: In real hockey and in NHL 18, a one-timer is when you pass the puck to another player on your team and they slap shot it immediately without moving with the puck. These are incredibly useful when a you’re on either side of the goalie, like each player being in one of the face-off circles near the net. If the goalie is focused on where the puck currently is, you can pass it off to your teammate to shoot a one-timer to score a goal. It is dangerous to use this when defenders are covering both players.
To perform a one-timer, pass your teammate the puck using R2 then hold up on the right stick to immediately shoot the puck upon getting control of it.
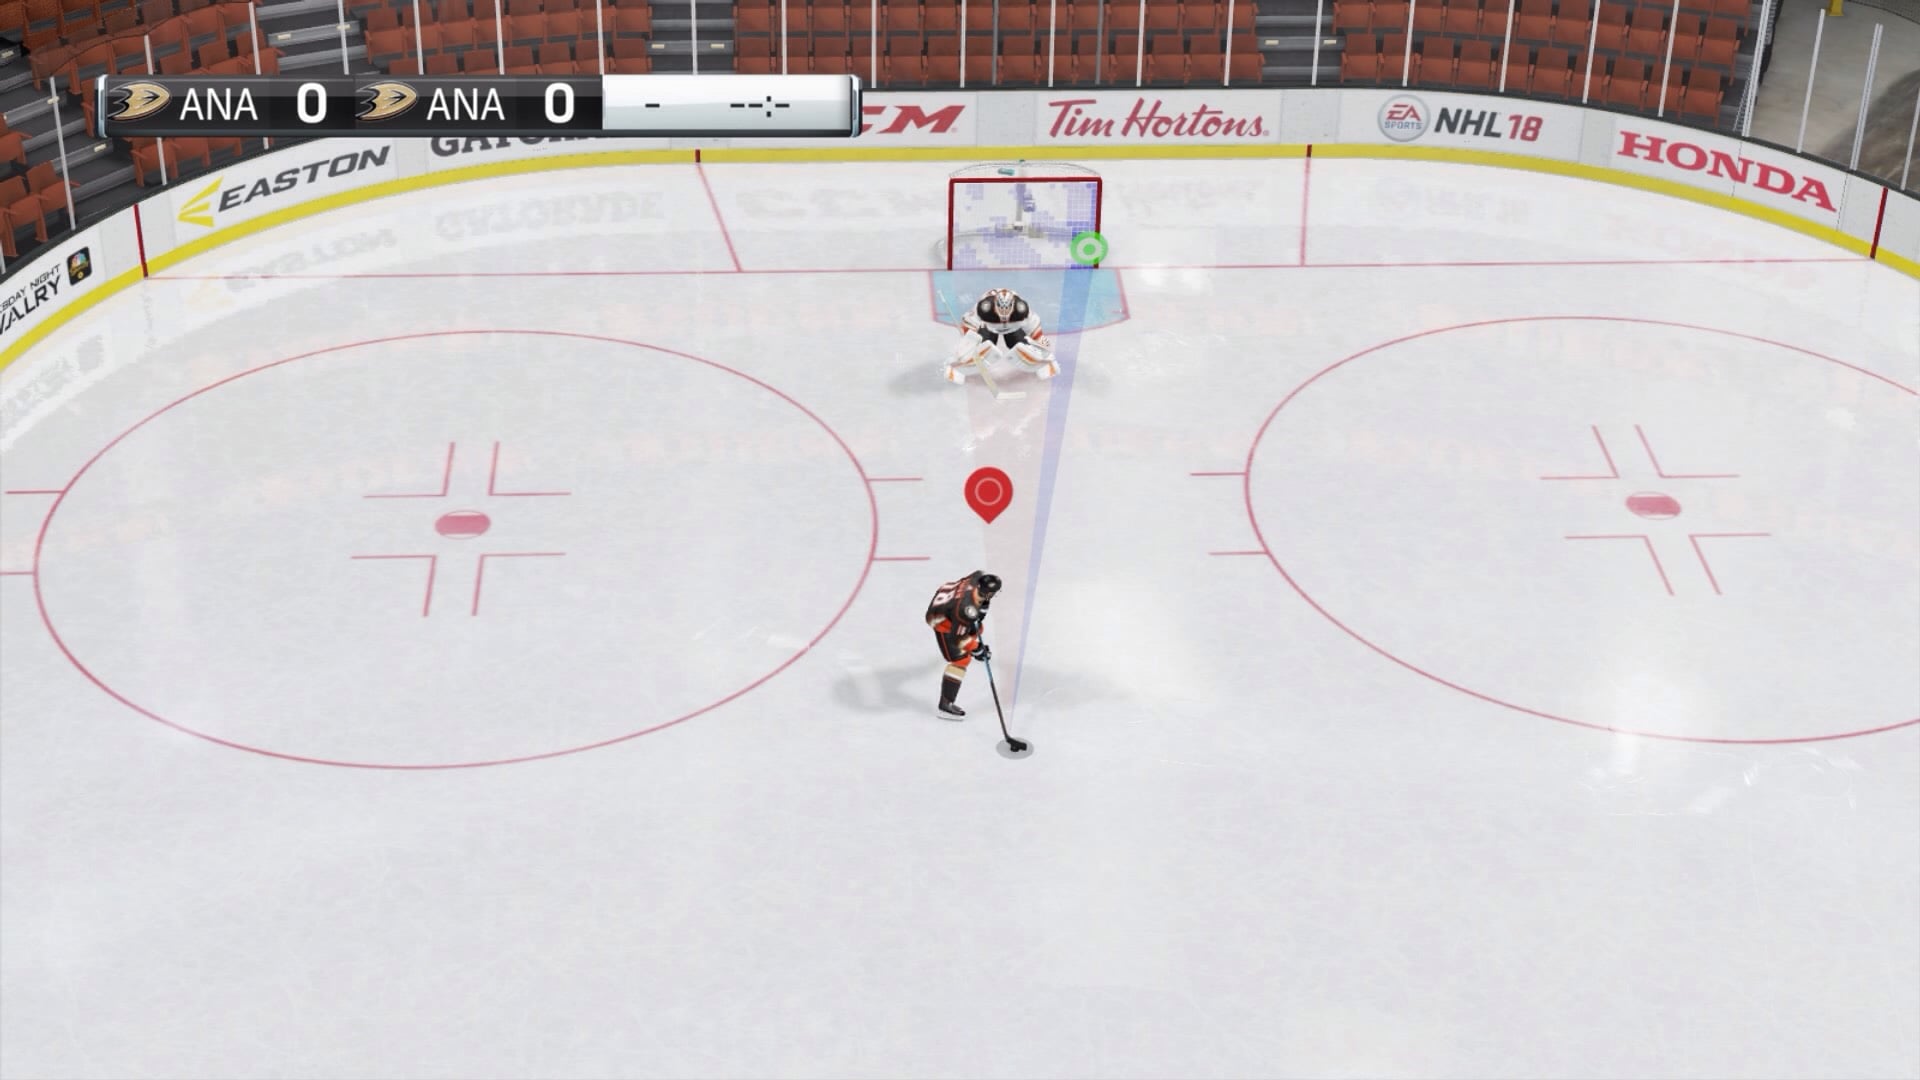
Aiming: When performing a slap shot or a wrist shot in NHL 18, you can use the left stick to aim the puck. The area covered in red is an area the goalie has covered, and the blue area is open. You will also see a target to show you generally where your puck will go. If it’s red, that means there’s practically no chance you’ll make it. If it’s blue, there’s a chance. If it’s green, that shot is clean and you’re most likely to make it.
You’ll have an easier time aiming if you’re slowed down or stopped, but you’ll also be more likely to have the puck taken away from you. Learning how to aim well will take practice.
Passing
Hockey is a team sport — whether in an actual ice rink or a virtual one. You can’t win a game with just a center; you need the rest of your teammates to help you out. Even if your custom NHL 18 player has the best stats, you’ll still need to pass the puck from time to time to get past the opposing team’s defenses and trick the goalie so you can score a goal.
Passing: One of the main two types of passes in NHL 18 is just a regular ol’ pass. You can perform one by pressing (or holding for more power) R2. There will be a yellow arrow to show you where the puck will go, and a blue arrow that shows you where a good pass would be for an open teammate.
Saucer Passing: If your opposing team is all up on the puck while you have it, you can try out one of the other two main passes — a saucer pass. You pass the puck to your teammate while knocking it up in the air. You do this with R1 instead of R2. It is perfect for when you need to give the puck to a teammate, but you don’t want your opponent to intercept your pass.
Bank Pass: This isn’t a unique kind of pass in NHL 18, but instead is a regular pass that bounces off the wall before going to a teammate. Similar to the saucer pass, this is great for when your opponent’s defense is on you. You can easily avoid a turnover by doing this. Just be careful, as you’ll have to anticipate where your teammate is headed while simultaneously bouncing the puck off the wall.
Puck Control and Deking
Maintaining control of the puck is just as important in NHL 18 as it is in real hockey. This is probably one of the hardest parts of the game, but have no fear — we have tons of tips and tricks for you to improve your deke skills. (Fun fact: Deke is Canadian short-hand for decoy. The more you know, eh?)
Stick Handling: The most basic form of deking in the game. When the puck is in your possession, you can control which side of your body it’s on by pressing left or right on the right stick. This is a great defensive tactic when you’re being pressured by defenders, as well as when you want to confuse the goalie.
Toe Drag: If you’re covered by an opponent in front of you and want to switch sides without risking them lifting your stick, you can press the side you want to go to on the left stick while pressing the opposite side on the right stick, then rolling it under to the opposite side (e.g.: right on the left stick, left on the right stick then roll it from the bottom left to the right side on the right stick). This brings the stick in closer to you momentarily as you switch sides so your opponent can’t easily control your stick and steal the puck.
Loose Puck: This NHL 18 deke involves letting your puck out of your control for a brief moment to fake out your opponent. This allows you to move the puck under their legs while you get behind them or to move it under their stick as you move to their side. You tap L1 to “loosen” the puck and you aim it by holding the left stick in the direction you want to go.
This is a bit tricky when there’s multiple defenders around so it’s most useful when you’re being covered one to one. Be careful of using this during a power play.
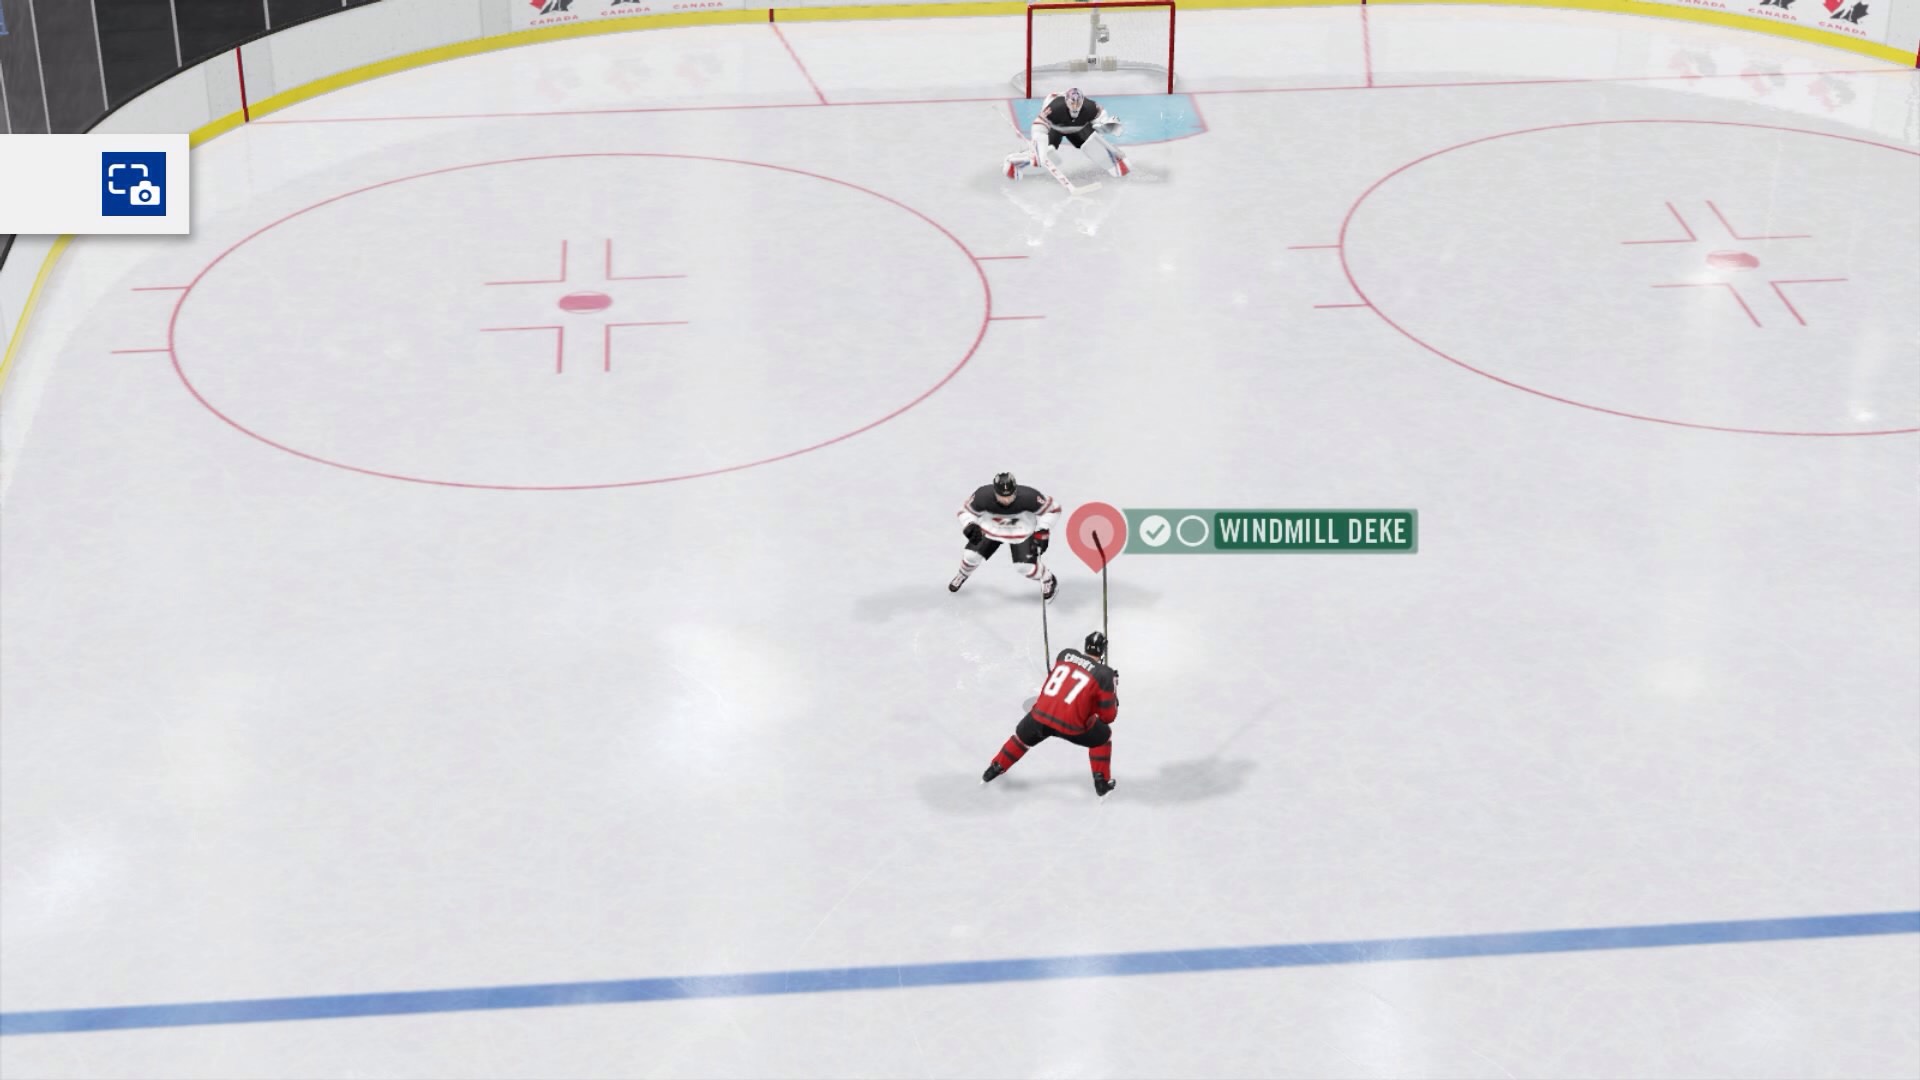
Windmill: This is probably my favorite deke in NHL 18. You perform it by pressing L1 to let your puck go loose while simultaneously pressing left or right on the right stick to lift your stick up in a windmill motion to go over your opponent’s stick. Like the toe drag, this is great for switching sides when being pressured.
Between the Legs: This is one of the more difficult NHL 18 dekes to perform, so this will take practice. It’s also very effective. You roll the right stick to your forearm side (most likely to the left) then down and in that direction (bottom left). While doing that, you press and hold L1 to initiate a loose puck deke, then press the direction you want to the puck to go in (likely to the right) on the right stick. This will cause your player to pull the stick back then pass the puck between their legs to trick the opponent.
This is great if your opponent is catching wise to your stick-handling dekes and you want to keep them on your toes.
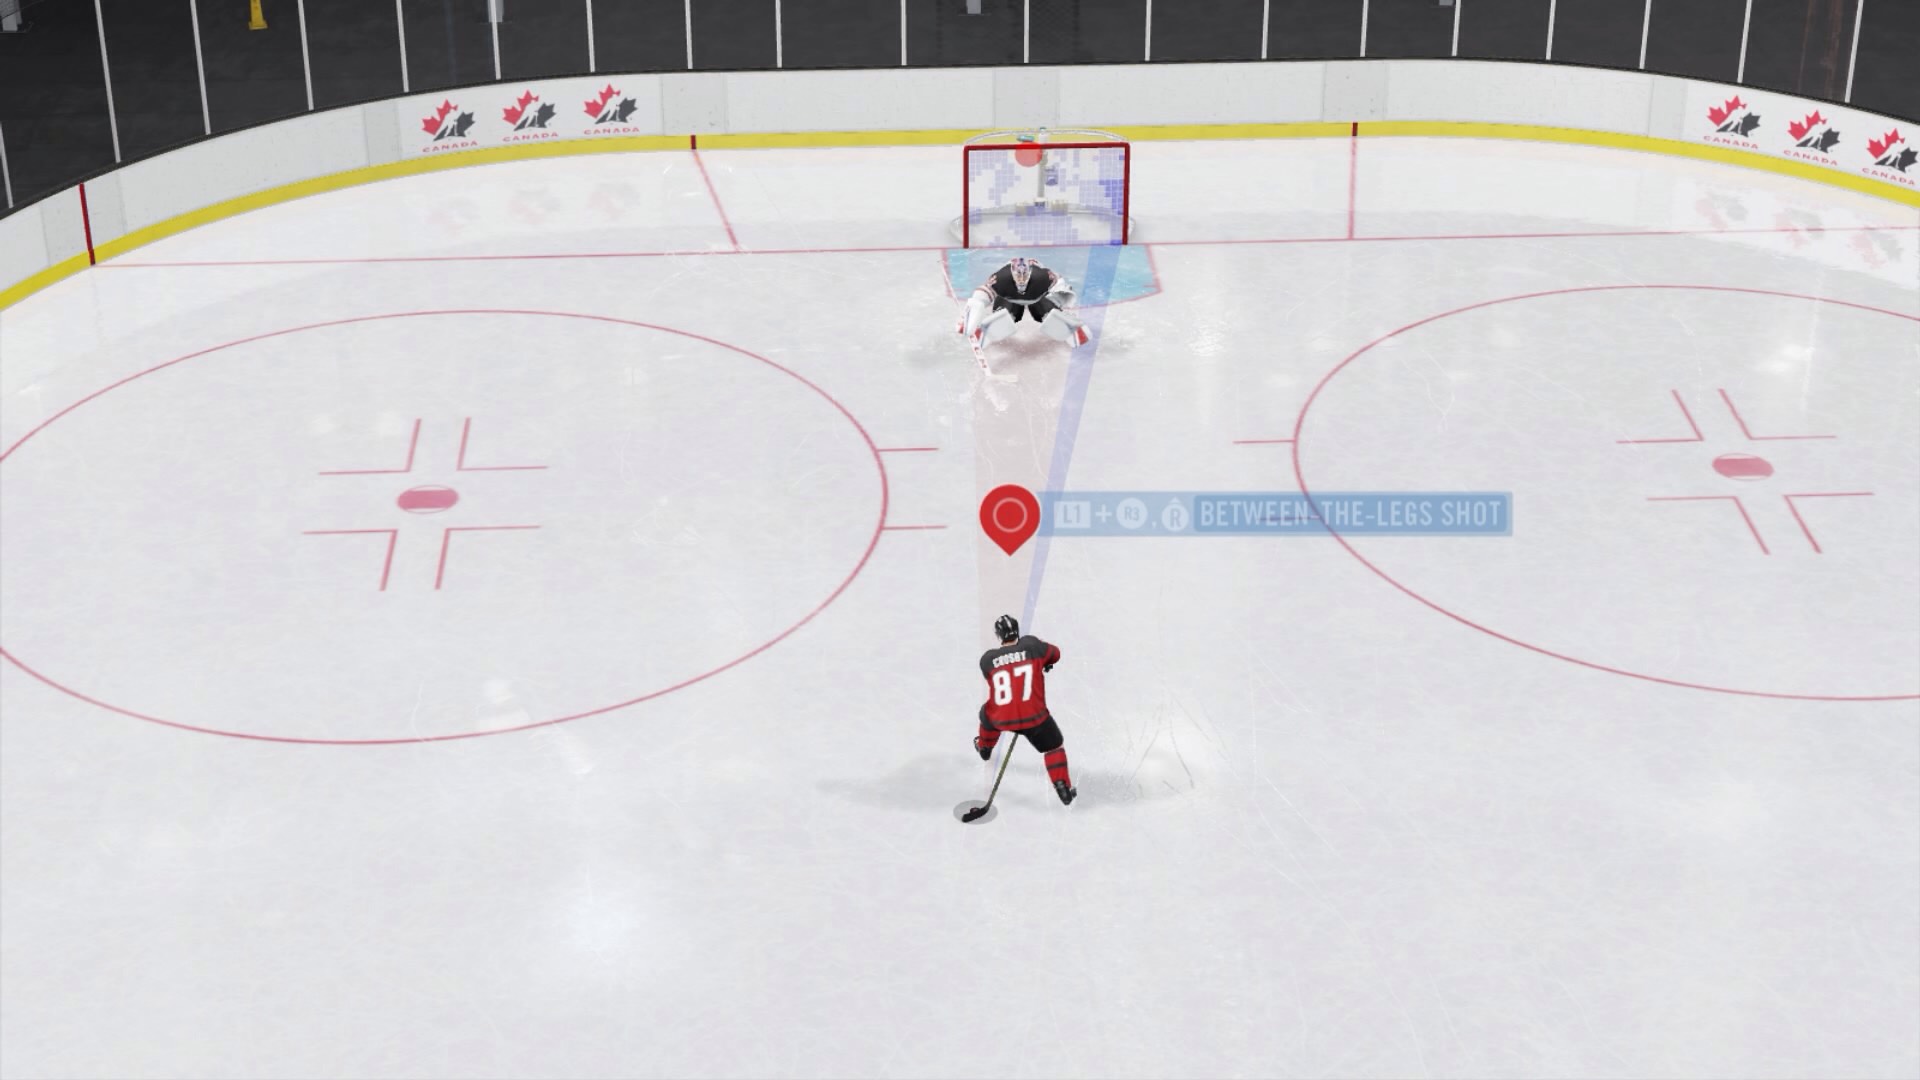
Between the Legs Shot/Pass: Similar to the other deke above, this one differs in that it’s both a deke and a shot or pass. Instead of rolling your stick like the between the legs deke, you simply hold L1 and R3 down to get the puck between your legs. From there you can either press up on the right stick to make a shot, R2 to make a pass, or R1 to make a saucer pass. This is definitely one of the most stylish ways to score goals in NHL 18.
Backhand Drag Shot: This is another complicated deke. You first fake a shot then either perform a shot in another direction if the goalie isn’t expecting it — or if the goalie is wise to your tricks, flipping the puck up in the original direction of the fake shot to catch them off guard. To perform this, you fake the shot by pressing R3. Then you pull your puck away by pressing down on the right stick and shoot with up on the right stick. If you want to flip the puck up in the air, you tap R1 instead of pressing up.
One-Handed Tuck: Need more ways to trick the goalie in NHL 18? Try this. You bring the puck to either your forehand or backhand side (left or right on the right stick) then you hold it there while holding L1. While holding the buttons, you tap R1 which quickly sends the puck in the opposite direction of where you were holding it originally.
This is hard to pull off because your puck releases far away from you, so it’s quite easy to overshoot the net. It’s most effective when you’re going to one side of the net and are further out, as this forces the goalie to hug one corner while you glide the puck to the other corner.
Tap-Back Deke: Probably the most complicated trick in NHL 18, this deke involves four inputs on your controller. It involves pulling your stick back to your forehand side (left then down on your right stick if you haven’t memorized it yet), then you hold L1 to have the puck go loose while pressing the left stick to the left and the right stick to the right. Let go of L1 to have the puck go loose. Complicated enough? You then press the right stick to the left to tap the puck back around to you when you let it go.
This requires perfect timing, as you have to press the right stick to the left as it’s still close enough to your stick to control it. Kudos to you if you can master it as it’s sure to confuse your opponents to see you skate one way while the puck goes behind them in the opposite direction.
Defensive Tips for NHL 18
They say the best offense is a good defense. While that’s not 100% true — since you can’t win without scoring goals — it is definitely something worth practicing to ensure you shut your opponent out!
Defense
Thankfully, defense in NHL 18 isn’t nearly as insane as deking is for offense. There are a few different ways you can take the puck away from your opponent, but you won’t have to perform fifty inputs and summon a demon to pull them off.
When you’re playing as just plain old defense instead of a goalie, you have a few different options:
Poke Check: This is a great technique in NHL 18 for getting the puck away from your opponent and yourself. You simply press R1 to knock the puck away from your opponent. This is especially effective if they’re deep in your zone and you want to gain some distance between them and the goalie. It might not guarantee a turnover, but if you have teammates behind them or to the side, it creates the possibility of one.
Body Check: Minus fighting, this is most people’s favorite part of hockey. There’s a reason why hockey players are stereotyped for not having many teeth and that’s because body checking can be brutal. Body checking in NHL 18 is all the fun of knocking your opponent on the ice without the possibility of injuring another human.
To perform this technique, you skate towards your opponent with the left stick and then you press the right stick in whichever direction you’re coming at them from. This will likely knock the opposing player to the ground, giving you or a teammate a chance to recover the puck.
Stick Lift: The technique that lead to many a bruised hand as a child playing street hockey with friends is present in NHL 18 in full force. To perform this technique, just press X when your stick is near the puck-controlling opponent’s stick. The more under their stick yours is, the more effective this technique is.
This is especially useful if your controlled player is smaller than the opponent and a body check might not be as effective. It’s also much more likely to result in you gaining control of the puck than a poke check would.
Goalie
One of the most underappreciated positions in any sport (and I’m totally not saying this because goalie is my favorite position), the goalie is your main and last defense against opposing offense. Learning how to effectively play goalie can mean the difference between a W and an L in NHL 18.
Positioning: Similar to the aiming system for offense, if you’re playing as a goalie, you’ll have a blue and red zone layout. The blue from the goalie’s perspective means an area is covered, and the red means it’s not covered. The more blue, the safer your goal is. The more red, the more likely your opponent will score on you.
It is important to know which areas you need to cover in NHL 18. If your opponent is shooting high, you’ll want to be standing. If you’re opponent is shooting low, you will want to be in the butterfly position (explained later).
Covering the Puck: This is one of the most important aspects of playing goalie. You have to be able to move your limbs to where the puck is. The game is automatically set to have the goalie do this, but you can adjust these settings in NHL 18 in the menu if you trust yourself more than the AI. To manually cover the puck, you press triangle and go in the direction the puck is going. You have to time it right, otherwise you’ll miss it.
When you’re towards the middle but you need to get quickly to one of the other sides, or if you’re too far out to one side and need to quickly get more towards the other or the middle, you simply press the direction you want to go (left or right) on the right stick. This is a fast way to get to where you need to be, but it will leave the area you vacate vulnerable to one-timer shots or other plays as you’ll be in full momentum going in the opposite direction.
If you really need to get to the other side of the goal in a hurry, you can press square while pressing the left stick in the direction you want to go in. This will cause you to dive in that direction. You can even dive check an opposing player as a goalie in NHL 18 by holding square while pressing up on the left stick. A regular check as a goalie works similarly to one as a defensemen; you just use the right stick. Be extra careful with that one, though, as it will leave your goal open!
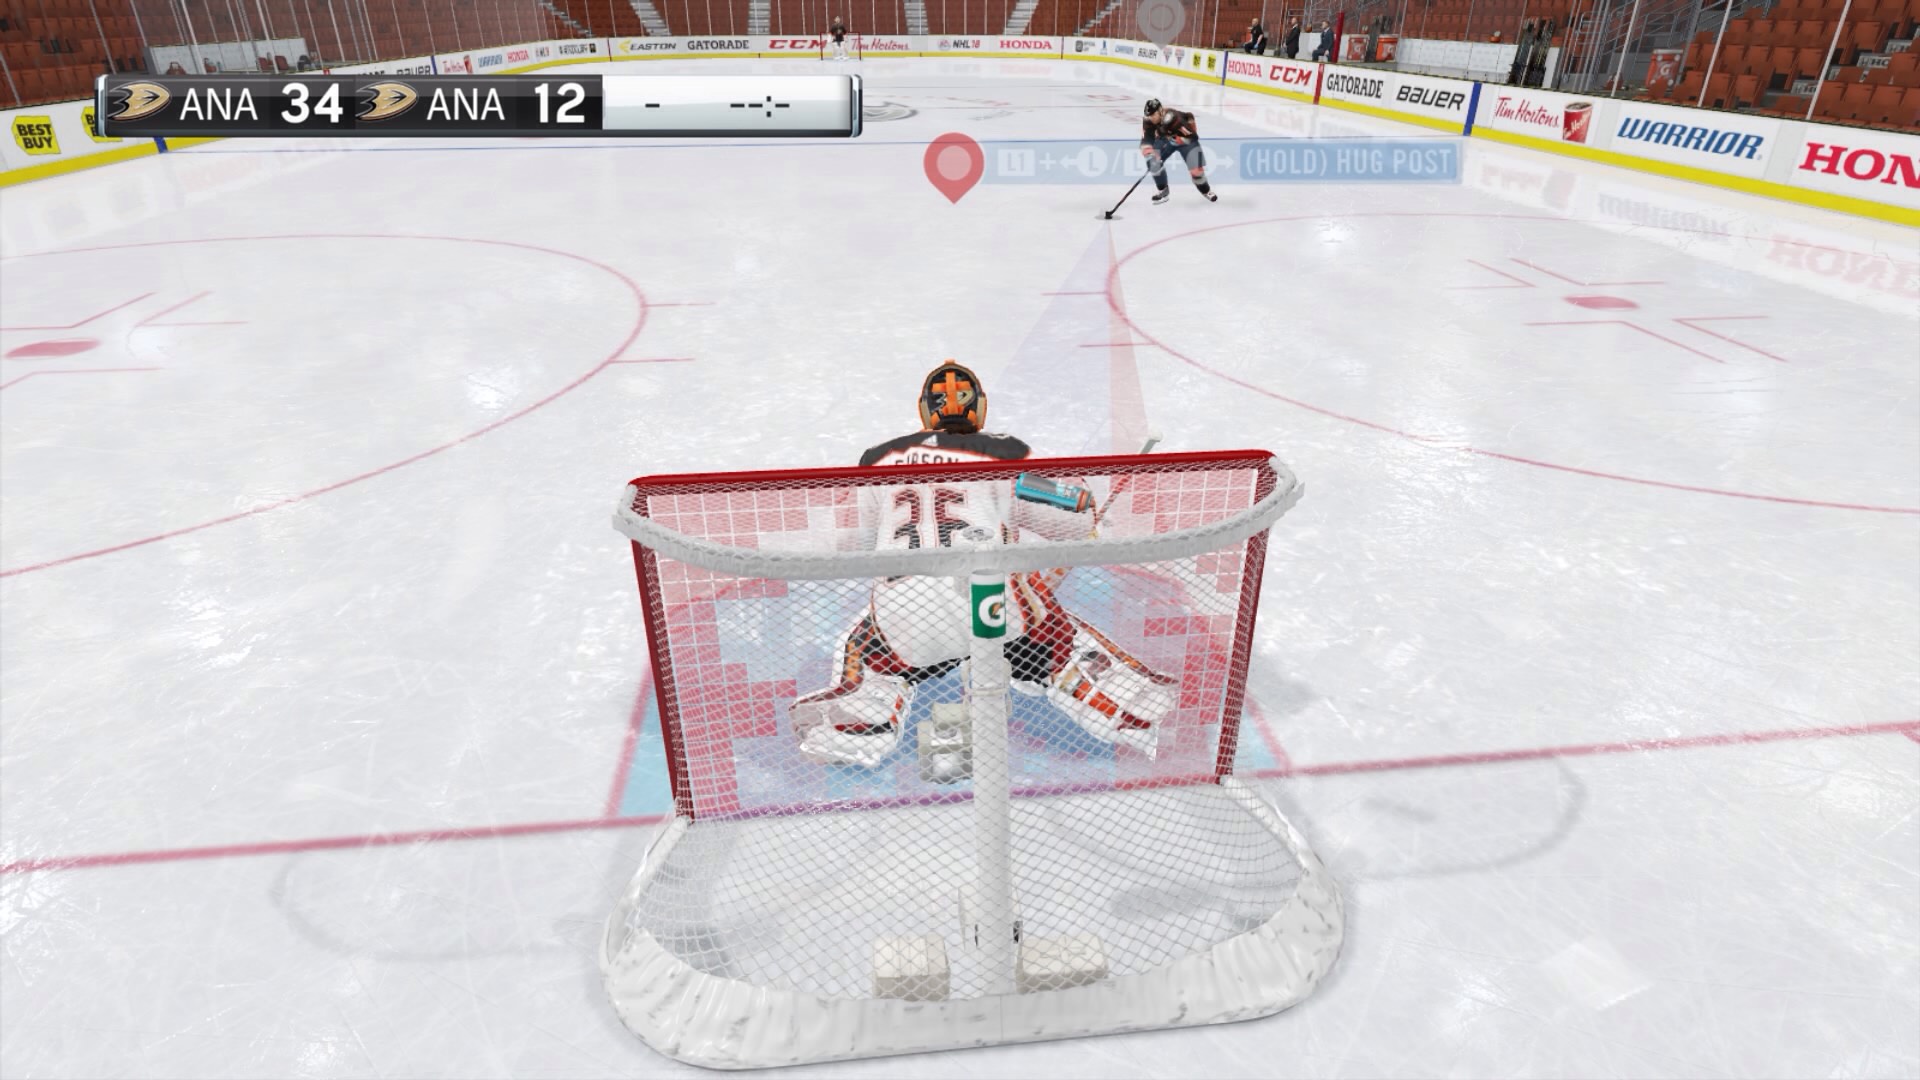
Hugging the Post: To hug the post (stay to one side of the net), you hold L1 and move the left stick to the side you want to hug. This is useful when playing NHL 18 if your opponent is coming around a corner to try and get a goal in. However, if your opponent is in the slot (the area directly in front of the goal), you want to avoid using this and instead stay in a more central, neutral position.
Precision Modifier: If you want to move around in a more precise way (as the name suggests) you hold L2 while skating. This allows you to move in a more controlled fashion. Sort of similar to moving with the right stick, this allows you to move faster and farther at the risk of leaving yourself open a little bit on the area you leave. However, unlike the right stick slides, you can recover much faster.
Butterfly Style: There are numerous techniques in NHL 18 for covering the ice in case an opponent is trying to aim low to catch you off guard. The main way to do this is by holding R2 and getting into the butterfly position (named after the way it looks). This causes your goalie to take a lower stance as they move their knees inward, closing much of the space between their legs.
This is more effective when your opponent is doing a lot of low to ground shots or are up close but not quite around a corner. You can even make quick saves by pressing left or right on the right stick to slide.

Spread V: Finally, a goalie move that utilizes square without diving. This technique is performed by holding square and pressing down on the left stick. This causes your goalie to lay flat on their stomach and spread out on the ice in a V formation with their legs spread.
While possibly one of the most comical looking positions in NHL 18, this covers a lot of ground area on the net, but it leaves your top incredibly open. Only use this if you really need to cover as much ground as possible and aren’t worried about slap shots.
Stack Pads: Another technique for covering the ice in NHL 18 is stacking pads. Your goalie will lay on their side, effectively covering the ice on the side of the net they’re on. The difference between this and butterfly style is that you cover more width — and the difference between stacking pads and spread v is you are on your side instead of being flat, meaning you still cover a bit more of the space above you than you would laying flat. This move is great for when opponents are up close.
Paddle Down: The last of the ice covering techniques in NHL 18 is playing paddle down. In this position, the goalie sort of crouches with their legs apart while their stick is flat on the ice. This is another way to cover the ice without getting too low to the ground. It’s especially effective against corner and wrap around play.
Free Skate: Sometimes even the goalie has to leave the net. To free skate, you hold X as you move around. This allows you to exit from the puck facing stance your goalie is in by default and lets you move where you need to be.
If most of the players are on the right side of the rink, but the puck goes behind the net then out towards the left, you can free skate to claim it before an opponent has the chance to. Just be careful, as a goalie is a slow moving pad behemoth and not nearly as nimble as a center — so you will lose out on a race from equal distances.
Possessing the Puck as a Goalie: Last but certainly not least — what do you do if you get the puck as a goalie? If you want to shoot the puck out, you press up on the right stick. If you want to pass it to a teammate, you press R2 to pass it. If you want to leave it for a teammate somewhere near your net, you press L2. However, if you are fully surrounded and are worried the pressure might lead to a goal if you let the puck loose, you can hold onto it or press triangle to lay on it if it’s not quite in your possession to force a face-off.
In the new Threes mode in NHL 18, holding the puck gives it back to the opposing team but resets positions so that your players start in your zone and the opposing players start with possession in the neutral zone.
—
With these NHL 18 tips and tricks, you should be able to take your game to the next level. Whether you’re playing rookie or superstar, if you master shooting, deking, passing, and defense, you will see better results in your gameplay.
Stay tuned for more NHL 18 guides and content — including a trophy guide and a review by yours truly coming soon. If you want to see any specific guides, suggest them in the comments section! Good luck and go Ducks!


Published: Sep 15, 2017 09:05 am