Every time a new update drops in Destiny 2, there are bound to be a slew of errors, bugs, and other issues that pop up. Error code CAT is one of the most annoying, but is also one of the (potentially) easiest to fix. In this guide, we’ll cover how to address the CAT error across PC, PlayStation, and Xbox.
What is Error Code CAT in Destiny 2?
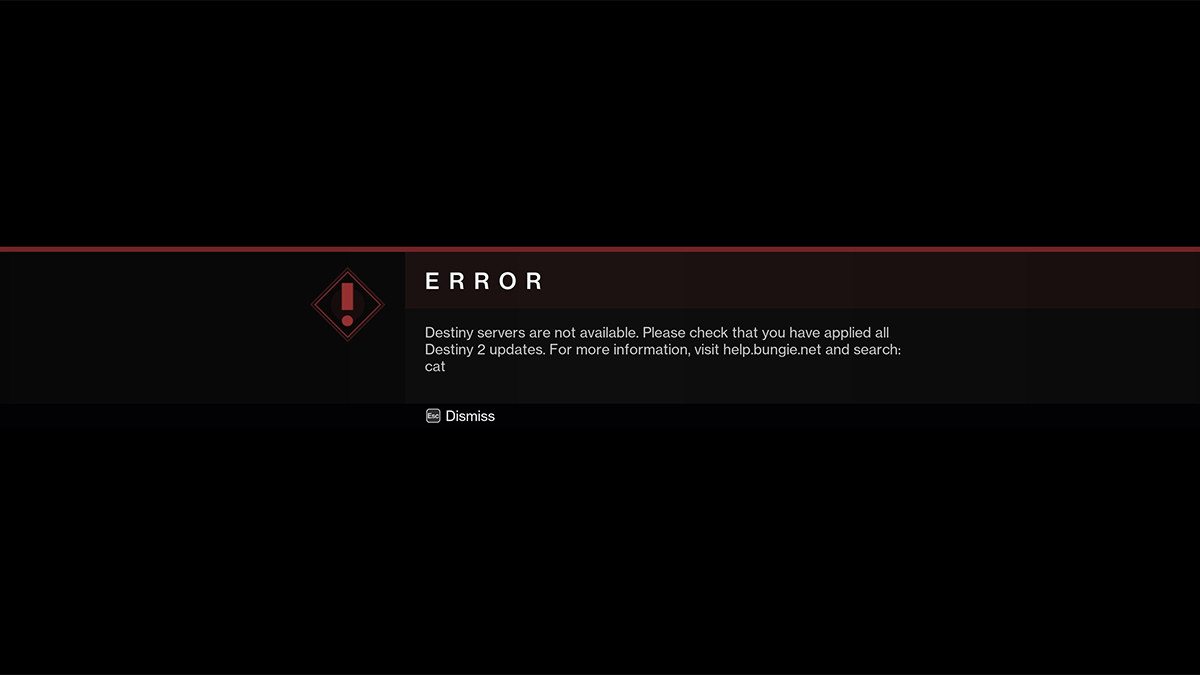
Error code Cat should only appear in Destiny 2 when your game is out of date following an update. For instance, if you were logged into the game as the update went live on your platform, you might be kicked to orbit by the error. Or, if you’re like me, you logged in just before maintenance ended, got error code Cat, and wondered what to do. Here’s how to fix it.
How to Fix Error Code Cat in Destiny 2
No matter what platform you play Destiny 2 on, fixing error code Cat should be as simple as closing out of the game and letting your system’s automatic updates install the patch for you. In other words, to fix error code Cat, close Destiny 2 and wait for it to update. Once the patch is installed, open the game back up and you should be good to go. Note that the Cat error has nothing to do with server throttling due to high traffic or other connection issues that can sometimes arrive with new updates.
In the event Destiny 2 isn’t launching for you, we’ve listed out all the steps you need to know based on your platform below, whether you’re on PC, PlayStation, or Xbox.
How to Update Destiny 2 on PC

If you play Destiny 2 on PC and get the Cat error, here’s how to get back to fighting the enemies of humanity.
- Open the Microsoft Store app.
- Click on the Library icon in the bottom left of the app.
- Click “Get Updates” at the top right to check for new updates.
- Select “Update” on Destiny 2 to start the patch.
Here’s what to do on Steam:
- Open the Steam app.
- If you have automatic updates enabled, the game should start the update, well, automatically.
- Otherwise, the green Play button will be replaced with a blue “Update” button.
- If it is, click “Update” to update Destiny 2.
- To turn on automatic updates, first, right-click on Destiny 2 in your Steam library.
- Select “Properties.”
- Select “Updates.”
- Under “Automatic Updates,” make sure “Always keep this game updated” is selected.
If Steam isn’t receiving updates from the Destiny 2 servers, try right clicking on the Steam icon on your taskbar and selecting “Exit Steam” to close the app entirely. Reopening it should push the update live.
How to Update Destiny 2 and Fix Cat Errors on PlayStation
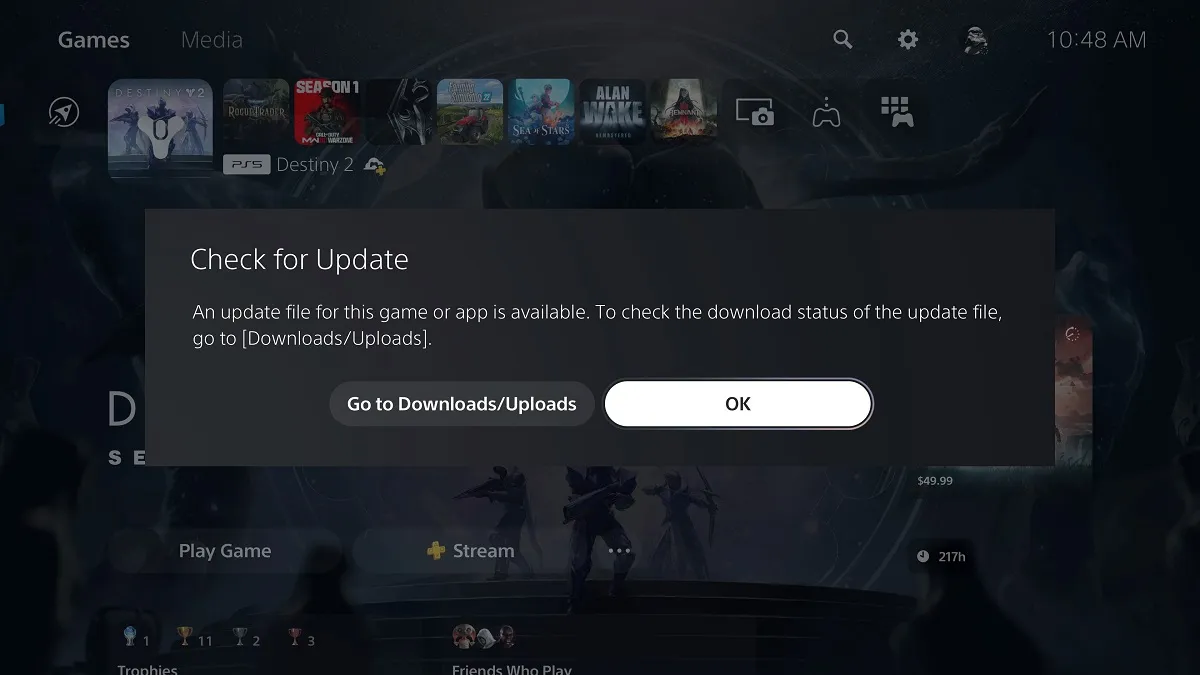
Fixing the Cat error on PlayStation consoles is a a bit different than on Steam, but the thought process is the same. While the game should update automatically, as it does on other systems, if you need to force an update on your PS4 or PS5 manually, here’s how:
- Go to the “Games” tab.
- Highlight Destiny 2.
- Press the Option button on PS5 or the Start Button on PS4.
- Select “Check for Updates.”
If there are new patches or hotfixes available, they will be installed immediately, which should fix the CAT error. I also highly suggest setting up automatic downloads and installations on your console by following these steps:
- Go to the “Settings” menu.
- Select the “System” tab.
- Go to the “System Software” tab.
- Turn on “Download Update Files Automatically” in the “System Software Update and Settings” field.
How to Update Destiny 2 and Fix Cat Errors on Xbox One and Series X|S
Follow these steps to update on Xbox One and Series X|S:
- Go to the “My Games and Apps” menu.
- Select the “Manage” tab.
- Go to the “Updates” tab.
- Highlight Destiny 2 and press “Update.”
Here’s how to turn on automatic downloads:
- Go to the “Settings” menu.
- Select the “Systems” tab.
- Go to the “Updates” tab.
- Turn on the “Keep my console, games & apps up to date” option.
And that’s how to fix error code Cat in Destiny 2. Though it can be pesky and frustrating, it’s one of the easiest to eliminate. Once you have automatic updates set, you shouldn’t run into it again. For more tips and tricks articles, visit our dedicated D2 guides hub, including guides on how to find Overthrow chests, solve glyph puzzles in the Final Shape campaign, and more.


Published: Jul 16, 2024 09:00 pm