The Samurai Job in Final Fantasy Explorers is the hardest Job to unlock, because it requires you to create over 150 different pieces of equipment. The number is somewhere around 153 give or take a few, so it is more of a percentage. These must be all different pieces, so multiples of the same type don’t count.
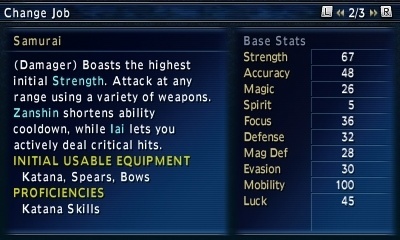
Samurai use Katana skills, like the Ninja, but have a higher Strength stat and are a pure damage Job.
I will go over the basics of the Samurai Job, describe the play styles, give an example of a build, and more. Check out my Beginner Tips and Tricks for more help with the game, or the Ninja Job Guide if you want to know how that job works.
This guide will go over everything about the Samurai Job in Final Fantasy Explorers including:
- Samurai Job Basics – Everything you need to know when deciding whether or not to play Samurai.
- Samurai Ability Build – An example build that I use for Samurai and why I use it.
- Samurai Job Mastery – What you need to complete the Mastery Trials: Samurai quest and what you get for doing it.
- Samurai Job Equipment – What materials you need to craft the Samurai-Only gear and how to get them.
Samurai Job Basics
Samurai will use the same abilities as a Ninja (Katana skills), but they still work differently. Their unique ability is called Iai, and it is a physical attack that you can charge. If you fully charge, it will always be a critical hit.
Their passive, Zanshin, reduces cooldowns for abilities. This makes the Samurai much more offense-oriented and able to attack faster. They also have higher Strength and only use Katanas, which cannot be dual-wielded. They can still get the great defensive ability Quarte, but don’t have the Utsusemi ability that Ninjas have.
Samurai Ability and Mutations Build
I’m going to give you the build I currently use for Samurai, and describe why so you can get a good idea of one of the ways you can play Samurai. If you need info on mutations and how to get each one, visit my Mutations and Crystal Surge Reference List.

Left Abilities
- X – Reflex
- Suggested Mutations – Faster Cooldown, Haste, Create Image, P-Attack Up
- Y – Hagakure
- Suggested Mutations – Link Ability
- A – Peerless Illusion
- Suggested Mutations – Attack Buffs
- B – Quarte
- Suggested Mutations – Some type of Status ailment
Right Abilities
- X – Cherry Blossom
- Suggested Mutations – Absorb AP, Link ability
- Y – Shiranui
- Suggested Mutations – HP Power Factor, Link: Snow Storm, Critical Power Up
- A – Snow Storm
- Suggested Mutations – Link: Nether Moon, Absorb AP
- B – Nether Moon
- Suggested Mutations – Link: Cherry Blossom
Shiranui is a dash move that is good for closing in, and can link to Snow Storm. Snow Storm increases mobility, and Nether Moon does more damage if your mobility is higher. Nether Moon can Link into Cherry Blossom, so linking the 4 abilities in that order provides a lot of damage.
Cherry Blossom can link into Hagakure, which leaps back and creates a whirlwind. I also have a link from that into Peerless Illusion. It is best to use Reflex before the combo, because it raises Evasion, and Peerless Illusion does more damage with higher Evasion.
Iai does good damage if charged all the way, but it has a long charge and there are only a few times when you can safely pull this attack off. This is why I took it off and got Reflex and Peerless Illusion instead.
Samurai Job Mastery
When you complete 10 quests as a Samurai, you can do the Mastery Trials: Samurai quest. You must defeat 3 Iron Giants in the same fight to complete the quest.
Completing this will do multiple things:
- Allows Samurai to dual wield
- Allows Samurai to equip axes
- Increases max HP and AP for Samurai
- Gives Samurai Guide
The last part is an item used to craft gear that only the Samurai Job can equip.
Samurai Job Equipment

All of the Samurai Only equipment starts with the word Tatenashi. There are pieces for Head, Torso, and Legs. Besides the unique look, Job-specific gear adds 5 to your max ability load and takes away 1 from the base equipment trait for each piece. This gives you a total of 15 extra Load.
They all require the same types of materials, but the torso uses more. Below is a list of the materials needed and where to get them.
- Samurai Guide – Completing Mastery Trials: Samurai quest.
- Amount Needed: 1 for each piece, total of 3.
- Death Knight Skull – Drops from Death Knight monsters, located in Leggi Woods.
- Amount Needed: 1 for each, total of 3
- Centaurion Plate – Drops from Centaurion monsters, located in Fosta Forest.
- Amount Needed: 2 for each, total of 6.
- Animal Bone – Random from gathering bone spots.
- Amount Needed: 3 for Head and Legs, 4 for Chest, total of 10.
This is it for my guide on Samurai in Final Fantasy Explorers. Let me know if you have any questions or suggestions!


Published: Feb 2, 2016 01:23 pm