
The final boss Providence is back in RoR Returns, visually overhauled with classic abilities and some new moves. Let’s talk about how to beat Providence in Risk of Rain Returns.
How to Beat Providence in Risk of Rain Returns
Providence is one of those bosses where the journey is perhaps tougher than the final challenge. Simply reaching him at the end of the Contact Light ship area is a challenge in and of itself. That said, once you face him, his four phases will challenge even players from the original game.
General Tips and Tricks to Defeat Providence
Providence is a battle of attrition boss fight. You’ll have to go through four phases before defeating him. Let’s first talk about some general tips for the entire fight and then move on to specific phases.
To start with, I recommend utilizing keycards to unlock special rooms before the fight, which can give you the following interactables:

- Surgical Bed: You can teleport a Surgical Bed to the boss room that replenishes your HP from the Med Bay.
- Gauss Canon: You can teleport a high-damage cannon from the Armory that can be fired when Providence is in front of it.
- Nano-Chest: You can teleport a free item chest to the boss room from the Cabin.

Besides these special interactables, I found that certain Survivors fare much better against Providence than others:
- Acrid: This acid best boy can trivialize the Gilded Worms that Providence spawns with his Epidemic skill that spreads to each of their segmented parts.
- Miner: Combining high mobility skills to dodge Providence’s attack and decent damage output against both him and his worms, the Miner is one of the best heroes for this fight.
- Huntress: Her teleport skill combined with the ability to fire while moving makes her excellent at maneuvering around Providence.
- Engineer: His turrets can drag away aggro from the player for most of the fight.
- Loader: His invulnerability shield makes this fight a lot easier since you can activate it as he drops on you and attack.
You should also be moving as much as possible, regardless of which survivor you pick. As for equipment, I recommend the Unstable Watch time stop as it’s highly useful to stop the chaos of the fight and provide you with windows to deal heavy damage to Providence. It’s unlocked by beating the first stage in under five minutes. If you’re having difficulties finding it or any item for that matter, you can guarantee item drops with the Artifact of Command and make a custom tailored build to defeat the final boss. Now let’s talk about specific phases and attacks to look out for.
Phase 1: Dodging Teleport Slashes & Delayed Attacks

The main attack to look out for as the fight begins is that Providence will teleport on top of you and slam his sword downward. Dodging to the left or right and turning back to damage him will be a rhythm game that you’ll get better at throughout the fight.
He’ll also follow up with a combo of attacks that end in a shockwave projected from him on the ground. I always make some distance from him, jump over the shockwave, and dash in to hit him a few times before getting ready for the teleport. Also, take care of his transparent blue projectiles firing in a mini bullet-hell style that require you to retreat or get hit.
The last element to look out for is the delayed attacks. This is in the form of telegraphed rings marked around you where he’ll send out attacks on that fixed location. Simply retreating slightly and circling back in towards Providence as the attack ends is a good way to dodge and damage him.
Phase 2: Gilded Worms
In this stage of the fight, Providence retreats and unleashes his two massive Gilded Worms to fight you. This is one of the easier parts of the fight as their attacks are highly telegraphed. The red worm displays a crosshair where it’ll shoot its laser which can be easily dodged.
Likewise, the blue worm fires a spread of projectiles that you can retreat down or up to avoid. Feel free to utilize the ladders for dodging and exploit the fact that worms have segmented body parts that can all be damaged at the same time with AOE attacks.

Phase 3: Back Up & Shadow Clones
This phase is just a more difficult version of the first one since Providence comes back with two sentinel robots that deal high-ranged damage. I would recommend taking them out if you can as soon as possible while dodging to reduce elements you have to worry about. Other than them, Providence will have the same moveset as in the first phase but will spawn shadow copies of himself that double up on his delayed attacks.
This means that you’ll have to take extra care avoiding those rings and make wider dodging arcs as you circle back in to damage him. Note that shadows will attack slightly after Providence so passing through him as in the first phase isn’t a good idea and guarantees a hit from the shadows. Instead, create some distance and use ladders to maneuver around where you can safely hit him.
Phase 4: Dodging Lasers
This new phase in Returns cranks up the flashiness to eleven. Providence’s attacks are similar to Phase 3, however, hit-scan delayed explosions will begin to appear in your location that deal incredibly high damage. More importantly, Providence will fire a massive laser that splits into six directions thus isolating parts of the stage.
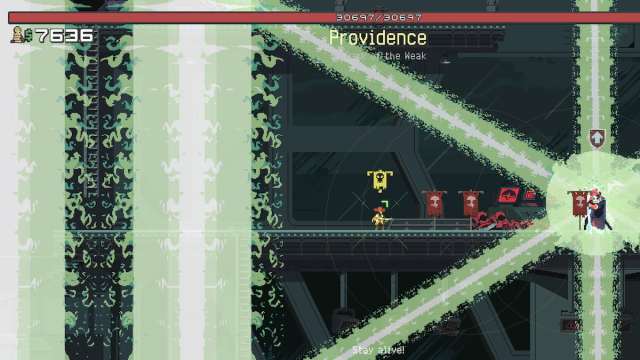
We say isolating because stepping into the lasers deals high damage. The lasers move slowly thus creating pockets in between where the player has to fight Providence. This drastically limits your maneuvering area and makes it harder to dodge his delayed attacks. He’ll also fire off a vertical and horizontal laser, sometimes both, so pay attention to his telegraphs. That said, remain patient and try to find nooks to avoid his attacks in between his lasers.
As always, I recommend to always be on the move and to utilize those ladders if your movement skills are on cooldown. Patience is a virtue here, it’s better to chip away at his HP when it’s safe than risk getting into an awkward position only to be downed by a stray laser beam and his delayed attacks. Your best bet is to bait a delayed attack away from Providence, dodge it, then go in and damage him. Rinse and repeat until he’s defeated in this final phase.

Defeating Providence for the first time will unlock the Sniper survivor and beating him five times will unlock the Mercenary. We hope this guide on how to beat Providence in Risk of Rain Returns has been useful. The fight isn’t easy and lasts for a while so getting items that restore HP or the Surgical Bed interactable via keycards is highly recommended. For more helpful Risk of Rain Returns articles, check out our guides hub here.
Related: Risk of Rain Returns Review.


Published: Nov 9, 2023 10:56 am