If you’ve just come to Travel Frog from Neko Atsume, you’re going to find yourself more than a little confused. The game is currently only in Japanese, and it’s much slower than the cat-collecting hit. Despite these two facets, Journey Frog is an easy game to get into and can be enjoyed even with the language barrier.
You wait for cat visitors in Neko Atsume, but Travel Frog is completely different. Here you send your resident frog off on adventures, after which he will return with souvenirs and pictures for you to marvel at.
Your frog may take some time on his adventures. Sometimes he will be gone for a few hours, and other times he’ll be gone for a few days. I haven’t figured out whether the goods you give him affect the time he’s gone, but they do affect what he brings back.
The first thing we’re going to go over in this guide is a translation of the tutorial the game puts you through the first time you launch it. This way you know what you’re getting into and understand the flow of the game better than you would just blindly tapping through the Japanese menus.
Tutorial translation
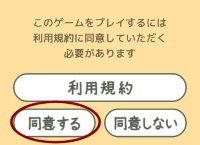
When you first launch the game, you will be prompted with the terms of service. Tap the circled button to continue to the game.
You’ll then be prompted to enter a name for your frog. This part is easy enough to understand. Enter your preferred name and continue, tapping through the menus as the game demonstrates.
Next, your frog will be preparing for his first journey when you enter the house.
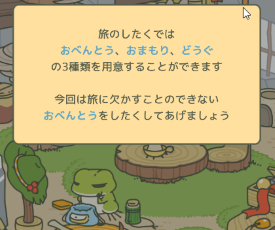
The frog can take three types of items with it on its journey, those items ranging from food, amulets, and tools. This time you’ll be sending him off with some food.
Three-leaf clovers are used to purchase items from the shop. The game will now prompt you to go to your front yard to collect clovers, your primary currency in Travel Frog. You can collect them just by swiping across the garden.
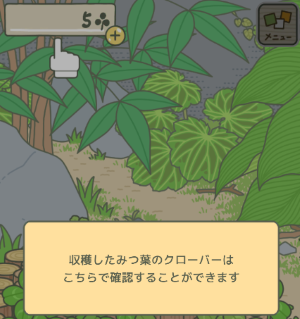
You can see how many clovers you have at the top left of the screen.
Sometimes you can collect four-leaf clovers instead of three-leafed ones. These can be used as amulets on journeys, rather than being used as currency. You will be sending your frog off with his first four-leaf clover soon enough.
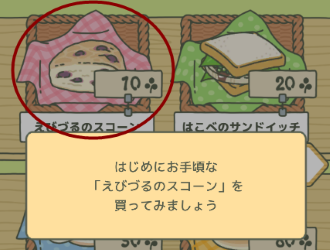
Once you’ve finished collecting your clovers, the game will prompt you to go to the shop to purchase a snack to send the frog off with. The item you need to buy here is the grape scone, which is on the top left of the first page.
Let’s equip some items for your frog’s journey.
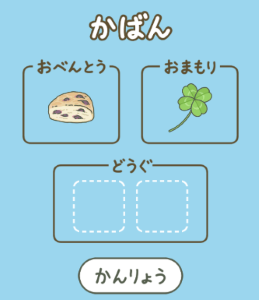
Equip the grape scone you just bought and the four-leaf clover you found, then press the accept button at the bottom.
Restart the app for your frog to go on his tutorial journey. You won’t have to restart the app when sending him off after the tutorial.
When you restart the app and return, the game will tell you that your frog is on a journey and will return after some time.
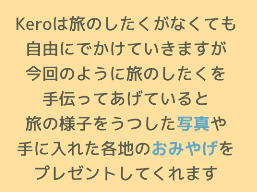
“Your frog will head out on journeys by himself, but if you prepare him as you did here in the tutorial he may bring pictures and souvenirs home for you.”
From here, you’ve got to play the waiting game. Your clover garden will replenish over time, and from time to time you’ll have friends of the frog visit like little ol’ Maimai shown below. These friends will grant you tickets, which we’ll get into shortly.

I’m not sure what dictates how long your frog takes on his journeys, I haven’t gotten to test enough. When your frog friend returns, you will be prompted with a red notification when you launch the game.
 “It seems Kero (my frog’s name) has come home.”
Let’s go over the rest of the game’s UI and other functions.
UI and menu translations
The game’s menus change based on where you are (in the yard, in the house, in the shop, etc.), so we’re going to go through them step by step.
The image below shows the menus when you are in the yard. The top right takes you to the menu, and the bottom two take you to the store and house respectively.
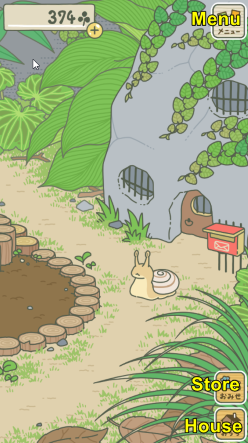
Menu
Let’s go over what’s in the “Menu” first. Three new icons will appear when you tap it.
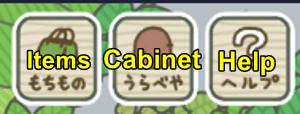
You can tap “Items” to view your food, amulets, tools, and the specialties your frog brings home.
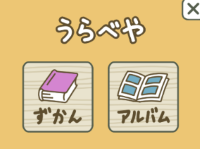
Your “Cabinet” holds a record of all the items your frog has brought back for you. The left is item records, and the right is your photo album.
“Help” is a little more complicated.
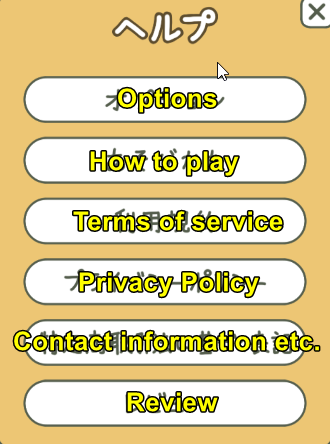
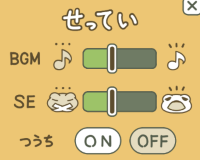
All you need to know about this menu is what’s in the options section. You can adjust the music and sound effects, as well as change your notification setting (set to “On” for notifications when your frog returns home).
Store
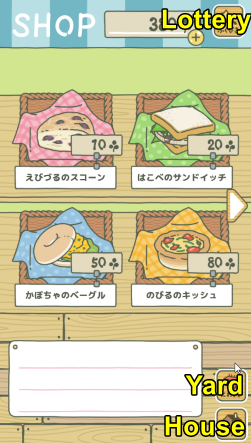
The function of the store is pretty obvious, and tapping around in it is fairly easy — so we don’t need to go over that. Double-tap to buy something and all that fun stuff.
The real thing to pay attention to here is the “Lottery,” which you may have overlooked completely.
You get lottery tickets after journeys and from visitors. They can be used here.
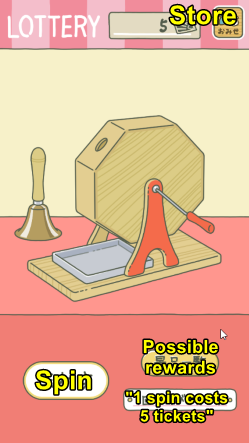
It costs five tickets for one spin, and it is very possible you’ll spend five tickets to spin … and win one ticket in return. It’s something to be aware of.
That’s about all there is to translate with Travel Frog, sans the items you can purchase in the shop. The game is easy to understand and follow despite being in Japanese, and you can easily have fun waiting for your frog to come home and show you what he’s picked up on his travels.
The game’s not just what you see here. Check out my animal friend & food translation guide to get the deets on those animals that show up at your doorstep, and my item translation guide to at least know what’s in the shop and lottery.
Why bother with all of this? For spiffy souvenirs and pictures of your frog’s travels! I’ve worked up a picture requirements guide, but for now (if you don’t mind slight spoilers) you can take a look at the 12 rarest pictures your frog can bring home.


Published: Jan 22, 2018 03:27 pm