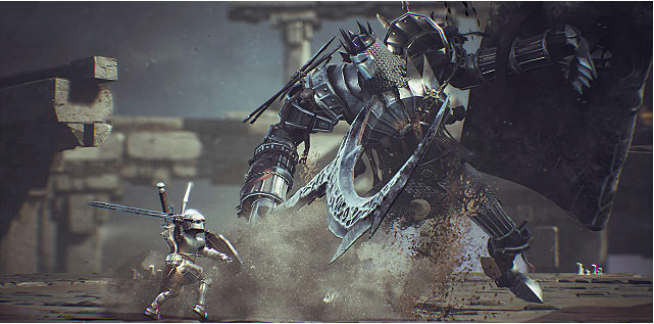
Boss fights are typically used to anchor a level or game. The challenges up until that point have culminated into a showdown with a big bad, which in turn elevates the drama. Other times, they are tools used to measure the player/gate content; they test a player’s knowledge of the game’s mechanics before letting them move onto a more difficult part of the game.
Neither of those ideals apply to Sinner: Sacrifice for Redemption. Here, players are tasked with dispatching eight bosses. This is, of course, easier said than done. Acting like a Souls game – and by that, I mean it’s a weird fusion of Titan Souls and Dark Souls – each fight is a harrowing experience full of loss.
Thankfully, we’ve taken the lumps and bruises in the process of writing this bosses guide, in the hopes of saving you some time.
Notes Before Fighting Your First Boss
Before getting into the nuts and bolts of each fight, there are a few things to note. One of which being the sacrifice system. Each time you enter an arena to wage war with a foe, you’ll be giving up something important. The total amount of stamina your character has, their armor/defense level, a surplus of potions – the prerequisites for a battle can be harsh.
The second thing to note is the boss order. There isn’t one.
You’re free to choose which boss to tackle, à la Mega Man. Only, there are no clear advantages in your decision on who to take on; defeating a foe won’t reward you with a tool to use on another. It has more to do with your playstyle and personal preference. So, while I’ve placed each boss in a certain order below, there is no need to follow my pattern. My tips and tricks will stay relevant regardless.
Lastly, this is a guide of the first seven bosses. The eighth and final boss is only made available after the others have been defeated. Given the mystery surrounding this particular foe, we’ve decided to hold off on elaborating on this character for now.
Sinner: Sacrifice for Redemption Boss Tips & Tricks
Boss: Greedy Faiz Tilus
Greedy Faiz Tilus is located directly in the center of the stone mound in the nexus. Upon activating his stone, you’ll sacrifice a portion of your health and stamina.
Tilus isn’t a melee-based boss. Though he does occasionally attack with his scythe, he usually resorts to shooting projectiles and summoning enemies from afar.
Your goal is to get in close, making sure to avoid his flaming eyeballs, poison orbs, and gusts of wind. The eyeballs and orbs are easy to dodge, especially if you hide behind the strange stone structures.
The gusts of wind tend to follow you around making them tricky to get away from at first. I found that rolling toward them hinders their effectiveness; they can’t turn around fast enough to catch you once they’ve passed your location.
You can also try parrying the gusts – blocking with your shield right before they hit you – and send them flying back toward Tilus for some big damage.
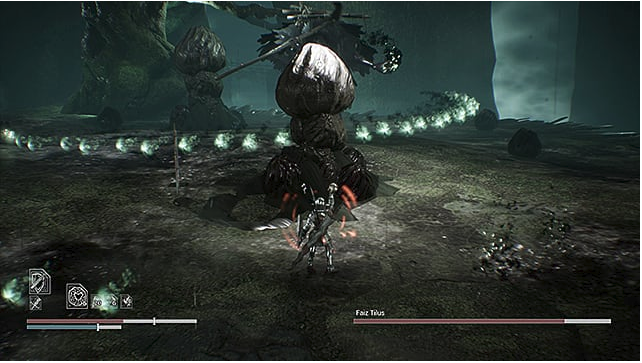
As you get close to Tilus, you’ll want to take a few swipes at him with your sword before backing off a bit. After a few hits, he’ll flap his wings and dive underground, damaging you in the process. He’ll pop up moments later and try to cut you down with his scythe (which can be easily dodged) before retreating to fire off a few eyeballs.
Continue hitting him when you can. Be wary of the poison trail he sometimes leaves behind when hit. The damage will be minimal, but stand in the green goop for too long though and you’ll become fully poisoned, taking damage over time.
When his life goes below the 40% mark, Tilus will jump to the platform in the middle of the arena. After a few seconds, he’ll start coating the battlefield with a poisonous gas. Escape a quick death by hightailing it to the edge of the map.
Be sure to avoid the weird looking plants and exploding frogs – both of which spews poison on contact. When he finishes his gas attack, he’ll become more aggressive, swinging his scythe and shooting eyeballs at a quickening pace. He’ll also summon more exploding frogs.
Avoid all of this by dodging and running and keep hitting him. If you can, toss a few firebombs at him when he starts to conjure his projectiles. It can be a risky move – if you get hit with one eyeball, you’ll typically get hit two or three more times in rapid succession – but worth the damage over time. Using your flaming sword is also a good tactic.

If you’re lucky, you’ll kill him before he jumps back onto the center platform. If not, you’ll have to contend with miniature versions of Tilus. They’ll spawn around the platform and chant/cast a spell that’ll cause your poison meter to slowly rise. Dispatch them quickly, using the javelin (it only takes one hit to kill them). Once they’re all dead, return to smacking up Tilus. It won’t be long before he bites the dust.
Boss: Envious Levin Undok
Envious Levin Undok’s portal is positioned two spots to the right of Tilus (past Gluttonous Camber Luce). To fight her, you’ll need to give up some of your supplies; you’ll have fewer health potions, firebombs, ect., for the remainder of the game.
Like Tilus, Levin Undok likes to use projectiles whenever she can. Unlike Tilus, she also utilizes deadly melee attacks. You see, she comes in two versions: a gold and silver persona. The fight starts with the gold version.

Fighting Undok in her first state can be tricky. She has multiple projectiles that are tough to dodge. Her ax, for instance, flies back and forth between you and her like a boomerang. Carefully time your rolls to avoid getting hit by the ax, which circles you twice before returning to her.
That’s just the one ax, though. She also summons multiple axes from the ground and flings them at you in intervals, covering a wide distance. She also summons axes to circle her like a shield, widening out further and further with each revolution around her.
Then there’s her scythe, which will travel in an arc around you after being tossed at your face. Last are her daggers. These projectiles seem to home-in on your location, making them tough to dodge depending on how close you are to Undok.
It is possible to parry, roll past/dodge these attacks. Her sword attacks should always be parried though. They’re easy to read as she tends to “charge up” before swinging.
That said, it is still a risk/reward situation. Parrying will stun her, allowing you to get in a few free hits. Missing the parry will either cause you to block (lowering your stamina and possibly get knocked backward) or cause you to get hit.
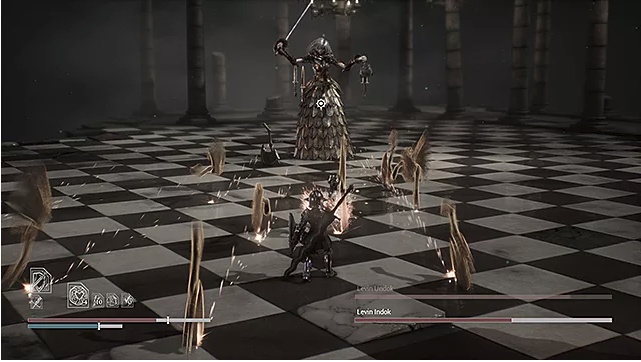
For me, the best strategy was ignoring the projectiles and rushing her. If you can dodge quickly, you can get two hits on her backside before retreating. Your heavy sword works well here if you forgo the shield (depending on your skill, this strategy can work well for both versions).
After taking enough damage, Undok will remove her head and transform into her silver version (complete with a new life bar).
This one uses lightning attacks as well as her sword. Whenever she rubs her head across her sword, that means she’s about to do a powerful attack and you must act accordingly.
When her whole body electrifies, she will unleash an electric AoE attack. When she lifts her rapier into the air and only electrifies her upper body, she will either:
- Send down a lightning bolt that splits into dozens of smaller bolts that travel along the ground in a circle pattern
- Rain down multiple lightning strikes across the arena
The first attack has no discernable signal as to where the bolt will hit. The second will be signaled by little glowing orbs across the arena.

After a certain amount of time has passed, Undok will change back into the gold version of herself. If you’ve gotten her life low enough, she’ll skip that phase and go right into her final assault which sees both versions appearing at the same time.
This last part of the fight can be overwhelming. You have to contend with every attack plus falling chandeliers.
Instead of rushing the gold version her like before, use your javelins to whittle her life down. A few choice hits when she conjures her daggers will stun her, dropping the daggers and negating the attack. Once she dies, then focus on the silver one, this time using the sword and shield combo (for its quick attacks). She should die soon thereafter.
Boss: Lustful Chanel
To enter Lustful Chanel’s domain, touch the second stone mound from the left. Upon doing so, you’ll sacrifice your shield’s durability; it’ll shatter when your defense is broken.
This is a more typical fight.
Chanel is a fast-moving melee fighter who occasionally uses a bow. She’ll lunge at you with her ice daggers. The primary concern here is being frozen: getting hit increases a freeze-meter to rise. Fill it up and you can’t move — and she easily kills you.
Dodge her spinning daggers and follow up with one or two sword swipes. Keep moving and rolling to the left or right to avoid a few more of these strikes. She will occasionally shoot arrows at you, either from the ground or in the air. Avoid these as they cause big damage and can freeze you.
After taking enough damage, Chanel will back away and quickly fly toward you. Don’t attack at this point. It isn’t hard to dodge but because of her quick movements, you might not be able to counterattack like before. At about half health, she will also jump away and be engulfed in a grey liquid which will freeze you if you’re inside it.

After she taking more damage, she’ll start shooting more and more arrows at you. She also becomes more aggressive with her melee attacks and starts conjuring vines that pop up from under the water.
Her most devastating attack though is an ice arrow barrage; she’ll aim upward, sending a ton of arrows raining down on you.
This move can be tough to dodge – if you don’t move toward or away from Chanel at the right times, you’ll end up running out of stamina before getting a reprieve. The easiest method is to stand still, wait for the first arrows to drop, and then running the opposite direction, either right or left. You’ll have just enough stamina to outrun them if you haven’t already fought Faiz Tilus.

Continue attacking like before. I recommend using the long sword to speed things up, making sure not to swing too many times in a row.
Chanel should fall rather quickly; I was able to kill her before she did her barrage during one playthrough.
It’s important to note that when her life gets low, she falls to her knees. Kill her quickly or she will transform into a nightmarish slug beast with a brand-new health bar.
The best method to beat this foul creature is to use your heavy sword and charge at him. When you get close, roll to the right or left and attack twice and then retreat.
Watch out for the creature’s gigantic tongue, which is slams on the ground both in front of itself and in a semi-circle, its munching mouth, which will chew on you, and its jump (forward and back), which will crush you. It will also spew frozen water when you get close, which will freeze you, leaving you easy prey.
Boss: Wrathful Angronn
Wrathful Angronn’s stone mound is the first one on the left. Choosing to fight him will forfeit your armor and healing rate (it’ll keep you from regenerating health at all).
Angronn is one of the larger bosses you’ll face. Half of his body is submerged under a sea of lava. The parts that are exposed are covered in swords, armor, and a mean disposition. He isn’t that tough of a fight though.

Angronn has several attacks:
- Fist slam
- Arm rake
- Punch
- Sword rain
- Lava throw
- Fire minion spawn
- Fire beam
Angronn will typically slam his fist onto the ground. This comes in two variations: single fist slam (right or left) and double fist slam (right, then left, then both at the same time). He will also rake his hand across the stage; He has a tell for this – he’ll pull back slightly before attacking, covering a smaller distance than his normal attack.
Aside from his ground pound are his angrier attacks. He’ll pull his right arm far back and punch forward, covering a large distance. Timing your dodge (so that you can follow up with an attack) is tricky considering how fast his fist moves.
Get too far away from him, and he’ll reach into the lava to either throw fireballs onto the stage that linger and cause fire DPS or throw fiery minions on the stage. These can only hurt you when they leap at you (you can run through them). Dodge to avoid them.
He also has a fire beam that he shoots from his mouth. He will lean toward the ground; the initial burst doesn’t hurt — the second blast does, so don’t roll into it.
Finally, Angronn will also lean back, open his arms, roar, and rain swords from the sky. These hurt and stun if they hit you and act as barriers on the stage. You can see where they’ll land by looking for the glowing marks on the ground. You can hit them to make them disappear or send them back to Angronn for some small damage. When Angronn pounds the ground, they can fly at you and hit you, so be careful.
To hurt Angronn, dodge to the left or right of his sweeping hand attacks and pounds and attack his gauntlet hand. He won’t take much damage at first thanks to his armor.

His last move will commence shortly after he grabs his head in anger. He’ll then slam his fists into the ground, destroying a large part of the battlefield. Obviously, you’ll die if caught in this attack.
It shouldn’t take too long to kill Angronn once his armor is destroyed. The trick is to focus on him more so than what’s happening around you. The fireballs and such are an issue, but they pale in comparison to his fists and light beam. Just make sure not to accidentally roll off the side of the stage when trying to avoid one of his attacks.
Boss: Gluttonous Camber Luce
Gluttonous Camber Luce’s stone mound is located right next to Faiz Tilus (to the right of his, to be exact). Fighting him decreases the total number of potions and also lowers your healing rate.
Stay away from Luce. Seriously. His melee attacks can be hard to dodge. Especially when he goes to slam both of his swords on the ground; he’ll quickly reposition himself to catch you rolling away.
He can also bite you using the mouth on his stomach and gnaw on you, knocking off a ton of life. Instead, hit him a few times with your javelins. The goal is to get him to start shooting purple orbs from his stomach-mouth, which seems to only happen after he’s taken a certain amount of damage.
At this point, I recommend saving the rest of your javelins for later (I’ll explain why in a moment) and concentrate on staying out his Luce’s reach. Wait for him to send some orbs your way. After a few volleys, Luce will become tired, prompting you to take a swing at him.

I recommend using the heavy sword, taking two swings when he grows tired (after the orb attack) before fleeing.
That said, don’t get complacent. For one, as the fight goes on, large portions of the frozen lake will fall away. This spells trouble; not only can you fall into these holes and die, Luce can use them to launch an airborne attack.
Every so often, he’ll dive into the water via a hole and emerge somewhere before slamming into the ground. His aim is spot on, meaning you’ll have to roll away at the right time or else be crushed underfoot.
Things go from bad to worse once Luce’s life passes the halfway mark. At this point, he’ll start to use strong moves more frequently. One of which is a rolling attack that not only hits hard but can also knock you off the map.
The best bet here is to try and steer him into one of the ice mounds/pillars by positioning it behind you and rolling away at the last minute. This will stun Luce for a decent amount of time, opening him up for an attack.
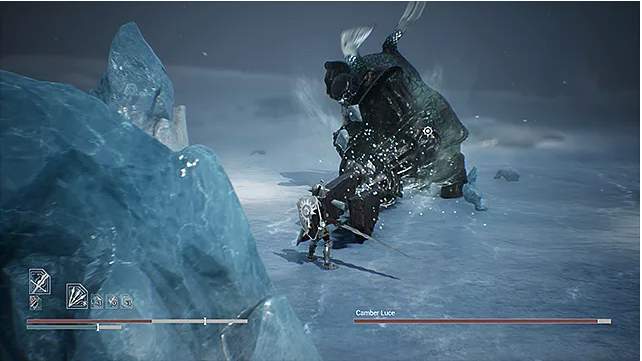
His last two abilities are the worst. This is where the javelins come in.
Occasionally, Luce will spin around in a circle before making a beeline toward you. If you hit him twice with the javelin before he starts spinning (signaled by him winding up) you’ll stun him. He doesn’t typically try to do the move again afterward.
His other ability isn’t an attack but is just as powerful. Luce will fake like he’s about to shoot his purple orbs but instead, will open his mouth to reveal a yellow vortex of sorts. It’s at this point that Luce will try to regain his lost health.
By quickly using a javelin, you’ll be able to knock him out of this state before he gets too much life back. Continue to wait for him to get tired or to stun himself before following up with attacks. If you use mostly power attacks from the heavy sword, he shouldn’t last too long.
Boss: Slothful Yordo
Slothful Yordo’s stone mound is the farthest to the right. Fighting him will sacrifice your stamina. When your bar runs out (due to your attacks or rolling) you’ll become exhausted and collapse.
At first glance, Yordo appears to be one of the tougher bosses. He is the only one who has minions that stay on the battlefield the entire fight. Not only that, but he and his soldiers all have shields. A frontal attack isn’t possible; they’ll just block your sword swipes.
Instead of trying to take out his soldiers, keep your focus on Yordo. What you want to do is stay close to him while avoiding their attacks. Wait for Yordo to attack and then parry it.
This will stun him, allowing you to do a stab move; it’ll auto connect if you attack right after the parry. This will plunge your sword into Yordo’s stomach, knocking him to the ground.

At this point you’ll either want to follow up with a few attacks or roll away, to avoid an attack from his soldiers.
After a few stabbings, Yordo will start to run away from you. At this point, he’ll raise his spear and all his soldiers will disappear. They’ll then respawn in different places to try and open you up for an attack.
Just keep moving while being mindful of your stamina level. Soon, Yordo will try to attack you again. Parry and stab him. Once his life hits below 40%, he’ll forgo the spear and shield, opting for a longsword instead.
You can still parry his attack and stab him.
The thing is though, he’ll be more aggressive. Also, when he calls for his soldiers to disappear and reappear, they’ll spawn around him. Acting like a living shield, they’ll make it impossible to hit him. He’ll also throw spears at you while huddled inside their circle. No worries. Just toss a javelin at one of them to knock them out of formation.
Finishing him off is easy going forward. I personally just kept hitting him with javelins; with his shield gone, he could no longer block my attacks. A few well-placed shots later and I was off to the next boss.
Boss: Proud Rhodes
To get to Proud Rhodes’ arena, you have to touch the third stone mound from the left. Doing so will sacrifice your attack power.
Rhodes can be tough. His attacks do a considerable amount of damage, he can be fast on his feet, and he’ll eventually summon minions. That said, his moves are mostly predictable.

I preferred using the heavy sword to cut down on the number of hits it takes to kill him. The stamina strain can be a bother, though.
You’ll want to dodge his attacks by rolling toward him and to the left (his right) as most of this power comes from his right hand.
From a distance, Rhodes will shoot energy waves at you. He will either lift his right arm over his head and shoot a verticle energy wave or pull his right arm back and shoot a horizontal energy wave along the ground. Dodge the first by rolling right or left; dodge the second by rolling toward it once it gets close.
Get underneath him and attack his legs. You’ll see he has a few hard-hitting swipes. Some attacks will be straight, while others will be in an arc going toward his left. Roll to his right to avoid them. Be careful of his stomp.
Also be careful of his shield bash. He will smash the ground with the bottom of his shield and with the face of his shield. Each has different AoEs, so roll through his legs and toward him to avoid damage.
After a few attacks, Rhodes will also jump away from you. The shockwave can damage you.
Finally, Rhodes will also summon energy bolts. This happens when you’re close to him. They move slow but follow you around the arena. You can’t dodge them if hit by them, so stay away and use the terrain to stop them.

When Rhodes life hits the halfway mark, that’s when the real fight starts. At this point, he’ll kneel to the ground and emit an aura that’ll summon minions.
During this time, it’ll be too dangerous to attack up close. Instead, throw javelins at him until he stands back up.
Once back on his feet, make sure to stay close to him. If not, he’ll constantly throw energy waves at you. If you can, put the minions between you and the waves to kill them.
He’ll also slam the ground with his shield before charging directly at you. Roll at the last minute, turn, and get in some quick hits before retreating.
Lastly, he’ll lean back and slam his sword onto the ground, sending shockwaves across the arena. Roll to avoid them.
Keep whittling away at his legs, and he’ll eventually fall.

And that’s how you beat the first seven bosses in Sinner: Sacrifice for Redemption. As noted at the beginning of this guide, you don’t have to beat each boss in this order, and there are other strategies for beating these bosses depending on skill.
However, almost all of these tactics will work for each boss, even if you choose to dodge instead of parry, for example.
Stay tuned for more Sinner: Sacrifice for Redemption coverage. And if you haven’t already, be sure to check out our review of the game.


Published: Oct 16, 2018 12:02 am