The Reaper is a “debuff tank” class in Breach‘s Dark school of magic. Its unique Reap and Sow abilities allow it to lower enemy damage while also healing the Reaper. Additionally, it gains nice benefits from the skills of other Dark school classes, namely Necromancer and Lich.
This guide will focus on a build for Reaper, so I will only describe the spells that you might use for this build. Gear, talents, gems, and tips for using the build will also be given.
Reaper Tank Build

Reaper is listed as a Warrior, the Breach version of a tank, and it specializes in debuffs. However, there isn’t much that makes the Reaper “tanky” besides its Ultimate.
This build looks to make the class much more of a tank, and you will die less often when using it. This is done by using gems and talents to maximize the effect of the Grim Reaper Form Ultimate, and combining that with elements of the other Dark classes.
Spells
You will need to get Reaper to Level 6, Lich to Level 6, and Necromancer to Level 6 to use every spell in this build.
The spells are:
- Sow (Signature to Reaper)
- Reap
- Phylactery
- Haunting Spirits
- Grim Reaper Form
As mentioned, this build heavily relies on the Grim Reaper Form Ultimate, so you won’t be switching that out with anything.
Here are details on the spells used in this build:
Reaper (Warrior)
- Sow (Signature Melee)
- Strikes all enemies in front of you for 150 damage.
- Decreases an afflicted enemy’s bonus damage by 15%.
- Additional stacks reduce damage by an additional 5%.
- Stacks up to 4 times.
- 3 charges with a 6 second cooldown per charge.
This ability is great for mitigating damage to not only the Reaper, but the entire team. If you use this on elite or boss enemies, you can stack it so that you take 50% less damage from them.
You can also ensure it never falls off if you have a special weapon talent. This will add significantly to your survivability.
- Reap (General)
- Consumes all Sow debuffs in the area to restore 210 health per application.
- Deals 210 damage to afflicted enemies.
This is another ability that helps the Reaper survive, and it deal a bit of damage at the same time. Consuming a Sow that is stacked to its max on a single target allows you to heal for 840 health, which helps a lot.
There is also no cooldown normally, but you have to stack Sow before every Reap for it to be effective.
- Grim Reaper Form (Ultimate)
- You become immune to damage.
- Haste is increased by 60%.
- Lasts for 15 seconds and automatically triggers when health reaches zero if you have it ready.
This Ultimate is the core to the build and the Reaper’s tanking capabilities in general. When active, you have an entire 15 seconds where nothing can harm you.
Additionally, haste increases movement and attack speed, so that’s a significant increase as well.

Lich (Assassin)
- Phylactery (General)
- Places a Phylactery imbued with your soul, making you immune to direct damage.
- Damage dealt to the Phylactery is subtracted from your own health.
- Lasts until destroyed or removed.
- 20 second cooldown.
- Unlocks at Level 6.
This ability allows you to take no damage at all as long as you keep enemies and attack away from the Phylactery. That said, enemies will usually target the Phylactery, so you have to get used to managing it properly so that you don’t end up taking more damage than normal.
Because enemies will often target the Phylactery, it can also be used as a taunt. This can allow you to round up enemies in one location in order to burst them down or keep them away from an objective.
There’s a lot that can be done with this spell, so experiment with it.
Necromancer (Specialist)
- Haunting Spirits (General Ranged, AoE)
- Sends forth several wraiths that deal 175 damage to all enemies.
- Provides a 400 damage shield to yourself and all allies touched by the wraiths.
- 15 second cooldown.
- Unlocks at Level 6.
The biggest reason to take this ability is for the 400 damage shield. Even though it may not seem like much, and it doesn’t last too long, it adds up to good damage mitigation over the course of a match.
The fact that you can greatly reduce the cooldown with a specific talent, and it gives the shield to everyone touched by the wraiths, makes it even more worth using.
Gear/Talents
The talents you need for this build can be assigned to different pieces of gear, except for the weapon talent, so I’m going to list the talents you want rather than the specific gear pieces.
They are:
- Each enemy hit by Haunting Wraiths reduces its cooldown by 0.5 seconds.
- Newly deployed Phylactery objects grant 10% bonus damage to nearby allies.
- Newly deployed Phylactery objects grant 10% damage resistance to nearby allies.
- Gain an Ultimate charge and increase Ultimate Accrual Rate by 25%.
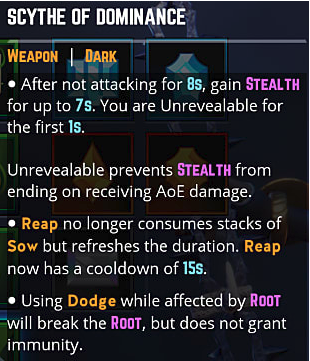
- Reap no longer consumes stacks of Sow, but refreshes the duration. Reap no has a 15-second cooldown.
The most important talent in this build is the one that grants an Ultimate charge and makes it charge faster. As previously noted, Grim Reaper Form is critical to this build, and the more times you can go into it, the less damage you take.
I would also always take the first talent, as it greatly helps you reduce the cooldown of Haunting Wraiths.
Regarding the Phylactery talents, you can actually choose which one you want to take. Either more damage or damage resistance is helpful, and it applies to the entire team. The only drawback is that you have to stay within the aura that surrounds the Phylactery, which means you will need to be pretty close.
The special weapon talent can be bought from the store for 1,200 gold. This limits how often you can heal from Reap, but it allows you to keep up the damage debuff for entire boss fights. It works even better if you have any sort of healing in your group.
Gems
The gems you want to focus on are those that let you get your Ultimate back faster, and those that offer a general cooldown reduction.
- Light Sapphire of Advancement (Blue Gem): +7.5% Ultimate Accrual Rate
- Vitality Sapphire (Blue Gem): +730 Health
- Light Ruby of Advancement (Red Gem): +15.25% Ultimate Accrual Rate
- Ruby of Recurrence (Red Gem): -4.5% Cooldown and Charge Accrual for All Spells
- Phylactery Duration (Prismatic Gem): Phylactery now has a 60 second duration, but 20% reduced cooldown.
The extra health that the Vitality Sapphire gives is significant, as it makes Reapers survive even longer.
The rest of the colored gems allows you to get your Ultimate back as fast as you possibly can. This is especially useful in boss fights so you can become immune multiple times.
With the Prismatic Gem, you almost never have a Phylactery up for longer than 60 seconds, as you will need to constantly replace it when you switch rooms or it takes too much damage. This means that you are essentially getting a 20% reduced cooldown with no real drawback.
There are no other Prismatic Gems that offer anything significant to this build, so that’s the only one I recommend.
Combat Tips
Reapers get the most benefit from hitting multiple enemies with Sow, but it is especially important to hit enemies that won’t die within a few seconds. Always focus on stacking Sow on enemies with multiple bars of health, elites, and bosses.
Try to stagger using your Phylactery and Grim Reaper Form. If you use your Ultimate while your Phylactery is up, it will still take damage, so it’s a waste.
Always try to aim Haunting Spirits so it hits the most enemies and allies for maximum effect.
As long as you reach Session Level 4, you can put your Sow stacks on the boss in the final room and keep it there until it dies. Just be sure to use Reap on cooldown to heal and refresh your Sow stacks, and the fights will be much easier.
—
That’s all for the guide on the Reaper and the Dark school in Breach. Leave a comment if you have any further questions or have Dark school builds of your own.
If you want general information and explanations of mechanics in the game, check out the Breach Beginner’s Guide. For specific builds, check out our guides page for tips on:


Published: Jan 24, 2019 07:35 pm