
Welcome to the wizarding world of Harry Potter Citadel: Forged with Fire! Before you tame a dragon to fly around the skies with, you’ve got to pick up some sticks and kill some orcs. This beginner’s guide will show you the way.
Getting Started
First things first, you’ll have to choose a server. If you want to level up faster or play in an easier way, look for the 2-10x style servers. These servers give you bonus EXP, attribute points, knowledge points, and/or harvested resources. If you’re looking for just a vanilla experience, look for a server with a relatively normal sounding name without a 2-10x marker.
You can choose a PvP server in Citadel: Forged with Fire if you want, but keep in mind that this guide is intended for starting out on a PvE one.
After that, you will have to create a character. After joining or creating your own server, you will be brought to this menu. You can choose your gender, one of four different faces, one of four different hairstyles, and the color for your skin, hair, nails, and eyes. Give yourself a proper magic-y name like Merlin, Morrigan, or Phillip.
After that, you’ll be given the choice of starting off in one of three different areas. I go with Raincourt because it’s near a coast with easy access to iron and gold ore, but you can still find those in mountains or on other coast near the other starting zones.
Shortly after spawning, check your keyboard configurations and make sure you know your bindings in Forged with Fire. It’s also helpful to make sure you know where your melee button is for when you need to attack enemies close up when you’re out of mana. You can make the game easier for yourself by going to the game tab in the options section and enabling the equip on auto equip feature.
Magical Gathering
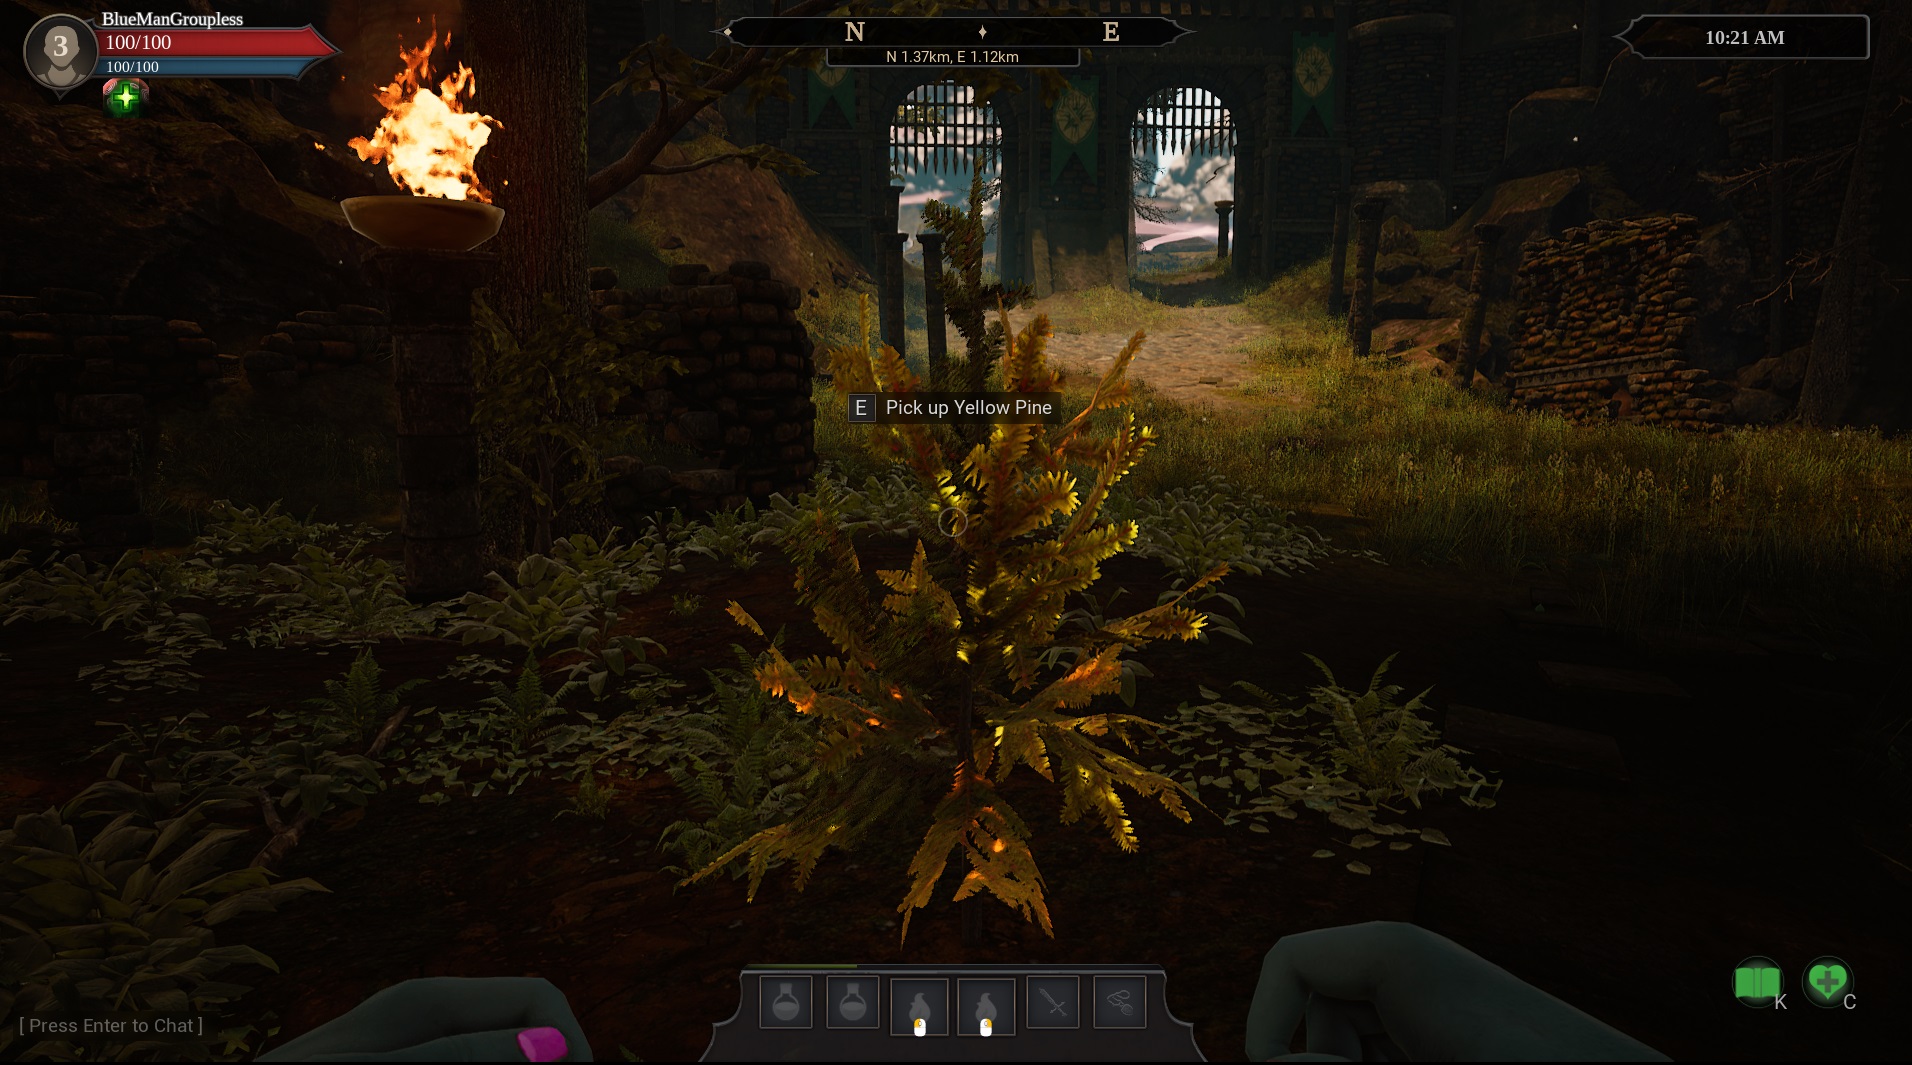
After doing all the above, you’re finally ready to play. Look around you for resources on the ground. Your first batch of resources in Citadel: Forged with Fire will be Wood, Yellow Pine, Stone, and Rune Crystals. These will be used for building your structures, crafting weapons and armor, brewing potions, etc. You’ll also find Ghost Orchids, Mushrooms, and Crowberries, which can be consumed to restore mana and health. They’re also used in creating mana and health vials which will be important later on.
Once you hit level 5, you can unlock the extract spell, which allows you to take resources like wood from trees, stone and ores from different kinds of rocks, for 1.0 mana per second. This is a very, very useful and time-saving spell to have, so be sure to get it as soon as you can.
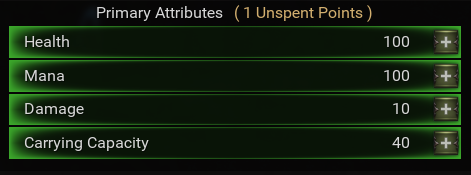
Progression – Primary Attributes
If you couldn’t tell by my previous mention of it, leveling up is a part of Citadel: Forged with Fire. You level up in the game by collecting resources, exploring new areas, killing enemies, crafting items, and building structures. When you level up, you gain attribute points and knowledge points.
Attribute points go towards increasing your health, mana, damage, or storage capacity. Depending on the kind of server you’re on, you’ll get one or more points per level. When you get extra points, you have more freedom when spending them, but if you’re playing on a no bonus attribute point server, you’ll want to only spend as much on storage as is absolutely necessary because health, mana, and damage will take priority.
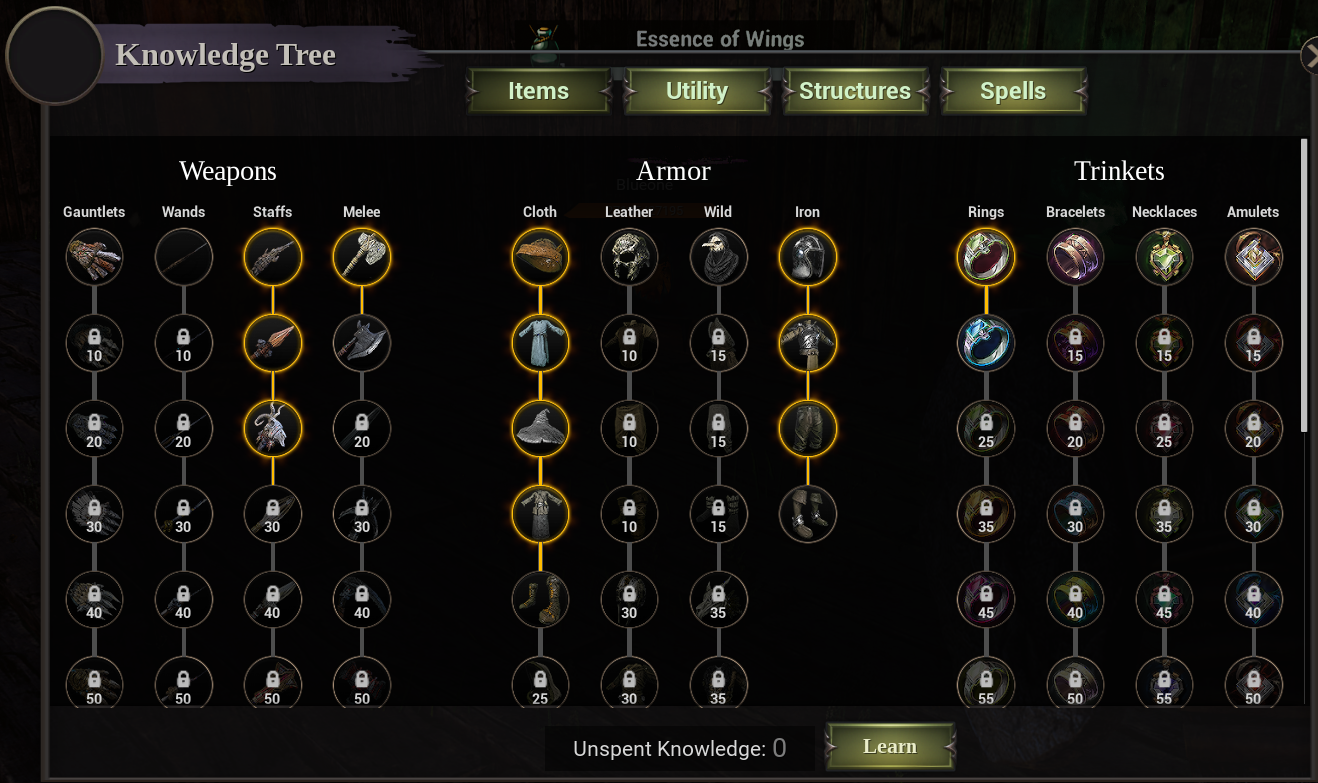
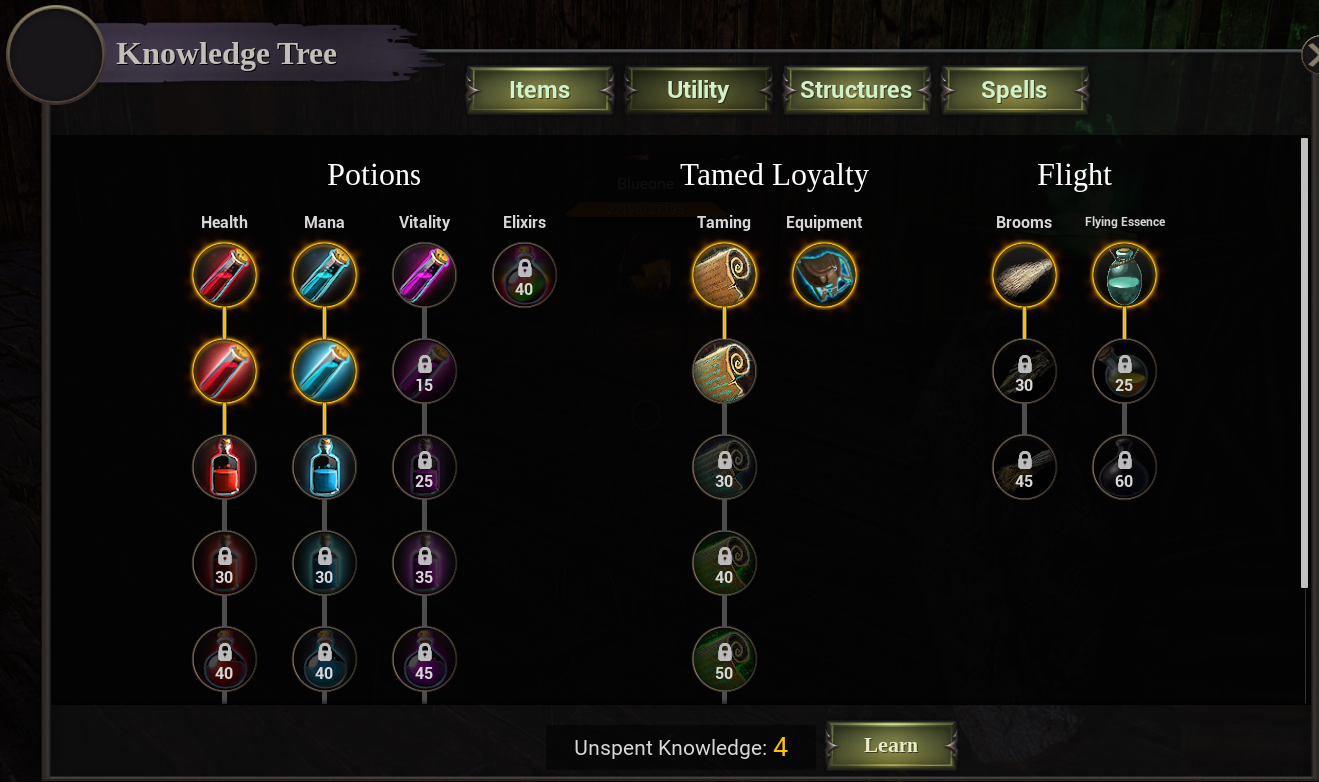
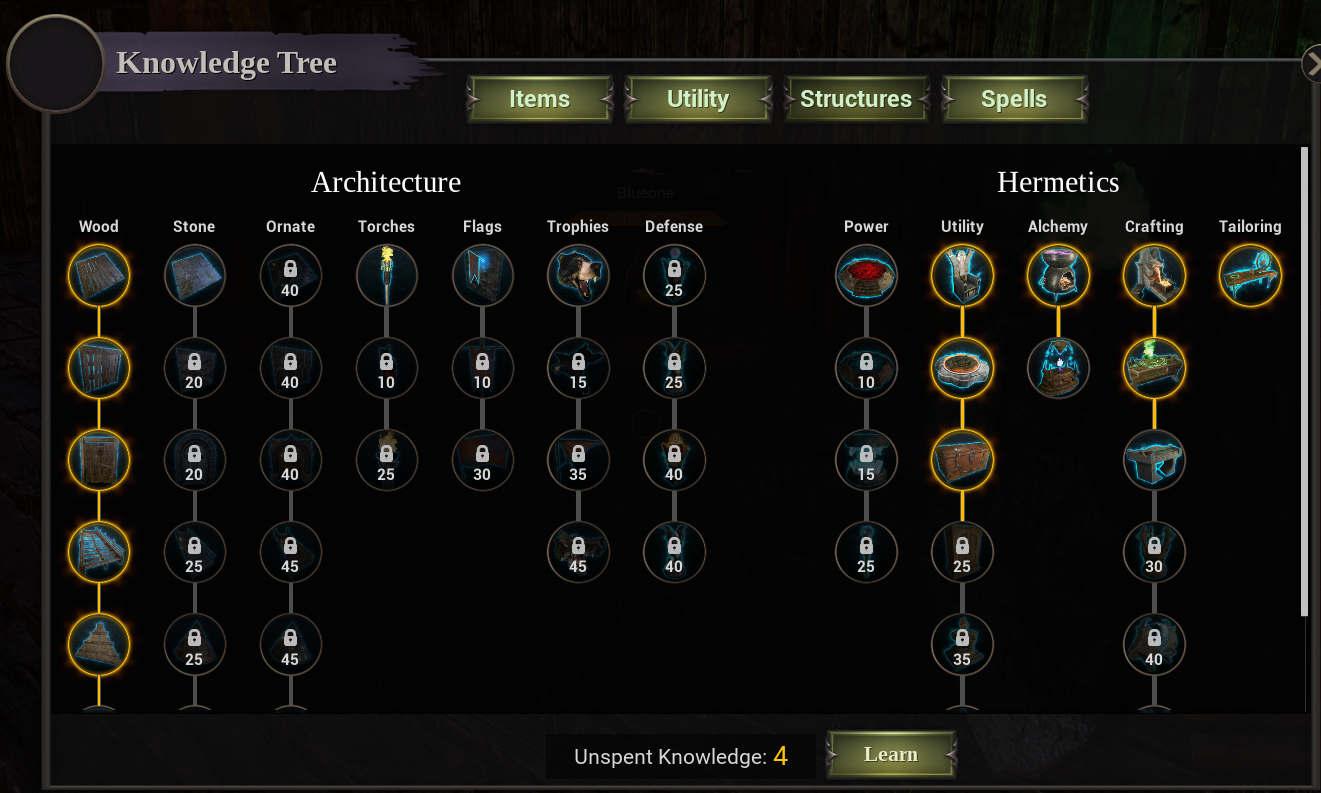
Progression – Knowledge
Knowledge points go towards recipes for crafting and structures as well as unlocking spells. Each node, save for the Amnesia Elixir under Utility, has at least one more node underneath it. They all have level requirements. For example, you can create the most basic versions of the four weapons, a couple pieces of cloth armor, a health and mana vial, wooden floors, walls, and doors, a throne, one combat spell, and four other spells for each weapon type.
In Citadel: Forged with Fire, each piece of knowledge has its on point requirement. For example, the combat spell Mana Blast costs only 1 point to unlock but Lightning Bolts, the level 10 combat spell, takes 4 points. The most expensive unlock is the Dark Flight flying essence; it costs 12 points.
When playing on a vanilla server with limited points, you have to plan ahead. If it’s possible, it’s best to work with other people. One wizard can focus on one type of combat or crafting structure (which I’ll address later) while another takes what that wizard didn’t. One ally can focus on wands, pump his mana up, and brew potions — while another one focuses on axes, pumps her health up, and forges armor. Trading resources, weapons, armor, etc. with each other is an efficient way to play the game without spreading your focus too thin. This is important in PvP and in higher level PvE situations.
The picture below is a progression I followed in a recent game of Forged with Fire. This is at level 22. You don’t have to follow this build, but it is an example of a solo one where I focused on the staff as my main source of damage.

Starter Weapons and Armor
You are free to choose your first weapon, but I have a preference for staff and axe so that’s what I’ll suggest.
In order to build a Staff of the Forest in Forged with Fire, you’ll need: 1 Rune Crystal and 6 pieces of Wood. You should unlock the Fireball spell when you can to go along with this weapon. This will let you do some decent damage to enemies from afar. When they get in close, you can try to melee them with your staff but it might break so be warned.
To build a Stone Head Axe, you’ll need 4 pieces of Wood and 2 Stones. I usually just use this as an off-hand weapon to melee with when I very first start out so take Terrene Smash if you so desire, but it’s not necessary.
For a Woodland Cloth Hat and a Woodland Cloth Tunic, you’ll need 2 pieces of Cloth and 6 pieces of Cloth respectively. This will be your first armor set. It’s quite wizard-y.
As you level up in Forged with Fire, you’ll be able to unlock improved versions of these weapons as well as new kinds of armor. I recommend sticking with the same style of weapon you picked at the beginning in order to conserve knowledge points. For example, if you went staff, once you hit 10, you can build the Deathweaver — and at 20, you can build Gorthrax’s Ramshead. You have more freedom in what kind of armor you wear. You’ll also be able to gain better armor as you loot enemies and treasure chests.
Let the Base Drop
You can access your structure building menu by pressing B if your keys are set to the default bindings. This will pull up a menu (pictured below) that allows you to choose between structures of different types. Under Wood, you’ll find what you’ve unlocked for wooden structures, like doors and walls. For magic, you’ll find your throne, the forge, the workbench, etc.

Find yourself an open area to build your structure. Depending on the surrounding ground, your floors might need support — so try and look for an area that is flat to save resources. You’ll need to build some floors. I find a 3×3 is okay for starting out, but 3×5 or more will eventually be needed to fit your chest, throne, etc. if you go for all of them. You must place your throne in your house to make sure it doesn’t disappear. As of right now, you can only have one throne out at a time.
Your base will be where the majority of your crafting is done. The picture above with the built house features one I made in the aforementioned solo play. I had a throne, forge, workbench, tailoring bench, storage chest, and respawn stone. I recommend this for your first solo playthrough, though you don’t need to have all three of the crafting tables if you’re playing in a group.
You’ll need a Forge to craft certain weapons, armors, and all the jewelry. You’ll need a Tailoring Bench to create certain crafting materials like leather and refined cloth, as well as to craft certain armors like your level 5 set with Soloman’s Hat, Initiate’s Robe, and Footwraps. The Workbench is used for certain weapons and armors as well as brooms, saddles, and Soul Binding Scrolls for taming. You’ll need a Conjuring Cauldron to brew vials for health, mana, and more.
Mana and Health Regeneration
Depending on the server you’re on, mana is scarcer than you’d think. The regeneration rates in Citadel: Forged with Fire are pretty low so you’ll want to craft as many health and mana vials as you can.
You can build health and mana vials starting at level 1. Health vials require 1 Rune Crystal, 3 Crowberries, and 1 Mushroom. Mana vials require 1 Rune Crystal and 2 Ghost Orchids. At level 10, you can unlock potent health and mana vials. These require a cauldron, so don’t get them unless you have one of those already. They’re stronger versions of the previous vials yet still require the same type and number of ingredients.
You can also craft a Primitive Magic Ring for an extra +1 to your mana regen and a Magic Necklace for the same in health regen. A Primitive Magic Ring requires 2 Iron Bars, 1 Amethyst Crystal, and 3 Rune Crystals. A Magic Necklace requires 2 Iron Bars and 1 Precious Stone.
Iron Bars are found on enemy corpses or smelted from Iron Ore found on the black rocks that line coastlines and lay on the sides of mountains. Precious Stone can be found in similar rocks that are in caverns or on certain mountain-y areas. Amethyst Crystals can be found at giant geodes located in more dangerous areas you’re not ready for. You can also craft one under your Inventory recipes with 2 Precious Stones and 1 Light Essence (found on peaceful creatures.)
Monster Hunter
After the exp from resource gathering, base-building, and exploring becomes negligible, it’s time to start slaying some beasts to level!
Always check an enemy’s level before engaging in Citadel: Forged with Fire. When you’re level 5, it’s dangerous to do combat with a Level 20 Giant, but not too scary fighting a level 3 Boar. Unless, of course, you have the pacifist enemy bug where none of your foes attack you. If that’s the case, then as long as you’re not in the aura around them that does damage to your character, you can take down higher level monsters to level faster. It’s not quite as fun, but it’s good for trying out spells, testing damage, etc.
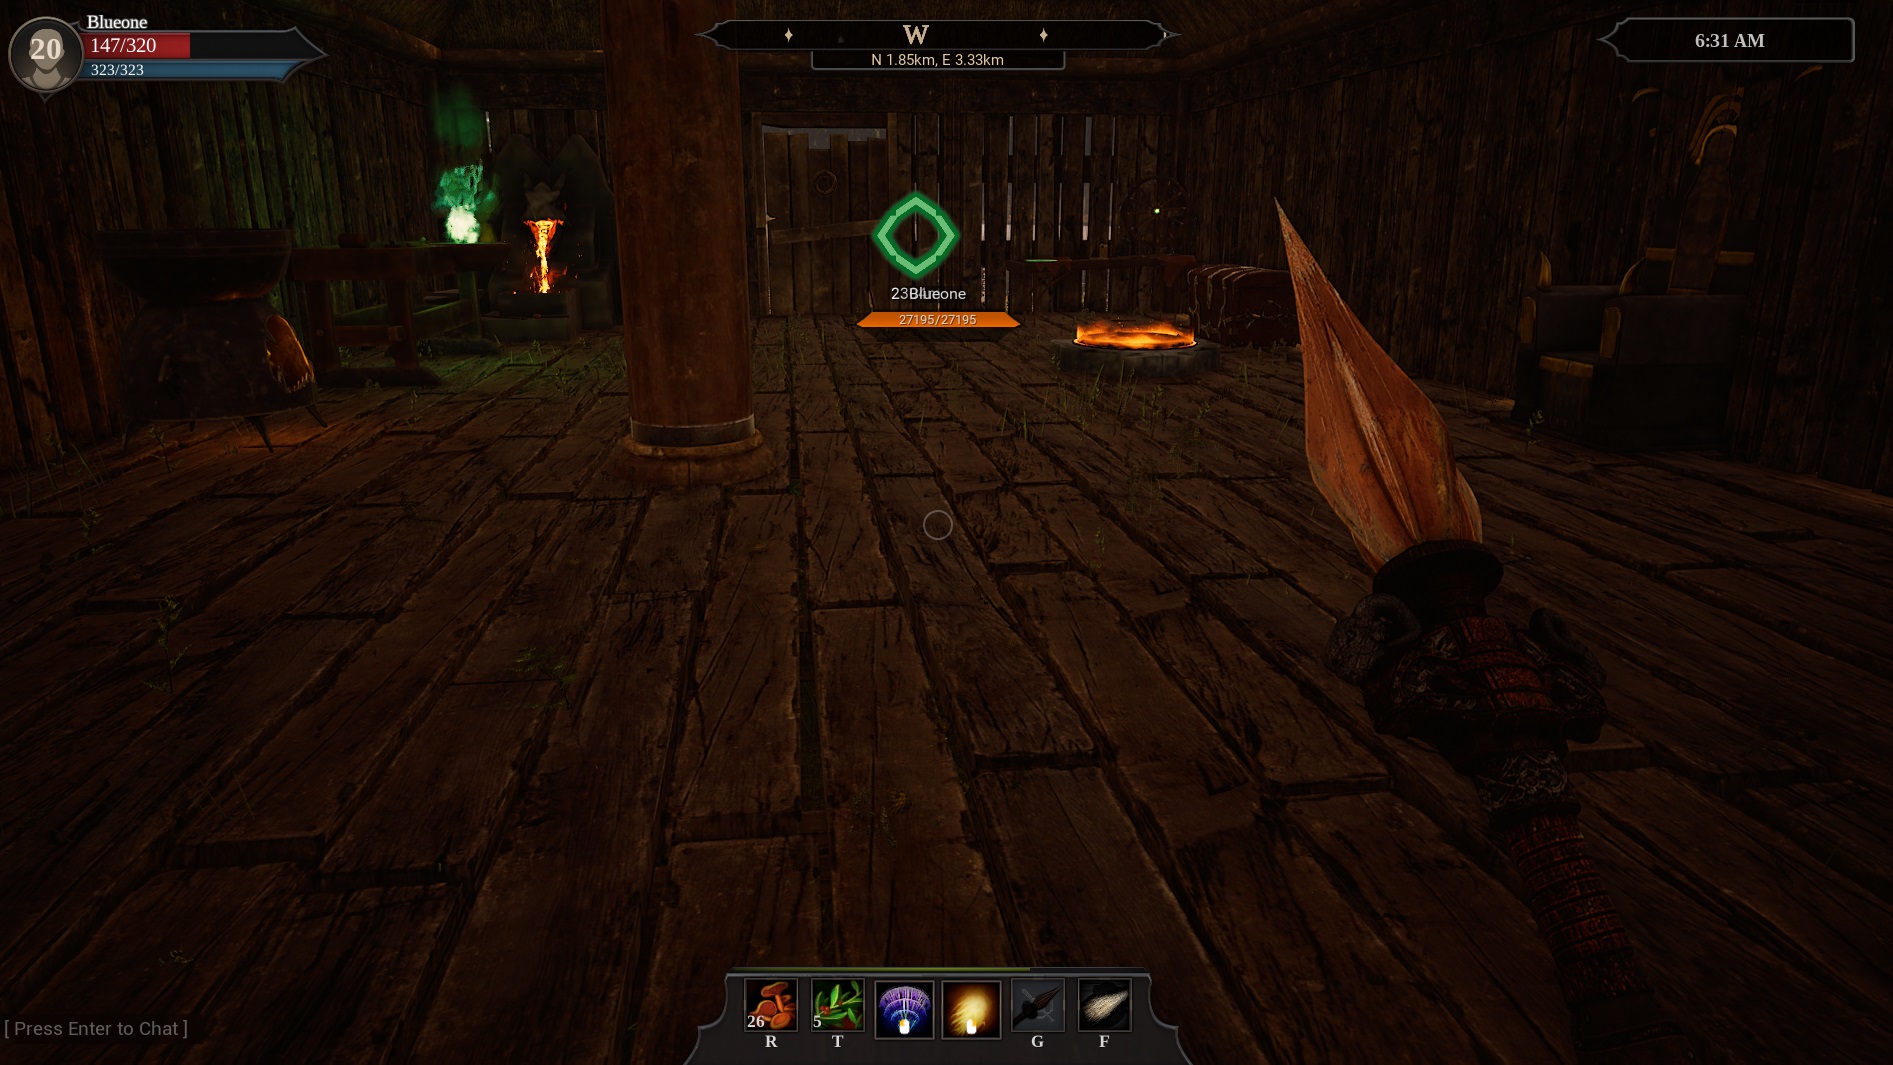
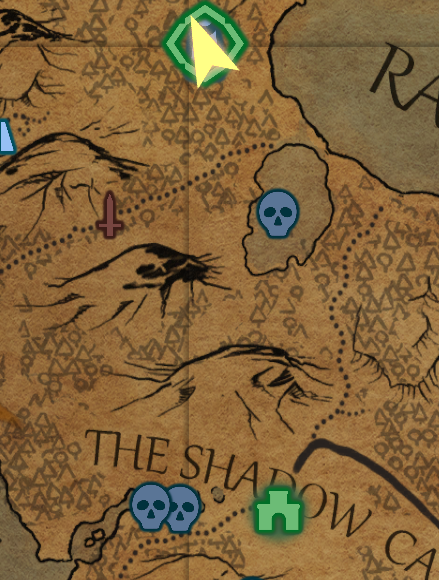
You’ll be able to find Enemy Camps to clear as well. They are marked with a red sword on your map. These are areas where you’ll find groups of enemies. Early on, this is likely to be an encampment of Orcs like shown above (though on this server for some reason, all my spells were on constant cooldown so I died shortly after this screenshot). Normally, there’s also a treasure chest nearby, so be sure to look for one of those. It might save you some resources or knowledge points, because they sometimes contain resources, armor, weapons, and potions.
Once you get some more levels under your belt, you can explore caverns, which are also marked on your map. These are where you’ll find rarer materials like Precious Stone. They’re guarded, of course, by stronger enemies than what you’re likely to find outside. These are best tackled with a group of other players.
Travel and Exploration
Traveling by foot is a pain in the butt in Forged with Fire, but thankfully by level 10 you’ll be able to craft a Traveler’s Broomstick to let you fly around much faster. One of the downsides to this is that it takes mana, of course, unless you’re on a server with the mana cost removed. This is where your mana potions will come in handy. You’ll need them to ensure you don’t fall to your death while up in the air on your broom.
Another downside is that it prevents you from having any other trinkets equipped — because apparently in this universe, you can’t wear a ring or a necklace at the same time.
In order to create a Traveler’s Broomstick, you’ll need a Workbench and 10 pieces of Wood, 2 pieces of Leather, and 1 Faery Dust. I recommend doing this as soon as you hit 10. You can get Faery Dust from faerie and sprite enemies.
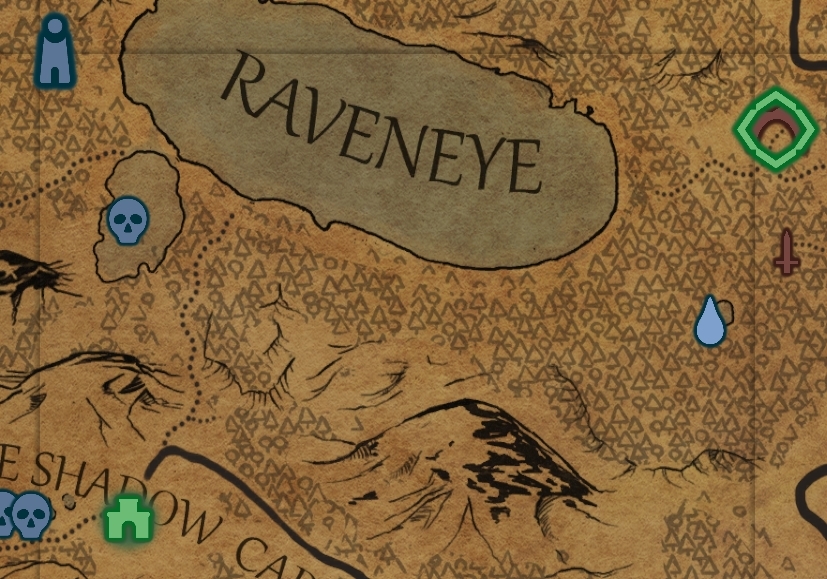
One of the most convenient features of Citadel: Forged with Fire is fast travel. There are a number of towers spread throughout the map that you can use to travel between them. In the map picture above, the player icon is where the closest fast travel tower is. These are very easy to unlock on a no broom mana restriction server so if you’re on one of them, fly around and unlock as many fast travel towers as you can as early as possible. This will save you some travel time later on.
You can also try and build your base close to a travel tower if it’s safe to do so. This is especially useful as you progress in the game since you’ll need rarer resources from deeper into the map. You can use the towers to head back to your base shortly for dropping off resources when you’re encumbered.
Taming
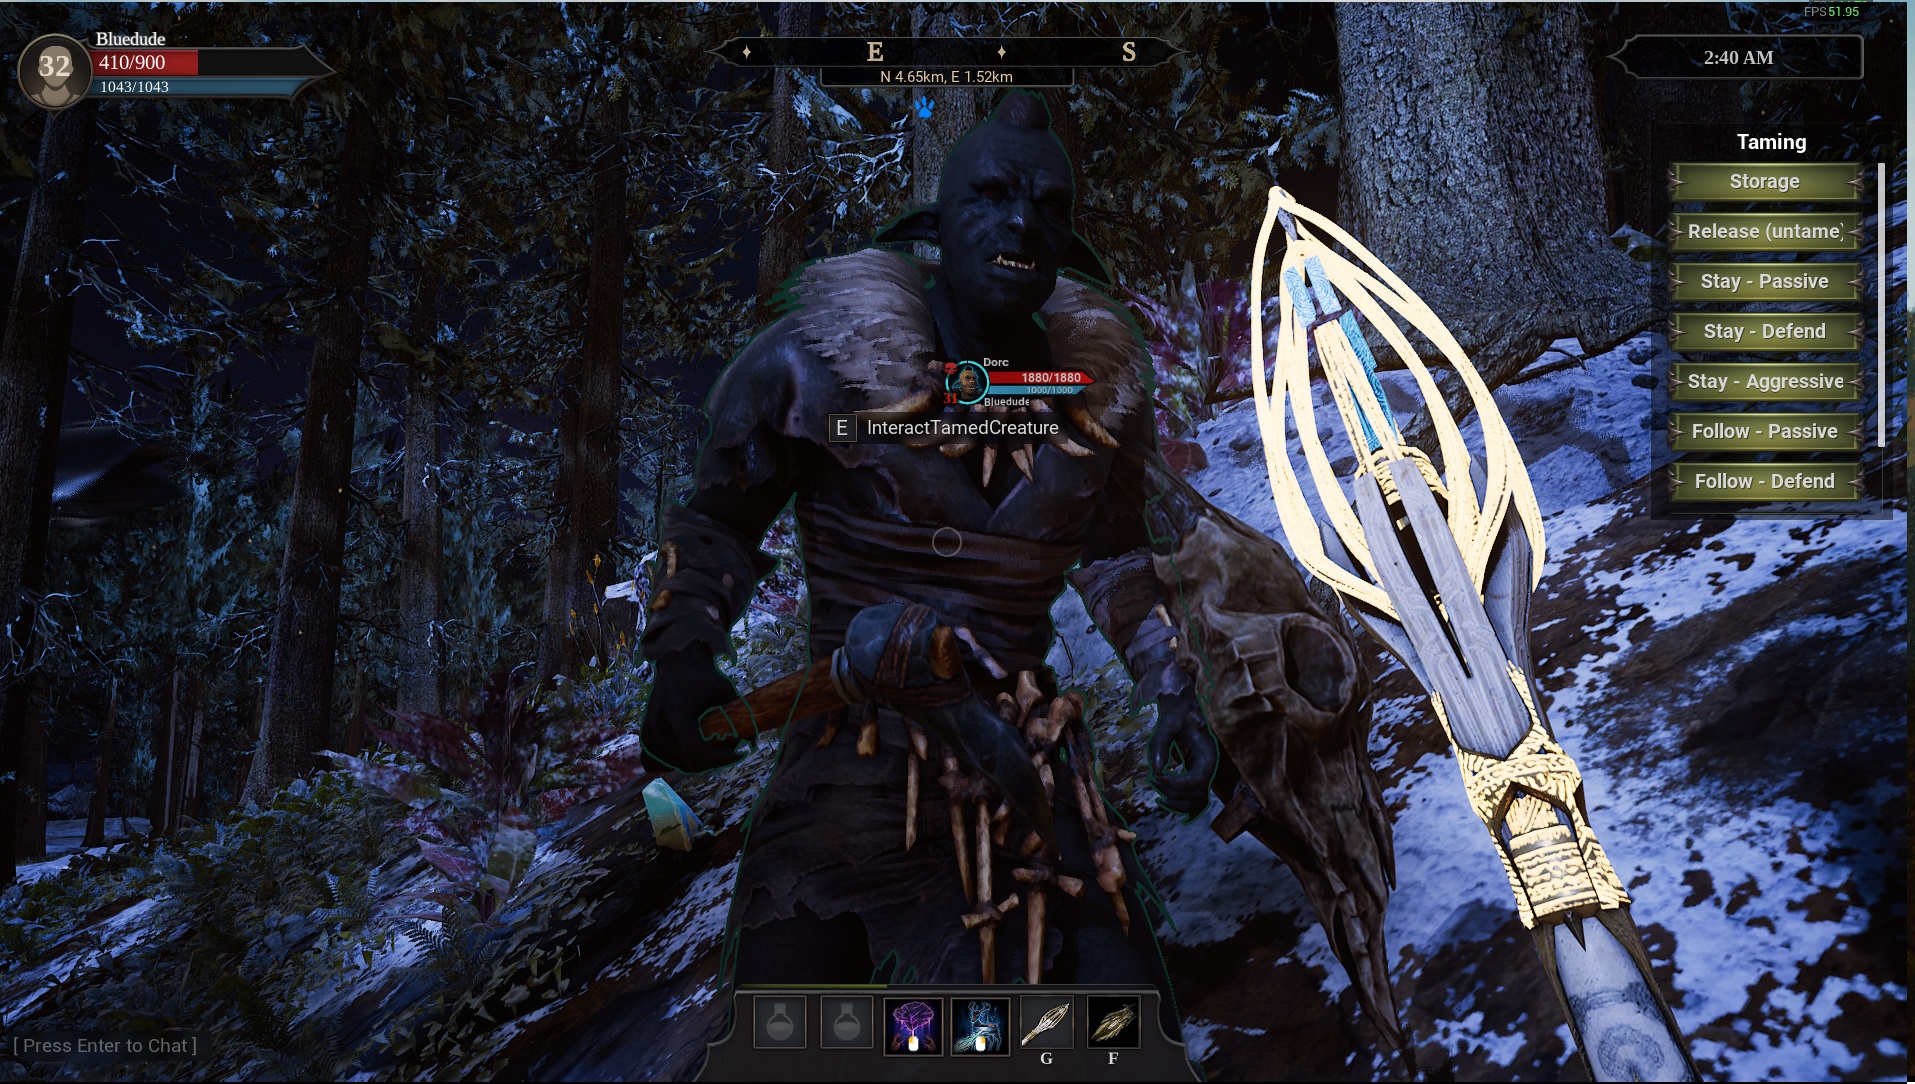
You unlock the spell to tame creatures called Pacify at level 10 in Forged with Fire. This is useful, as it’ll not only give you a 4-hour long pet that follows you around, but it also lets you give them commands. You can give orders like those shown above, as well as mount certain creatures like horses, elk, and dragons. The storage function is great for when you are on a resource run and get encumbered, but are too far from your home to get to your chest.
You can extend the duration by anywhere from 4 hours with soul binding scroll I (level 15 requirement) to 14 days with soul binding scroll VI (level 60 requirement.) This is of the utmost importance, as you’re likely to bond with your pet. I had a wonderful elk named Goofus who carried my burdens, let me ride him, was a loyal friend, and died valiantly defending me from a group of orcs. Rest in peace, Goofus.
Hitting Level 20
If you followed my advice above for building your base, crafting your weapons, etc., you’re likely to get somewhere in your teens just from harvesting, crafting, exploring, and killing the handful of monsters you run into. After that, though, you will have to hunt monsters more. As mentioned above, I recommend going for the camps. Keep doing this until you hit 20 in Forged with Fire.
If you hit 20 and are using the staff, I have a specific recommendation for you. The third tier of the staff is Gorthrax’s Ramshead, which requires 11 Rune Crystals, 3 Bones (found on demons and the like), 6 pieces of Wood, and 1 Eagle Feather. An Eagle Feather is something you likely won’t have come across at this point, as it drops from powerful Giant Eagles.
If you go to the east of Raveneye Lake, there is a cave marked on the map above called Yako Bokin’s Cave. Outside of the cave is a camp of undead enemies. Inside of it is a bear and two Giant Eagles that are around level 20. If you maintain the right distance and you’re lucky, you can attack the first Giant Eagle you see without it aggroing. Be careful, though, as it will easily kill you if you try to engage it up close and aren’t prepared. It’s doable solo, but if you can, I recommend grouping up for this.
After getting an Eagle’s Feather from one of the Giant Eagles, head back to your base and forge your new level 20 weapon. You can see how much you’ve progressed in a few hours by flying back to the starter areas and trying out your higher level spells and weapons on weaker enemies. It’s nuts to see how many enemies you can one and two shot at this point.
—
If you follow the beginner’s guide above, you’ll have nothing but smooth sailing — assuming the game doesn’t bug out a ton for you, an issue I address thoroughly in my Citadel: Forged with Fire review. If there’s anything missing from the guide that you think I should add in, something that I didn’t explain in enough detail, or anything else, leave a comment below! Either way, happy wizarding!
Need more help with the game? Check out the rest of our Forged with Fire guides to get all the information you need!


Published: Aug 4, 2017 04:49 pm