Welcome to the beginning of my series on The Legend of Zelda: Majora’s Mask. Over the next few weeks, I will be playing the game and sharing with you my experiences and opinions as well as various tips and strategies for beating the game.
Let’s start, shall we?
As the game begins, passages of text cross the screen to introduce the player to the story of the game. A prior knowledge of Zelda games is not needed, but having some experience with Ocarina of Time, in particular, can be helpful. Majora’s Mask is the direct sequel to Ocarina of Time, so there are references here and there to parts of the story. Basically, there’s an ocarina given to Link by Princess Zelda. It’s the same ocarina for which the first game is named, and you can probably infer from the title (or prior knowledge of Zelda) that it controls time. The only other piece of information that really comes up is that Link had a fairy named Navi in Ocarina of Time who helped him out.
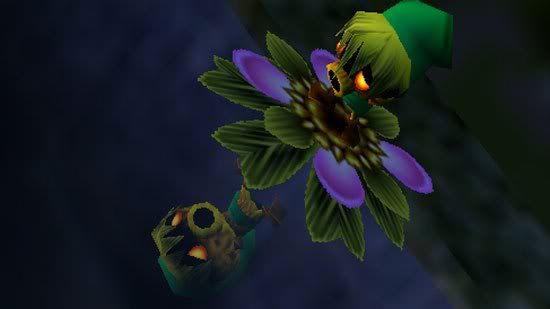
The game opens on a cutscene featuring Link riding Epona through the forest. Supposedly, he is looking for a “lost friend” (Navi). Instead, Epona is spooked by two different fairies, one white and one a purple-y color. These fairies are Tatl and Tael. Epona rears back and throws Link to the ground where he lays unconscious for a few moments. The Skull Kid (the game’s main villain) who is wearing a creepy mask then shows up to praise their good work.
The Skull Kid seemingly recognizes Link but disregards this fact to begin rummaging through Link’s pockets for items of value. (Near the end of the game, it is strongly implied that the Skull Kid recognizes him because they met back in Ocarina of Time. In fact, Link sold the Skull Kid a mask in that game. Funnily enough, it was the Skull Mask.) He finds the ocarina and begins to play with it as the fairies argue and Link regains consciousness. In an attempt to make an escape, the Skull Kid rides off on Epona, dragging Link along part of the way.

Gameplay begins in a clearing shortly after Link loses hold of Epona. Link has his sword and shield, so he’s already better equipped than he is at the start off Ocarina of Time. As this section of the game is untimed, I recommend pausing the pursuit of the Skull Kid and cutting down the grass nearby. You can score some rupees, and it never hurts to have more of those.
This is one of the few parts of the game where you don’t have to worry about time, so take advantage of that. Don’t rush. Take your time. It’s a luxury you’ll be wishing you had later in the game. Follow the Skull Kid’s path through the tunnel, and there’s another clearing. Again, grass = rupees, so start swinging your sword.
There is a line of tree stumps that gradually progresses in height, culminating at a platform where another tunnel awaits. Link automatically jumps (with some incredibly unnecessary but impressive flips), so just line him up with the next platform and run.
Here’s where it gets interesting. Link falls down through a pit of darkness and neon Zelda-related shapes, like the ocarina. The Skull Kid is, of course, waiting at the bottom. He informs Link that he “got rid of” Epona before deciding to have a bit of fun. So he transforms Link into a Deku Scrub.
So much fun, right? Now you’re a Deku, and you’re stuck like that for a while. Don’t worry, you’ll be able to fix it pretty quickly, and pretty soon, you’ll be able to transform Link back and forth as it pleases you and suits your needs.
The Skull Kid leaves after your transformation, but one of his fairies hangs back to mess with you and gets left behind. Meet Tatl, your new companion. Like Navi in Ocarina of Time, she helps you out and provides hints at tips as the game progresses.
You next enter a room with a large pit and a door on the other side. The only thing on your side of the pit is a pink Deku Flower. As Tatl informs you, as a Deku Scrub, you can use Deku Flowers as a mode of transportation. But oh hey, wait, there’s some grass on the ground beneath you, so drop down and get some more rupees. You can then use the Deku Flowers to make your way back up to the starting platform and then cross the room to the door.
The next room acts as a more advanced tutorial in Deku Flower use. Simply fly from Deku Flower to Deku Flower and make your way across the room, making sure to stop and open the chest on your way to get your very first Deku Nuts.
If you’re like me, you’ll probably fall a couple of times and die, but that’s perfectly fine. You just start over at the beginning of the room and try again. There are no penalties, so it’s no big deal.
Next to the room’s exit, there is a shriveled and sad-looking tree to which Link bears a strong resemblance. Remember this tree. You’ll understand its significance in time.

After exiting the room, you find yourself in a long, twisty passage which Link walks through. Then, bam! You’re magically inside a building that you’ll soon realize is the Clock Tower in Clock Town. Make your way over to the door, and you’ll be stopped by the (incredibly creepy) Happy Mask Salesman. He recognizes that you’ve been cursed and informs you that he has been following you. He also mentions that an important mask of his was stolen recently. Huh, I wonder which mask he’s talking about.
Then he drops the bomb: he can turn Link back into his normal self, but he wants his mask first. Your mission, should you choose to accept it, is to retrieve this mask from the Skull Kid. Sounds doable, right? Then comes the second bomb: the Happy Mask Salesman has to leave in three days’ time, and you have to have the mask by then.
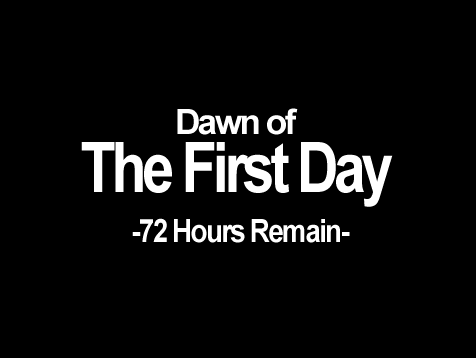
Exit the Clock Tower, and it’s the Dawn of the First Day. There are just three days left to get the mask back from the Skull Kid so you can be returned to normal.
Look for my next article soon. I’ll go through what my strategy is for the first three days, and give you some tips on how to make the most of your time.


Published: Oct 15, 2013 05:21 pm