Promethean Giant’s Hideout is the first group dungeon in Echo of Soul. You get access to the Normal mode at 35, and the Hero mode at 60 with gear score 590. The Normal mode is like an introduction to group dungeons, much like Hidden Cavern is an introduction to solo dungeons. In this guide I’ll give you the basics of each boss, as well as tips on getting to them quickly.
Queen Araknos:
Getting to the spider boss is simple: just kill everything as it aggros. Beware the baby spider spawns. There are three points on the path where these will spawn. These spiders die fast though, so just unload area damage on them.
Normal Mode:
Here I’ll list the attacks that the boss uses in the Normal version.
- Tangled Web: An unavoidable grab that pulls in all players and knocks them down briefly. Always used before Venomous Jet.
- Venomous Jet: A large AoE poison attack centered on the boss. This attack deals moderate to severe damage and poisons.
Hero Mode:
Here’s the attacks that are exclusive to the Hero mode. Please note that the Hero mode version will also use the Normal mode attacks.
- Gossamer Embrace: It’s unclear what this actually does, as it’s targeted on the party member who holds the boss aggro. It’s always followed up by Silken Suffocation on the same target.
- Silken Suffocation: A moderate damage attack used on the target of Gossamer Embrace.
Also, it warrants noting that Queen Araknos also has a randomly targeted poison attack that she uses. This attack is used in both modes and poisons the target. Like I said, it’s random, so keep an eye out for it and use your class cleanse if necessary.
Satyrus Flame Pontifex:
Getting to this boss differs in Normal and Hero mode. In normal mode, you’ll just kill everything until you reach the boss. In Hero mode, the tank runs ahead and pulls everything before the last pair of Trolls. The tank then runs to the side and dies while the rest of the party moves forward away from the mobs. If done right, the pulled mobs will all reset and run back to their original points. Then any party member can resurrect the tank with a scroll. For a better look at this, watch the Hero mode video below.
Normal Mode:
Here are the attacks this boss uses in Normal mode. These will carry over to Hero mode.
- Liquid Courage: The boss will cast this self-buff throughout the fight. As the fight progresses it will take more interrupts to actually interrupt it. The yellow text will tell you how many interrupts are needed.
- Satyrus’ Flames: A straight-line area attack that chooses a player at random as the focus. Avoid this attack by moving out of the black marker before it goes away. It is possible to down the boss without ever seeing this move in Normal mode. In my normal mode recording below, we successfully killed it without seeing this attack.
Here’s my Normal mode recording.
Hero Mode:
In addition to the Normal mode attacks, you also have one new attack to worry about.
- Slap Happy: This attack causes Satyrus to be surrounded in a damaging aura that will deal considerable damage to players near it over time. The tank should kite the boss during this while ranged attack and melee stay away. There is a purple haze around the boss while this aura is active; once it disappears melee can rejoin the fight.
Much like Araknos, Satyrus will hurl fire balls at random targets in both modes of this fight. However, there is no damage-over-time effect for this fire attack.
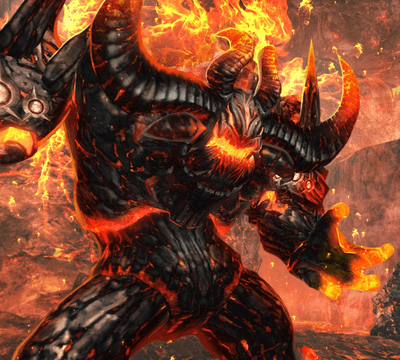
Promethean Giant:
This is the final boss of the dungeon. Much like Satyrus, the approach for this boss differs in both modes. In Normal mode, you’ll want to just kill everything. In Hero mode, the tank will sacrifice himself again so that the party can skip the trash monsters. This time, the party will run inside the boss room while the tank dies outside – again, a party member can use a scroll on them afterwards.
Normal Mode:
You start out this boss by killing the Flame Fragments tethered to it. Don’t aggro the boss until you kill the fragments, as they buff the boss. In both modes of this fight, the boss will periodically resummon the Fragments. Be sure to kill them immediately.
- Quake Stomp: A room-wide AoE attack that is unavoidable. (I’ve even tested the jump technique that you use on the attack Keshet uses.) In Hero mode, after Fragments are summoned, this attack has the potential to be used twice, so be ready to self-heal. It’s also a knock-back, so don’t start a long cast/action during this move as it will be interrupted.
- Infernal Flame: Several ground indicators will be spread throughout the room randomly. Move to a safe spot before these indicators detonate.
- Flame Spurt: This attack is identical to Satyrus’ Flames from the previous boss. Treat it the same as that attack.
This is my Hero mode recording.
Hero Mode:
This version only has one additional attack outside of minor attack pattern changes.
- Compress: The boss places a large indicator on the ground and leaps to that location once the cast completes. This attack deals a massive amount of damage. Our Firemage was at full health and got dropped to 1/3 health after this attack.
This wraps up my rundown of the dungeon. For more Echo of Soul content, be sure to check out my guide list. If you have any comments, questions or concerns leave them down below.


Published: Jun 5, 2015 06:54 pm