Ready to dive into Fallout 4’s first official DLC Automatron? Bethesda has provided fans with a horde of new crafting options on this first release of the Fallout 4 season pass, between new robot-themed settlement pieces and even the ability to create and modify any type of robot you can imagine.
Besides the robotic crafting (see our complete guide here), Automatron offers a handful of new quests, with one open ended robot-slaying quest afterwards for mopping up all those pesky ‘bots still rampaging across the Commonwealth.
Basic Automatron Strategies
Besides a few Rust Devil raiders, every single new enemy you come across in Automatron will of course be a robot. Unlike with normal enemies, aiming for the head isn’t always the best option with Automatron foes. The assaultrons with lasers mounted on their heads for instance take significantly less damage to that location, while swarmbots take bonus damage if you aim for their bottom thrusters.
Keep in mind that many of the larger robots – the sentries, tankbots, and even some robobrains – will explode with the force of a mini-nuke after they are destroyed, so don’t stay in close range! Robots are more likely to do this if you destroy their weaponry, so try not to take out both of their arms before destroying them.
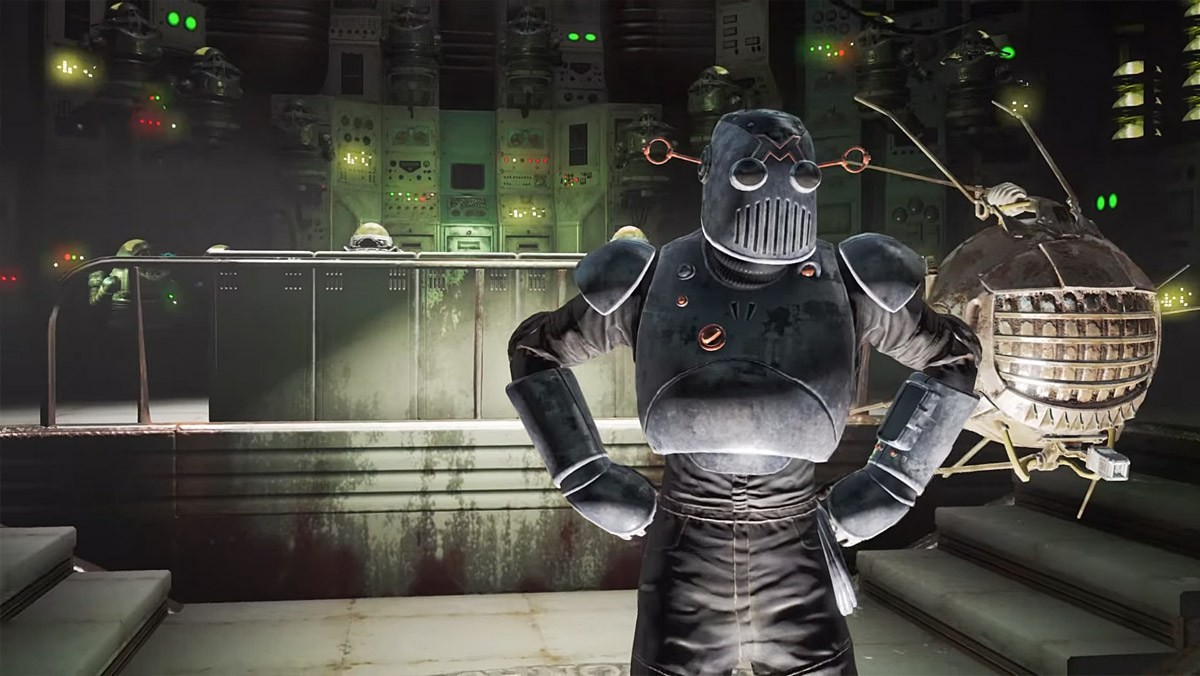
 A massive new robot enemy
A very solid strategy for surviving some of the more difficult areas is to get in power armor so you survive the explosive ordinance coming your way, and then run up and simply hack the robots.
As long as you have two points in the Robotics Expert perk, you can hack almost every single enemy in Automatron – even most of the tougher “boss” type robots or the random legendary spawns. If you have trouble taking them down the old fashioned way, just run up, hack ’em, and initiate a shut down or the self-destruct sequence. Then run.
Mechanical Menace
Automatron kicks off with the Mechanical Menace quest, which you can get by listening to the caravan distress call on your radio tab and then traveling to Wattz Consumer Electronics (located to the northwest of Cambridge Police Station and southeast of County Crossing).
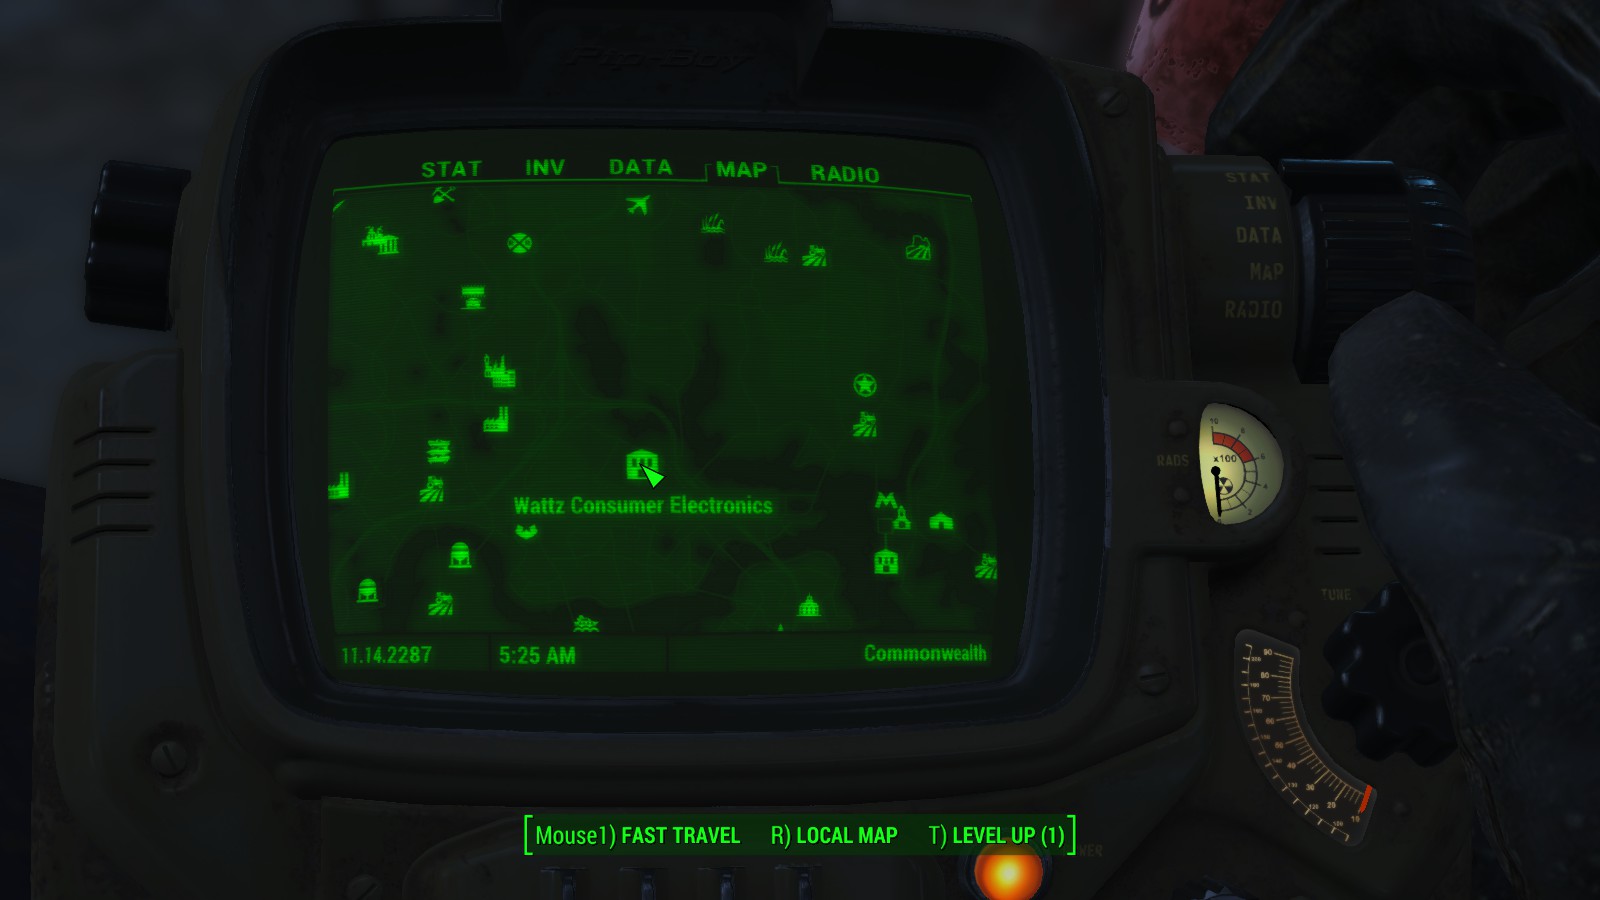 Wattz Consumer Electronics Location
You will immediately be in a pitched battle against an array of robots. It’s best to take this one from afar for as long as possible so you don’t get swarmed, then run in and hack anybody left alive when the bots finally notice you.
Following the battle, talk to Ada and agree to help her to get the schematics for a robot crafting station and wrap up the first quest, which unlocks the “Mechanical Menace” achievement. For info on what materials you need to build the crafting station, check out our getting started guide here.
From now on you can modify Ada, Codsworth, and Curie or even build your own custom robots. Swapping out any combination of 10 different mods between robots will unlock a new achievement named “The Most Toys.”
A New Threat
After the pitched battle kicking off Automatron, its time to get into the heart of the story: tracking down the Mechanist and finding out why all these killer robots are shouting messages of peace while they gun people down.
The quest takes you to General Atomics Factory, just slightly to the northwest of the Castle settlement, which will be handy if you happen to use that as your main base and put your robot crafting station there.
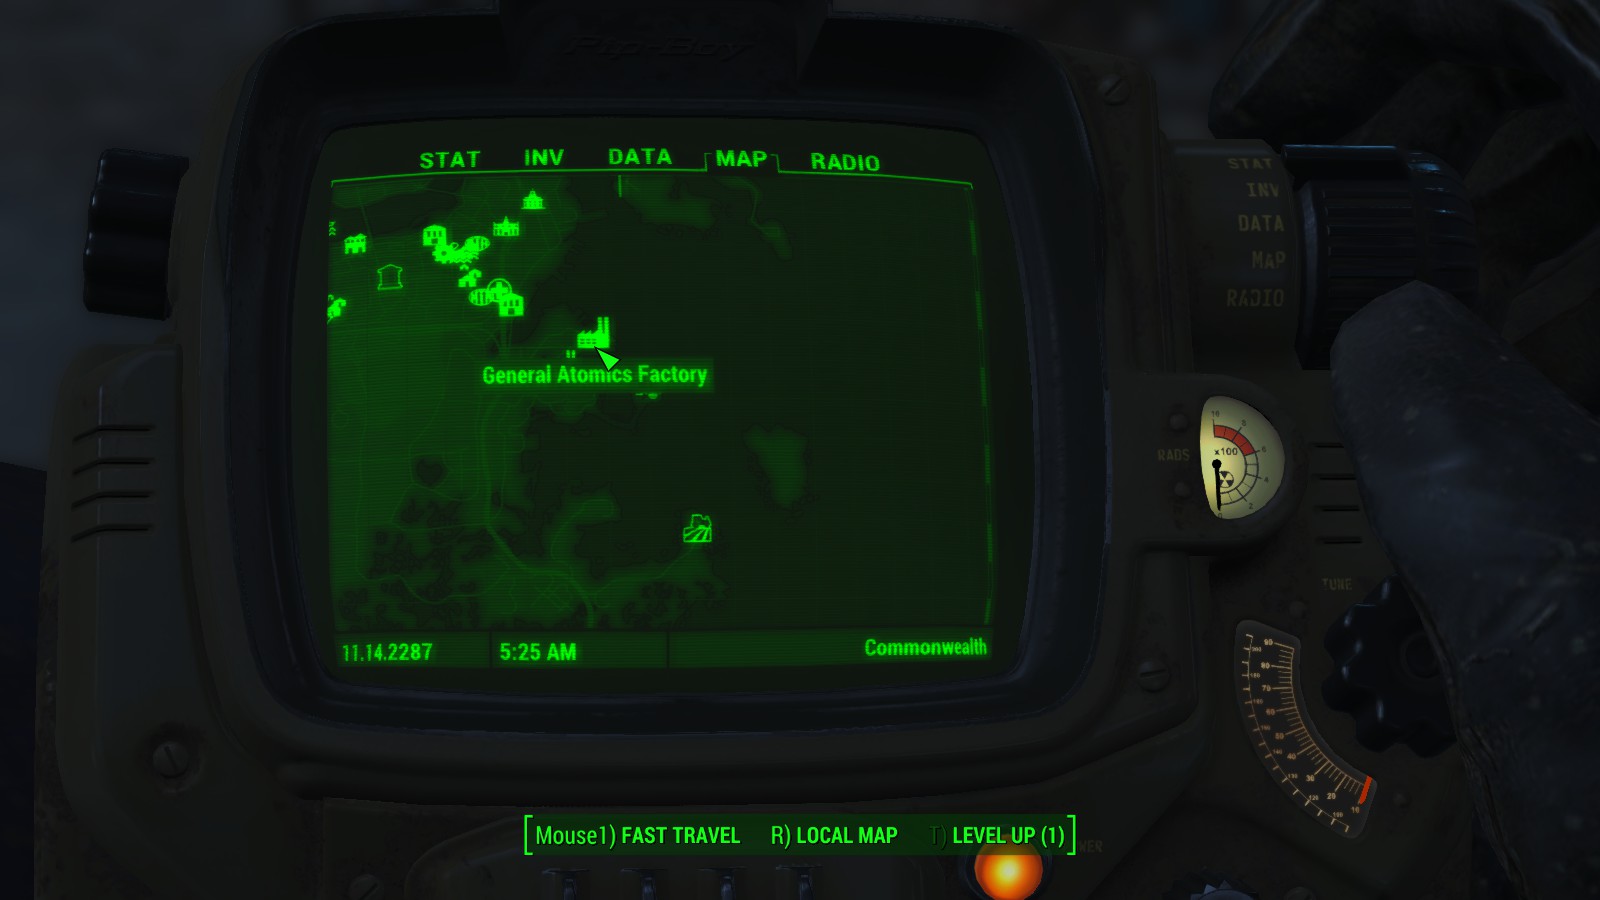 General Atomics Factory Location
This part of the quest is very straightforward and just like any other indoor exploration quest in Fallout 4. Head in, follow the tips above for fighting robots, and you should be good.
Keep an eye out on the second floor for Tesla Science book sitting on a desk, and be sure to scavenge the twisted wreckage of every robot you kill! New mods galore can be found in the enemies here, and after picking up a 10th unique mod part you will unlock the “Robot Hunter” achievement.
Fight your way to the robobrain boss, who will again self-destruct after being defeated, so try to stay away. Loot his body to find a handful of new mods and the quest-specific Mechanist Device, which is required to continue the story.
Talk to Ada and then use your robot crafting station to install the Radar Beacon on her, which initiates the next quest.
![]() Installing the radar beacon
Installing the radar beacon
Headhunting
With the beacon installed, follow Ada’s directions to a new battle location, where you will face off against more robots to pick up the next beacon.
That’s just the start though – the real meat of the quest is up next, when you have to travel to the Fort Hagen Satellite Array at the far west edge of the map.
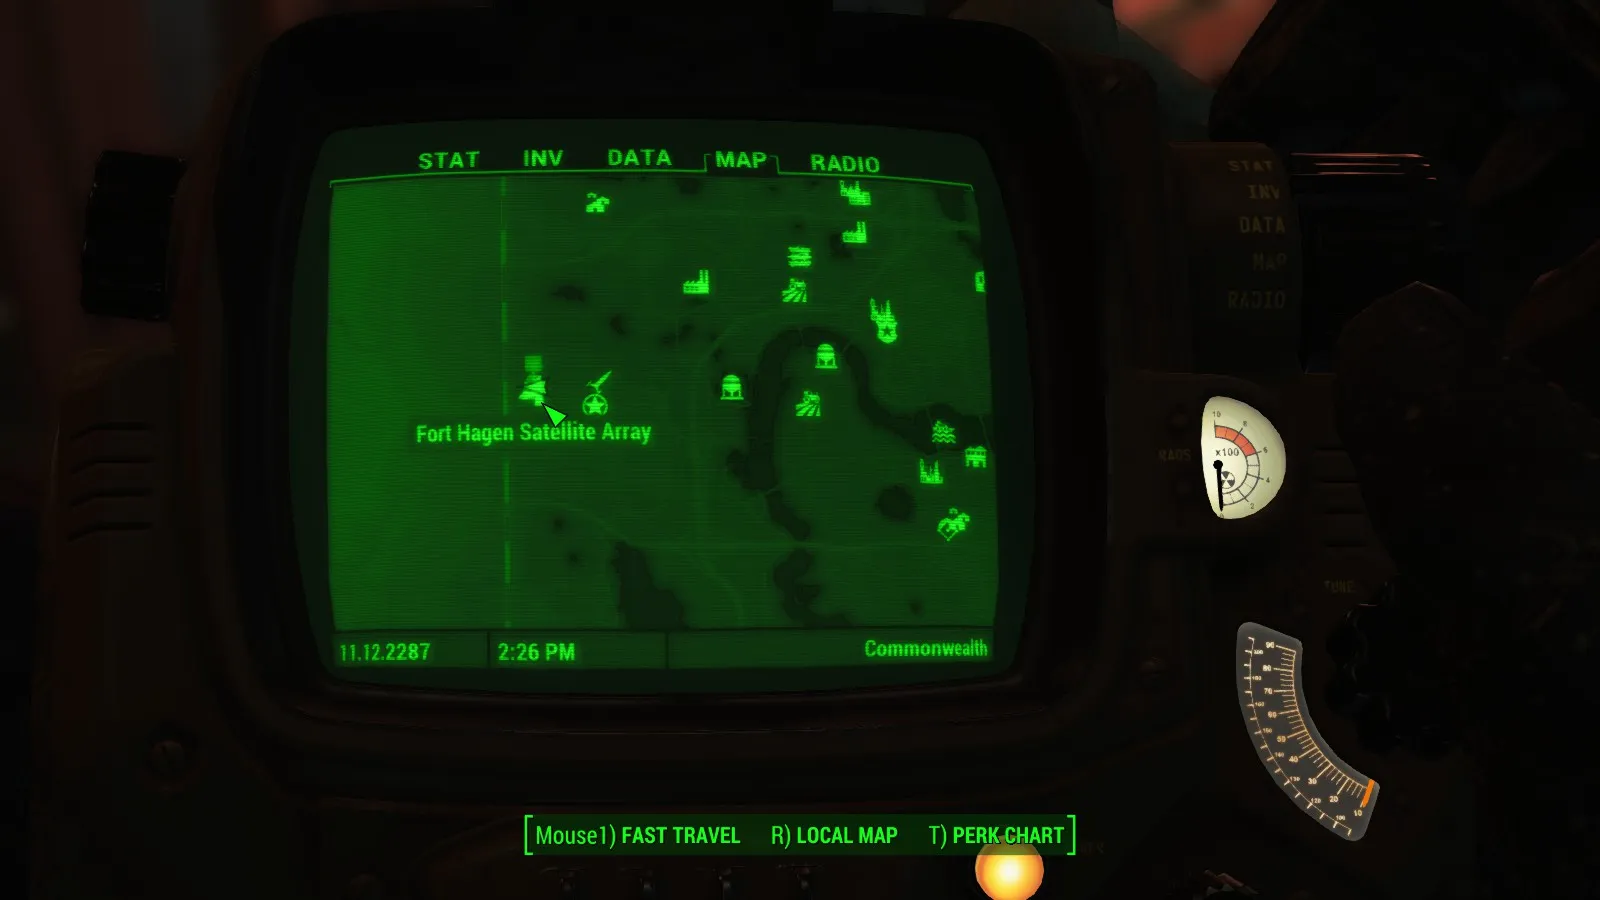 Fort Hagen Satellite Array Location
Here we meet the Rust Devils, who have some sort of occult fetish with the robots they’ve captured and reprogrammed to do their bidding. Be sure to keep picking up mods off bodies here, as there are bound to be loads of interesting random drops here.
To access the actual internal area of Fort Hagen, head up to the top of the structure and use the black terminal to unlock the door back at the bottom. Head inside and stay on the lookout – there are traps galore inside, including both laser trip wires and the new assaultron totems.
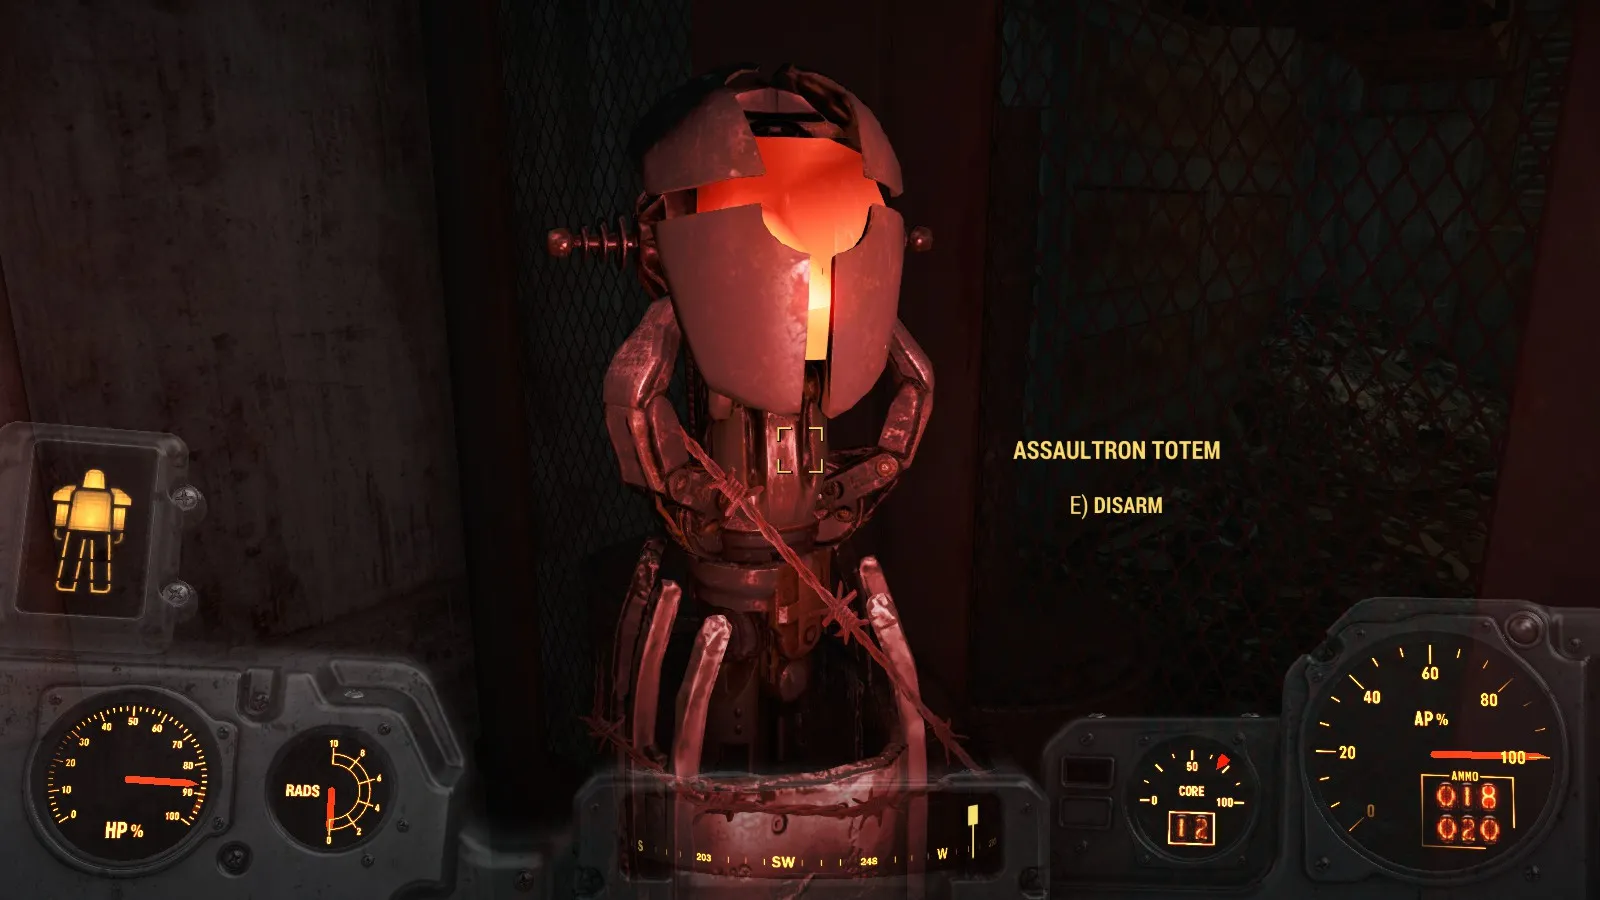 A fun new trap to keep you on your toes
Keep heading down at every opportunity until you go down a ramp and hit an area with a small in-between security room – here you can loot a very nifty set of high defense X-O1 Power Armor.
The next room is where the quest takes a turn, as you come across the disembodied brain Jezebel, who needs your help finding a new robot body.
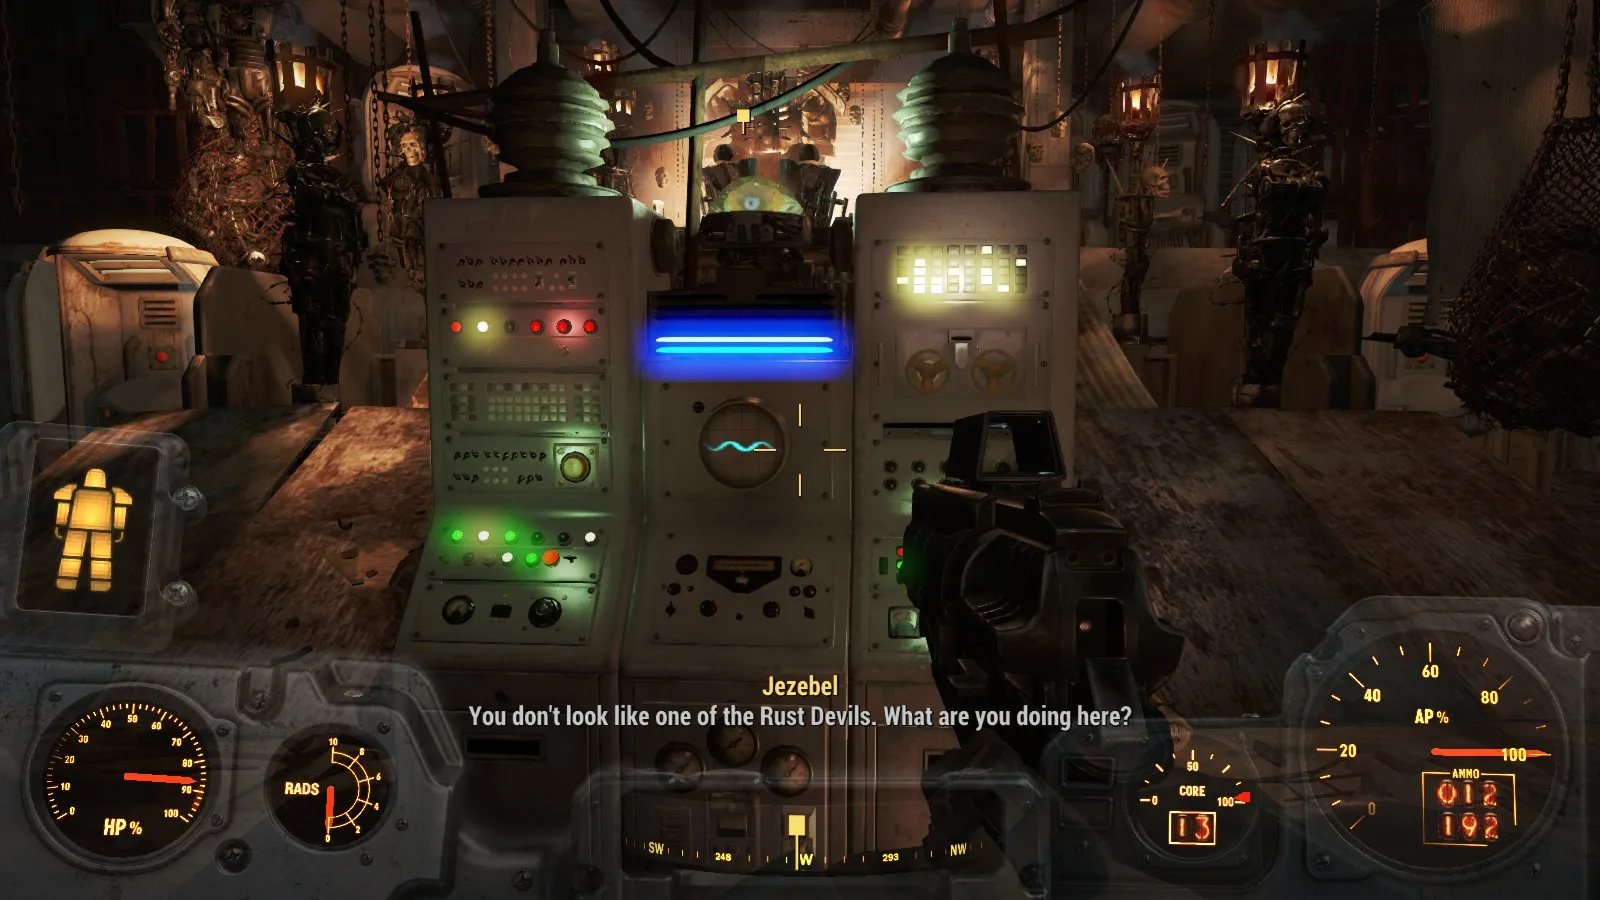 Meeting Jezebel
Removing Jezebel’s head will activate this area’s boss – the demonic sentry bot Ahab, who is outfitted with flamethrowers, missile launcher, and a minigun!
You will definitely want to equip that power armor if you haven’t yet, or Ahab is likely to make short work of you. It’s best to have Ada take point on this one and fire from afar, and of course be ready for the self-destruct sequence when he goes down. If he’s still chewing you up quickly, don’t forget you can target each individual weapon in VATS to disable his offensive capabilities.
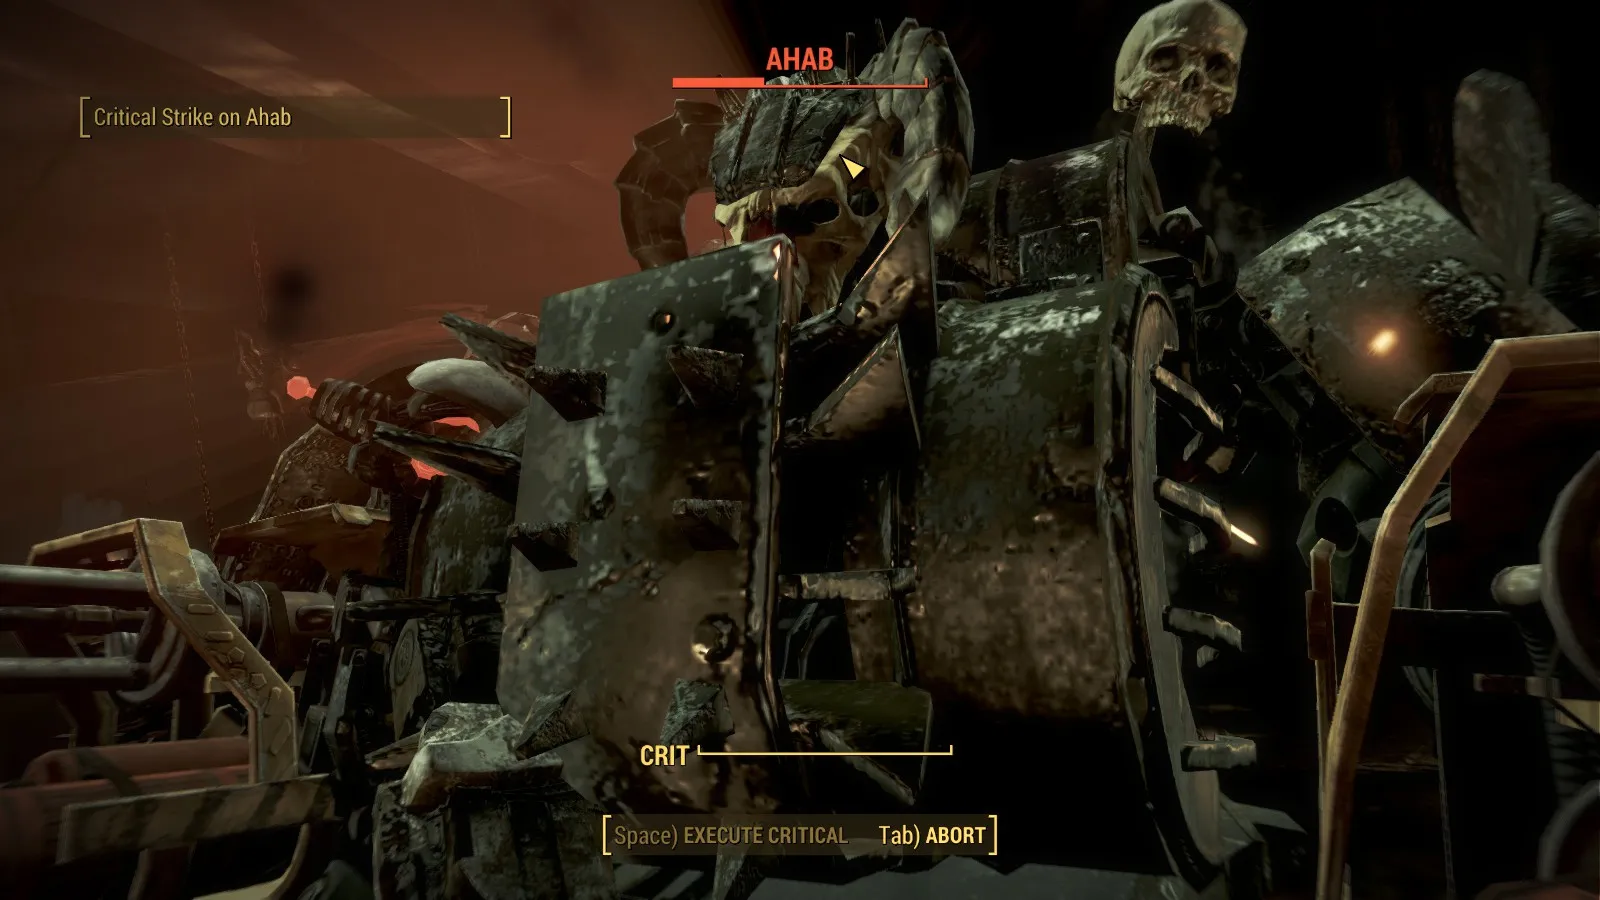 Battling Ahab
After the battle, it turns out you can’t leave the way you came in, and instead you have to head out a side door to a room filled with laser tripwires.
Follow the path here until you come across the secondary boss Ivey and her Assaultron Succubus guardian. This is another fight where power armor is incredibly helpful.
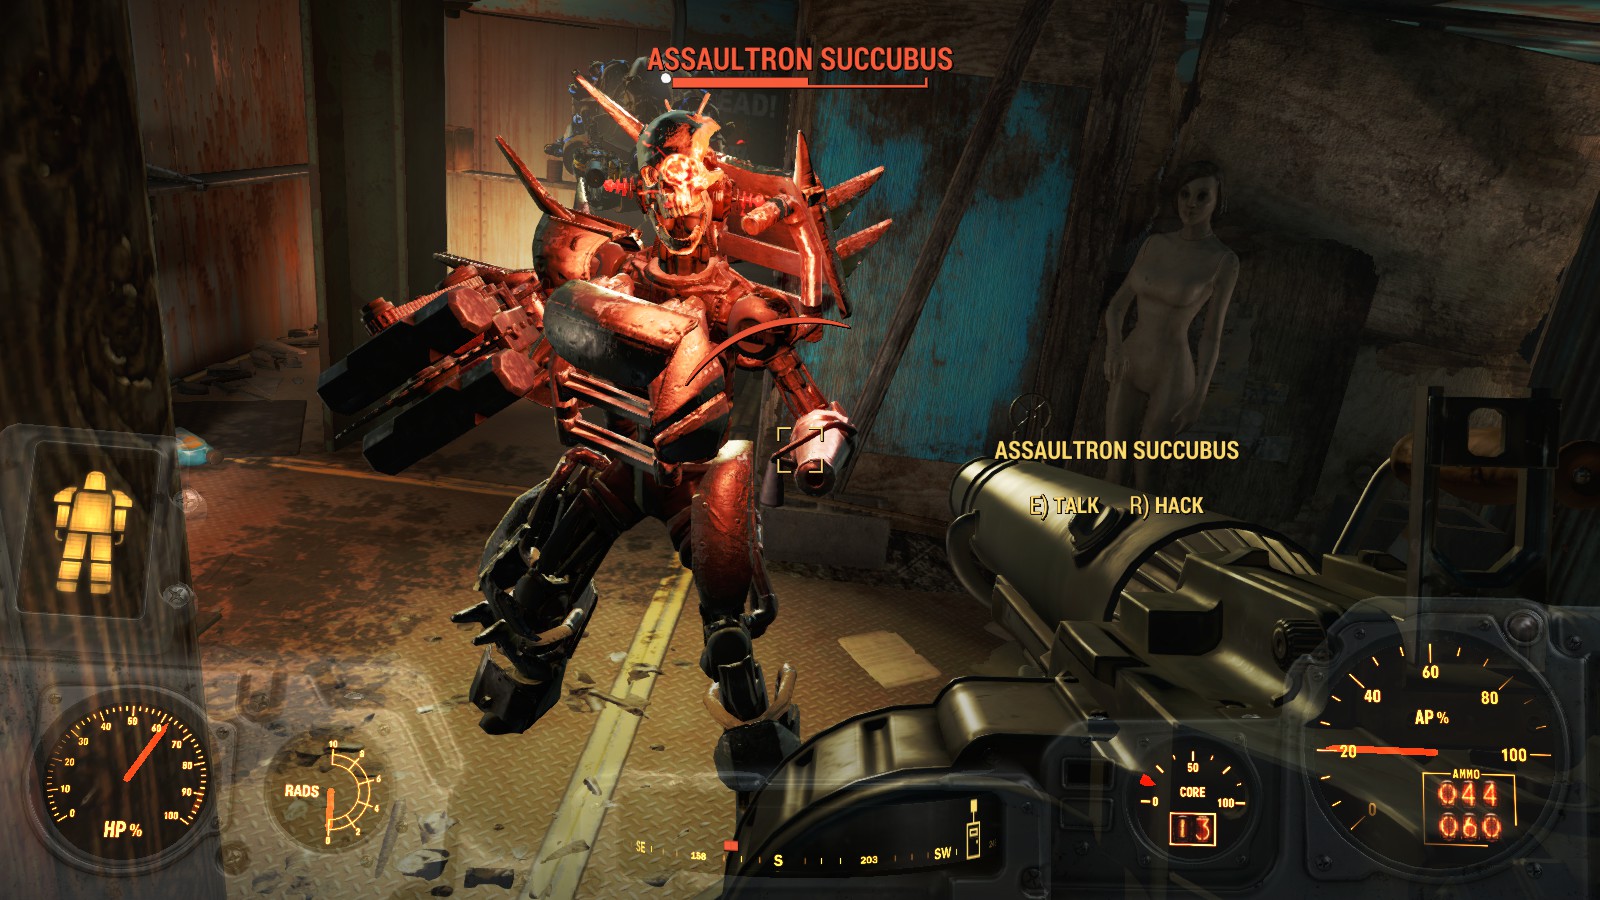 More demon robots!
When Ivey finally goes down, you can loot both her Tesla Rifle (which arcs electricity between multiple enemies) as well as her Tesla power armor. That’s right – you get two suits of power armor in this area.
If you happened to walk in wearing power armor already, it’s a good bet you will go way over your weight limit, so its time to either drop one of them or take some strength-enhancing drugs like Buffjet.
After defeating Ivey, be sure to check her terminal in the next room and read the entry labeled “Pioneer Park Disaster.” This reveals a new map location and also gives info on the terrifying Ahab boss and why he has a flaming skull on his robot body.
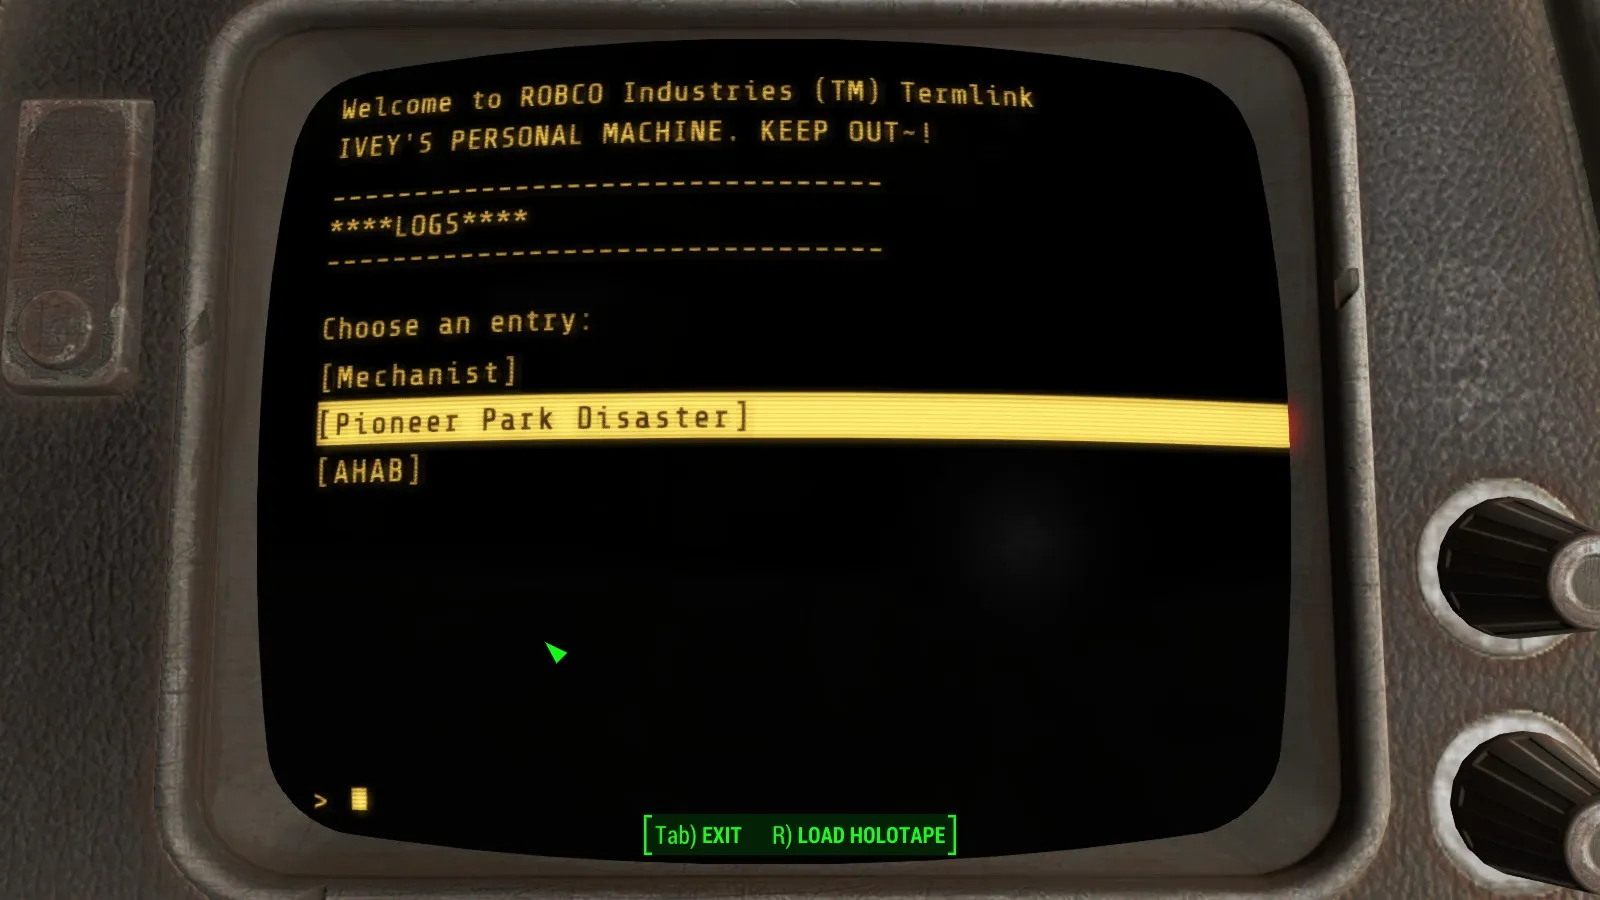 Learning about the Pioneer Park disaster
If you can pick the lock on the nearby security room, a fatman and two mini nukes are yours for the taking. From there it’s a simple trip out of Fort Hagen back to the surface.
Head back to the settlement with your robot crafting station and build a new robot. Select the “Jezebel Head” option to complete this quest and unlock the “Head Hunting” trophy.
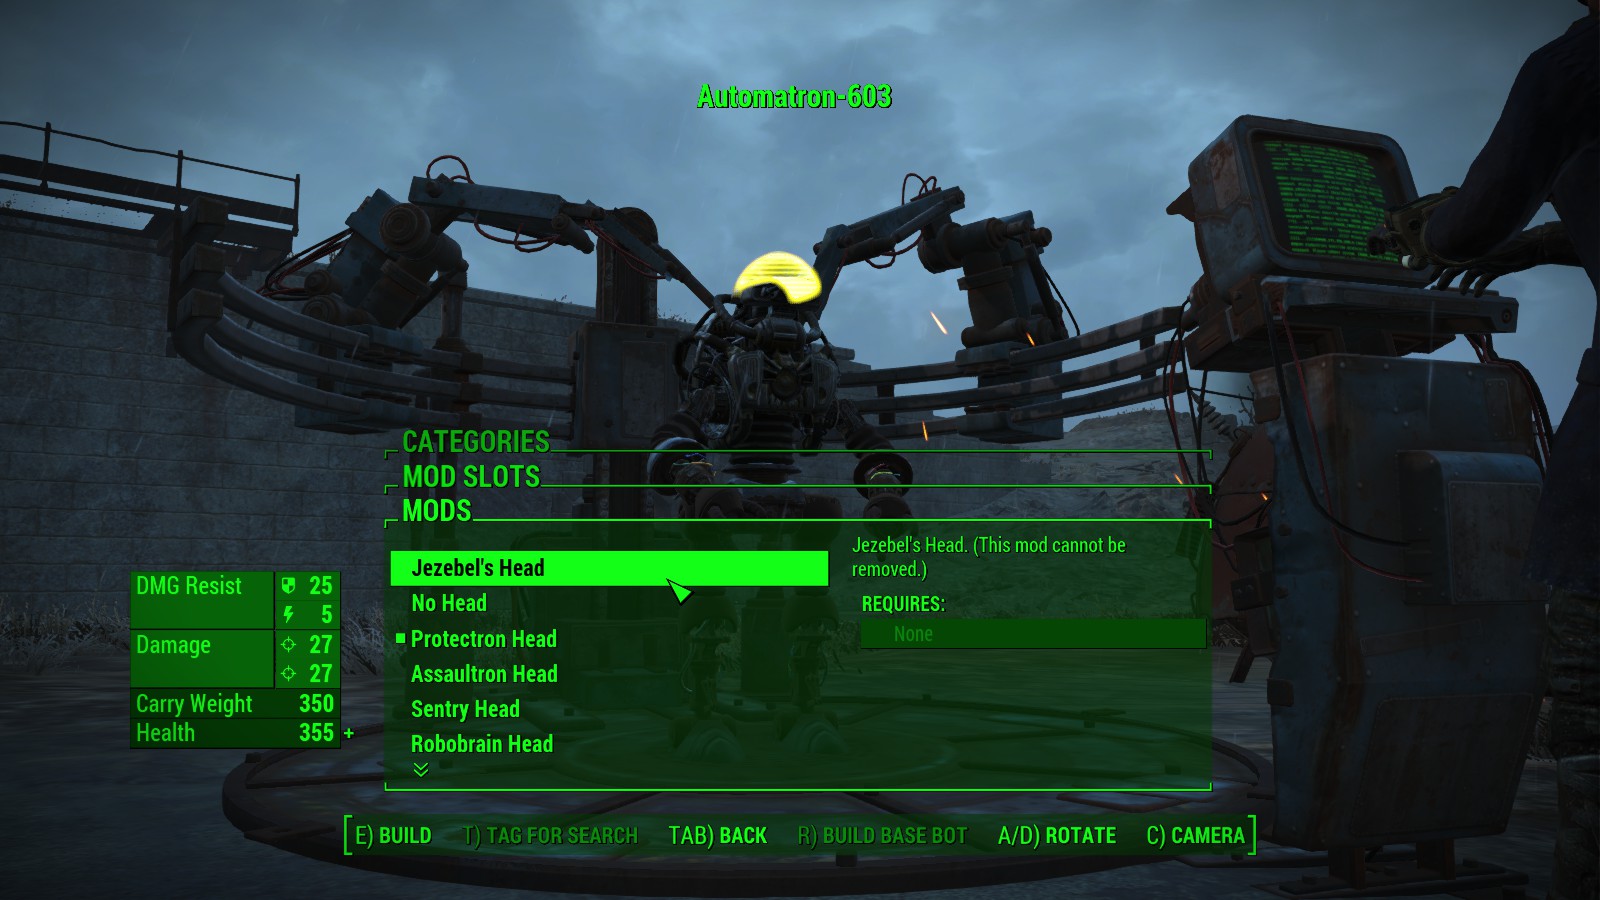 Giving Jezebel a new body at the crafting station
Restoring Order
To get this last main part of the Automatron quest line going, return to your robot crafting station and swap out Ada’s Radar Beacon for the new M-SAT option. Now the path to the Mechanist’s lair will be made clear.
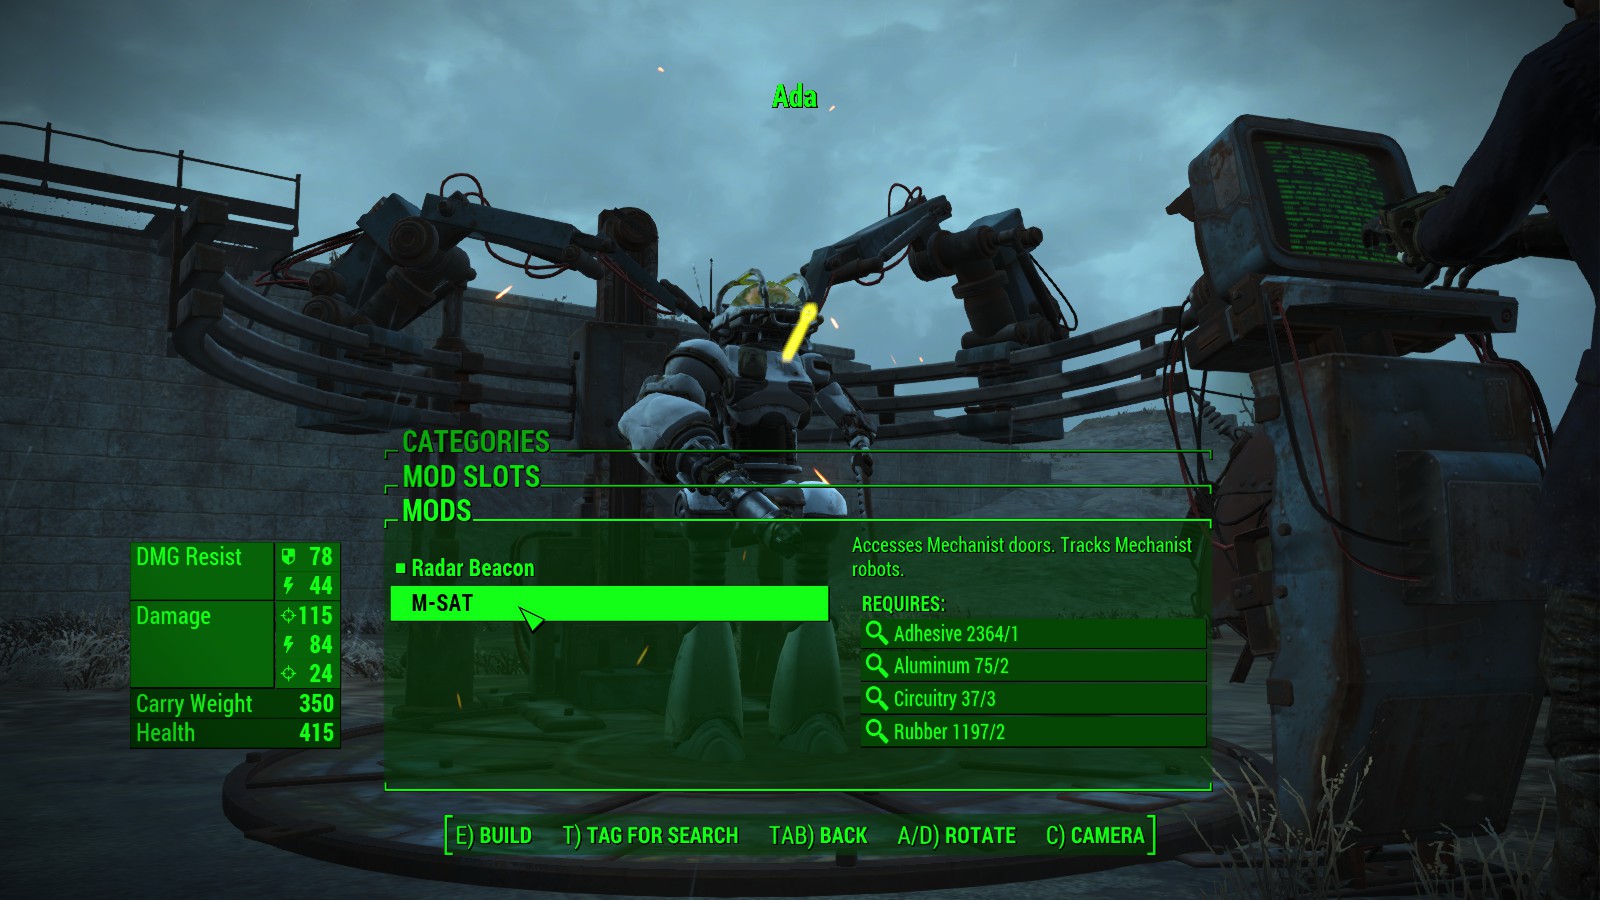 Installing the M-SAT device
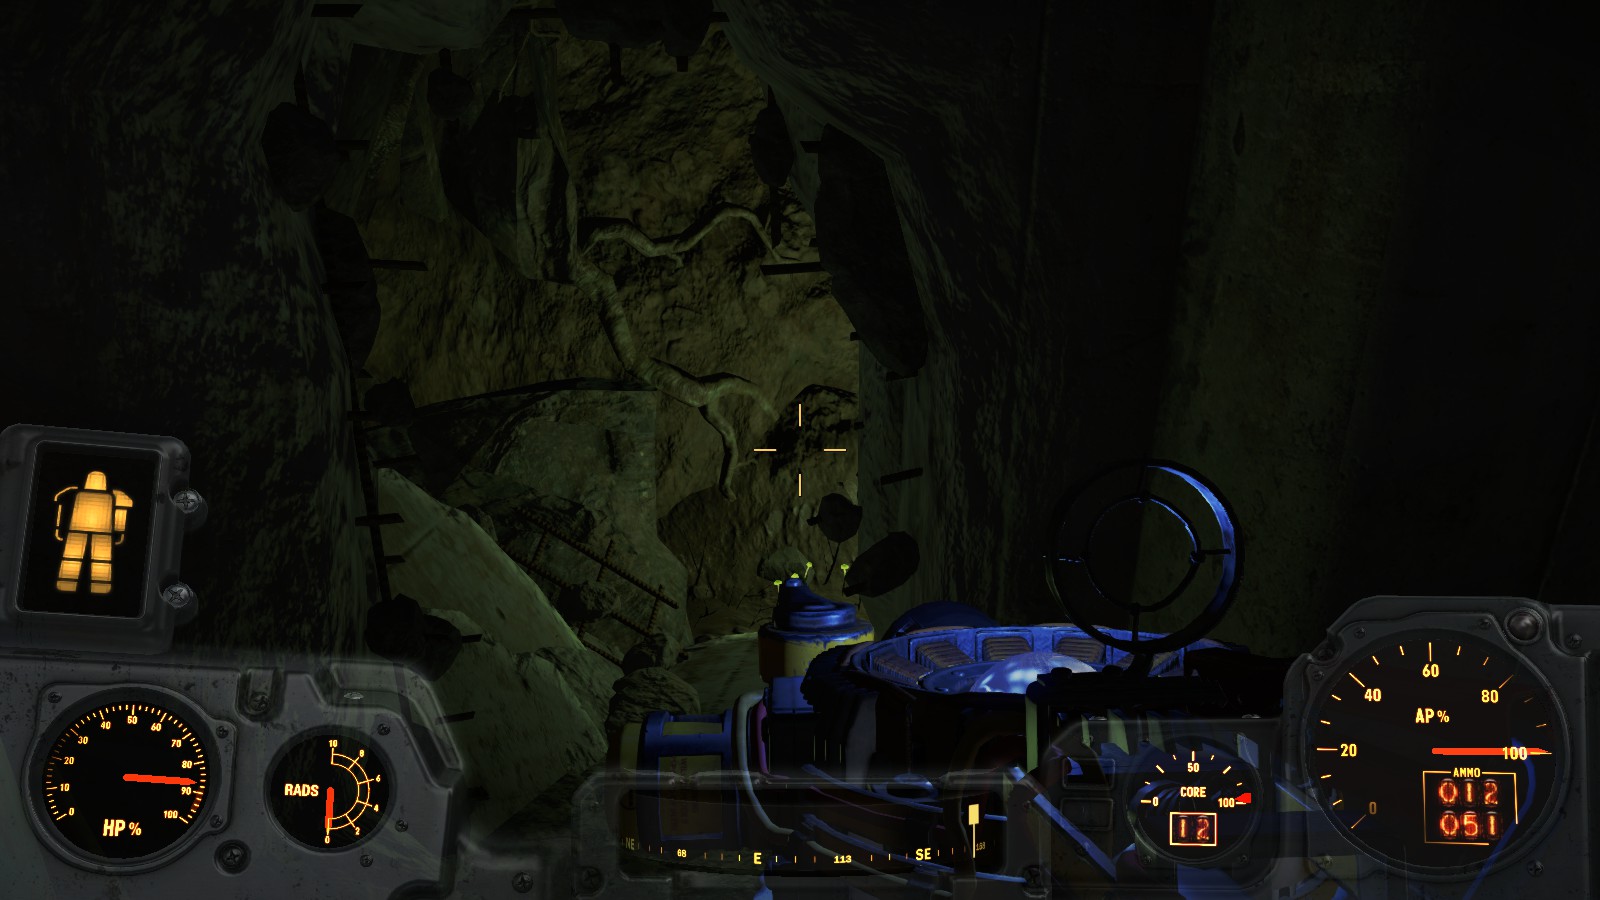
Inside is a glowing red light death tunnel, which I don’t recommend running through (but hey, if you’ve got strong enough armor and high enough hit points, go for it!).
Instead, anyone with a few points in the hacking and lock picking perks can bypass that entirely by going through the side tunnel in the broken wall segment.
 This is the door you want go down to avoid laser death
From here on out you will find a bunch of locke- down blast doors that only Ada can open – just walk up and interact with the wall objects labeled “strange device” to order her to unlock the doors.
While exploring the Mechanist’s lair, keep an eye out for metal desks, as you can find three important items needed if you want to go the non-combat route later on: the Lead Engineer Holotape, the Facility Director Holotape, and the Chief Scientist’s holotape.
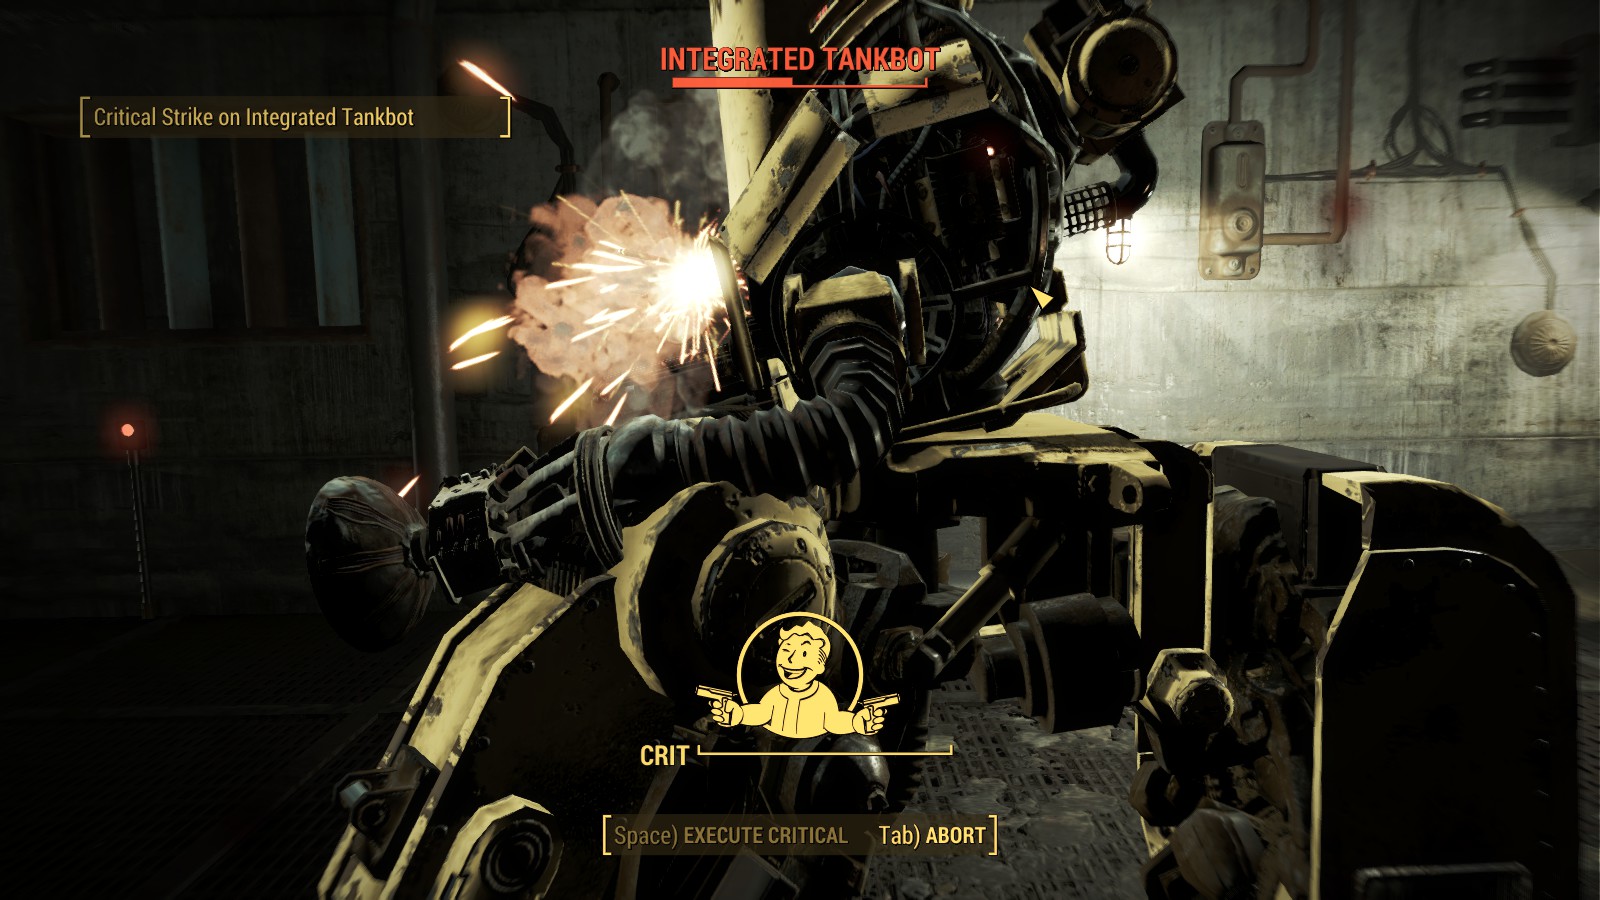
Halfway through the Mechanist’s lair is the Integrated Tankbot mini-boss, who rolls out of a storage room. Watch out for the explosion after he loses all his health! To continue past this area, head up the yellow stairs on the left and press the red button to extend the ladder.
 We’re finally nearing the end of the robotic bosses!
You probably thought you’d battled a whole lot of robots already up until this point, but you haven’t seen anything yet. Upon finally arriving at the Mechanist’s chambers, things get nuts.
Turns out she’s under the mistaken impression that you are the evil menace and her robots are the Commonwealth’s saviors. Oops.
Now that you’ve invaded her home and are clearly intent on killing her, she will send wave after wave after wave (after wave after wave… after wave… after wave) of robots to take you down – all while dropping mines and exploding barrels from above, so keep an eye out on the ceiling!
 Confronting the Mechanist
Power armor is a must, and stim packs are helpful, but a better option is actually to install the regeneration field mod on Ada. This can seriously turn the tide of the battle, since there’s a bit of down time between each wave of enemies where you will be fully healed without having to use stim packs.
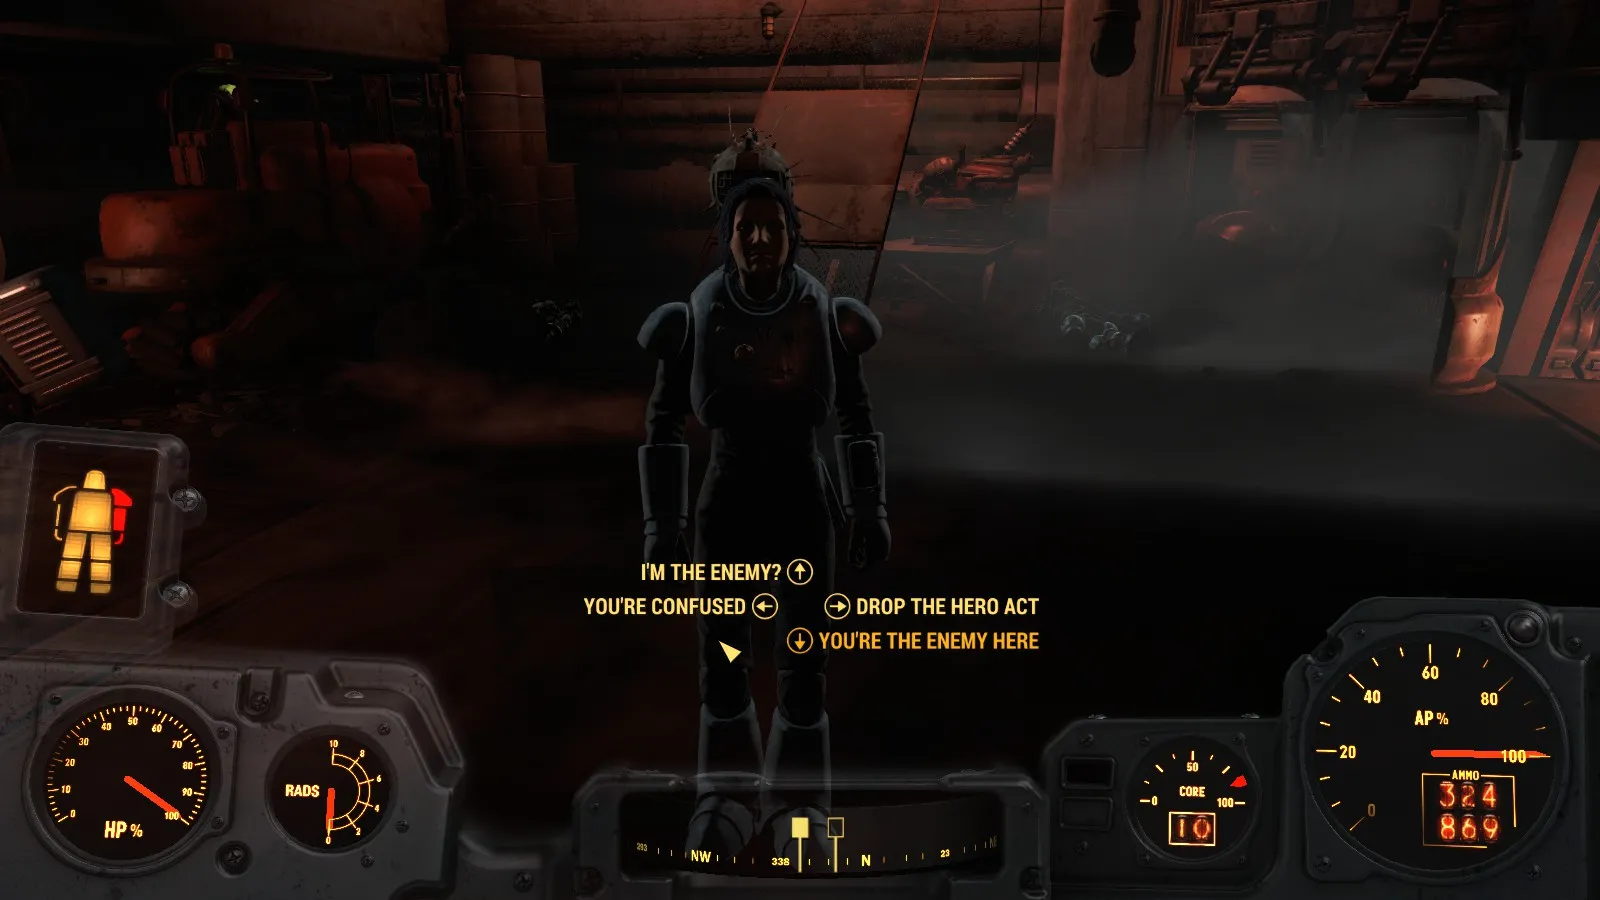
After taking out the endless hordes, it’s time to confront the Mechanist herself. If you choose to be antagonistic, the Mechanist will attack you, leading to the violent outcome.
Instead choose “Lets Talk Face To Face,” “You’re The Enemy Here” and “Your Plan Backfired” to reach a peaceful resolution, in which the Mechanist will then give you the password to shut down the factory, along with her specialized armor.
 Overcoming differences semi-peacefully
If you happen to be wearing the Silver Shroud Armor and Silver Shroud Hat (found in a previous non-DLC quest at Hubris Comics), you will get some extra dialog options before deciding how to resolve the situation.
There’s another option to take here that requires you have master level hacking skills and all three of the holotapes mentioned earlier. After the Mechanist starts talking, and before fighting the waves of robots, leave and go all the way back to the main elevator at the start of the area. Hack the large green terminal and use the three holotapes you found to bypass the Mechanist’s defenses and go straight to the final dialog!
 Completing the main Automatron quest line
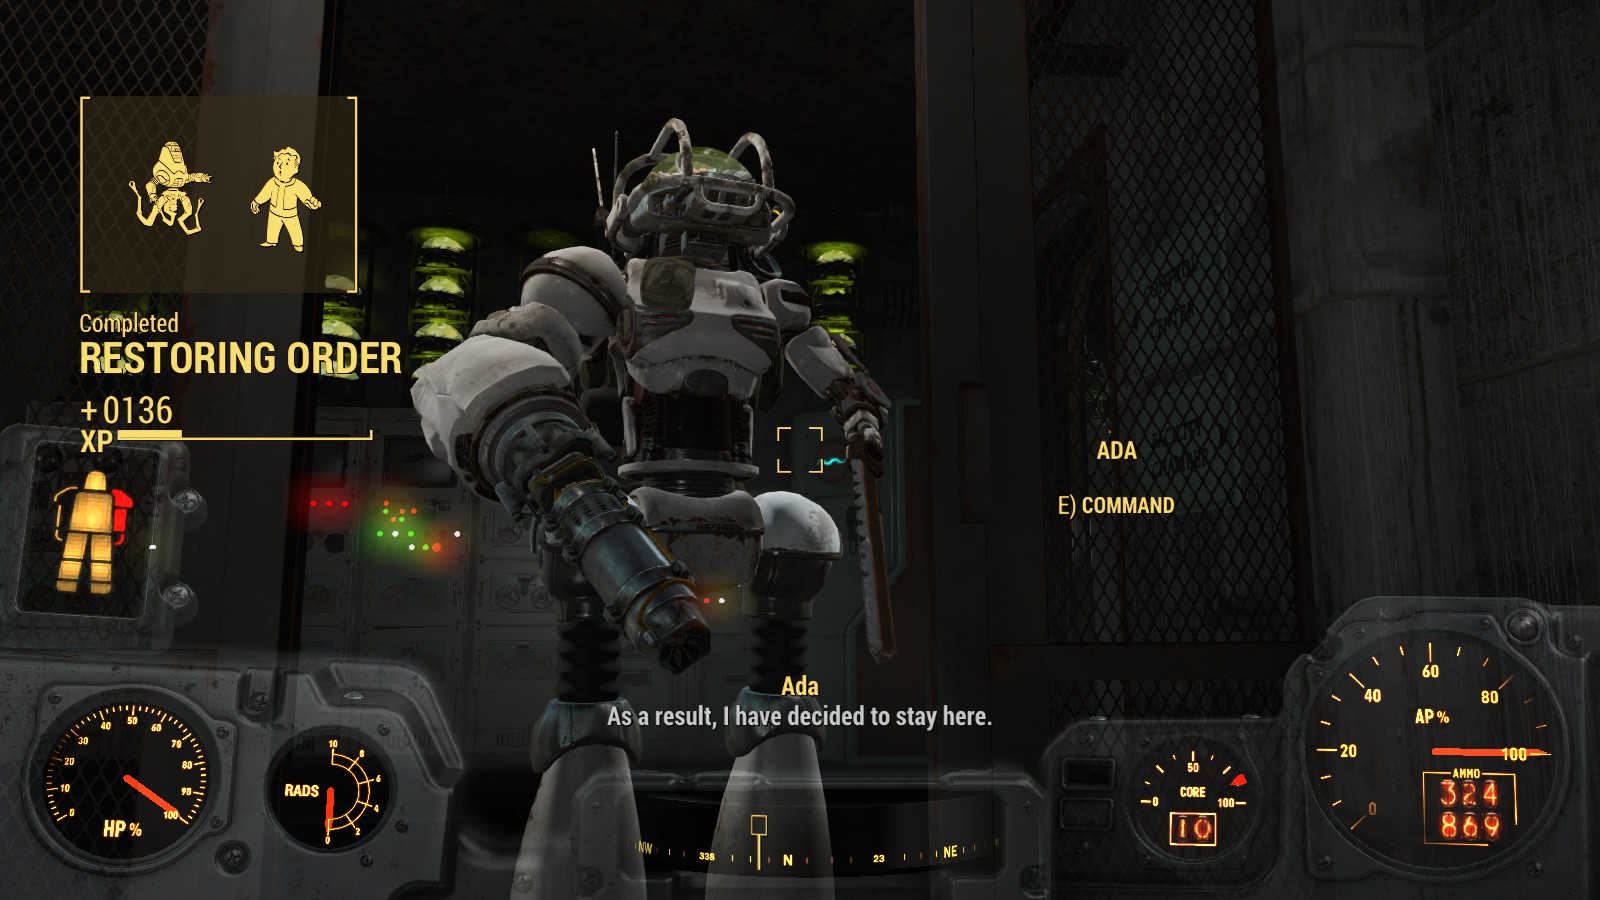
Whether you kill the Mechanist, choose a peaceful resolution, or bypass the robot waves altogether, next talk to Ada to finish the quest and unlock the “Restoring Order” achievement. Every single robot mod will also now be available at the robot crafting station, even if you haven’t found them all yet.
The entire area now unlocks so you can go in all those shuttered doors in the Mechanist’s chambers. Be sure to pick up the eyebot schematic, which lets you build an eyebot pod in any outdoor settlement area. These nifty little guys will go out and search for objects for you, like crafting materials or ammo!
Rogue Robots
Following the main quest, either the Mechanist (if you spared her life) or Ada (if you killed the Mechanist) will give a new never-ending quest called Rogue Robots, which is similar to how Preston Garvey keeps giving you settlement quests.
Rogue Robots will send you off to fight new mechanical enemies that scale to your level, with a good chance for legendary enemies with unique loot drops.
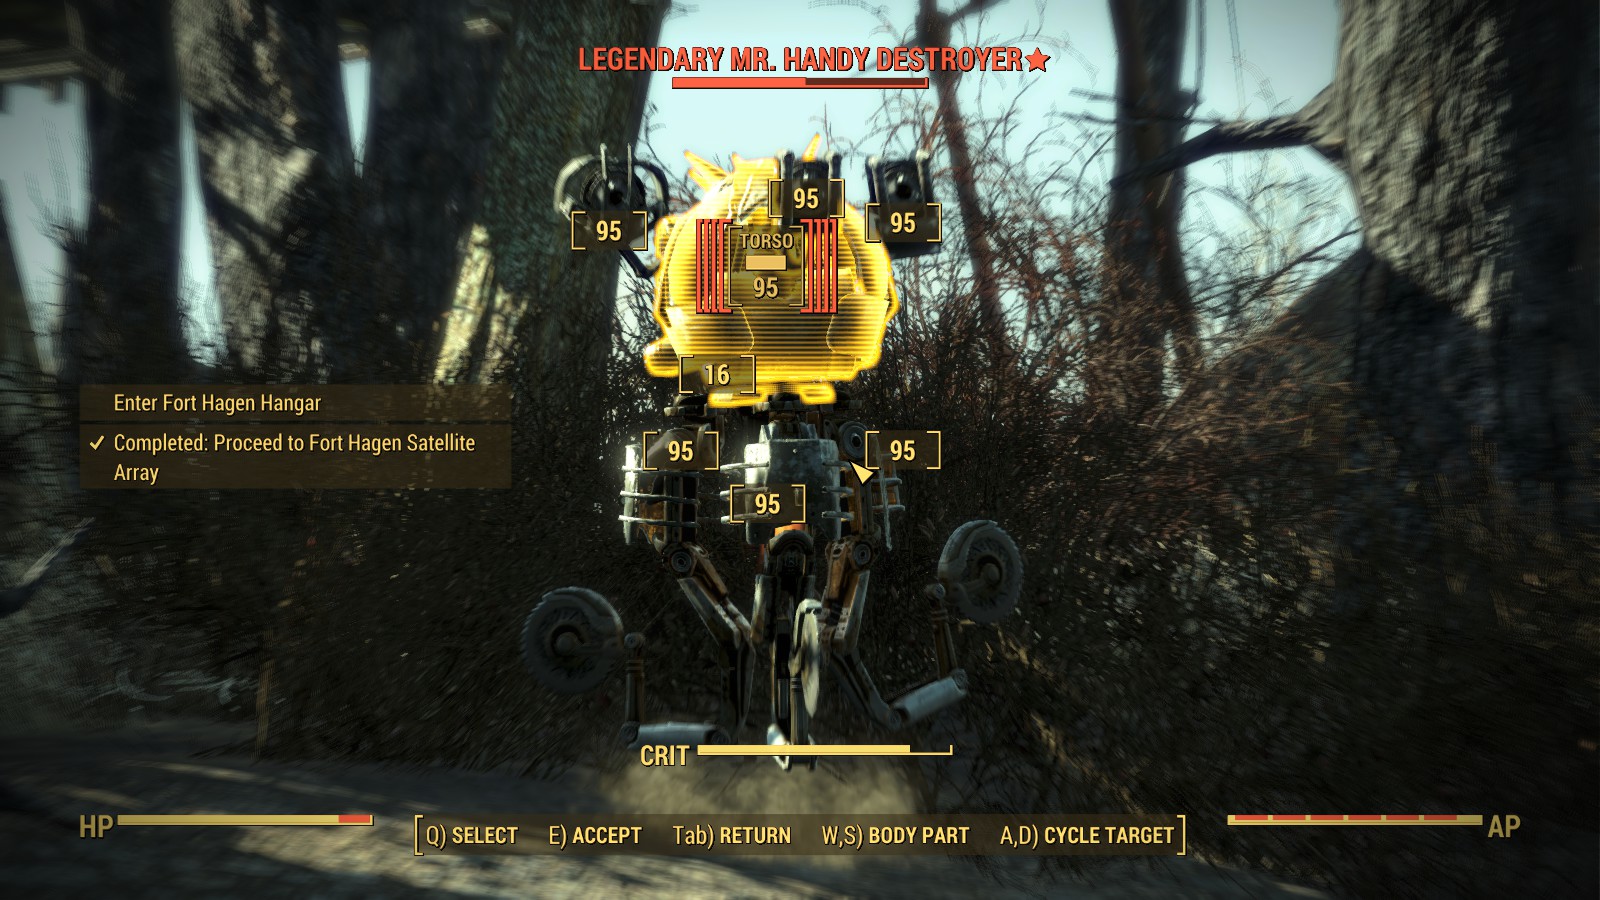 Legendary robotic enemies await!
That’s it – we’ve reached the end of Fallout 4‘s first major DLC! Let us know if you took any different routes on these quests or discovered any interesting loot we missed!


Published: Mar 24, 2016 02:16 pm