
Much like the difficult prologue, the wilderness outside Osbrook is a serious deathtrap in Stoneshard. If you’re having trouble staying alive long enough to even finish the first quest, we’ve got you covered with a host of simple Stoneshard tips and tricks.
All of these will help you avoid death longer and earn enough gold for better gear.
As with our other Stoneshard Early Access guides, these tips are current as of patch 0.5.7.8. Significant changes are expected ahead of full launch with numerous updates. If you see something below that’s drastically different from what you’ve experienced, drop us a comment and we’ll get it updated to the latest patch.
Let’s start relatively simple and work our way down. If you’re having trouble with the prologue, be sure to head over to our walkthrough on that.
Provisioning For Travel & Filling Your Waterskin
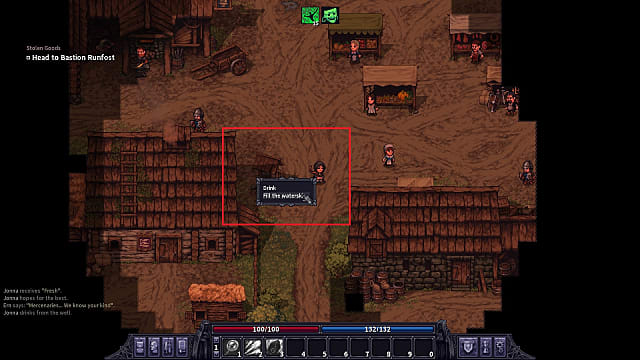 How to fill your waterskin in Stoneshard
Before tackling the first quest, given to you by Odar on the second level of the barracks, search all the barrels and enter all the homes in Osbrook. Loot anything not nailed down.
Various cups, nails, straw, barrels, coal chunks, and earrings are up for grabs, and you can them to sell to Jurg the Carpenter or Jebar the Smith for a minor gold boost. That money should be put towards buying food from the vendors in the middle of town. But more importantly, you can find bandages while scavenging the barrels.
Before leaving town, make sure your waterskin is filled at the well. Because of the game’s color scheme, the well is incredibly easy to miss. The Stoneshard well is located just southwest of the vendors in Osbrook, directly to the right of Hold’s house.
While you can drink from the well by clicking on it, that’s not very helpful for the rest of the journey. Instead, right-click the well and select “Fill the waterskin.” For particularly long and arduous journeys, it’s not a bad idea to buy a second waterskin from one of the food vendors, either.
Now that you’ve got water and money, what should you buy for provisions? Here’s the breakdown of what’s worth your gold and what should be skipped until later:
- Grapes combat hunger and thirst at the same time, making them more useful than other options at a lower price.
- Dumplings increase hunger resistance and lower hunger, so buy a few of these before you go.
- Cheese provides some of the best hunger reduction, but it spoils the fastest. Use it up quickly.
- Smoked and cured meat doesn’t spoil at all, but it costs significantly more than non-cured meat making it a mostly unviable option early on. Get it if you can.
Don’t worry about loading up on too much food, though, as you can forage for mushrooms when you leave town. Make sure to press “Tab” periodically while exploring the wilderness. Fungi and other items that can’t be seen are easy to pick up once they are highlighted.
In the beginning, don’t bother with the Fly Agaric or Deathcaps. Instead, you just want the Pinecaps, as they offer quick boosts to food and energy and don’t take up much space in your extremely limited inventory.
How to Save Your Game & Navigating the Map
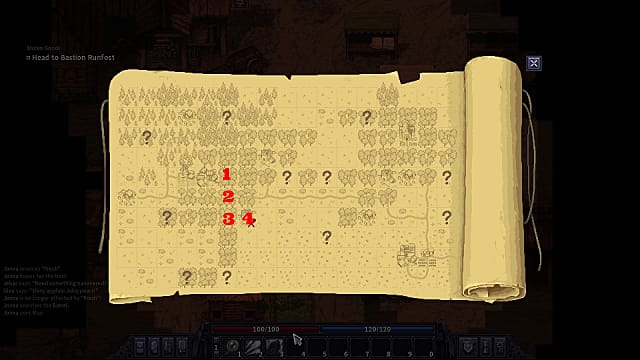 The quickest path to Bastion Runfost
In Early Access, saving can only be done in two places: the inn (which costs money), or by clearing out a bandit camp and resting (camps are marked by the ? on the map). A traveling caravan is expected to be added down the line for another save location, but it is not currently implemented.
Working around the map is key to surviving. Not only does the map take up valuable space in your inventory, but it also doesn’t feature any sort of marker to let you know your character’s current position. Players are asking for that to change, but the lack of a position marker is currently done on purpose. It’s a design choice meant to increase the game’s difficulty.
To use the map, you need to count the number of area segments you travel through, and keep note of the landmarks.
For instance, to reach Bastion Runfost from Osbrook, exit the town on the eastern side. Travel south until you hit the next arrow exit mark. The next screen should be a forest with a road, which is the only landmark on the map for this section. Travel south one more time, then east to reach the area with Bastion Runfost.
Major landmarks like the Bastion don’t usually take up a significant portion of the area. That means you need to fully explore an area to actually find your destination, which is bad news for a low-level character who can be easily killed by any stray bear or pack of wolves.
How to Farm Gold
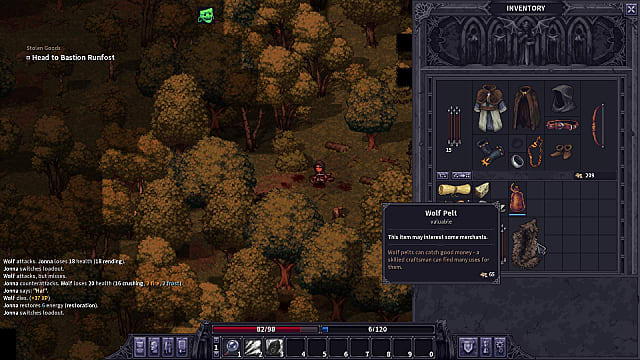 Pelts are a valuable source of early game income.
Bowls and charcoal sell for a pittance, and enemy equipment takes up too much space to be effectively farmed for serious cash. If you need money to re-supply your food or get better equipment, there’s really only one main option before leveling up and getting ready to take on bandit hideouts.
Your early main source of income will be pelts and antlers to sell to Hold (his house has the chickens inside the fence and is to the left of the well).
Wolf pelts are the easiest to acquire so long as you don’t try to tangle with more than one at a time. If you want the most bang for your buck, however, moose antlers are the most valuable item to sell for the amount of space they take up in your inventory. After that, the fox pelt is the second most valuable.
You will need a ranged attack or spell to get antlers, though, as deer and moose will quickly flee from you. Didn’t go the ranged route? The Mutilating Lunge skill in the Axe skill tree can be used instead.
Surviving the First Quest

Since you can swap between two weapon sets by pressing “W,” there’s no reason not to have a bow equipped at all times for ranged combat. The other slot should be your primary melee weapon, depending on which character and skill loadout you chose. It should always feature an enchantment to enhance your skills.
Before heading out, enchant your equipment whenever you find enchantment scrolls, like the free one immediately available in Osbrook. Make sure to save before using a scroll, as enchantments are entirely random.
A little save scumming here to get an enchantment that works with your build will prevent a lot of headaches later!
When you get outside of town, keep your eye on the text in the lower-left corner. It lets you know when an enemy has been spotted, even if you can’t actually see it on the map yet.
In the wilderness around Osbrook, stay far away from the bears until you hit Level 7. They aren’t worth the trouble, and since saving is so sparse, you don’t want to lose a bunch of progress.
Instead, focus on wolves and other animals that can be killed for pelts. While in the Level 1 to Level 5 range, make sure to lure wolves towards you one by one. Do not try to tangle with multiple enemies at once. If you get swarmed, move towards the arrow exits of the area.
After exiting the area, do not move at all, or the creatures will follow after you. Instead, hit “Space” to repeatedly skip the turn and recover health and energy so you are ready when an enemy appears.
Whether fighting bandits, wolves, or anything else, focus on diagonal movement to put as much distance between yourself and an enemy as possible while waiting on energy to recharge to use a skill again. There’s no point in standing still and getting hit when you can move away and heal a small amount of health and energy.
Follow the same strategy as the wolves for the bandits outside Bastion Runfost. Walk up and lure them away from the campfire one by one as the question mark appears over their heads, and use the terrain to your advantage to keep them away from you longer before engaging in melee. If you have trouble getting bandits to chase you, right-click your character and choose “Shout” to make some noise.
If you are playing the sorceress character, don’t forget to use the Runic Boulder skill in the Geomancer skill tree. This spell doesn’t just damage an enemy, it also creates an obstacle that pushes enemies back a square so you have time to fire off other spells or arrows.
When used near trees outside or in hallways underground, it effectively prevents an enemy from moving towards you while you rain down death.
 Using multiple Runic Boulders to force enemies to
take a longer path to reach me.
Inside the Bastion itself, it is absolutely critical that you use the Find Traps skill every single time you enter a new room. Hitting a trap is extremely deadly since you won’t have many items for dealing with bleeding, pain, and other ailments. Enemies can also trigger traps, so lure them towards the trap square whenever possible.
Like the prologue section, you want to fully explore each level of the Bastion to level up and find better gear before heading down further. The boss bandit can quickly annihilate you in a few turns due to his heavy melee damage and stun ability, so keep mobile and hit him from afar as long as possible before resorting to melee attacks.
With these Stoneshard beginner tips and tricks in mind, the first quest should be much less difficult to complete, and you are now on your way to figuring out the rest of the campaign yourself! Getting stuck anywhere else? Check out our other Stoneshard guides, including how to tackle the first Ascended Archon boss fight.


Published: Feb 11, 2020 03:44 pm