Openly hostile to outsider newcomers, the city of Oakmont is a confusing maze of flooded streets and back alleys in The Sinking City. Just simply getting around to find locations in any given side case or main quest will often be your biggest hurdle.
If you can’t seem to figure out where to go next, we’ve got every main quest and side case location in the entire game listed below, broken down by district.
Before we dive in, be sure to check the notes in your casebook before traveling to any of the locations listed below. If the note has a compass symbol in the upper right corner, then you can immediately travel there and access the next section of the case. If the note has a book symbol, however, you need to hit the archives and research the location before any evidence will actually spawn there.
 Letters From Oakmont location symbol
There’s one other kink in the format to know about concerning a few side cases.
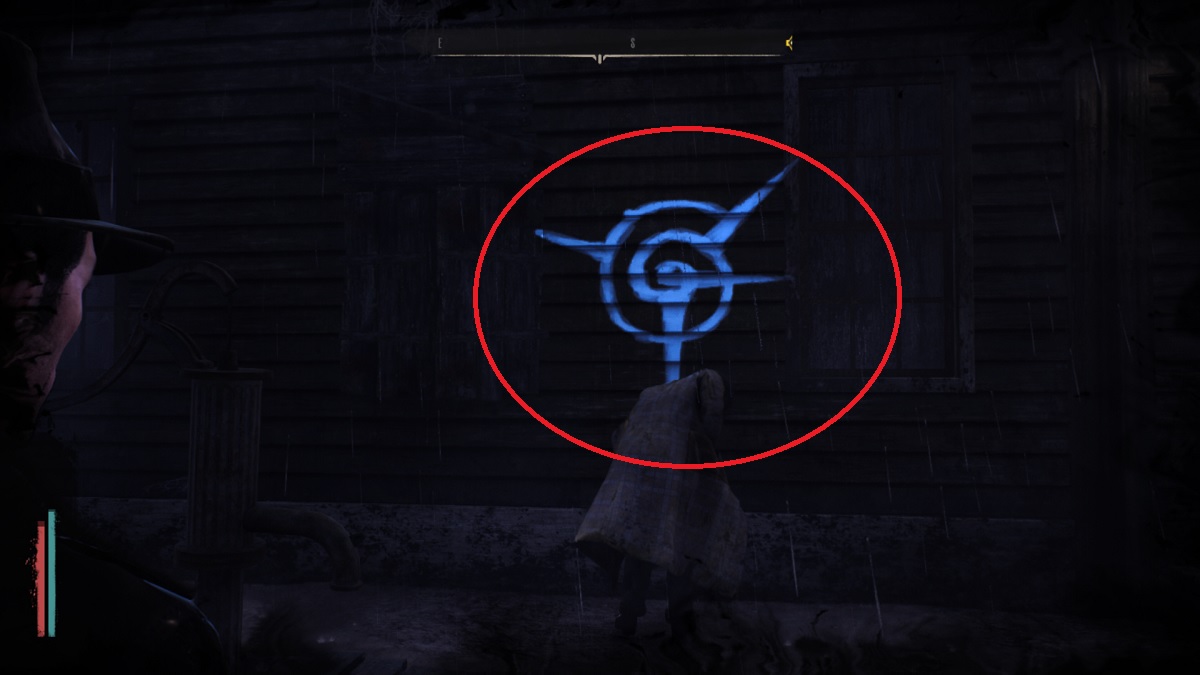
Unlike other map locations, the Letters From Oakmont and All That Glitters side case locations don’t appear on the map after you find them, and they don’t give you the normal “key evidence found” or “all evidence found” notifications.
You will know you’ve found the right place because the compass symbol will disappear from the top right corner of the note in your Casebook, and you get experience for finding the main evidence in that location.
In the case of All That Glitters, the experience is granted after finding a piece of treasure (usually hidden away behind an illusory wall or object). For Letters From Oakmont, the symbol above will also appear in blue while using Mind’s Eyes either on the exterior or interior of the building somewhere.
Haven’t found how to initiate side cases yet? Here’s where and when to grab them:
- Letters From Oakmont — from the owner of the Devil’s Reef Hotel after finishing the prologue segment in Grimhaven Bay
- Bounty Of The Sea — from the man standing under the awning near the Grimhaven Bay fast travel booth
- Field Research — from the doctor at the front desk of the hospital in Coverside
- Extra Hours — from the police officer in the Seven Oaks after discovering the Smuggler’s Hideout
- All That Glitters — initiated by reading a letter on the front desk of the Oakmont Chronicle after being arrested for murder
Grimhaven Bay Case Locations
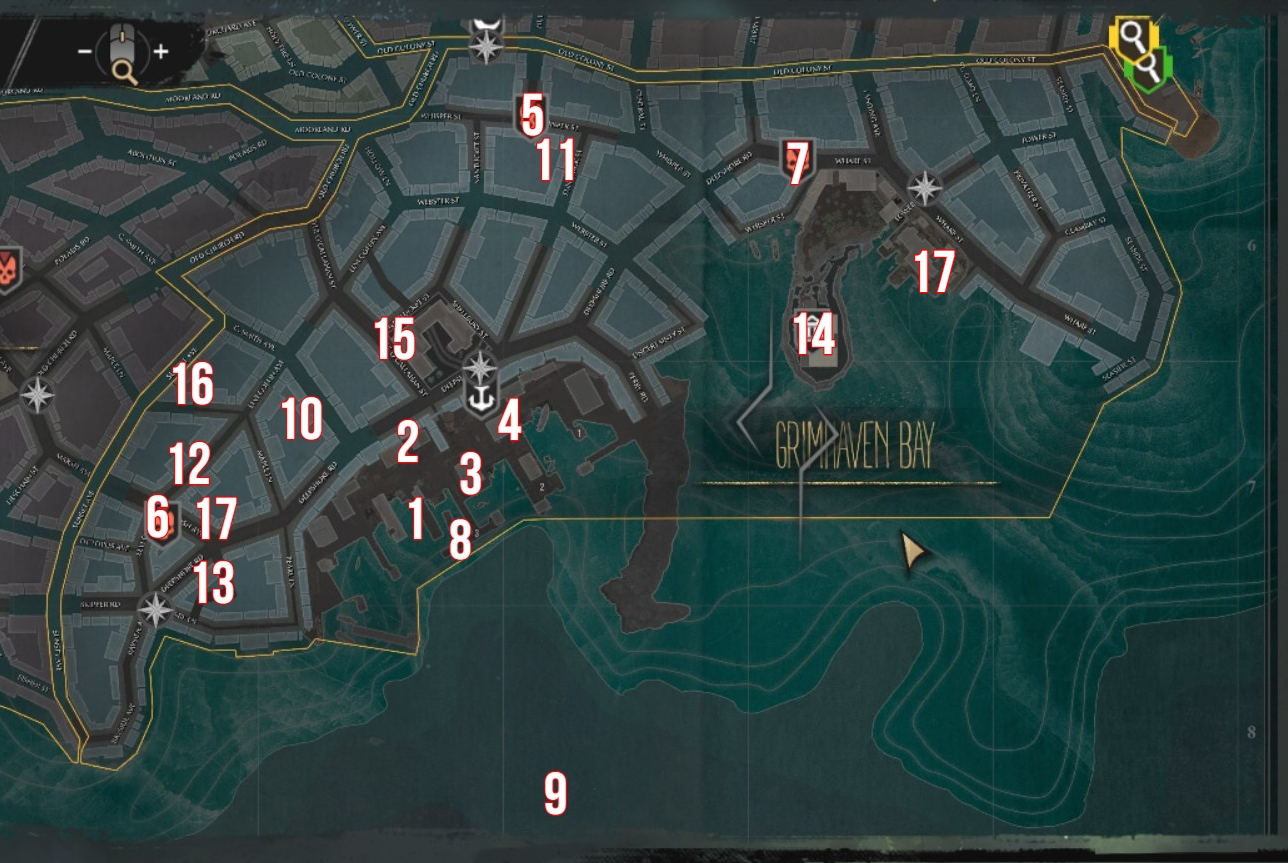
| Map # | Location | Directions | Case |
|---|---|---|---|
| 1 | Charon Ship | West of pier 3 | Frosty Welcome |
| 2 | Fisherman’s House | SW of Oakmont City Port | Frosty Welcome |
| 3 | Warehouse | North of pier 3 | Frosty Welcome |
| 4 | Under The Keel Bar | North of pier 2 | Frosty Welcome |
| 5 | Infested Area | Whisper St between Nantucket and Flintlock | None |
| 6 | Infested Area | Levi Coffin Ave and Marsh Ave | None |
| 7 | Infested Area | Between Deepshore Rd and Wharf St | None |
| 8 | Pier N3 | Southside of the map west of pier 2 | Lost At Sea |
| 9 | Devil’s Teeth | Far south of the map (reach via boat on the pier) | Lost At Sea |
| 10 | Diving Suit Factory | C. Smith Ave between Levi Coffin and Deepshore | Lost At Sea |
| 11 | Insmouther’s Notes | Whisper St between Flintlock and Nantucket (in the infested area) | Letters From Oakmont |
| 12 | Courier’s Final Destination | Levi Coffin Ave north of Marsh Ave (outside the infested area) | Fathers and Sons |
| 13 | Blackwood’s Hideout | Deepshore Rd between Pearl and Marsh Ave | Nosedive |
| 14 | Blackwood Manor | Peninsula south of Wharf St and Tower St | Deal with the Devil |
| 15 | Blackwood Marsh Factory | Corner of Nantucket and Fitz O’Callahan St | Deal with the Devil |
| 16 | More Walking | Maple Ln between Levi Coffin and Sunset Ave | All That Glitters |
| 17 | Big Mouth | Marsh Ave between Deepshore and Levi Coffin Ave (in the alley in the infested area) | All That Glitters |
| 17 | “Skylark” Ship | Harbor on Wharf St Southeast of Tower St | Bounty of the Sea |
Salvation Harbor Case Locations

| Map # | Location | Directions | Case |
|---|---|---|---|
| 1 | Former Patient’s Shop | Windheim St South of Polaris Rd | Field Research |
| 2 | Infected Man’s Residence | Moorland between Higgs and Old Colony St | Field Research |
| 3 | Infested Area | Maple Lane east of Oxford Ln | None |
| 4 | Infested Area | Crimson Rd between Silver and Swift Mercy St | None |
| 5 | Forlorn Woman | Corner of Old Church and Fitz O’Callahan St | Letters From Oakmont |
| 6 | Residence of Sidney Stokes | Moorland Rd west of intersection with Salvation | A Delicate Matter |
| 7 | Randall Glassworks | Skipper Rd between Eel and Calmshore St | Through the Looking Glass |
| 8 | The Seven Oaks | Calmshore S between Salvation and Swift Mercy | Fathers and Sons, Deal With The Devil |
| 9 | Smuggler’s Meeting Point | Alley on Windmill Ave between Skipper and Octopus | Fathers and Sons |
| 10 | Smuggler’s Hideout | Calmshore St at corner of SKipper Rd | Fathers and Sons |
| 11 | Redemption Church | Marsh Ave between Old Church and Polaris Rd | Fathers and Sons |
| 12 | J.R. Nelson’s House | Seven Oaks St north of Skipper Road (in flooded section) | Extra Hours |
| 13 | Virginia Cooper’s Residence | Maple Ln between Old Church and Polaris Rd | Rest In Peace |
| 14 | Calmshore Marina | The far end of Pembroke Ln | Nosedive |
| 15 | Calm Shore | West of Calmshore St and Ocean Drive | Deal With The Devil |
| 16 | Gang Hideout | Eel St north of Skipper Rd | Self Defense |
| 17 | Backyard Crime Scene | Old Church Rd between Maple and C. Smith Ave (in the alley past police barricade) | Fleeing Phoenix |
| 18 | Hidden Lab | Moorland Rd between C. Smith and Powderhouse (in the flooded section across from the house with the dead family) | Fleeing Phoenix |
| 19 | Warehouse | Abolition St between C. Smith and Powderhouse (in the flooded section) | All That Glitters |
| 20 | Ruined Tenement | Oxford Ln between Marsh and Maple (in the infested area) | All That Glitters |
Coverside Case Locations

| Map # | Location | Directions | Case |
|---|---|---|---|
| 1 | Devil’s Reef Hotel | Between Lincoln St and Old Colony St | Multiple |
| 2 | The Oakmont Chronicle | Howard St | Multiple |
| 3 | Oakmont Police Department | Old Church Rd between Roosevelt and Freedom | Multiple |
| 4 | Hospital Of Saint Mary | Between Roosevelt and Lincoln | Multiple |
| 5 | Asylum | Seaside St (NE corner of the district) | Through the Looking Glass |
| 6 | Expedition Headquarters | Intersection of Hubert and Asher | Lost At Sea |
| 7 | Infested Area | Asher Rd between Derry Ln and Landing Ave | None |
| 8 | Lone Child | Corner of Kingsport and St. Elmo (the flooded section) | Letters From Oakmont |
| 9 | Lullaby Crossroad | Tanner St past the intersection with Old Church Rd | Letters From Oakmont |
| 10 | “Red Queen” Ship | Southeast corner of the Asylum courtyard | Bounty Of The Sea |
| 11 | Fabian Coswick’s Residence | Providence Ave between St. Elmo and Victory Ln | Rest In Peace |
| 12 | Boondocks | Lincoln between Old Church and Hubert Ave | All That Glitters |
| 13 | Coastal Monolith | Crescent-shaped docks area east of Old Colony St | Into The Depths |
| 14 | House Of Jimmy Price | Directly next to Coastal Monolith | Into The Depths |
The Shells Case Locations
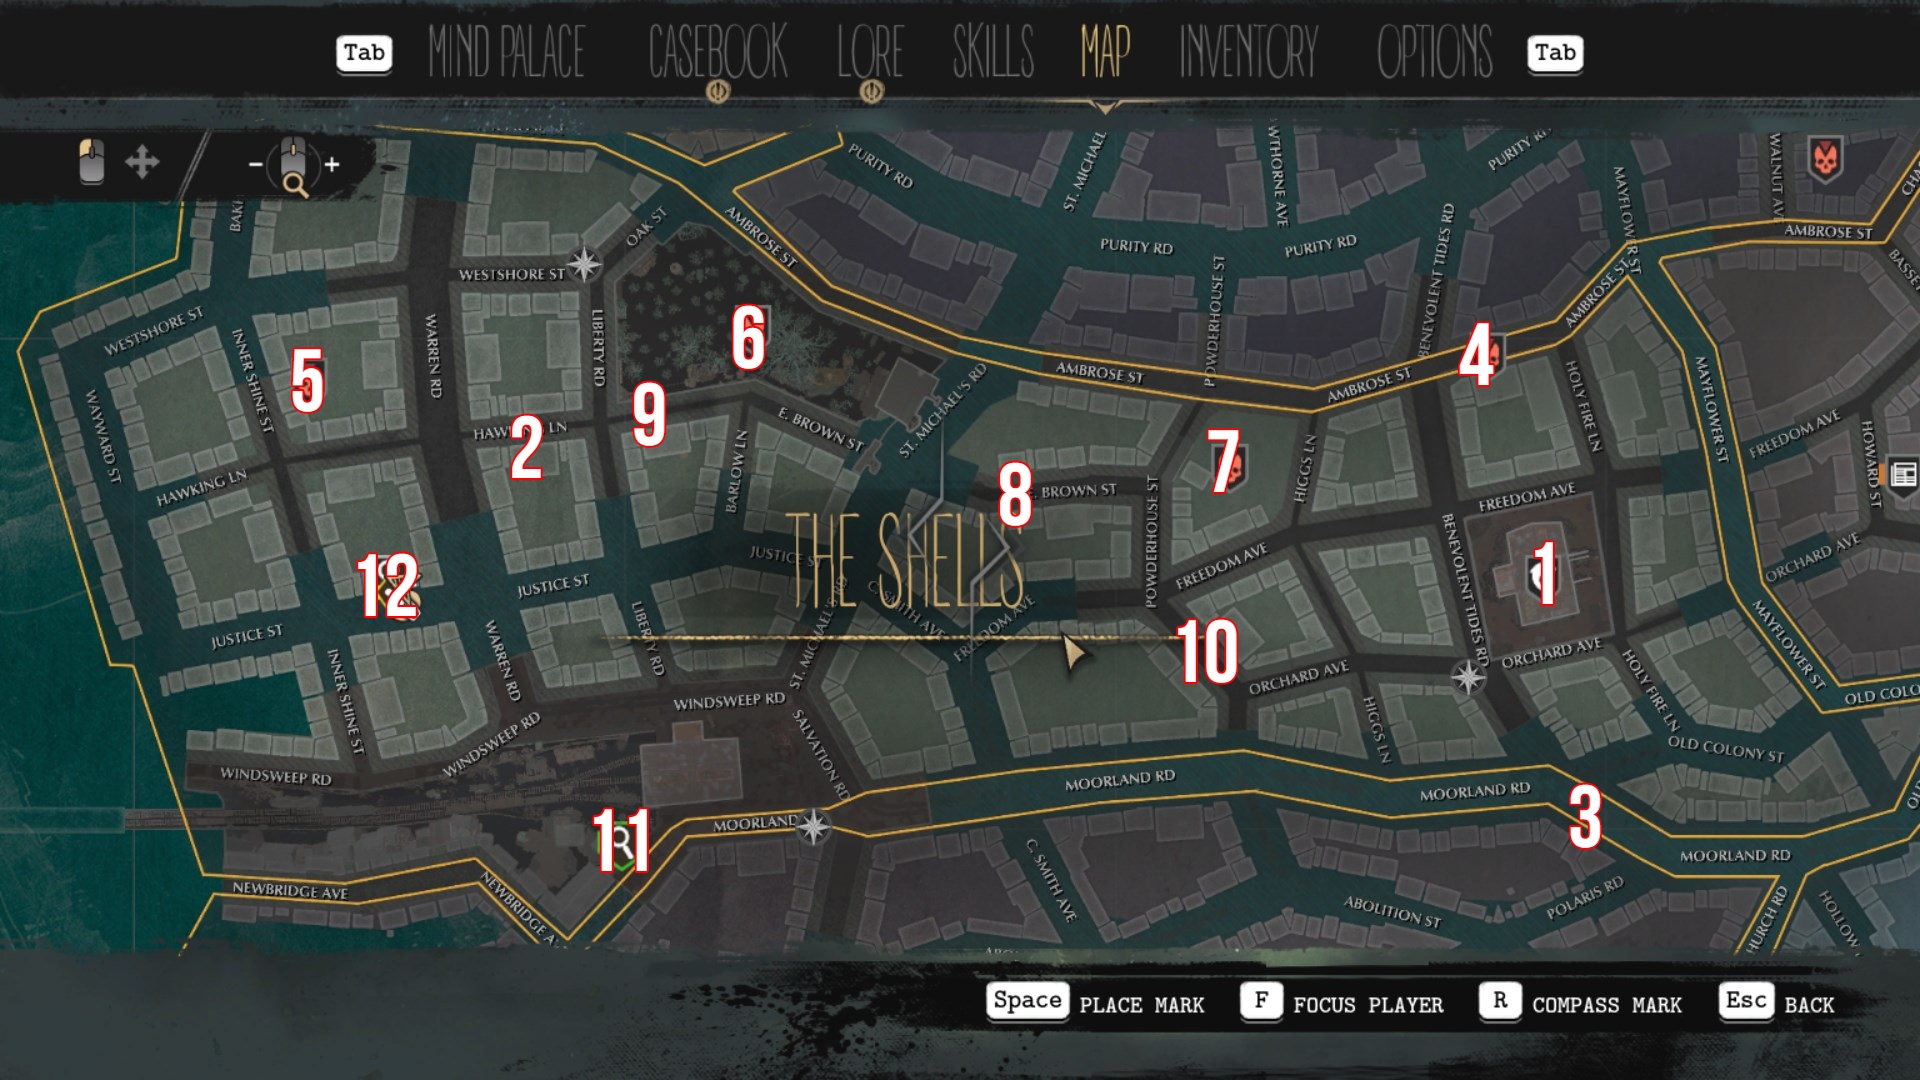
| Map # | Location | Directions | Case |
|---|---|---|---|
| 1 | Fish Market | Between Freedom and Orchard Ave | Quid Pro Quo |
| 2 | EOD Fish Storage | Hawking Ln between Warren and Liberty Rd | Quid Pro Quo |
| 3 | The Pride Barge | Moorland Rd south of Old Colony | Bounty Of The Sea |
| 4 | Infested Area | Benevolent Tides Rd and Ambrose St | None |
| 5 | Infested Area | Innershine between Westshore and Hawking | None |
| 6 | Infested Area | E Brown St north of Barlow Ln | None |
| 7 | Infested Area | Intersection of Freedom Ave and Powderhouse St | None |
| 8 | Call Of The Ocean | E Brown St at the intersection of St. Michaels | Letters From Oakmont |
| 9 | Joy’s Apartment | Slightly east of the intersection of Liberty and Hawking Ln | Silence Is Golden |
| 10 | Residence of Glenn Byers | Powderhouse St between Orchard and Freedom Ave | Self Defense |
| 11 | Railway Station Monolith | Moorland Rd, south of Windswept Road and east of Salvation Rd intersection | Into The Depths |
| 12 | Stone Worshiper’s Residence | Justice St between Inner Shine and Warren Rd (in the flooded area) | Into The Depths |
Oldgrove Case Locations
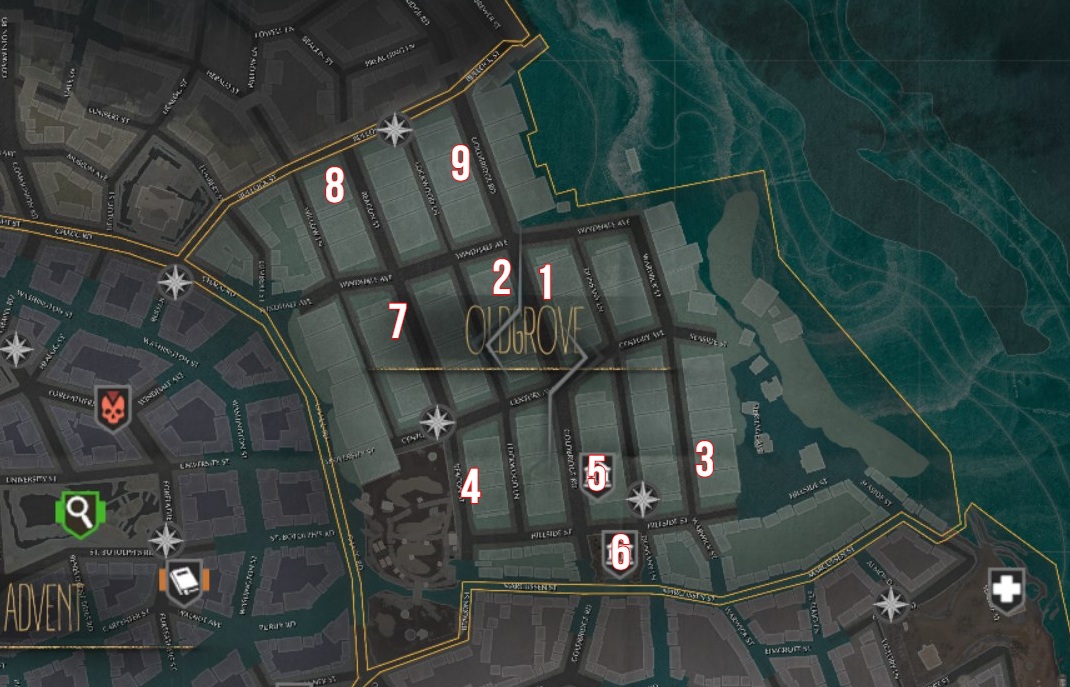
| Map # | Location | Directions | Case |
|---|---|---|---|
| 1 | Herbert Glover’s Manor | Goldbridge between Windhalf and Century Ave | A Delicate Matter |
| 2 | Mirror Maker’s House | Goldbridge Rd near corner of Windhalf Ave | Through the Looking Glass |
| 3 | Disgusting Exaltation | Warwick St (west of Heritage Ave) between Hillside and Seaside | Letters From Oakmont |
| 4 | R. Bekker’s Manor | Beacon St between Century and Hillside St | Extra Hours |
| 5 | Carpenter Manor | Goldbridge Rd between Century and Hillside St | Fathers and Sons, Self Defense |
| 6 | Throgmorton Manor | Hillside St west of Dunsany Ln | Multiple |
| 7 | Granny Weaver’s House | Beacon St between Century and Windhalf Ave | Silence Is Golden |
| 8 | Manor of Agatha Pierce | Beacon St between Bullock and Windhalf Ave | Self Defense |
| 9 | Rich Man’s Curio | Goldbridge Rd between Windhalf and Bullock St | All That Glitters |
Advent Case Locations

| Map # | Location | Directions | Case |
|---|---|---|---|
| 1 | Oakmont University Library | Forefather St between Walnut and St. Botoloph’s Rd | Multiple |
| 2 | Oakmont City Hall | Between Murdock Ave and Burning Valley St | Multiple |
| 3 | Infested Area | Walnut Ave between Tanner and Ambrose St | None |
| 4 | Infested Area | Corner of Forefather St and Windhalf Ave | None |
| 5 | Mirrors Mirrors | Oak St between Purity and Carpenter (the flooded section) | Letters From Oakmont |
| 6 | From Behind | Murdock Ave near Oak St | Letters From Oakmont |
| 7 | The Orion Club | St. Michaels Rd between Constitution and University St | Nosedive |
| 8 | Crown Theater | Vinland Ave between Purity and University St (must be accessed through side alley) | Deal with the Devil |
| 9 | Heirloom | Corner of Ambrose and Walnut Ave (in the infested area) | All That Glitters |
| 10 | St. Michael’s Church | The large area between University St and St. Botoloph’s Rd | Into The Depths |
| 11 | Apartment of G. Cavendish | St. Michaels Rd between Constitution and Carpenter St | Quid Pro Quo |
Reed Heights Case Locations
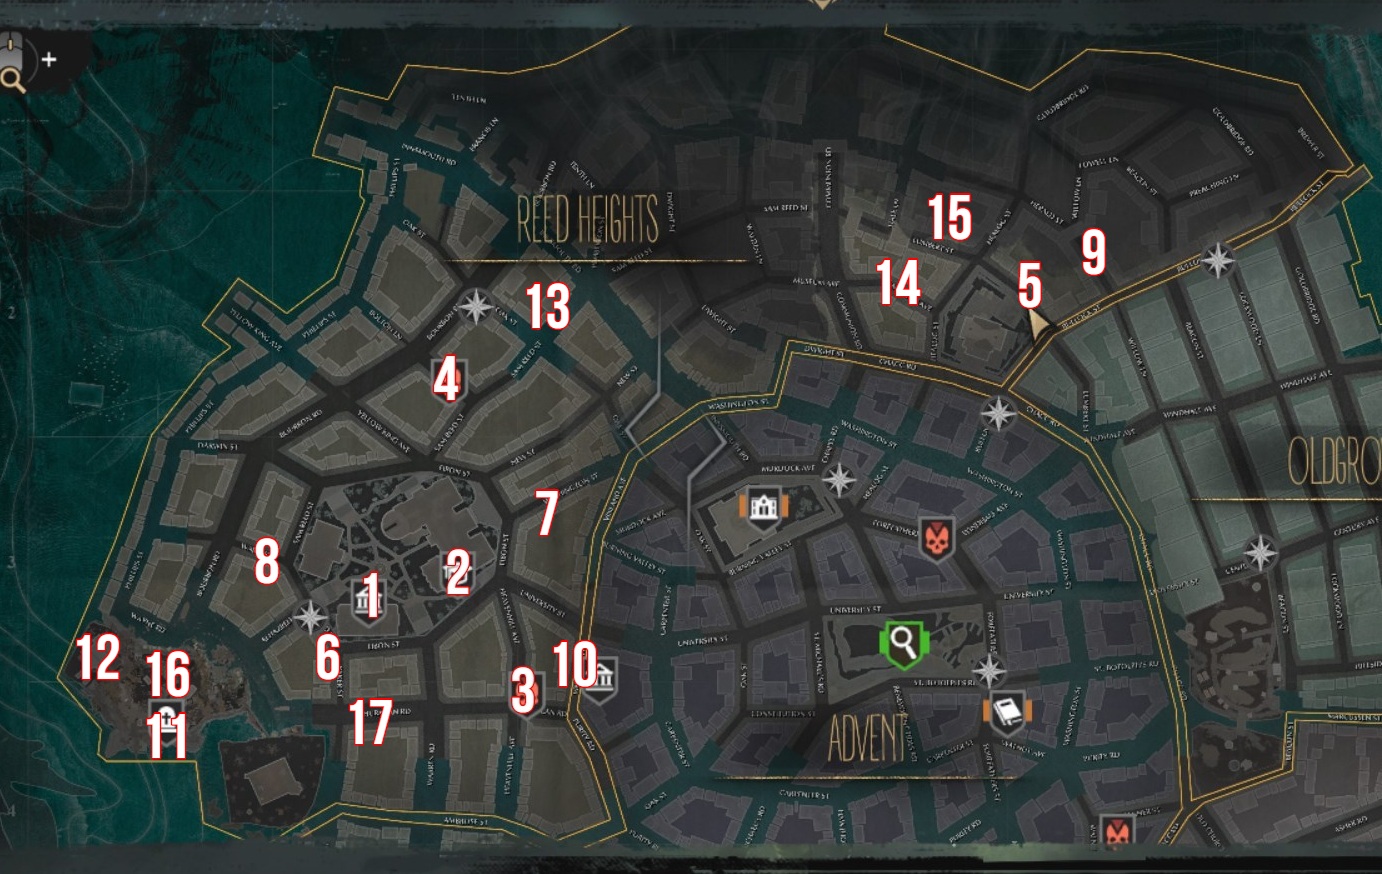
| Map # | Location | Directions | Case |
|---|---|---|---|
| 1 | Oakmont University | North of Eibon and Ward St | Quid Pro Quo |
| 2 | Department Of Medicine | West of Eibon and Heavenhill Ave | Quid Pro Quo |
| 3 | Infested Area | Corner of Huracan rd and Heavenhill Ave | None |
| 4 | Infested Area | Bolton Ln between Bourbon and Sam Reed St | None |
| 5 | Static In Ears | Lumbert St between Bullock and Healog | Letters From Oakmont |
| 6 | Voices From The Pipes | The intersection of Eibon, Ward, and Baker St | Letters From Oakmont |
| 7 | Terrible Fetus | Washington St between Eibon and Oak St | Letters From Oakmont |
| 8 | Abandoned Shop | Ward St between Sam Reed and Bourbon Rd | Field Research |
| 9 | Count Ugolina Restaurant | Willow Ln between Herald and Bullock | Field Research |
| 10 | E. Brian’s Apartment | Vinland Ave between University and Huracan Rd | Extra Hours |
| 11 | St. Botolph’s Cemetery | Far southwest corner south of Wayne Rd | Rest In Peace |
| 12 | Crematorium | Far southwest corner south of Wayne Rd (just slightly north of the Cemetery) | Fathers and Sons |
| 13 | Blackwood’s Flooded Office | Sam Reed St between Oak and Innsmouth Rd (flooded section) | Nosedive |
| 14 | Apartment of Milton Pierce | Museum Ave between Communion and Healog St | Self Defense |
| 15 | Residence of Joseph Hill | Lumbert St between Healog and Hale St | Fleeing Phoenix |
| 16 | Usha’s Tomb | North of the Cemetery map marker (take the left at the wood ramp, then right up the stone steps and into the stone mausoleum) | Fleeing Phoenix |
| 17 | Bad Neighbors | The intersection of Baker St and Huracan Rd | All That Glitters |
Have you found any other case locations that we missed? Let us know where it is and what case it’s for, and we’ll get them added to the maps!
Need more help getting around the city of Oakmont and solving all the various cases? Check out our other The Sinking City guides here:
- Sinking City Fast Travel Phone Booth Locations
- Tips and Tricks for Solving Cases in The Sinking City
- Sinking City Best Skills Guide


Published: Jun 17, 2019 08:47 pm