
Pocket MapleStory hit our mobile devices like a whirlwind recently, bringing the popular MMO IP to our pockets. As an MMO, there’s a lot players need to know, and we’re here to help.
We started with a simple guide to getting started in the game, and now we’re giving you the first of our class guides — Levels 1-10 for the Demon Slayer.
This guide will consist of two parts, a spoiler-free (ish) summary section that will give you a general rundown on things and a more detailed section that outlines your quest objectives. Don’t worry, we’ll let you know when the spoilers are about to start.
The Basics
For the most part, the first ten levels of the Demon Slayer’s adventures are pretty linear. There’s not a lot in the way of side quests. In fact, the first side quest you’ll see won’t be until somewhere around LvL 10, when you enter your second village. Between the start of the game and then you’ll do a lot of running back and forth between the first village (Ereve) and the quest objectives — completing one and turning it in before going back out again.
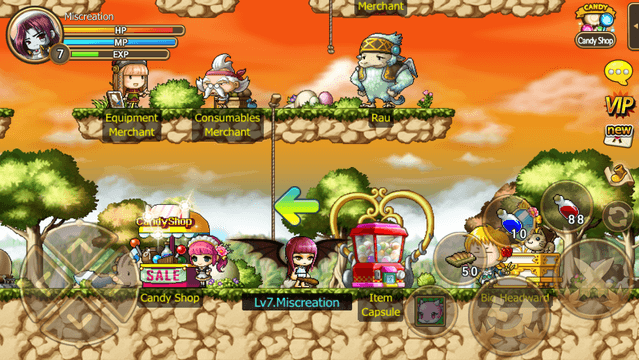
When you start out on your journey as Alyah the Demon Slayer, you’ll do so in a village named Ereve. You’ll have very few skills to start with and no armor. The only weapon you will have will be a simple club. You also won’t remember much about your past.
You’ll spend most of your time between Levels 1 and 10 in and around this village, running errands for four or five of the people and trying to learn about your past.
Skills
Skills in Pocket MapleStory are grouped into sets called Job Advancements. Skills can be “mastered” — with each skill requiring a different amount of skill points to master. You’ll start out wit 5 “Basic” skills. These are all already mastered (Master Level 1).
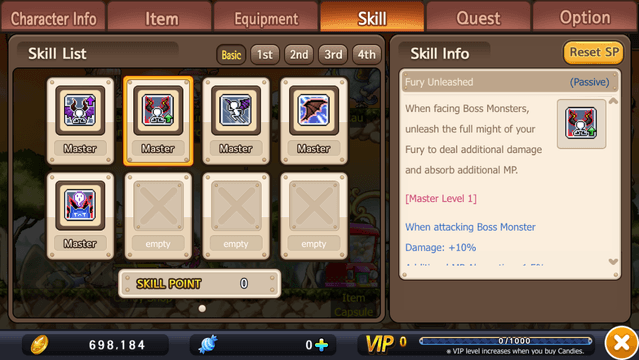
Basic Skills:
- Demonic Blood – When attacking monsters absorbs 1% of MP
- Fury Unleashed – When attacking Boss Monster, Damage 10%, Additional MP Absorption 1.5%
- Dark Winds – High Jump & Double Jump
- Demon Wings – Movement Speed +1, Jump Height +2
- Curse of Fury – Chances of instantly killing enemy with normal attack or Demon Slash: 1%, Recovers 5% HP when killing instantly, Absorbs MP from eliminated enemies
Job Advancement 1
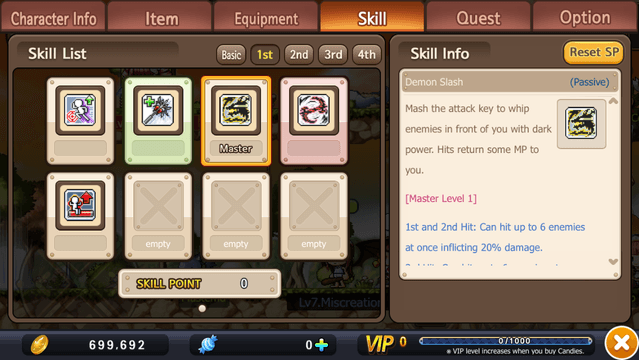
You’ll get your first job advancement from a quest around LvL 5 — a little earlier or later depending on some options you take while leveling. This advancement will give you 5 new skills needing anywhere between 0 to 30 skill points to master. You’ll get your first skill point to invest when you hit LvL 10. Stats for these skills will increase as points are added.
- Shadow Swiftness (Master LvL 10) – Permanently increases Accuracy, Speed and Jump.
- Battle Pact (Master LvL 30) – Temporarily increases the attack speed of your weapon by consuming HP
- Demon Slash (Master LvL 1) – Mash the attack key to whip enemies in front of you with dark power. Hits return some MP to you.
- Grim Scythe (Master LvL 30) – Summons a devilish scythe that attacks multiple enemies in front of you
- HP Boost (Master LvL 30) – Permanently increases your Max HP.
Non-Passive skills can be added to your ability/item bar by pressing the shortcut button in their info screen.
Gear

For your first few levels you may be tempted to purchase weapons or equipment from the vendors in the village. DON’T. Your quests will provide you with the exact same gear before you’re even able to use it. Save your money for something else. That said. The minute you hit Level 8, swap that gear out
Surviving
Early on, you won’t have too much trouble staying alive on your quests. In fact, you almost won’t think about it, which means you’re likely going to be very surprised the first time you actually die. Try to keep an eye on your health bar while out there. Healing potions are pretty easy to come by — if you’re not receiving that as rewards for quests finished, you can purchase them in the village. They’re not terribly expensive.
Making money (Misos)
Level’s 1-10 are basically all still part of the introduction/tutorial area. There won’t be a ton of opportunity to make money just yet, but there doesn’t really need to be. Pocket MapleStory practically hands players Misos every time they log in. There are rewards for logging in daily, different holiday “events” that will grant you items and cash, and more. Of course, you can earn extra by taking a little extra time to kill a few more things while out on quests and bringing back the loot to sell.
The Dirty Details: In-depth Guide
Above we covered the basics for Levels 1-10. If you’re wanting to play and experience the story for yourself, what’s above (plus our Getting Started in Pocket MapleStory guide) will give you everything you need to survive the first ten levels of your life as a Demon Slayer. So, stop here. Because anything beyond this point contains SPOILERS.
We’ll break this area down into sections based on levels. Keep in mind that depending on your own play-style, levels may vary slightly. But, if you follow what I did, they’ll be spot on.
Level 1
Intro
When the game starts, you’ll be talking to a purple, winged cat named Mastema, having a debate your mission to destroy the Black Mage Arkarium. The cat is worried about you, and for good reason. But you intend to do the job.
During your battle with the Mage, he knocks you out. When you awaken, you are being watched over by Mastema who tells you that you’re in Ereve, and that the “others” are still missing — implying there were other warriors on your quest with you.
You’ll be given your first quest after this discussion.

1st Quest – Awakening
- Objective: Talk to Masema again
- Location: Ereve
- Rewards:
- 60XP
- 140 Mesos
Mastema will ask you if things are clearer. After you click “Confirm” a conversation will start that results in you discovering you no longer have your powers — likely as a result of your battle with Arkarium.
2nd Quest – Starting Over
- Objective: Kill 8 Tinos
- Location: Tino Forrest
- Rewards:
- 120 XP
- 198 Mesos
- 5 Red Potions
Go to the forest and kill Tinos (the little guys on the lowest level of the forest). Since you’re going to be very close to Level 2 after meeting your quota, stick around and kill a few more to ding. Return to Mastema and turn in your quest.
Level 2
Mastema will tell you that someone named Lyn is responsible for helping locate you. Being a Demon Slayer of honor, you feel obligated to repay her.
3rd Quest – Remembering
- Objective: Talk to Lyn
- Location: Ereve
- Rewards:
- 60 XP
- 140 Mesos
Lyn is the pink haired girl just behind Mastema. Go talk to her and you’ll thank her for her assistance. You’ll offer to pay her back for her help. After a bit of back and forth, she’ll accept.
4th Quest – In Return
- Objective: Collect 8 Tiv feathers
- Location: Tino Forrest
- Rewards:
- 153 XP
- 226 Mesos
- 5 Blue Potions
Accept the quest and you should ding Level 3.
Level 3
Head back to the Tino forest and you’ll find the Tiv on the floating islands, above the smaller Tino. Once you kill enough of them to have 8 feathers, you’ll be halfway to Level 4. Kill another 8 – 10 Tiv and you’ll be Level 4 before you get home.
Level 4
Return to Lyn with the feathers and she’ll ask you about you wanting to know about the “Heroes”, which will queue up your next quest.
5th Quest – Hero History
- Objective: Talk to Rau
- Location: Ereve
- Rewards:
- 77 XP
- 140 Mesos
Lyn will tell you to go speak with Rau, a big dude on a floating platform behind her; near the equipment and consumable merchants. Speak with Rau and you will have a short discussion where he explains he can’t leave his post or do anything until his shift replacement Jenn gets there. This will offer you your next quest.
6th Quest – Graveyard Shift
- Objective: Locate Jenn
- Location: Tino Forrest
- Rewards:
- 77 XP
- 140 Mesos
Talk to Jenn and he’ll let you know he’s late for his shift.This will complete the quest, immediately starting the next one.
7th Quest – Asleep on the Job
- Objective: Talk to Mastema
- Location: Ereve
- Rewards:
- 77 XP
- 140 Mesos
- Weapon – Jacker
Accept the quest and you’ll just be a sliver away from Level 5 so kill a few things before going back.
Level 5
Return to Mastema and she’ll ask you about your progress. After a bit of discussion about it, she’ll tell you she figured out a way to give you her battle powers (and your first Job Advancement), kicking off Quest 8.
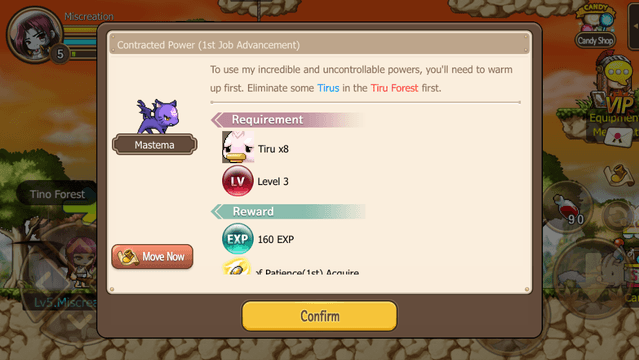
8th Quest – Contracted Power (1st Job Advancement) – You must be at least Level 3 for this.
- Objective: Kill 8 Tiru
- Location: Tiru Forest
- Rewards:
- 160 XP
- Force Shield of Patience (1st)
Head to the Tiru forest and begin fighting. This will likely be the first time you’ll really need to watch your health, so be certain you have plenty of potions on hand and slotted to a shortcut.
Once again, after 8 Tiru, you’ll be halfway to Level 6, so you may want to stick around and knock out the rest of the level before heading back to Mastema to turn in your quest and get your new power.
Level 6
After turning in your quest, Mastema will tell you that Rau wants to talk to you.
9th Quest – A Grave Message
- Objective: Talk to Rau
- Location: Ereve
- Rewards:
- 80 XP
- 140 Mesos
Talk to Rau and he will ask you if you want to know more about the Heroes, telling you of a legend of a “Black Mage” being sealed away. The Mage’s last act was to curse the Heroes to a life of neverending sleep.
Rau will suggest that you need to go visit the Warrior’s Tomb, but note that you’ll have to get permission from Jenn first. This is where things will get annoying because Jenn will send you on several errands to help improve his love life before granting you permission.
10th Quest – Cursed Heroes
- Objective: Talk to Jenn
- Location: Tivo Forest
- Rewards:
- 80 XP
- 140 Mesos
11th Quest – A Present For Lyn
- Objective: Collect 8 Tiru Feathers
- Location: Tiru Forest
- Rewards:
- 160 XP
- 226 Mesos
- Orange Lolica Armor
Go to the forest and get the feathers. By the time you’ve hit your quota, you’ll be almost to Level 7. So knock it out (Keep in mind, this will be your first chance to use some of your newly acquired skills as well.) Return to Jenn and give him the feathers, which he will then ask you to take to Lyn.
Level 7
12th Quest – Excuses, Excuses
- Objective: Take feathers to Lyn
- Location: Ereve
- Rewards:
- 88 XP
- 140 Mesos
Lyn will refuse the gift, sending you back to Jenn with them.

13th Quest – No Excuses
- Objective: Return the feathers to Jenn
- Location: Tivo Forest
- Rewards:
- 96 XP
- 140 Mesos
Return to Jenn, and he’ll be surprised that Lyn refused the gift; asking you to go acquire a different gift for her instead.
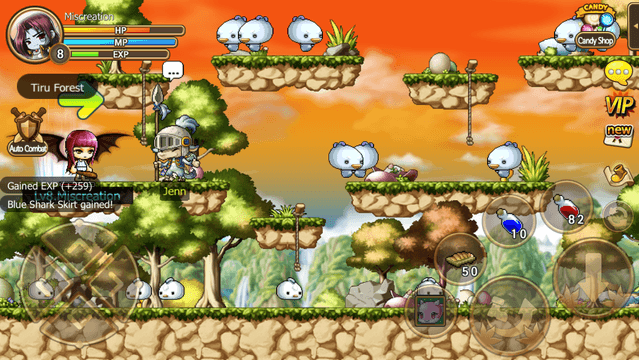
14th Quest – Relentless Requests
- Objective: Collect 8 Joy Bird’s Ribbons
- Location: Ereve Strolling Path
- Rewards:
- 259 XP
- 226 Mesos
- Blue Shark Skirt
Head to the Ereve Strolling Path and start killing Joy Birds. Once again, keep an eye on your health, these stupid looking birds can hit hard. You’ll probably have to use a health potion about four or five times during this quest just to be safe.
And, as is always the case, you’ll wind up pretty close to Level 8, so take care of that before returning to Lyn.
Level 8
Once again, Jenn insists you take his gift to Lyn rather than doing it himself.
15th Quest – Desperate Gifting
- Objective: Take Ribbons to Lyn
- Location: Ereve
- Rewards:
- 130 XP
- 140 Mesos
- 5 Blue Potion
This time, Lyn will take pity on your poor soul and accept Jenn’s gift. But don’t think that’s the end of the errands.
16th Quest – Acceptance
- Objective: Tell Jenn Lyn Accepted his Gift
- Location: Tivo Forest
- Rewards:
- 130 MP
- 140 Mesos
- 5 Red Potion
While in Ereve, you’ll want to go ahead and swap out your gear. You should have a new weapon and new armor from quest rewards. (Remember, you do have to be Level 8). You can also take this time to infuse the new equipment using Miracle Cubes if you have any. Each upgrade will be random, but you’ll get bonus stats on anything you apply them to.

Once geared up, return to Jenn and let him know Lyn finally accepted his gift. He’ll give you permission to go to the tomb… provided you take care of some Thief Crows first.
17th Quest – Grave Mistake
- Objective: Kill 8 Thief Crow
- Location: Tiguru Forest
- Rewards:
- 204 XP
- 198 Mesos
- Red Ramel Skirt
The Thief Crows are the blue bird on the upper levels of the forest. Again, once you kill 8 of these, you should be very close to the next level so go ahead and kill a few more.
Level 9
Return to Jenn and he’ll finally tell you how to get to the Warrior’s Tomb.

18th Quest – As the Crow Flies
- Objective: Go to the Tomb
- Location: Warrior’s Tomb
- Rewards:
- 130 XP
- 140 Mesos
You’ll have to travel past the Ereve Strolling Path to find the Tomb. Arriving there will complete the quest for you and kick off a short cutscene. After you’ll be back in Ereve talking to Mastema about the Heroes’ Curse.
Mastema will tell you that something important is going on in the village and that you should talk to Lyn to find out what.
19th Quest – Path to the Grave
- Objective: Talk to Lyn
- Location: Ereve
- Rewards:
- 130 XP
- 140 Mesos
As it turns out, the “Alliance” — a group that opposes minions of the Black Mage — is holding a meeting in Ereve. She will invite you, prompting you to return to the Warrior’s Tomb.
20th Quest – Tell No Tales
- Objective: Go to the tomb
- Location: Warrior’s Tomb
- Rewards:
- 130 XP
- 140 Mesos
Once again, the quest will complete when you arrive at the tomb and another cutscene will start. Mastema, Lyn, Jenn and Rau will all be there along with some others you don’t know. You’ll see a ghostlike figure appear and disappear before the cutscene ends and you’re back in Ereve.
21st Quest – Alliance Assembled
- Objective: Talk with Mastema
- Location: Ereve
- Rewards:
- 130 XP
- 100 Mesos
Masterma will mention that the person you saw is someone named “Lotus,” and seems to imply this is another one of the Heroes as it’s someone you seem to know as well. When you tell her where you saw him take off to, she decides you should go looking for him.

22nd Quest – The Meeting Place
- Objective: Follow Lotus
- Location: Perion
- Rewards:
- 130 XP
- 140 Mesos
Once in Perion, locate Mastema and talk to her to receive your next quest.
23rd Quest – Lotus Sighting
- Objective: Go find out why some random girl is staring at you.
- Location: Perion
- Rewards:
- 130 XP
- 190 Mesos
Go speak to an orange-haired girl named Ayan standing on a platform to the left by herself. She will tell you you’re the first real demon she’s ever seen, although she’s been told about them by a Doctor Winston before.
She’ll then offer you an errand quest.
24th Quest – Armed With Confidence
- Objective: Collect 10 Firewood
- Location: Dusty Wind Hill
- Rewards:
- 416 XP
- 280 Mesos
- Mithril Coif
When you accept this quest you will ding Level 10, earning you your first skill point to apply to one of the skills of your choosing. You’ll also be offered your first ever sidequest — indicated by a little lightbulb over Ayan’s head.
And there you have it. Levels 1-10 of your journey as a Demon Slayer. Of course when you hit levels may vary depending on whether or not you decide to hang out in the forests to kill a few more mobs. But I’d suggest doing that rather than waiting and finding out much later that you’re going to be in the woods for a while in order to catch up.
In the meantime. Keep an eye out for future guides. Levels 1-10 for both the Dual Blade and the Angelic Buster are on their way.


Published: Nov 30, 2015 07:23 am