Star Wars Battlefront 2 has a campaign that spans 12 missions and multiple planets in a galaxy far, far away. And although each of those missions doesn’t contain hidden crates, there are 23 collectibles to be found before your fight against the Rebellion is over.
If you have EA or Origin access, you already have the option to play BF2‘s first three campaign missions across 10 hours of trial gameplay. Ultimately, this guide will cover the locations of all the game’s hidden collectibles, but until then, we’ll show you (with as few spoilers as possible) how to find your first 10 Battlefront 2 collectibles.
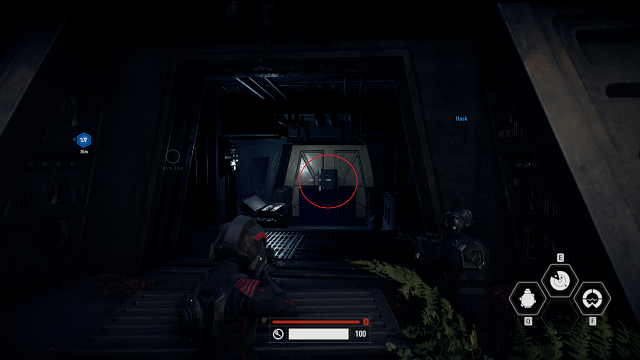
Battlefront 2 Prologue: The Cleaner
Collectible 1
The first collectible in BF2 is in the game’s first playable room. After you’ve gained control of the ID-10, turn to your right and look for a box in the right back corner of the room. Head over to the crate and splice it to get your reward.
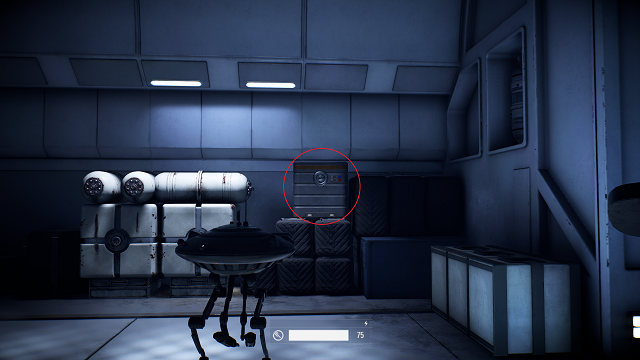
Collectible 2
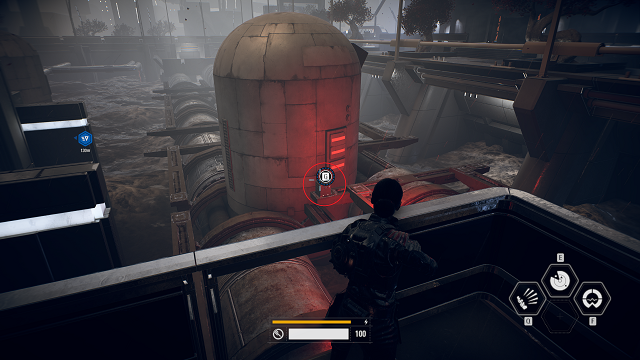
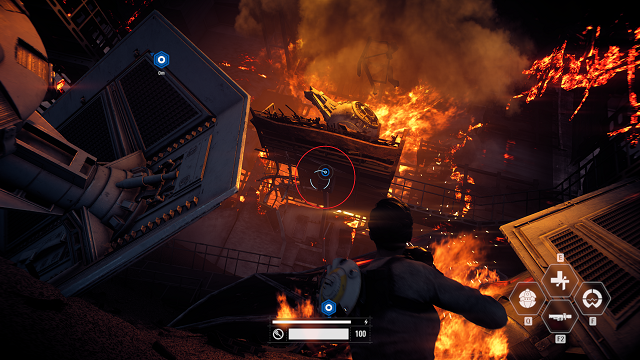
This crate can be found once you’ve exited the ventilation shaft for the second time. Here, you’ll be in a power supply room (you’ll know you’re in the right place because you’ll be able to see into space). Turn right after you enter the room and scan for enemies.
Proceed straight ahead in the screen shot above, between the left-most guard and the Rebels at the terminals to your right. You’ll find the mission’s second concealed collectible chest on top of four other boxes against the wall.
Collectible 3
You can find this splice box once you’ve gotten your first blaster in Battlefront 2. After this, you’ll come to a room with four Rebel soldiers. Immediately in front of you — as you enter the room proper — will be a soldier at a control panel. Take him out and turn right. Take out the other two soldiers on the gangway and travel to the end of it, where it splits to the left and right.
Turn left into the room there and find the last secret for The Cleaner Prologue mission.
Battlefront 2 Mission 1: The Battle of Endor
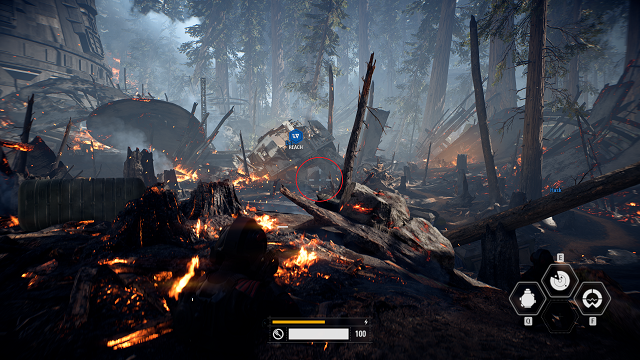
Collectible 1
As you begin the mission, you’ll have the wreckage of an intense battle in front of you — and about a dozen Rebel soldiers, too. After the inevitable firefight, check beneath the fallen AT-AT walker (to the right of where you began the mission). There, you’ll find the first collectible of the Endor mission.
Collectible 2
Soon after the above firefight, you’ll head toward Platform 4. On the way, you’ll find a group of Rebel soldiers near a bunker in a small valley. Defeat them and examine the bunker. Inside, you’ll find the second hidden collectible of the mission — and an awesome weapon in the barrage ability.
Collectible 3
This third collectible can be found when you come across the downed Lambda shuttle in the forest. Head along the left side of the shuttle. Once you reach the back (where its thrusters are), immediately turn left and follow the path to the Imperial bunker. There will be a large power cable about midway down the correct path. Go inside the bunker to find your prize.

Collectible 4
Once you get to Platform 4, go to the rear of the platform (before you ascend to the top) to find the mission’s fourth secret chest beneath a gangway and between two sets of stairs.
Collectible 5
The final crate of the Endor mission in Battlefront 2 will be a bit harder to acquire. Once you reach the top of Platform 4, you’ll have to fight through waves of Rebel enemies before you can end the mission. However, you’ll want to check the right rear of the platform.
If you do so, you’ll find a downed, burning X-Wing. Go to the back of the platform, along the X-Wing’s right side, to find the fifth — and final — collectible for this mission.
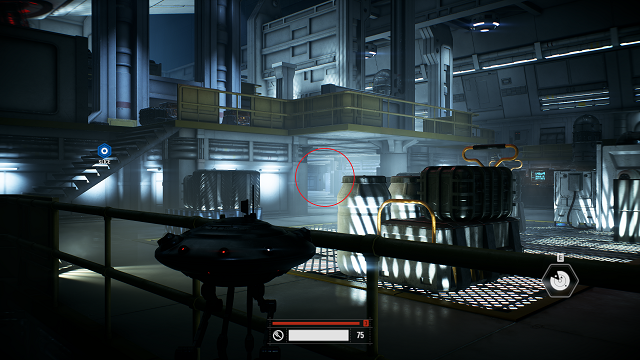
Battlefront 2 Mission 2: The Dauntless
Collectible 1
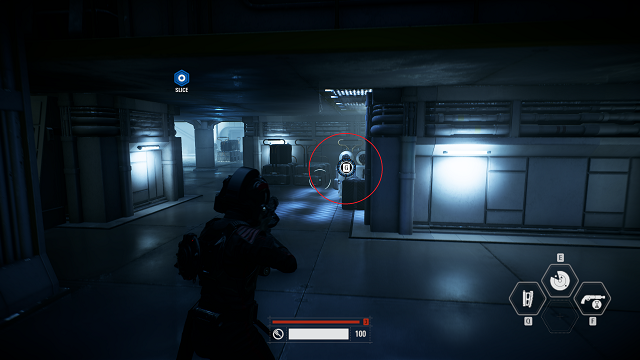
You’ll go a little while in BF2‘s campaign before you’re able to find your next collectible crate. But once you enter The Dauntless and defeat the first group of Rebels in the hangar, you’ll pass a burning A-Wing and X-Wing as you enter the second half of the room. Turn right and look up. You’ll find the box on the ledge above.
Collectible 2
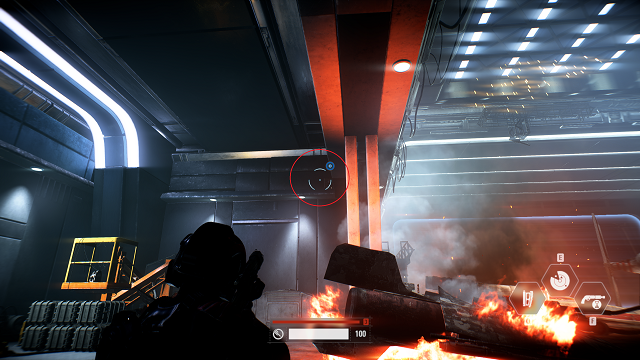
After going through a set of corridors, you’ll come to a large power supply room. Instead of going straight once you go through the blast doors, drop down to the floor below by dropping off the right side of the small gangplank in front of you. Continue forward and right, past the pillar and turn right (the computer terminals will be at your back).
As you move under the center of the platform, you’ll find the last hidden crate of The Dauntless mission in a pile of Rebel junk.
Battlefront 2 Mission 4: The Storm
Collectible 1
When you begin The Storm, follow the pre-determined path up the stairs and to the right. Once you pass through the second gate (the one with an AT-ST standing next to it), you’ll come to a square with a huge bronze statue of Garrick Versio in the middle. Immediately turn right after passing through the gate and follow the path around to the left. Go inside the fenced-off area to find the mission’s first collectible.
Collectible 2
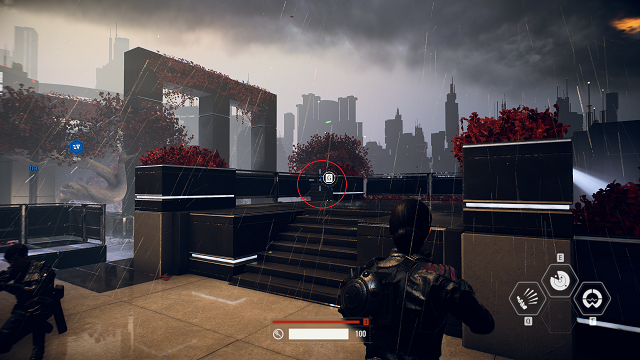
After you make your way through the halls full of Imperial propaganda posters and stormtroopers (soon after you trigger the alarm), you’ll come to a courtyard with a contingent of soldiers.
Instead of going straight across the courtyard to your objective, turn left and head toward the squad of troopers walking away from you and the searchlights at the far end. Go all the way to the gate and turn right. You’ll see the collectible crate stacked on two boxes.
Collectible 3
From the last collectible, turn right and go toward your current objective. However, don’t go through the gate at the objective yet. Instead, turn right and look to the structure in the water below. The third collectible will be at the base of the fuel container.
Collectible 4
After to grab the last collectible, go through the door to your left and continue with your current objective. Go down the corridor and dispatch the troopers in the elevator area. Take the staircase to your left and follow the next three stairwells to the top of the structure (to the fourth story, past all the troopers). Once you get to the top, there will be a barricade on your right. Take a left and go up another small staircase. Take another left to see the collectible crate on the platform.
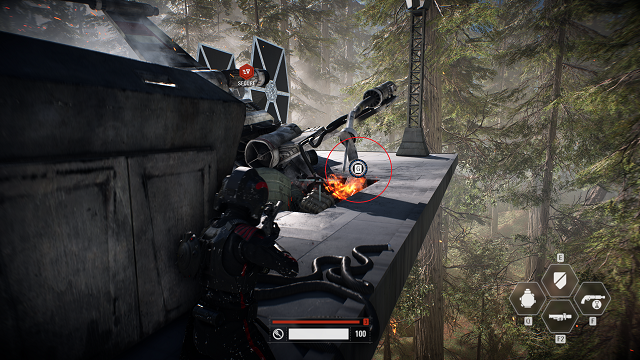
Battlefront 2 Mission 8: Under Covered Skies

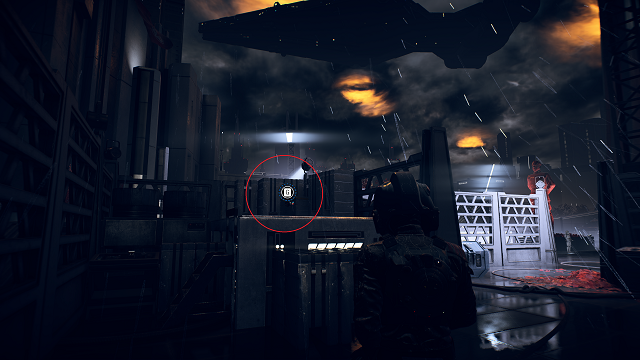
Collectible 1
As soon as you land your X-Wing on the landing pad and exit the cockpit, head straight ahead — to the end of the platform. To the right of the back-most stairwell, you’ll find your first collectible of the Under Covered Skies mission.

Collectible 2
After you’ve sounded the alarm and descended the tower, exit the room on the left-hand side and go down the stairs to your left. There will be a docked Tie Fighter in front of you. Turn right to find a collectible crate stacked on top of two containers along the wall.
Collectible 3
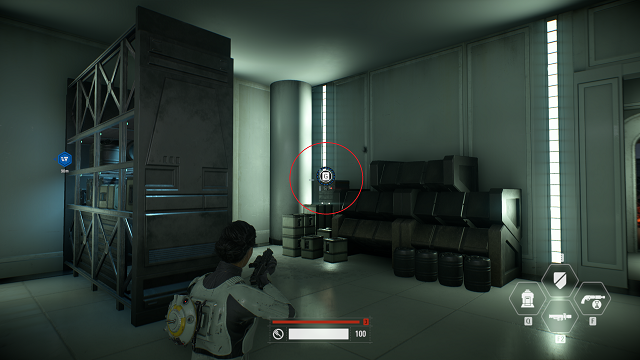
From the last collectible, turn to one o’clock and go down the stairs. When you get to the bottom, take an immediate left. You’ll move along a corridor between a building and a wall that will have an orange-red grate in the middle of it (which will be the color of lava). Follow the path around to the stormtrooper, who will have his back turned to you.
Dispatch him and turn right to go into the building. Defeat the troopers here and find the collectible crate on the opposite side of the room from where you entered.
Collectible 4
From the last collectible, exit the building through the door to your right and face your objective. Turn left and head toward the Tie Fighters (the ones behind the large, white fuel tank). Go to the Tie on the right-hand side.
Head up the stairs to find the collectible crate at the top.
Battlefront 2 Mission 10: The Battle of Jakku

Collectible 1
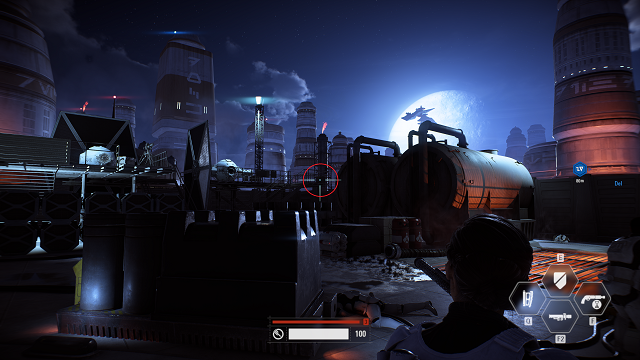
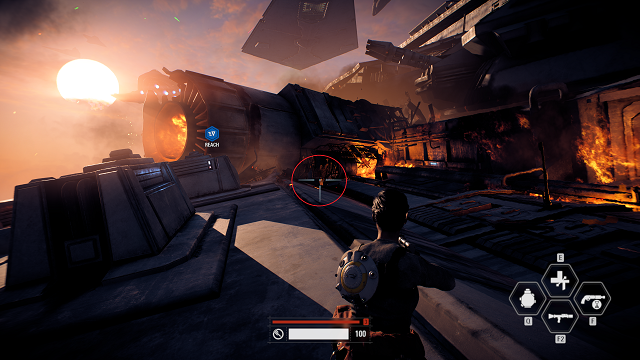
When you land at the downed Star Destroyer to stop the Tie Bomber attacks, you’ll want to stick to the right side of the map as you go through the wreckage. As you move further in, you’ll notice what looks to be a massive Star Destroyer turbine forming a tube-like structure. Go inside that structure. At the end, among several other boxes, you’ll find the first collectible crate of the Jakku mission.
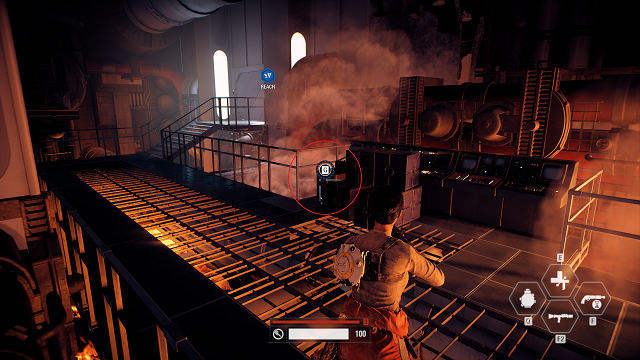
Collectible 2
Once you enter the Tie Fighter hangar inside the downed Star Destroyer, head straight to the back — before you set any explosives. There will be a platform about mid-way up the wall with a Tie cockpit on top of it. Look under the platform and you’ll find the collectible.
Collectible 3
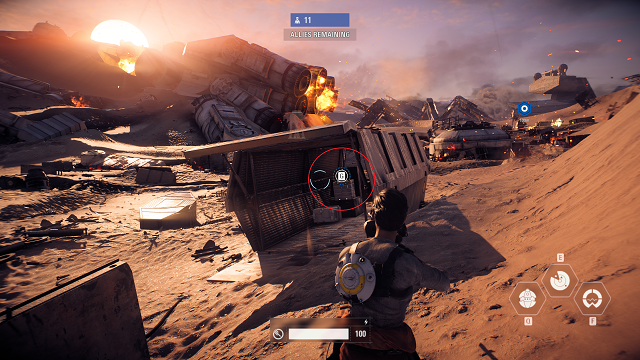
When you land to help the Rebels against the AT-ATs, head straight after exiting your X-Wing. You’ll cross over two dunes (the second will have a large piece of steel protruding from it). Once you crest the second dune, there will be a container with two birds on top of it to your right.
Go inside the container to find the collectible crate.
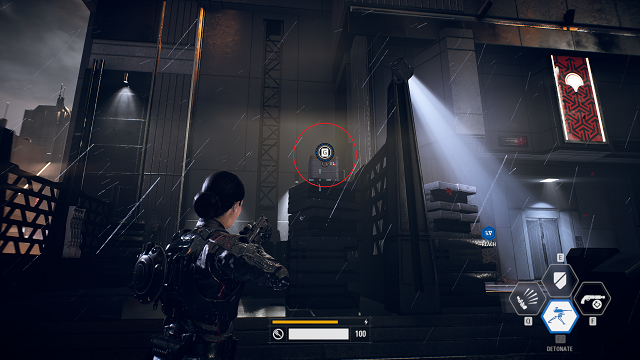
Battlefront 2 Mission 11: Until Ashes
Collectible 1
When you start the Until Ashes mission, go straight ahead and defeat the group of stormtroopers in front of you. You’ll see the wreckage of a large thruster between two turbo lasers on the right-hand side of the map. The collectible crate is nestled against the near side of the wreckage.
Collectible 2
Just after you enter the Star Destroyer, look for a set of computers on your right as you make your way along the gangway. Behind a set of boxes is the mission’s second — and the campaign’s last — collectible crate.
—
That’s it for this guide to Battlefront 2‘s campaign collectibles. Again, we will be updating this guide to include all of the game’s collectibles as more content becomes available, so be sure to check back. If you’re looking for other BF2 tips, tricks, or strategies, make sure to check out our other Battlefront 2 guides! Here are a few to get you started:
- How to Get Credits Faster to Unlock Heroes and Villains
- How to Fix Missing Last Jedi Challenges Glitch
[Note: Thanks to a GameSkinny community member for pointing out where some of the collectibles were in the missions The Storm and The Battle of Jakku.]


Published: Nov 13, 2017 12:46 am