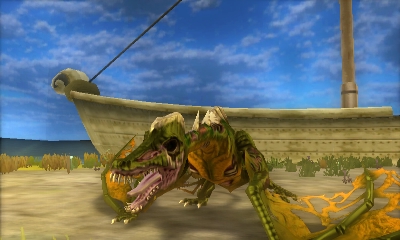
During Celica’s path in Act II of Fire Emblem Echoes: Shadows of Valentia, you will come across an island where a Necrodragon has taken roost. While the creature is about as nasty as it looks, it’s not impossible to defeat — provided you come prepared.
In this guide we’ll show you a two-phase process of two possible ways to defeat this beast, so that you can reap the rewards!
How to Beat the Necrodragon in Shadows of Valentia
The first thing you will note about the Necrodragon — aside from its ridiculously high defense and offense stats — is that it has a massive movement range. That said, it won’t move until something enters its aggression zone. Since most of Celica’s army won’t be able to close the distance, you will need to find a method to trigger its aggro. There are two ways to go about this.
Method 1: Tank It with Valbar

Knights were designed with one thing in mind: physical defense. The benefit of fighting the first Necrodragon is that it only has physical attacks. As such, you can get away with using Valbar to take the first hit.
Keep in mind that even Valbar’s defenses won’t be able to fend off the creature for long — he will take at least 3 or more damage unless you got good level rolls or you grinded levels at the graveyard — so keep Genny nearby to heal him.
Method 2: Use Genny’s Spirit Army Attacks
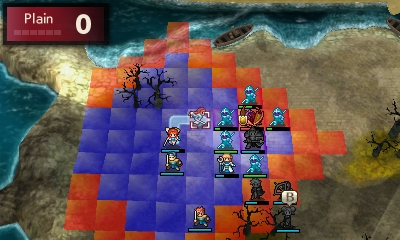
Provided you have leveled Genny to Level 4, you will gain access to a spell called Invoke. This ability is one of the best spells in the early game for Celica’s route, since she can summon up to six phantom soldiers to assist you.
These soldiers are treated as NPCs, and as a result they will move on their own; however, they will easily take a hit or two from the Necrodragon, thus luring it out of its den.
As an added bonus, they easily surround the beast, making room for the next phase of the plan!
Once the Necrodragon is out in the open, it’s time to lay on the pain. The question is…how? One again, there are two ways to go about it.
Method 1: Use the Seraphim Spell
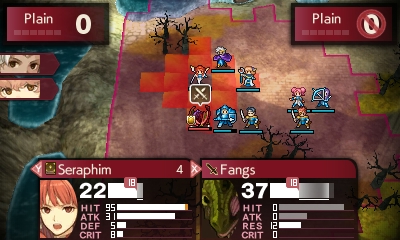
Necrodragons are counted as Terrors, and Terrors are “allergic” to the almighty powers of Mila! As such, using the Seraphim spell will spell a premature demise for our not-so-friendly undead dragon.
This method is absolutely necessary unless you spent hours grinding in the Graveyard level at the start of the game. Since most players don’t have the patience, this is the go-to method for defeating the creature.
Note: If Genny doesn’t have Invoke, it is highly recommended that you use this method, or else suffer the consequences.
Method 2: Beat it with Metal (and Ethereal) Sticks
Assuming you have the patience — and the levels to back it up — there is absolutely nothing wrong with going savage on this creature. Using Genny’s Invoke, take out the creature by summoning as many soldiers as possible to surround it. Once that is done, use magic to strike it from afar while maintaining your distance using your spirit soldier shields.
If you don’t have Invoke, prepare for a living nightmare — as you will need to keep everyone alive using Genny’s Recover spell. If you really have no choice, and you’re honestly too bothered to level Genny to 4, then stock up on food items and prepare for the long haul.
If you don’t want to do this, and you’re already this far without Seraphim, just avoid the creature for three turns and sound the retreat.
To the Victors Go the Spoils!
Winning this battle will earn you a Blessed Ring which heals HP over time, and is a great item to give to Genny if you want to abuse her Invoke spell.
It also grants you access to the Seabound Shrine dungeon, which is a serious step up from the graveyard for grinding levels and finding some sweet loot to help you on your journey. On top of all that, the Seabound Shrine is the first Mila’s Servant Statue on Celica’s journey — aside from the Priory — and so this will help you change classes if and when the time comes, without needing to backtrack through the Graveyard.
Now that we’ve given you the strategy, it’s up to you to put it into action. See you on the battlefield! Need more help with playing Fire Emblem: Shadows of Valentia? Check out our other guides:
- Fire Emblem Echoes: Shadows of Valentia Gameplay Mechanics Explained
- Fire Emblem Echoes: Shadows of Valentia Villagers and Unit Promotion Guide
- Fire Emblem Echoes: Shadows of Valentia Character Recruitment Guide


Published: May 20, 2017 07:54 pm