Previously, we took a look at the faithful Stormcast Eternal and how to best use the faction in Warhammer Age of Sigmar: Storm Ground. Now we’re going to look at the spectral Nighthaunt faction, and give you some tips and strategies on how to make the most of their strengths.
These spooky folk serve the Supreme Lord of the Dead, the Great Necromancer Nagash. Cursed into eternal servitude and suffering, they crave only the release of death — or the joy of spreading it to others.
In Warhammer Age of Sigmar: Storm Ground, the Nighthaunt faction is a tough force to master. They’re fragile and brilliant, and they’re great for messing with your opponents. The Nighthaunt faction is able to take advantage of their superior numbers to deny their opponent’s tactical opportunities.
Storm Ground: The Basics

One of Storm Ground‘s sticking points is that it doesn’t really explain some of its key mechanics. The most important fact you’ll need to know is that you will die before you beat a campaign.
As a roguelike, you are expected to fail and try again using the gear and skills you’ve picked up along the way. When this happens, it is important to remember to select two units from your roster to carry forward before you start the first mission. For this reason, it’s best to always focus your attention on upgrading two units as you progress.
Aether Points
Similarly, as you level up your units, they will gain more slots for skills and equipment. These will improve your units, letting them deal more damage or withstand more blows. But it also means that units cost more Aether to summon.
Due to the time it takes to save up Aether, it can leave your hero and less powerful units feeling exposed. There’s no perfect balance, but it’s good to aim for around 4-7 Aether Points per unit, and only stretch to 9 for one extremely powerful unit that you can drop to change the game state.
Playing Defense
Defense in Warhammer Age of Sigmar: Storm Ground is interesting. While a pip of defense will negate a pip of damage from an enemy, it also gives you a cumulative chance to avoid damage altogether. If you have the chance to buff health or defense, you’ll almost always want to take gear or skills that increase your defense. Two or more pips offer over a 25% chance to negate all damage, which cannot be ignored.
With these key things in mind, let’s move onto some Nighthaunt specifics.
Nighthaunt Playstyle
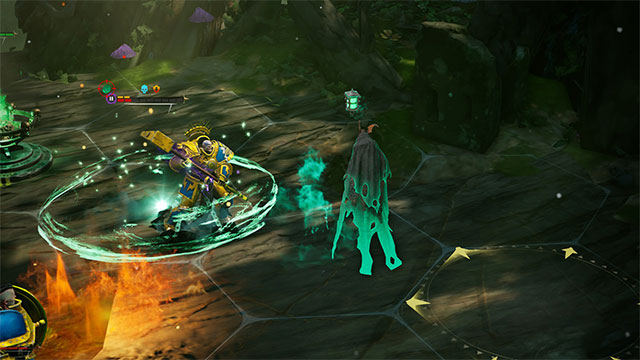
Nighthaunt rely on quantity over quality — for the most part. Their basic units, Chainrasps, come as a horde, and you can summon two of them. They aren’t very strong because of this, and you’ll need to use your debuffs and the sustain from Wisps to survive.
Your champion — usually the Knight of Shrouds Pellighast the Pitiless — can summon Wisps every turn. These are the tiles you can summon to, and they also heal any allied units that occupy the same hex. Putting these next to enemies so you can move onto them and negate damage to a unit is a core part of your strategy. Additionally, hitting units from range with Chainghasts and finishing them off with Pellighast is a good idea, because both have access to skills that will make them stronger in the process.
While Nighthaunt lack the survival prowess and raw damage of Stormcast units, and the utility and area denial of Maggotkin, they still have plenty of tricks up their ghostly sleeves.
Nighthaunt Unit Breakdowns
Pellighast the Pitilies
As a Knight of Shrouds, Pellighast is one of the most high-ranking officers in the Nighthaunt forces. He can place Wisps on hexes near him, which act as a healing force for other Nighthaunts; he can also create summoning nodes.
The game will instruct you to place Pyres around and feed them Wisps to summon, but the real utility in Pyres is putting them on the front lines. Every enemy killed within 2 hexes of a Pyre will turn into a Wisp, giving your spectral forces the sustain they need to stay alive.
Pellighast also begins the game with access to Malign Strike, a 2 damage skill that inflicts Quell on an opponent, ideal for reducing their damage potential if they’re able to get a charge off the next turn. While the Pyre is good early in a campaign, it can be a bit cumbersome to use as Stormcast begin to field faster units. It’s good to switch things up for a two-handed weapon like Greatsword, which gives Pellighast even more damage potential.
Given the Nighthaunt ability to self heal, giving Pellighast skills with extra armor, +1 Max Health on Kill, +1 Health on Kill, and Harvest, which confers +1 Damage on Kill, can make Pellighast snowball from formidable to unstoppable. With the right skills, he can even tank missions solo.
Chainrasp Hordes
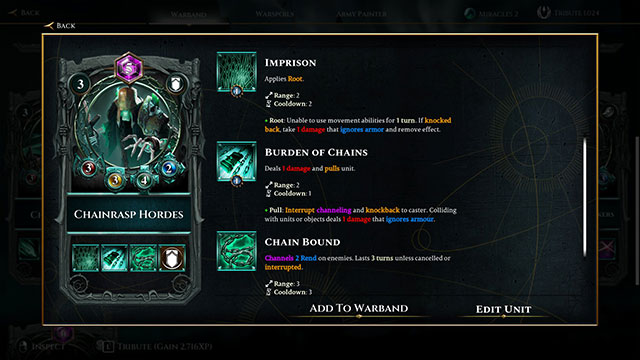
These are your basic ghoulish hordes. Unlike other units, you’ll get two of these per unit card equipped to your warband, making them very economic. They aren’t great in combat, but their real job is to debuff enemies and hold them up. The channeled ability Chain Bound causes them to strip 2 units of armor from an enemy, allowing you to disarm tough opponents.
There isn’t a lot to be said for their basic abilities, but you’ll quickly find lots of extra gear for them. The best pick is anything that gives you Burden of Chains, a weak ability that lets you pull enemies one square. Being able to flank two units with two Chainrasp Horde u nits and pull them into each other deals more damage than anything else they can do.
Imprison is also a helpful skill that lets you stop enemies dead in their tracks for 2 turns, and it makes the unit take one damage if you move them out of the hex, perfectly synergizing with Burden of Chains.
As they are a tank class, improving their defense is an easy pick, but if you can find the Force Multiplier skill, which lets you summon a third unit in a mission, you’ll be even more formidable. Three Chainrasp Hordes may not kill anything, but they’ll deal enough chip damage to let stronger units kill, which synergizes with Harvest to great effect.
Chainghasts
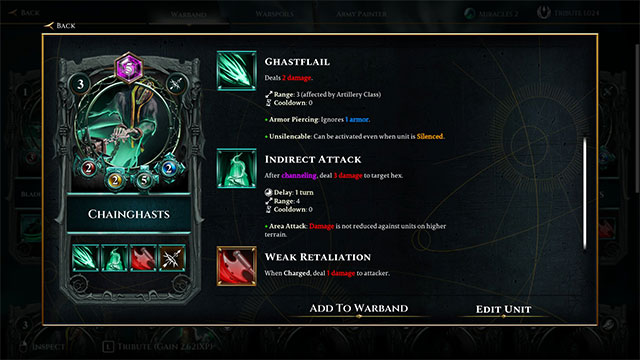
Not to be confused with their raspy friends, Chainghasts are the Nighthaunt’s long range damage dealers. They act a lot like Castigators, which were mentioned in our Strormcast Eternals Guide linked at the top of this Storm Ground tips guide. They have the ability to deal 2 damage at range (which ignores one pip of armour) and channel for a turn to deal 3 damage to a specific hex.
The Nighthaunt’s ability to load up on cheap chaff means they nearly always have a wall to hide behind, and Chainrasp Horde can easily pin units or drag them into range of a track or a channeled artillery shot. As mentioned previously, the best ability Nighthaunt have access to is Harvest, which confers units +1 damage with a killing blow. Chainghasts are the best target for this skill, and can get great mileage out of it, even doubling up on the skill to get 2 damage.
Engineering an early match kill with a Chainrasp Horde, or a tap from one of Pellighast’s damage abilities, means you can quickly turn these into unstoppable monsters able to delete any unit with one shot. As long as your defense and positioning are good, and you’re able to funnel units into range, you’ve got a surefire win on your hands.
Bladegheist Revenants

Grimghast Reapers are the Nighthaunt’s primary assault units. They wield rusted greatswords that grant them the Whirling Death ability, which hits a straight line of 3 hexes directly in front of them, synergizing brilliantly with Chanrasp Hordes’ movement manipulation. This attack has the advantage of not having its damage reduced against units on high ground, so it’s useful for shifting entrenched ranged units.
One of this unit’s more interesting effects is Frenzy, which allows them to buff adjacent allies when summoned, giving them +1 damage for one turn. This works excellently if you drop the next to Pellighast or your Chainghasts, or if you have multiple Bladgheists in your warband. Despite hitting hard, these units are fragile like all Nighthaunt, so you’ll need to keep Pellighast nearby for a healthy supply of Wisps.
While the obvious skills and equipment would be those that increase damage, defense is helpful so they can survive enemy retaliations. One rare skill allows units to act when they are summoned, which can be especially helpful if you can summon two Bladegheists next to each other. It’s a niche tactic, but it can be excellent when it goes off correctly.
Glaivewraith Stalkers
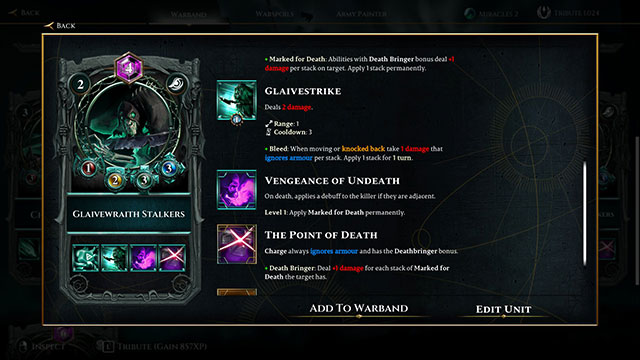
The first of the two Nighthaunt Scout units, Glaivewraith Stalkers are very weak, but each card lets you summon two. They are quite techy to use, designed around hit and run tactics. Their Glaivestrike allows you to inflict 2 damage and bleed, the latter of which lets them combo nicely with Chainrasp Hordes.
Their traps inflict enemies with Marked for Death, which causes them to take +1 damage for each stack they have. Glaivewraths also inflict Marked for Death on the unit that kills them if it is also adjacent (so no tricking Castigators to take them out).
Their final passive is The Point of Death, which causes Glavewraith charges to ignore armor and deal +1 damage for each stack of Marked for Death. Every pair needs to really work in tandem, inflicting as many stacks of marked for Death as possible before the second unit does a suicide charge to cause as much bonus damage as possible.
Because of the tightness of Storm Ground maps, this is hard to pull off without giving your Glaivewraiths extra movement, extra health, or extra defense, so keep those skills in mind. One Glaivewraith specific skill reduces the cooldown on their traps and makes inflicting Marked for Death much easier; you can flood the battlefield with traps.
Nighthaunt Advanced Units
It’s unlikely these Nighthaunt advanced units will show up in your first campaign, as they are rare rewards from missions and chests. Most likely, you’ll only get them at the very end of the campaign, so I’ll just touch on their key points
Myrmourn Banshees
Scouts that devour magic, Myrmourns Banshees present an interesting prospect for a Nighthaunt army. They have the ability to silence enemy units, which is good in a pinch, but their secret strength is their scream on death, which deals 2 damage and 1 knockback to adjacent enemy units. There are lots of ways to use this as a suicide bomb, pushing units into each other and into the scenery — and 2 damage isn’t to be sniffed at either.
Dreadblade Harrows
Smaller versions of your Knight of Shrouds hero but on horses. Dreadblades tend to be equipped with greatswords, meaning they can use Whirling Death much like Bladegheists. With their generous movement speed, it’s a good idea to give them skills that increase that, or if you can find it, a skill that lets you charge a second time on a successful charge kill, letting you play out your shock cavalry dreams.
Nighthaunt: Best Strategy on the Field
In battles, you’ll want to tune your approach to how you’ve equipped Pellighast. If he has Pyre equipped, be sure to throw it down ahead of you and bait conflict around it. If he doesn’t, be liberal with Wisps and summon Chainghasts behind your offensive lines
Try and focus on fighting near scenery if you don’t have a lantern, and use your Chainrasp Hordes to soak up damage, and drag enemies into each other, into your lantern, or into the scenery. If you need to lock down a strong enemy, consider using Root if you have it on a Chainrasp, and strip armor with Chain Bound, before following up with an assault unit or a bombardment from Chainghasts.
Remember that many of your units have the advantage of being summoned twice for one card, so if all fails you can make a bait with a weak unit whilst you shuffle around your offense units or wait for enough aether to summon a big hitter.
With these Warhammer Age of Sigmar: Storm Ground Nighthaunt tips, you should be able to make decent headway into your campaigns. Remember to experiment with loadouts and abilities and not to increase your aether costs too high. Careful positioning and use of skills on cheaper units is far more important than everything being upgraded to high cost, especially if you can’t get them into battle quick enough to protect your leader.


Published: Jun 2, 2021 06:11 pm