
Etrian Odyssey games are designed to be old-school, which means they aren’t often newcomer friendly. Even the Untold games, meant to be primers for newbies, have a steep learning skill.
Yet Etrian Odyssey Nexus is primed to appeal to old fans and newcomers alike, with its combination of all the best bits from previous games and some unique elements thrown in.That’s why we put this comprehensive guide together, covering all the basics you need to know to dive into the labyrinths without fear.
Etrian Odyssey Nexus Exploration
Nexus does a good job explaining the basics of exploration early on, though there’s a lot of information to deal with at once, and it doesn’t tell you everything.
There are two details of greatest importance: mapping and exploring.
Mapping the Labyrinths
Mapping might seem obvious, since it’s the franchise’s main feature. However, especially later on, paying attention to your surroundings and documenting them appropriately is crucial to your survival.
Auto-mapping is an option even some veteran EO players don’t realize exists. It’s on the third option screen, and you can adjust to “full” if you want to let the game map out walls for you. It’s a good way to save some time and avoid a bit of tedium, though it only records walls directly next to you.
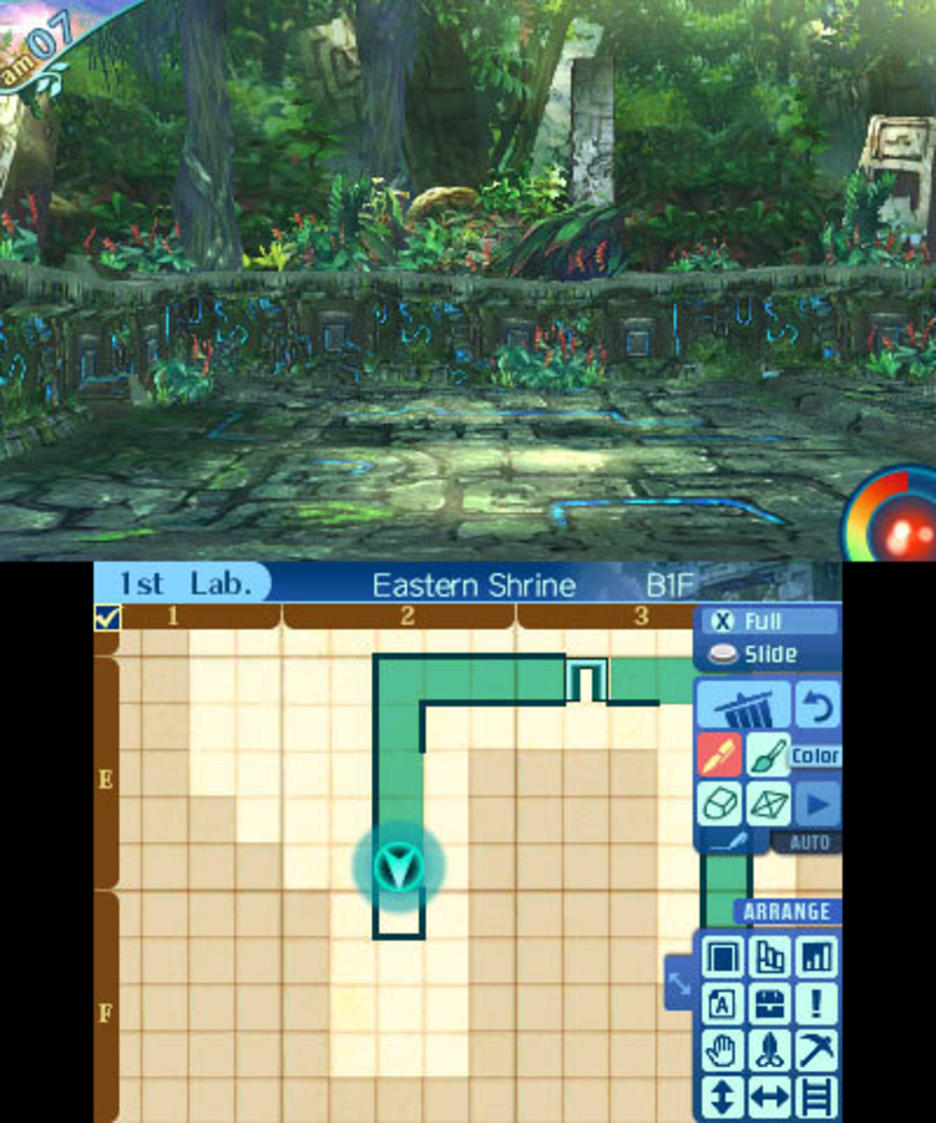
Still, it gets easier to figure out general room sizes and shapes as you go on, so if you don’t want to walk next to every wall, you can usually fill in most room outlines by turning around and gauging size and distance.
What you can’t fill in automatically is shortcuts. Shortcuts are exactly what they sound like: passages through walls that let you cut out a good chunk of walking. If you aren’t paying attention, they can be easy to miss, but each labyrinth uses essentially the same thing: some kind of flower or other unusual oddment on the wall as a signal to check that space.
Mapping where they are and what direction you can approach them from gives you an idea of where to go later in the labyrinth to get to where you can use the shortcut permanently. And it lets you easily go from floor to floor without dealing with monster hordes and long walks.
Exploring Every Nook
Exploration ties in with the other thing you want to record: mini-events. Etrian Odyssey is all about exploring, and the labyrinths make it worth your time and the extra random encounters.
Some corridors lead to short text-based events that go in your logbook and grant extra experience for the party. These recorded events are one-time occurrences and often affect the party in some form, for example, restoring HP or TP or inflicting status conditions. The potential for benefits and, most importantly, the extra experience make even negative outcomes worthwhile.
Other events are recurring—a pool of refreshing water, for instance, or a fruit-bearing tree—and these are excellent ways to restore a tired party without having to leave the labyrinth. They regenerate once per day/night cycle.
And in other cases, you’ll find evidence of something not useful at the present, but important for a later sidequest. Because some quest descriptions are incredibly vague (i.e., find my lucky coin I lost somewhere on B2), you really want to make sure you use the notes feature to mark places like that.
So, the TL;DR here is “explore every dead end.” Even if you end up seeing something like this.

Useful Skills
You also want to make sure you mark gathering spots. On the top screen, they show up as little sparkly squares. Many of them are in odd, easy to forget places, but they grant you valuable items once per day/night cycle. It’s important to mark which kind of gathering spot it is as well—Take, Chop, or Mine—since having a party member with the right skill can increase your yield from specific types of spot.
In fact, many EO players create gathering parties for the express purpose of exploiting these spots and raking in the cash and materials. Spending one Skill Point on Mine, Chop, or Take means you get double or triple the amount of materials. More importantly, the Farmer class – absolutely useless for combat in most cases – increases your yield, causes more monster drops, and shortens the time it takes for gather spots to regenerate.
If you’re looking to stockpile a lot of goods and money or just need to collect a certain number of things for a quest, a gathering squad with a Farmer is the way to go.
If want to just explore and don’t need as much combat for a while, invest in a skill like the Zodiac’s Horoscope, which reduces the random encounter rate for a set number of steps.
Alternatively, the Shogun’s Taunt Assassin skill increases both the random encounter rate and the experience you get from each fight, making it perfect for level grinding. After reaching level 20 and Veteran status, the Hero class gets access to a skill that draws in additional enemies in the area and ups the chance of encountering a shiny monster; shiny monsters are rare normally and give big experience boosts.
From the third labyrinth, Primitive Jungle, on, you’ll also encounter hazards and traps in the labyrinths. These inflict damage or status effects, and some can disable the map or transport your party. The Survivalist has a skill that nullifies traps and hazards for a set number of steps, but if you don’t plan on using one in your party, you get access to the Guard Sole item in Primitive Jungle, which works the same way. Just make sure you take several with you.
Etrian Odyssey Nexus Combat Tips
Battle advice is where Nexus goes silent, making it more of a trial and error experiment unless you’re already familiar with the systems. Like all EO games, Nexus throws you into party creation almost from the start, with no guidance whatsoever.
If you aren’t familiar with any of the classes, it can be overwhelming determining which ones might make a balanced team. After you get used to things, you can make almost any team work, but there are a few general tips to keep in mind.
Unlike most RPGs, you want a dedicated buffer, debuffer, and/or status inflictor. Nexus offers no shortage of choices for any of these, with Harbinger, Nightseeker, and Arcanist being three of the most useful. Binds are helpful in many ways and prevent an enemy from using certain skills.
- Head binds: prevents magic-type skills or head-bash skills
- Leg binds: prevents leg related skills
- Arm binds: prevents arm related skills
Doctor Sibil in the Tavern offers some advice for how to use binds, but careful observation of enemy patterns and specific skill names will clue you in on which enemies should be targeted with which binds. Analysis scopes help as well, filling in your reference book information slots and showing whether enemies are even vulnerable to certain ailments (and most are to at least one, including bosses).
On the other hand, status affects like the usual paralysis, poison, and sleep are highly useful as well. Poison skills can sap huge amounts of health from enemies (and you), while paralysis works much the same as in Pokemon, randomly preventing enemies from acting.
Sleep’s usefulness depends on your strategy; using a fast class like Ninja to inflict sleep doesn’t pay off when your other characters act later and target the same enemy, waking it up if attacks connect.
Buffs and debuffs don’t need too much explanation. But they’re importance can’t really be overstated. Boosting your party’s or a line’s defense and reducing your enemies’ attack (especially if you can do both at the same time) or reducing their defense and raising your attack are basic, but crucial strategies for making tough battles winnable—and shorter.
Shorter battles are good, too. Your TP (Technical Points) pool doesn’t last forever, and TP restoring items are very rare at first. Random battles should be dealt with via a mix of normal attacks and, when necessary, special ones. TP restoring items like Amritas are best saved for boss fights, which can drag on depending on how you approach them.
That makes dealing with certain classes like the Zodiac rather difficult at first, because they’re usefulness depends entirely on TP-based attacks. As you’d expect, though, TP increases as you level up, and some classes, including the Zodiac, let you spend Skill Points to boost TP further (though these abilities often have to wait until level 20 when you reach Veteran status).
One other thing to keep in mind is the Memory Conch. It’s a recurring item in the series that acts like the Experience Share in Pokemon, and you receive it shortly after the game begins. It grants party members back at the guild a small percentage of your battle experience (without taking it away from your party).
Obviously, it won’t keep your inactive party members at the same level as your active ones, but it should bump their levels up a fair bit during each labyrinth.
There’s a catch, though. It’s an accessory item, so it takes up a valuable armor slot for one of your active party members. Make sure it goes on a tank-y character that doesn’t need too much extra armor.
How to Use Skill Points in Etrian Odyssey Nexus
Spending your Skill Points is one of Nexus’s most important activities. You start with a handful and obtain one point every time a character levels up, but choosing which skills to spend them on involves a bit of strategy.
It’s best to pick one or two aspects you want to focus your character on, rather than trying to balance Skill Points across every available skill.
For example, you might want to emphasize passive healing and increased buffs for your Sovereign, instead of focusing on its elemental capabilities, or ignore the Hero’s Afterimage gimmick entirely and pour all your efforts into individual buffs and elemental cut attacks.
It’s completely up to you how you plan and what you do, but spending some time before creating a character to figure out how you want to build it long-term saves trouble later on in the labyrinths and makes leveling up more efficient.
If you find you screwed up somewhere along the line with your skill points or just want to reorganize them, all is not lost. Head back to your guild in Maginia and choose Rest in the Organize menu. It’ll cost your character a few levels, but you can redistribute your available skill points as you see fit.
And don’t think you have to max out skills to realize their benefits, either. Most skills that go up to 10 double in power at rank four or five, so if you want a significant boost without dumping too many points in a given skill, that’s one route to go. Others you can ignore entirely if they don’t fit with your chosen build or if you only need them to unlock new skills.
General Newcomer’s Tips
This section covers some general tips and advice to help you make the most out of your experience.
In Maginia
Most of the options available to you in Maginia are fairly self-explanatory. But the beginning of any EO can be overwhelming for newcomers, so it’s worth noting a few important things.
Kvasir’s Tavern
Kvasir’s Tavern becomes available shortly after you register your guild and do some basic adventuring. You don’t get your first quests for a little while after that, though. Instead, you can talk to some of the tavern patrons, each of whom usually has some interesting information to share.
Robin the Flee-Footed warns you of certain monster attacks to be aware of and potentially how to prevent them with binds, while Doctor Sibil offers important advice, including tips about obtaining rare items off monsters by defeating them in a certain way. Take that advice when you can; the En you get from those items is worth the while, plus they tend to unlock new goods at Napier’s Firm.
The most important reason for visiting the Tavern, though, is the quests. You usually get new quests at least twice in a labyrinth cycle. The first time after you’ve done some exploring and advanced the story to where Headquarters posts a new mission, and the second comes after you’ve advanced the story further, which usually involves revealing the main trial for that labyrinth (which itself is usually a boss monster).
Calling these sidquests would be a bit of a misnomer. They aren’t necessary, true, but they offer the best way to boost your party’s levels outside of clearing story missions. Experience gains from these can range from 300 to 1000 points, which makes a huge difference if you’re trying to strengthen your characters.
Napier’s Firm
Napier’s Firm is the place you’ll visit the most in Maginia. It’s your usual RPG store, where you buy and sell weapons, armor, accessories, and items, but it plays an important role in Etrian Odyssey games. Longtime fans will already be aware of this, but EO revolves around a few gameplay loops, and one of the primary ones is exploring, item gathering, selling, and returning to the labyrinth.
In each maze, you’ll come across items dropped by monsters and materials gathered through collection points. Unlike most RPGs, you don’t happen upon new equipment by chance. It becomes available as you sell Napier the goods needed to make it. So while selling everything you gather gets you En, it’s also vital for keeping your party up to scratch.
The importance of this loop can’t be emphasized enough. Don’t go into a labyrinth thinking you should try and clear the floor in one go. Fight, explore, get lots of stuff, then go back to town and start again.
Unless you grind for materials a lot, though, you’ll probably find you can’t afford to kit out every party member. Part of the game’s strategy involves choosing the right equipment for the right character, whether that’s giving your Hero a new sword to deal more damage or making sure your Zodiac gets a new set of boots to increase their defense.
But, Napier’s Firm also includes a Forge option for certain weapons, and it’s a good idea to check it from time to time to see if you have any materials or old (or current) weapons you can improve. Forging increases a weapon’s stats without costing you anything other than items, and sometimes, forged weapons end up being stronger than many of the weapons you can purchase.
Most importantly, don’t go back into the labyrinth without an Ariadne’s Thread. It lets you leave a labyrinth immediately and is vital if you get stuck or are in danger of a wipeout. For cost-saving purposes (and general practicality) you don’t need more than one at a time.

The Lady of the Lake
Vivian’s Inn doesn’t need much explanation, though there are a couple of things to pay attention to.
First is item storage. Since you’ll be selling a lot, you might ignore it for a while. But as you start gathering rarer healing items and the like, you may find you run out of room for gathered materials more quickly. That’s where Storage comes in, letting you stash away items you know you need later so you can maximize your profits in the present.
You’ll notice over time, Vivian starts charging more for resting and recovering. By the time it costs over 100 En, it won’t be that big of an impact to your wallet. But after clearing the second labyrinth, Lush Woodlands, you get the option to go back to Base Camp on the world map.
Once during a day/night cycle, two characters you met before offer you a steak dinner that replenishes your health. It’s a nice way to save some money and time, if you don’t want to go to the inn.
And of course, the save option. It’s easy to miss, but it’s at the bottom of the Inn menu and doesn’t require you to pay to stay overnight.
Headquarters
Last on the list of things to do in Maginia is visiting HQ from time to time. Don’t forget to report new monsters and items obtained periodically, along with completed maps. After reaching certain milestones (5 monsters, the 25, then 50, and so on), you get some nice rewards, including rare items and the always-necessary En.
—
It seems like a lot to take on all at once, but the aspects covered in this guide form the core of every Etrian Odyssey experience. Once you master the basics, you’ll find everything starts falling neatly into place as you venture closer to Lemuria.
Got any tips of your own? Let us know in the comments!


Published: Feb 2, 2019 02:29 pm