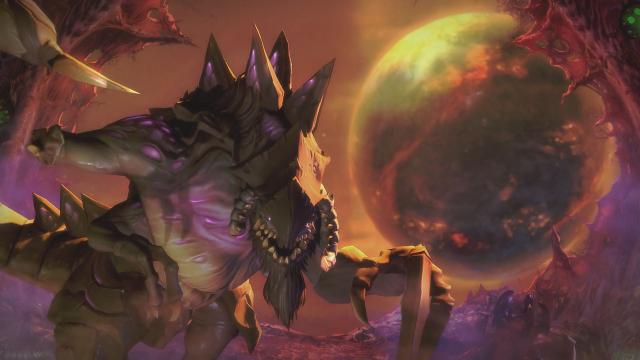
Hailing from the zerg homeplanet Zerus, the packleader Dehaka joined Heroes of the Storm this week as the zerg race’s first warrior role. This is a breakdown of his move set and the different ways you can successfully hunt down and harvest the essence of your enemies.
Dehaka’s role is that of a disruptive initiator and tank. While his health pool is not as large as other warriors, he makes up for his relatively weak frame with the ability to self-heal. This allows Dehaka to disengage, heal up, and wait for his cooldowns before re-entering the fight. Here’s a quick breakdown on what you can expect.
The Good
- Dehaka’s varied kit allows him to adapt to most any circumstance.
- His ultimate abilities are different enough to both be viable.
- Despite doing best in coordinated efforts, he is also a strong solo choice.
- His movement ability allows him to get where he needs to be quickly.
- He is excellent at disrupting enemy lines.
The Bad
- Dehaka can’t absorb as much damage as other Warriors.
- His long timers between cooldowns make him vulnerable.
- Missing his skill-shots drastically lowers your contributions.
- He lacks any long range options.
Dehaka’s Abilities
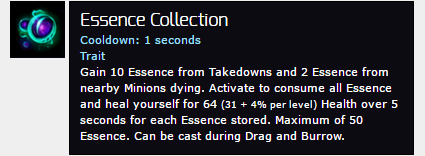
Dehaka’s unique trait is the ability to steal Essence from his fallen foes. This builds up stacks of a very powerful heal over time that is meant to make up for his overall squishy nature. Note that this ability can be used in conjunction with burrow. It is a heal over time after all, and you’re going to need that time to realize its full effect. Try to farm up stacks of essence whenever you can afford to.

Drag is meant to be your initiation ability. Using this move you’re able to pull tanks off of your squishier allies, bring fragile enemies into your allied territory, and pull enemy healers away from their intended targets. It also does a decent amount of damage, but has long cooldown and a short windup. Dehaka will be very vulnerable should you miss, and it will take quite a while to try again.
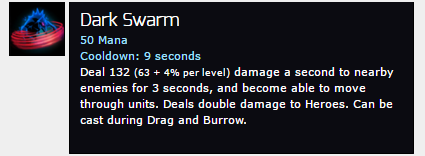
Dark Swarm is Dehaka’s primary means of dealing damage. When activated, it allows Dehaka to wade into enemy lines, dealing fairly significant damage to heroes. The 3 second duration in conjunction with the 9 second cooldown means you can have it up every 6 seconds. Note that this ability can also be used with Burrow and Drag, meaning you can use it as a way to block enemy pathing, or activate after successfully grappling a foe.
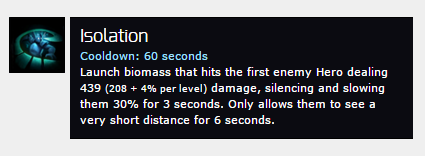
Isolation is the aggressive option of Dehaka’s ultimates. This ability lives up to its name, as it is wonderful for singling out an opponent. The “blind” effect is incredibly potent, as it drastically reduces the enemies line of sight, preventing healers from being as effective, or causing assassins to run the wrong way in their efforts to escape capture. It also does a sizable amount of damage, with a modestly low cooldown.
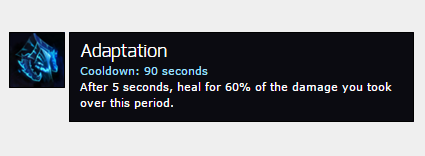
Adaption is the tanky option for Dehaka. Similar to Dehaka’s trait ability, Adaption allows him to soak up a decent amount of damage before returning a portion back to himself as a heal. Similar to Essence Collection, it’s a good idea to keep your finger on burrow while this move is active, since the 5 seconds can seem like a lifetime if the enemy team is focusing you down. Once you’ve survived, however, you’re almost guaranteed to return to the fight fully healed.
Dehaka’s Talents
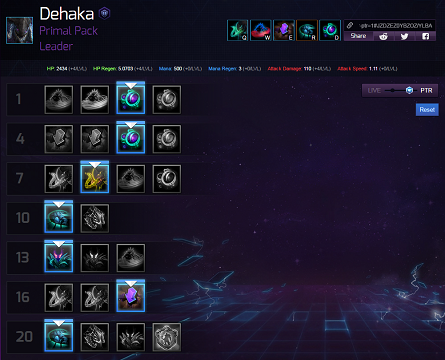
This is a default build I enjoy using for Dehaka for solo queues, but there are many situations where other options would be better suited. We’ll go over the choices individually so you can find your best options for your match-up.
Level 1 Talent
For my first talent I’ve chosen Enhanced Agility, and from what I understand this is a popular choice. Dehaka has no real movement abilities since he lacks a mount and his kit doesn’t call for any. This talent choice allows him to build stacks and permanently add to your overall movement speed. This has a separate counter than your stacked total, so don’t be afraid to use your heals to stay alive. Enduring Swarm is also a viable choice when trying to stay alive in the thick of enemy groups, but it will also be harder to close in on faster opponents.
Level 4 Talent
My next choice is One-Who-Collects. Early in the game, you will have little trouble gaining Essence, as you will have little reason to leave your lane. As the game marches on however, you will be wandering more often to help your allies. You still need Essence to use your heal however, and the faster you can accrue it, the better. This allows you to fill up your Essence counter sooner rather then later, and also has the benefit of helping you reach max stacks of Enhanced Agility quicker. Numbing Eruption also has a spot as honorable mention, since it turns burrow into a semi-aggressive crowd control once you have initiated.
Level 7 Talent
Next is Constriction, and this choice comes from personal experience. Even though the modifier of .5 seconds seems small, that extra time allows you to drag the enemy that much further away from their allies, while also keeping them inside of your Dark Swarm. I find this ability to easily be one of the better choices. Symbiosis wins second place in this tier, but gains value if you took Enduring Swarm at first level.
Level 10 Talent – The Ultimates
Isolation and Adaptation are both very solid choices. If you find yourself the target of enemy aggression, take adaptation. If your team already has a healer, it will make you near impossible to kill, and incredibly frustrating for your foes. This also pairs well if you picked Enduring Swarm and Symbiosis from earlier.
Isolation is great for if your team needs the extra damage, or if they focus on buffing and supporting a single character. It also works well for removing any pesky support from the battle, forcing them to get closer than they may be comfortable doing to be useful.
Level 13 Talent
Swift Pursuit pairs quite well with Enhanced Agility, which you should have maxed out by this portion of the game. It has similar benefits to Ferocious Stalker, except you don’t have to have used Brushstalker recently to have gained its effects. Can also be useful for escapes. Whirling Dervish pairs well if you’ve been building the beefier Dehaka with abilities like Adaptation and Enduring Swarm.
Level 16 Talent
All of these options are very good and for different reasons. Paralyzing Enzymes will make it so the enemy has that much harder of a time escaping once they’ve been drawn in to your team — a good idea when your team has less burst damage, or the enemy team has a lot of warriors. Elongated Tongue will allow you to surprise your enemies with ranged pulls from further then they would normally expect, and Rapid Regeneration is yet another way for Dehaka to self-heal. I choose Rapid Regeneration since my build doesn’t have any of the tank traits, but I wouldn’t fault you for picking any one of these.
Level 20 Talent – The Final Choice
Contagion is my go-to for this tier, but only in my generic setup. If you’ve picked Adaptation, I would actually suggest taking Apex Predator for both offensive and defensive reasons. Brushstalker makes for a good escape and initiate tool, and it’s great to have it up as much as possible. The short casting time makes it even better. However if you’ve chosen Isolation, it’s very hard to pass up on the idea of blinding the entire enemy team should they cluster up too close.
Desirable Allies and Dangerous Foes
Dehaka does well with anyone who can land a ranged stun, ensuring that his Drag will land. Tyrande, Uther, and Kerrigan are a few good choices for laning partners. Despite being able to heal himself, the extra help from any team healer is also appreciated, allowing him to save his long cooldowns for more dire situations.
Without any outside support, Dehaka will struggle against opponents who can sustain damage over long periods of time. Examples of this would be Illidan or Raynor, since they can typically just continue attacking into Dehaka without him getting a chance to realize the full benefits of his self-healing. Keep a close eye on your health around burst characters — Dehaka has the means to counter their abilities, like Nova’s Triple-Shot or Kael’s Pyroblast, but you need to save your burrows and self heals for the right times to get the full effects.
Hopefully this has been helpful for you when playing the newest zerg hero. Now get out there and hunt some Essence!


Published: Mar 31, 2016 09:10 pm