The sandbox creation platform Roblox is all about choice, and that extends far beyond you want to care for pets in Adopt Me or cause mayhem with heists in Mad City.
Of course there are thousands of options for clothes to put on your avatar, but what if you want to make your own rather than spending Robux on another player’s creation?
You can in fact but make your own shirts, decals, and pants, although the option to craft unique clothes doesn’t appear by default. Yes, you do need a Builder’s Club premium membership active to make your own clothes in Roblox.
Get ready to shell out some cash if you haven’t done so already, as that’s sadly just the way the blocky cookie crumbles.
Creating A Shirt In Roblox (2019)
 Downloading the basic template
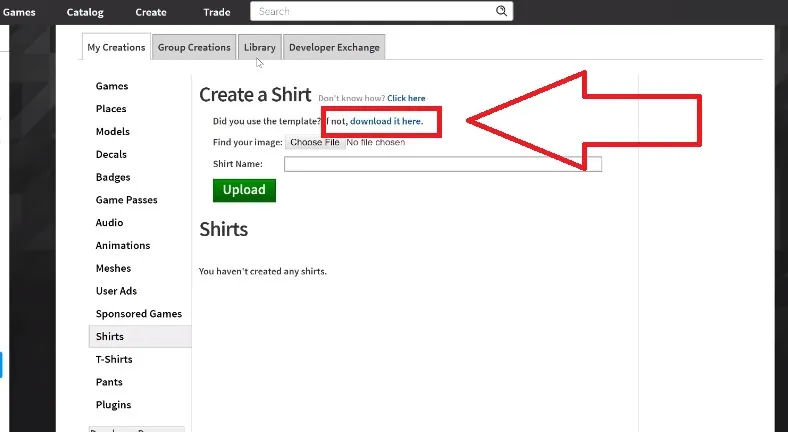
Head to the Create tab (only unlocked if you’ve got a Builder’s Club subscription) and then navigate to the My Creations section. In the list of options on the left, select “Shirts.”
The easiest way to get started and ensure you don’t have the wrong sizes or colors is to download the basic template directly from the interface using the blue link (or you can grab the template from the Roblox Developer site here).
Basic and Player-made Templates
While that’s the best option for learning the ropes of Roblox clothes creation, keep in mind the basic template is fairly limited. Want to start with something more unique than the standard template and create hoodies or tank tops? You can find a ton of readily available templates in different styles over here.
When you’ve got the template downloaded, now its time to actually get down to the real work of manipulating the image to create your own design and use an image editing program to alter the colors in the template.
Not sure what to use? Here’s a few free options if you don’t already have a preferred image editing tool:
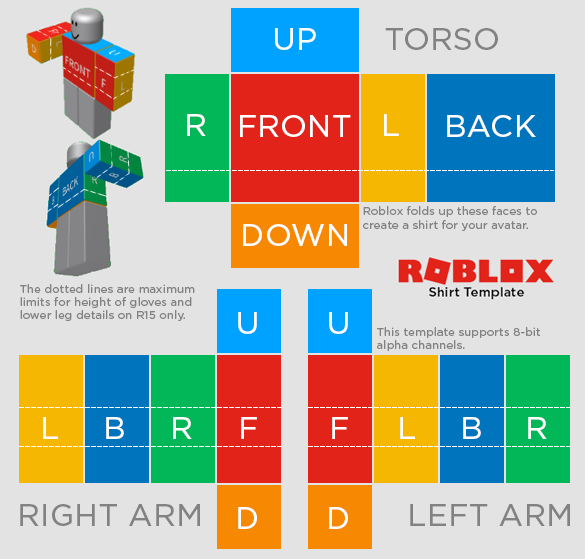
With the template open in your image editing tool, set whatever colors (or even write text) you want within the boundaries of the defined template areas for the torso, right arm, left arm, etc..
The basic template clearly shows you exactly which rectangle will appear on which part of your avatar, so its simple to create clothing with whatever design you have in mind, whether you want stripes, shading, logos, text — whatever you want.
If you go with the basic template instead of a fan-made template, make sure to remove the existing text denoting the different sections of each clothing item (“UP,” “FRONT,” “L”, “D” etc.) as anything within the rectangles will appear on your finished article of clothing.
Saving Your Clothing Designs
When you’ve got your design finished, save it in the same file format as the original template but choose a different save name so you don’t lose the base file. Since you probably want to make more than one shirt, its handy to keep the basic template unaltered.
From there, go back to the My Creations tab in Roblox and click “Choose File” (below the link to the template).
At the prompt, select the template you saved and choose Upload. After the clothes are uploaded, click the settings icon to the right of the file name you set for the outfit. Select Configure and then you can change the name and set a description so its easy for people to see what the item is supposed to be.
How to Sell Your Creations
If you want to sell your shirt or pants on the Roblox store to other players, click the “Sell This Item” check box, choose a category from the radio buttons, and then click Save.
Want to make or sell something besides a shirt? Just repeat the process in the Pants, Decal, or Badges sections of the My Creation tab.
Be sure to let us know what you end up making so we can take a look in the Catalog and find your clothing creations!


Published: Jul 8, 2019 01:22 pm