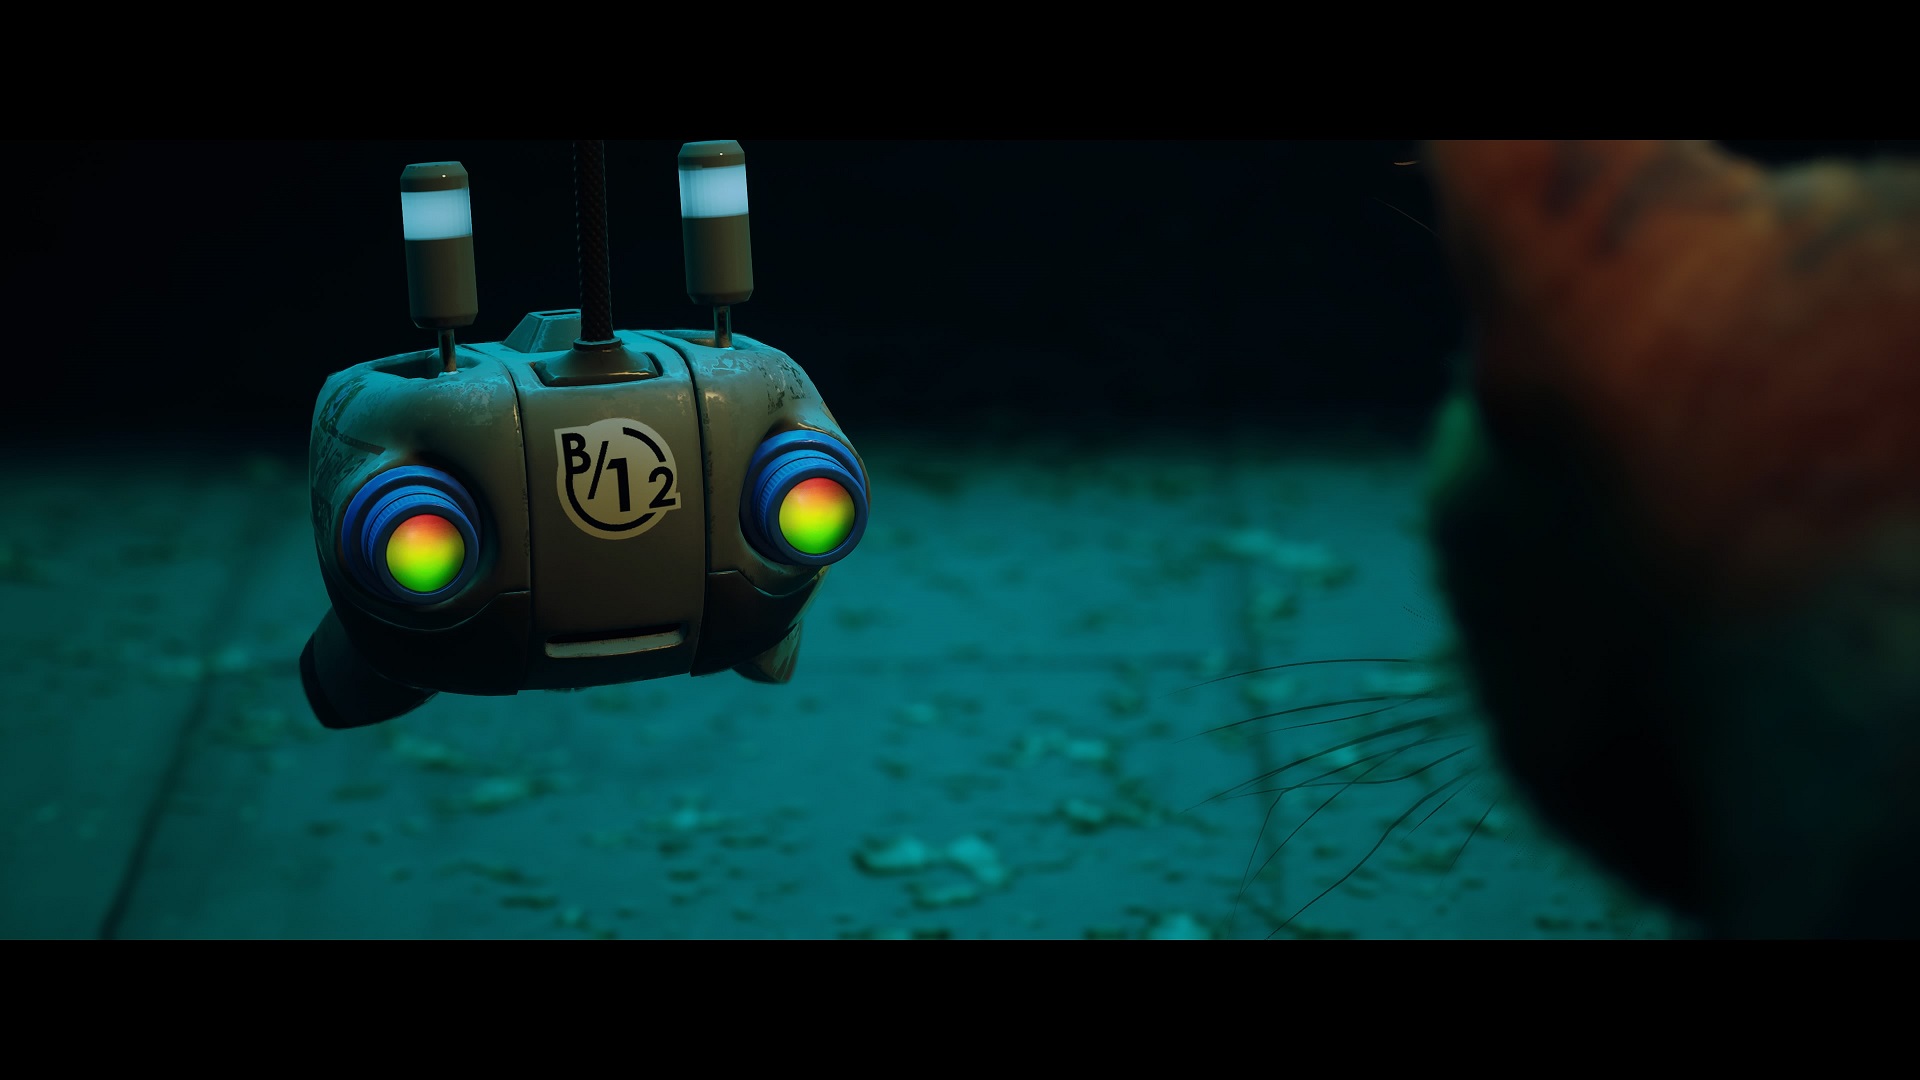
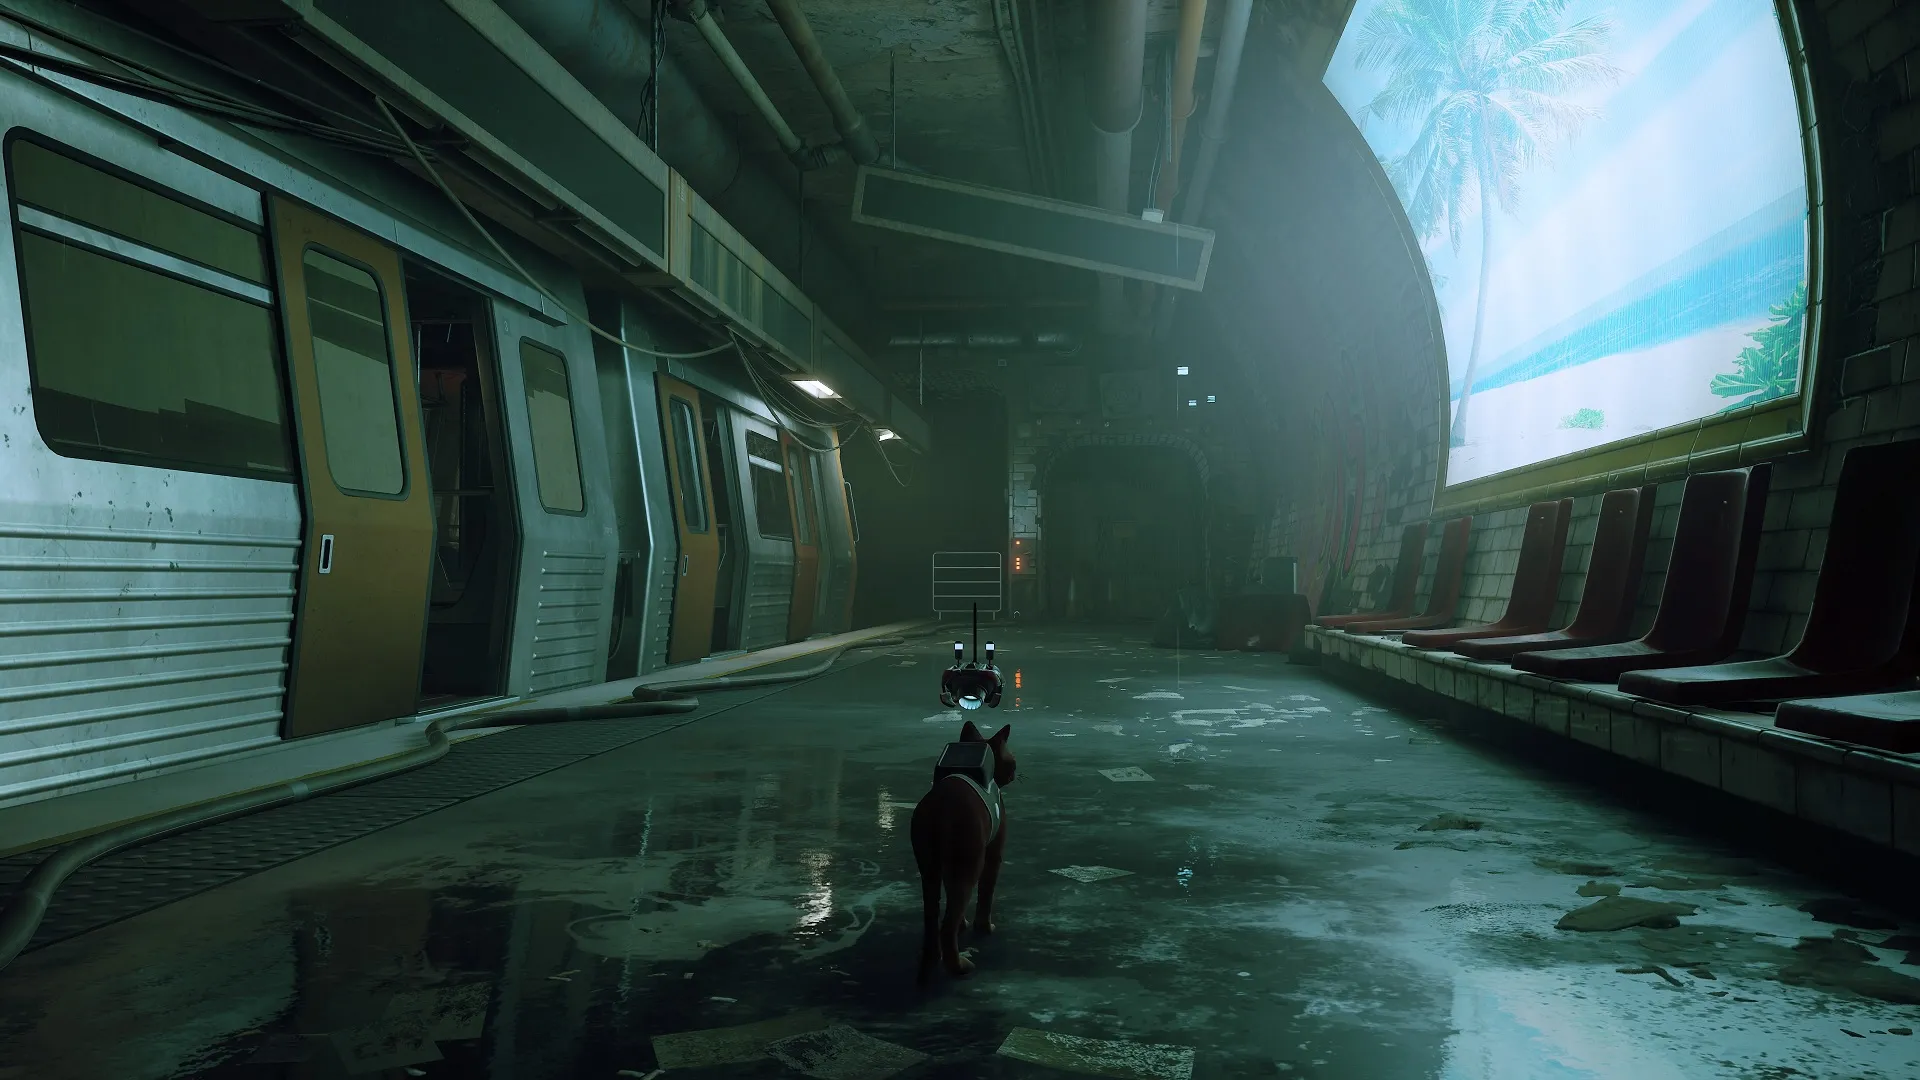
B12 is a drone companion that joins your journey in Stray‘s third chapter, The Flat. Once you find him, you’ll be able to discover his memories in each of the remaining chapters, learning more about B12’s background and the history of the world around you. There are 27 memories to uncover, and as is often the case with these things, some are harder to find than others.
Memories are colored in a light blue glow with small blue boxes flittering around them, and they can be anything from murals and signs to railings and deactivated robots. You can view glitchy previews of them by accessing your inventory and tabbing right to Memories; once you find a memory, you can view its complete form in this same location.
There are no memories in the first two chapters: Inside the Wall and Dead City. We’ve outlined the rest of them in the guide below. You can see the total number of memories you’ve collected when loading your save file and by each chapter by choosing chapter select. Discovering them all will net you the “I Remember” trophy (PS4/PS5) or achievement (PC).
Every B12 Memory Location in Stray
The Flat — 1 Memory
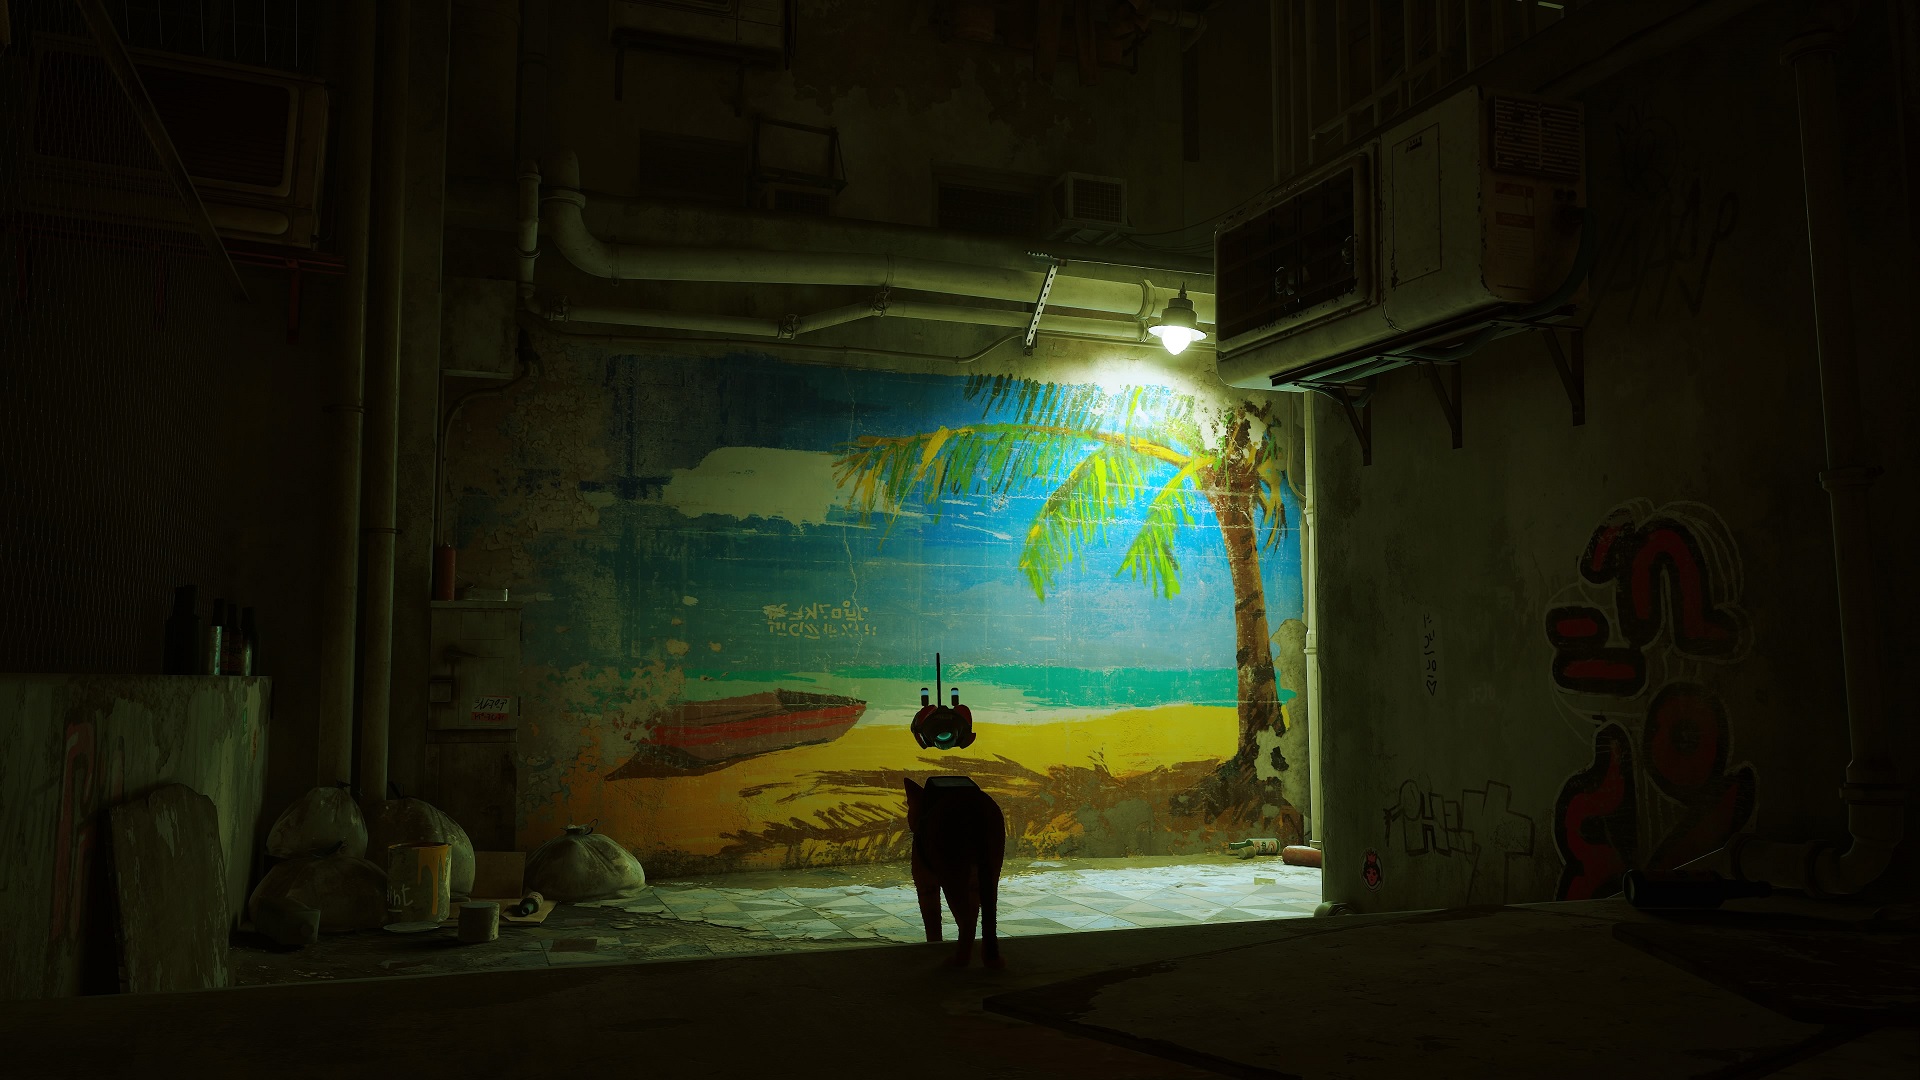
Memory 1/27: Eventually, you’ll find a mural of a beach along the main path after meeting B12 and riding in the bucket outside of the flat. B12 will grab a postcard off of the mural after reminiscing, adding the memory to your log.
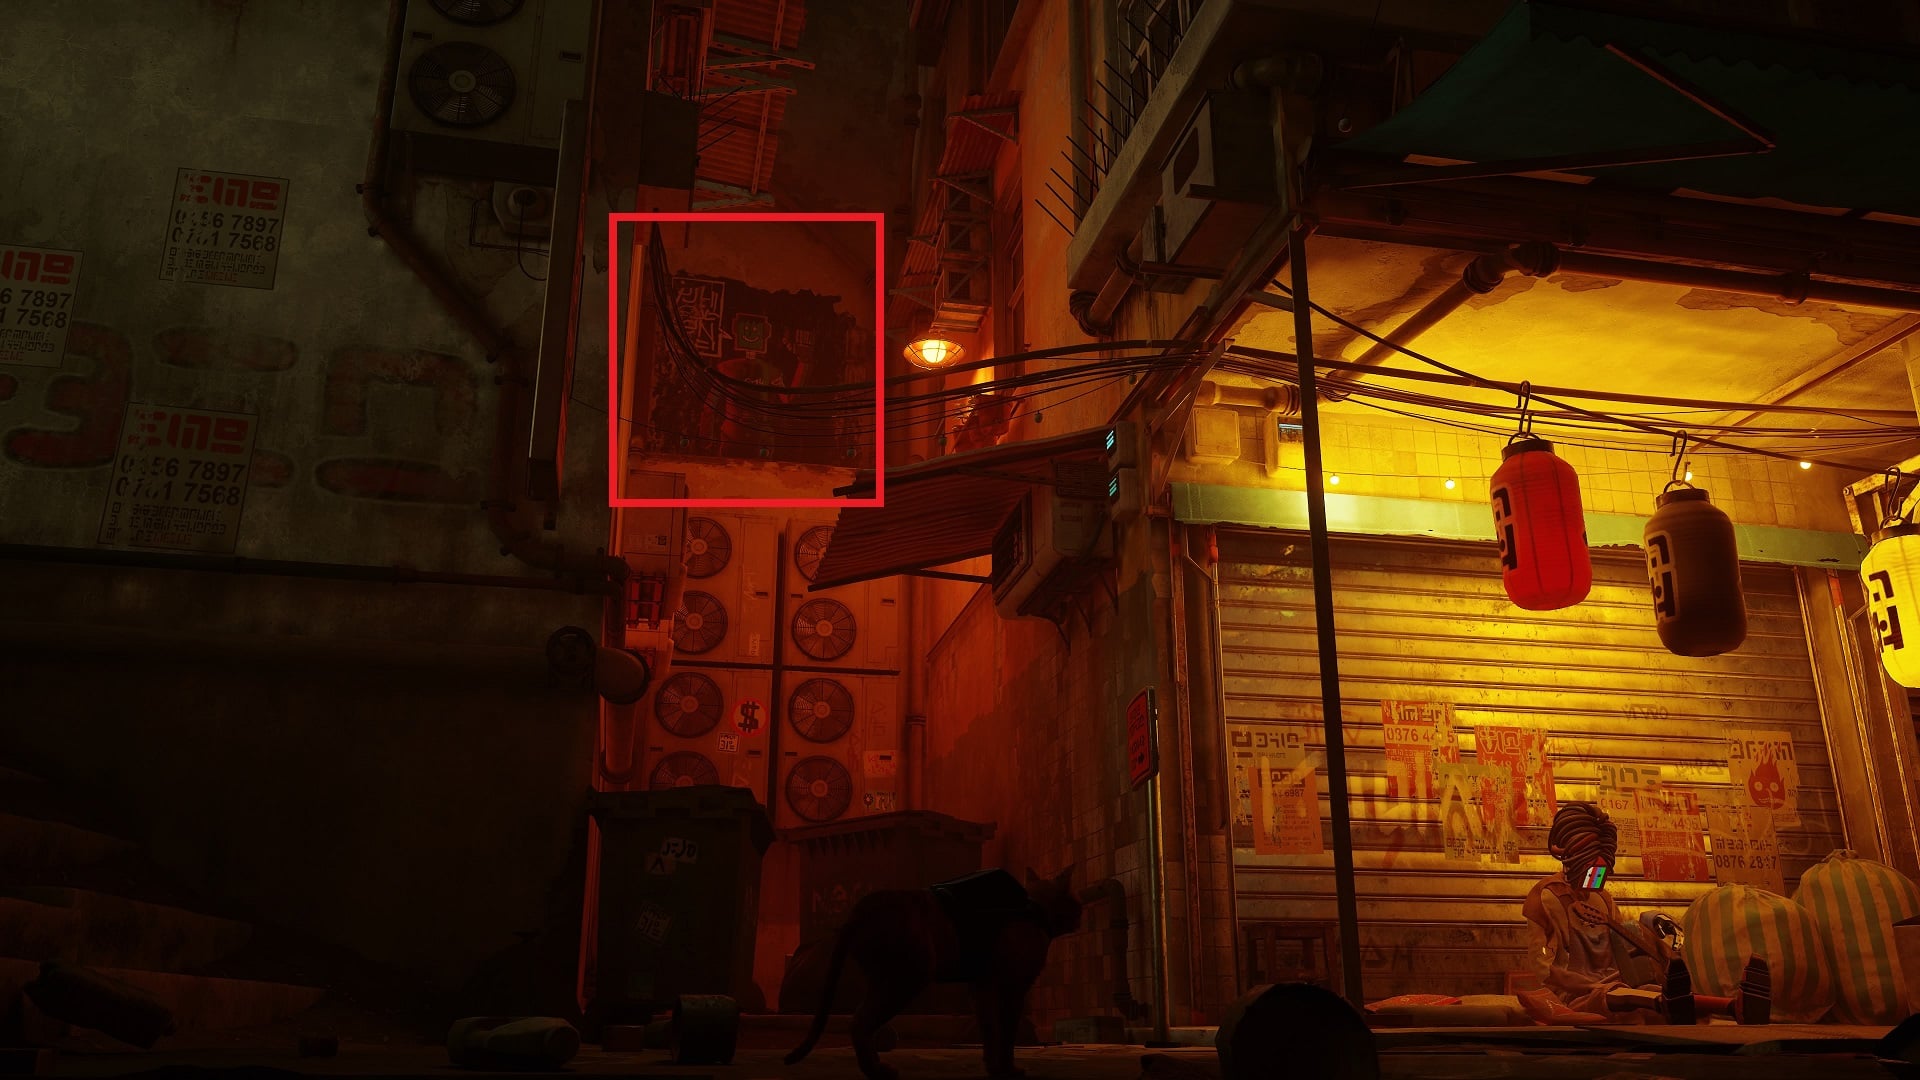
The Slums — 7 Memories
Note: All of these Memories can be found in both The Slums — Part 1 and The Slums — Part 2.
Memory 2/27: The next memory, this time a mural of a companion, is to the left of the Guardian in The Slums (the robot carrying the staff you meet when you first arrive). Facing the Guardian, go left past Roshee, the robot tending the plants, and down the stairs. At the bottom, go left into the small alley left of Morusque, the Companion with the guitar, and climb up to the top. The mural is in the back above a block of air conditioners.

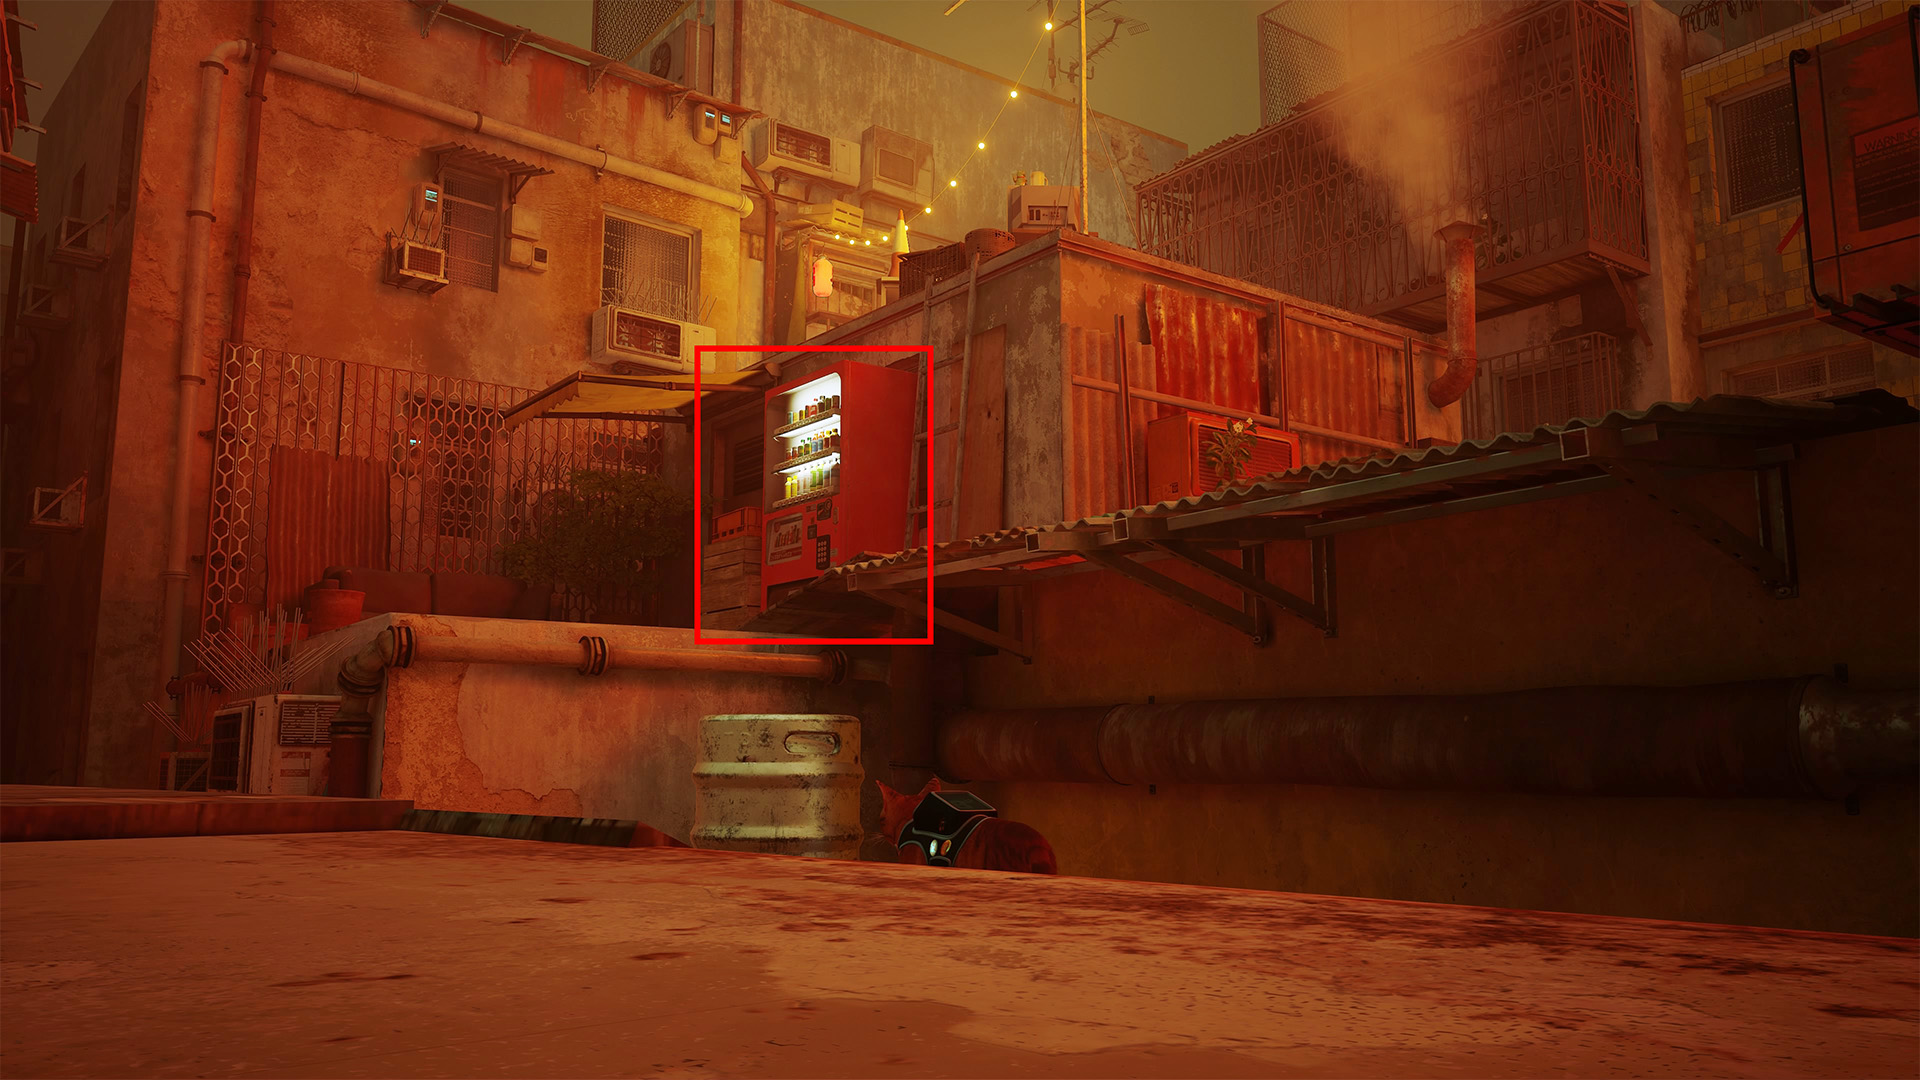
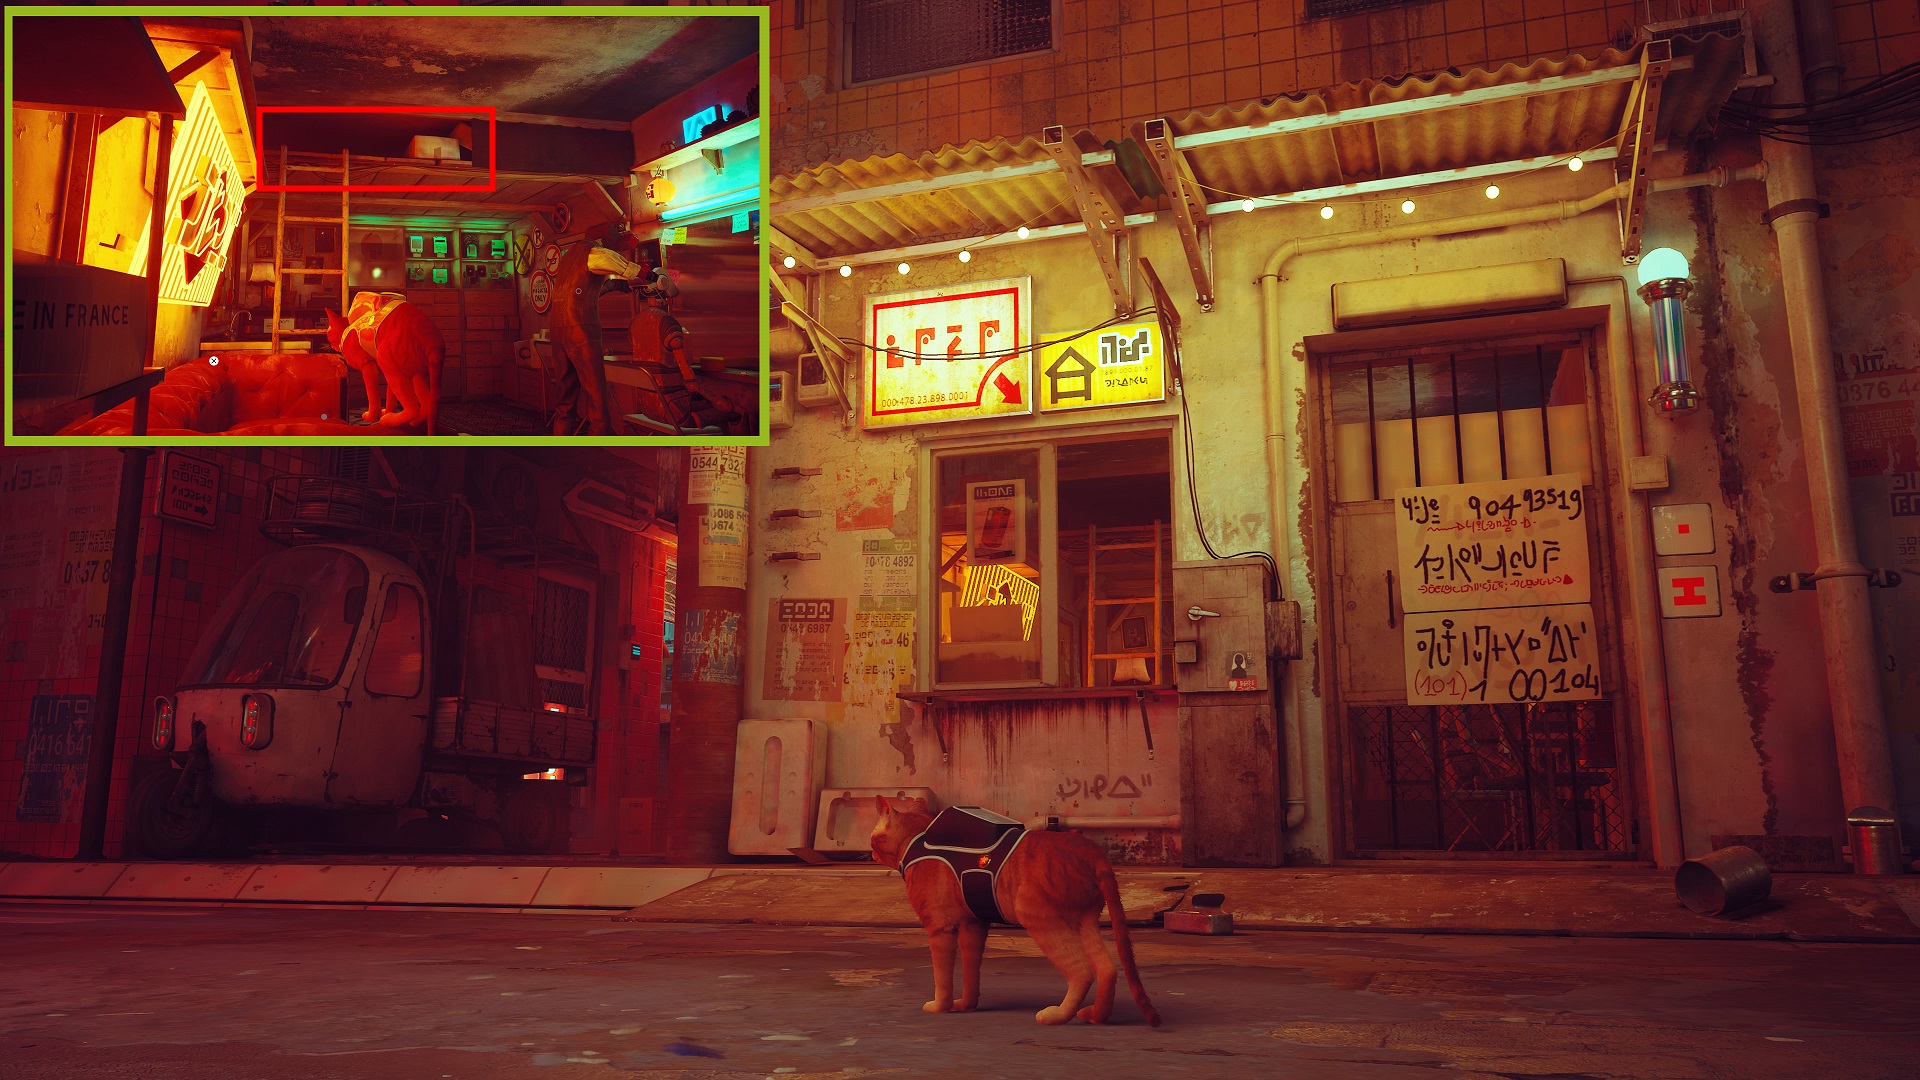
Memory 3/27: With your back to the Guardian and facing down the stairs toward Dufer Bar, climb to the top of the building directly to your left with the red vending machine (directly across from the building with the yellow vending machine). Interact with the robot leaning against the sign at the top.
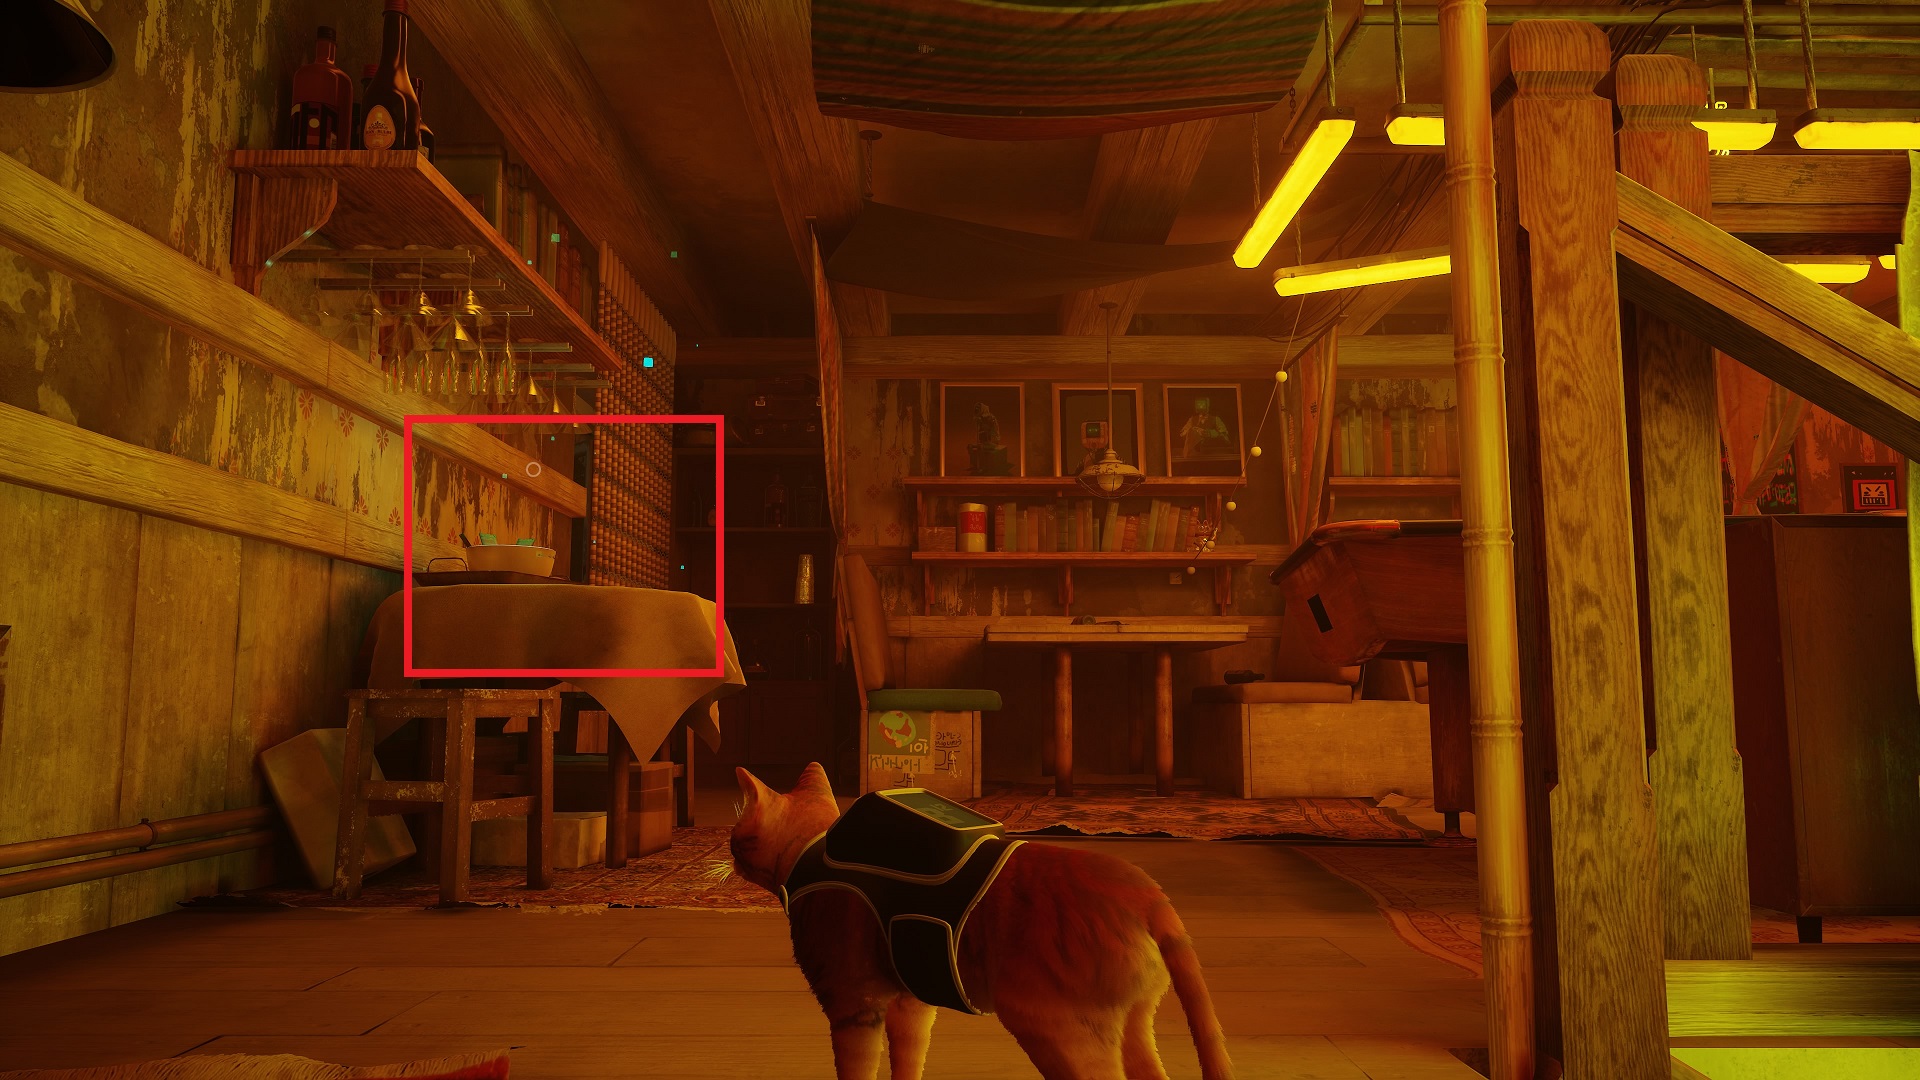
Memory 4/27: Another memory is in Dufer Bar. Go upstairs and inspect the bowl on the round table at the top, across from the pool table.
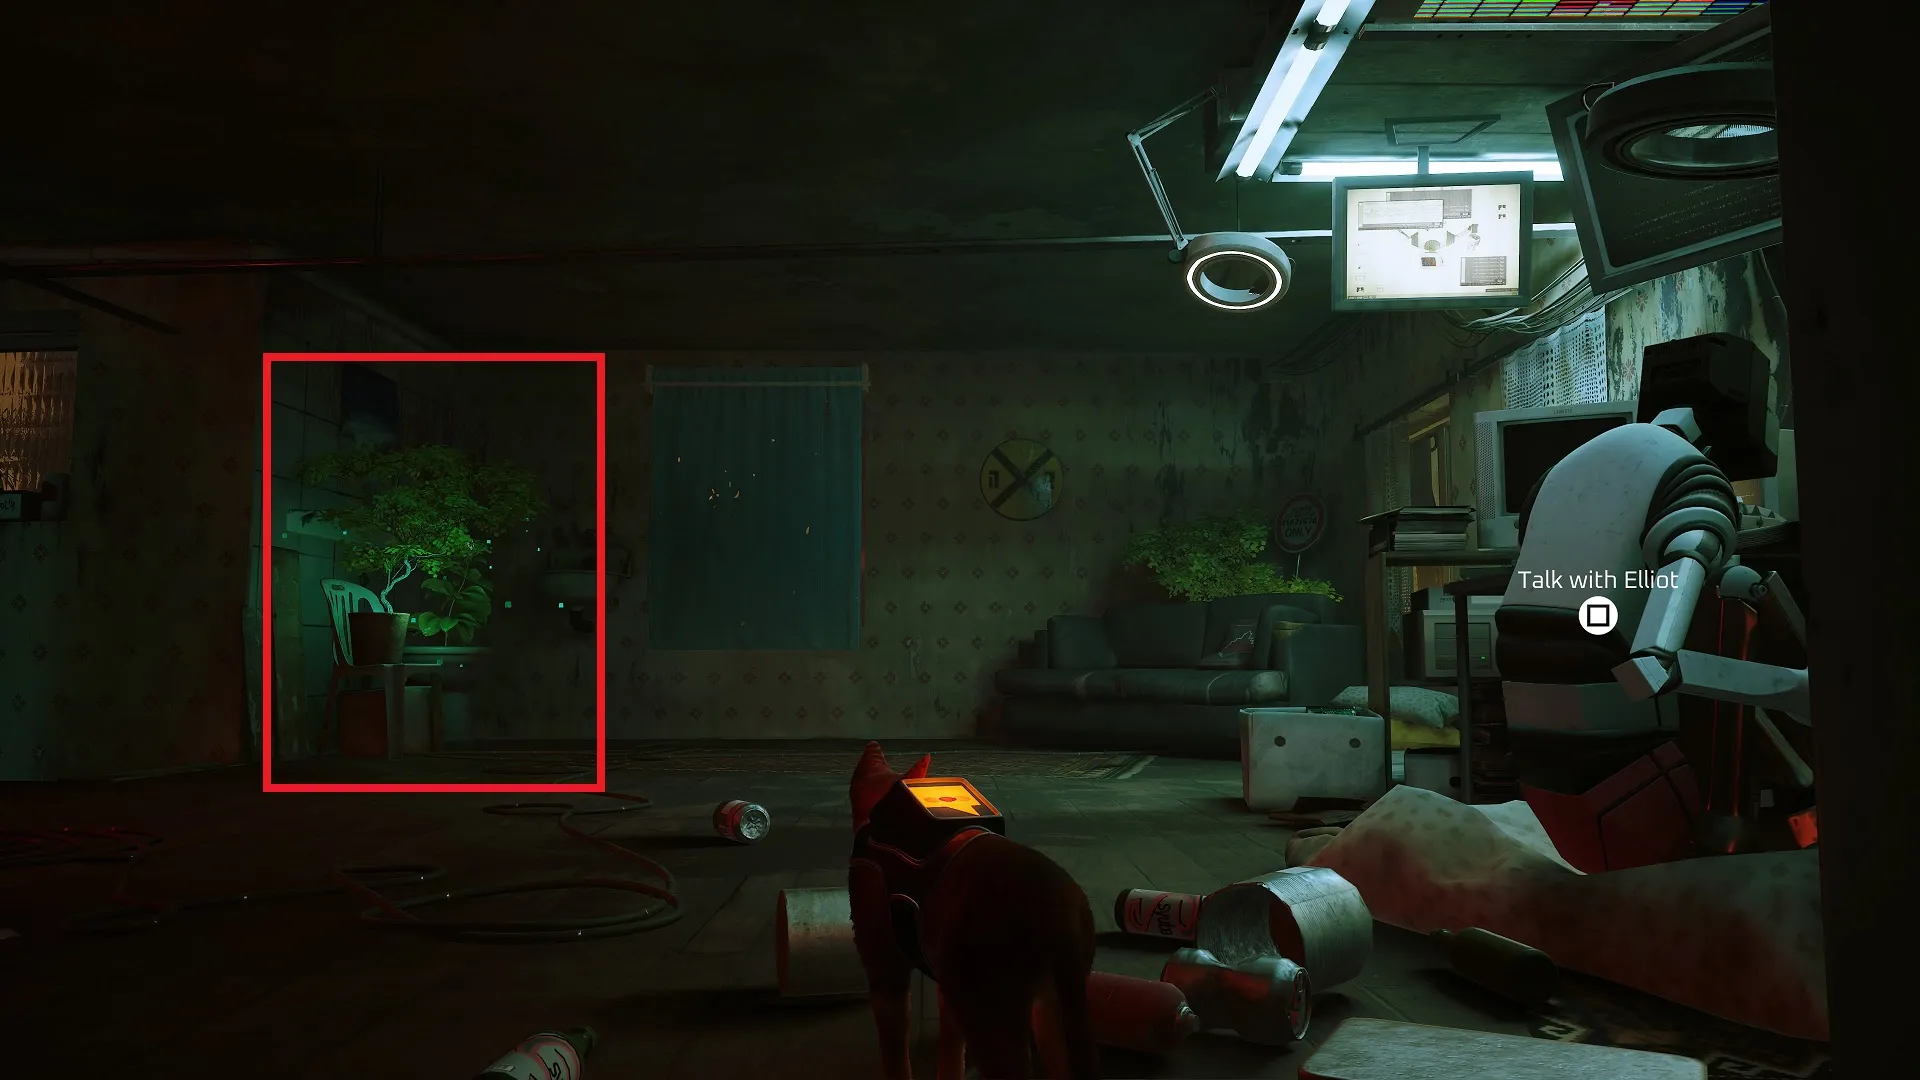
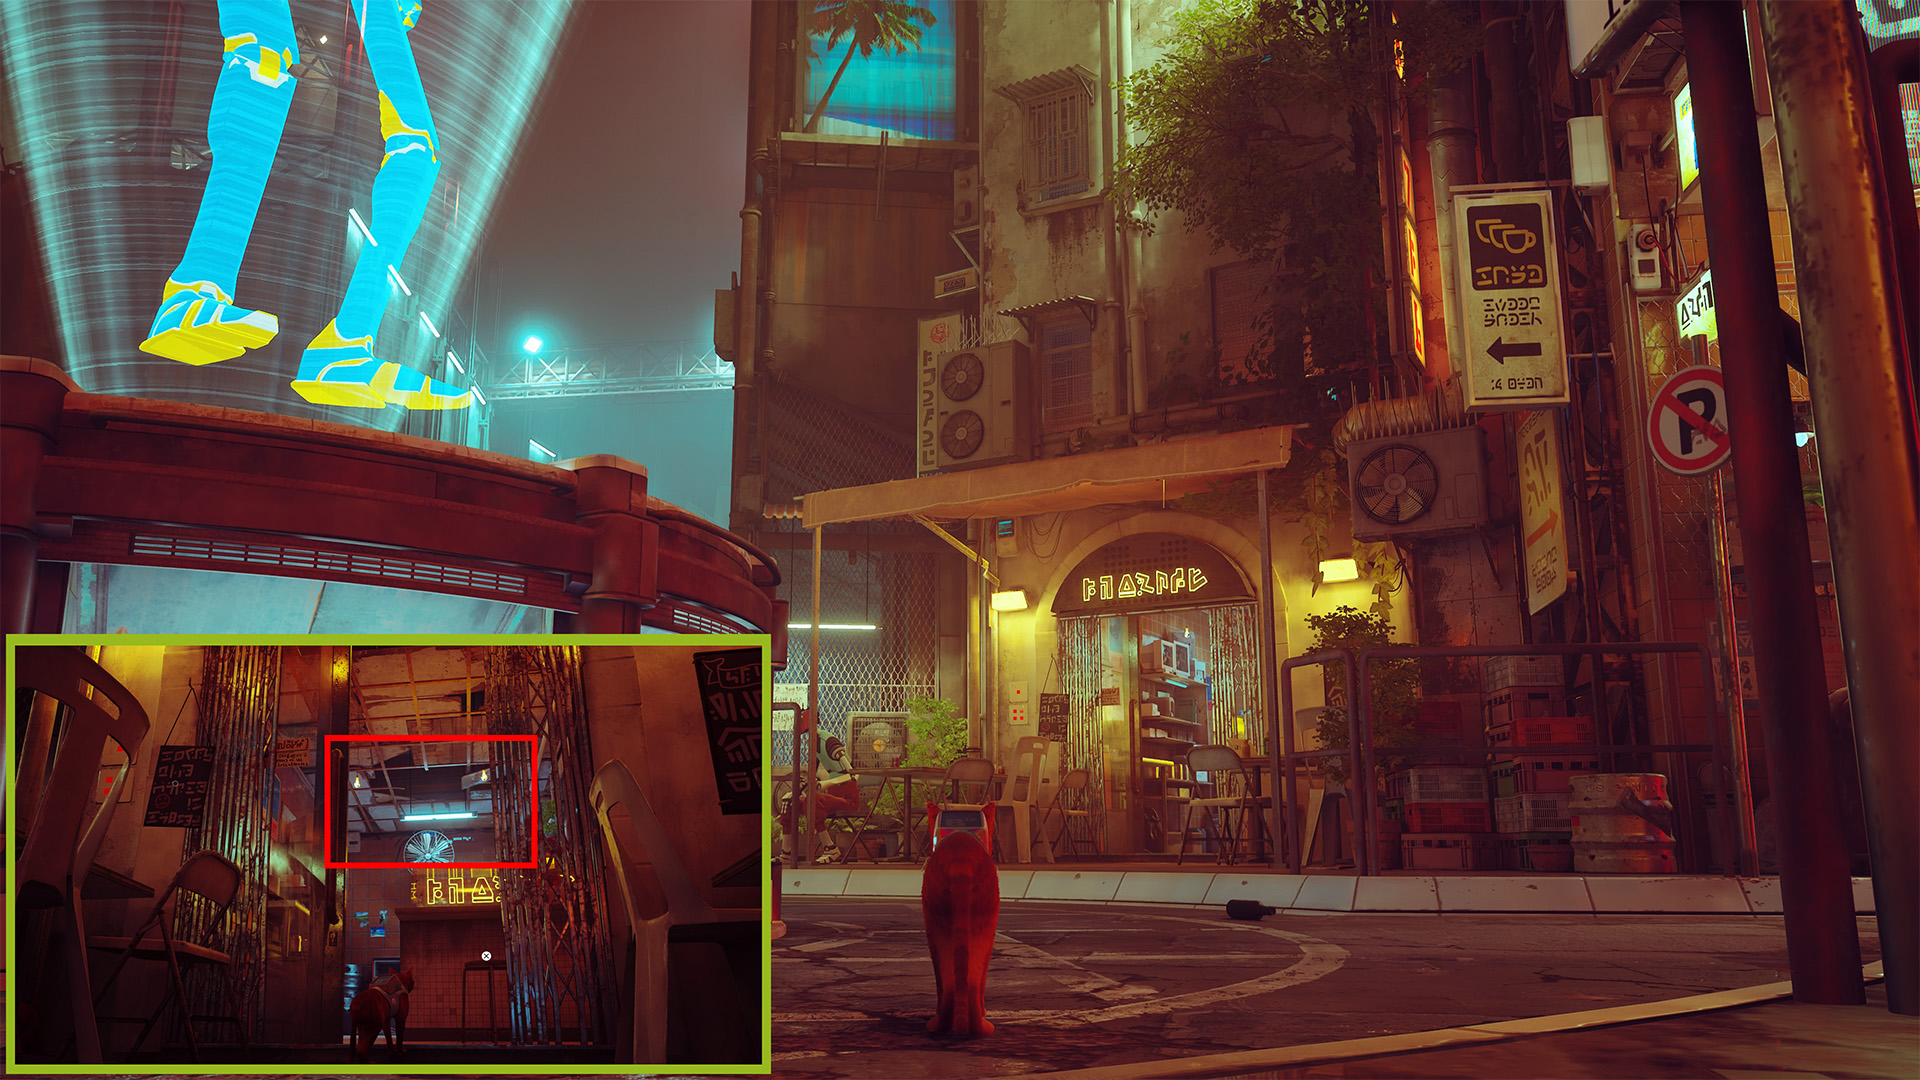
Memory 5/27: Another Memory is in Elliot Programming (in the alley where you begin the Slums area, near the “Bar” sign for Dufer Bar). Enter and grab music sheet ⅜ off the wall directly in front of you if you haven’t, then go left and up the stairs. At the top, on the left, there will be a green, glowing tree near a white plastic chair.
You could also get this one during The Slums — Part 2 when you convince Elliot to fix the tracker by giving him the poncho from Grandma.
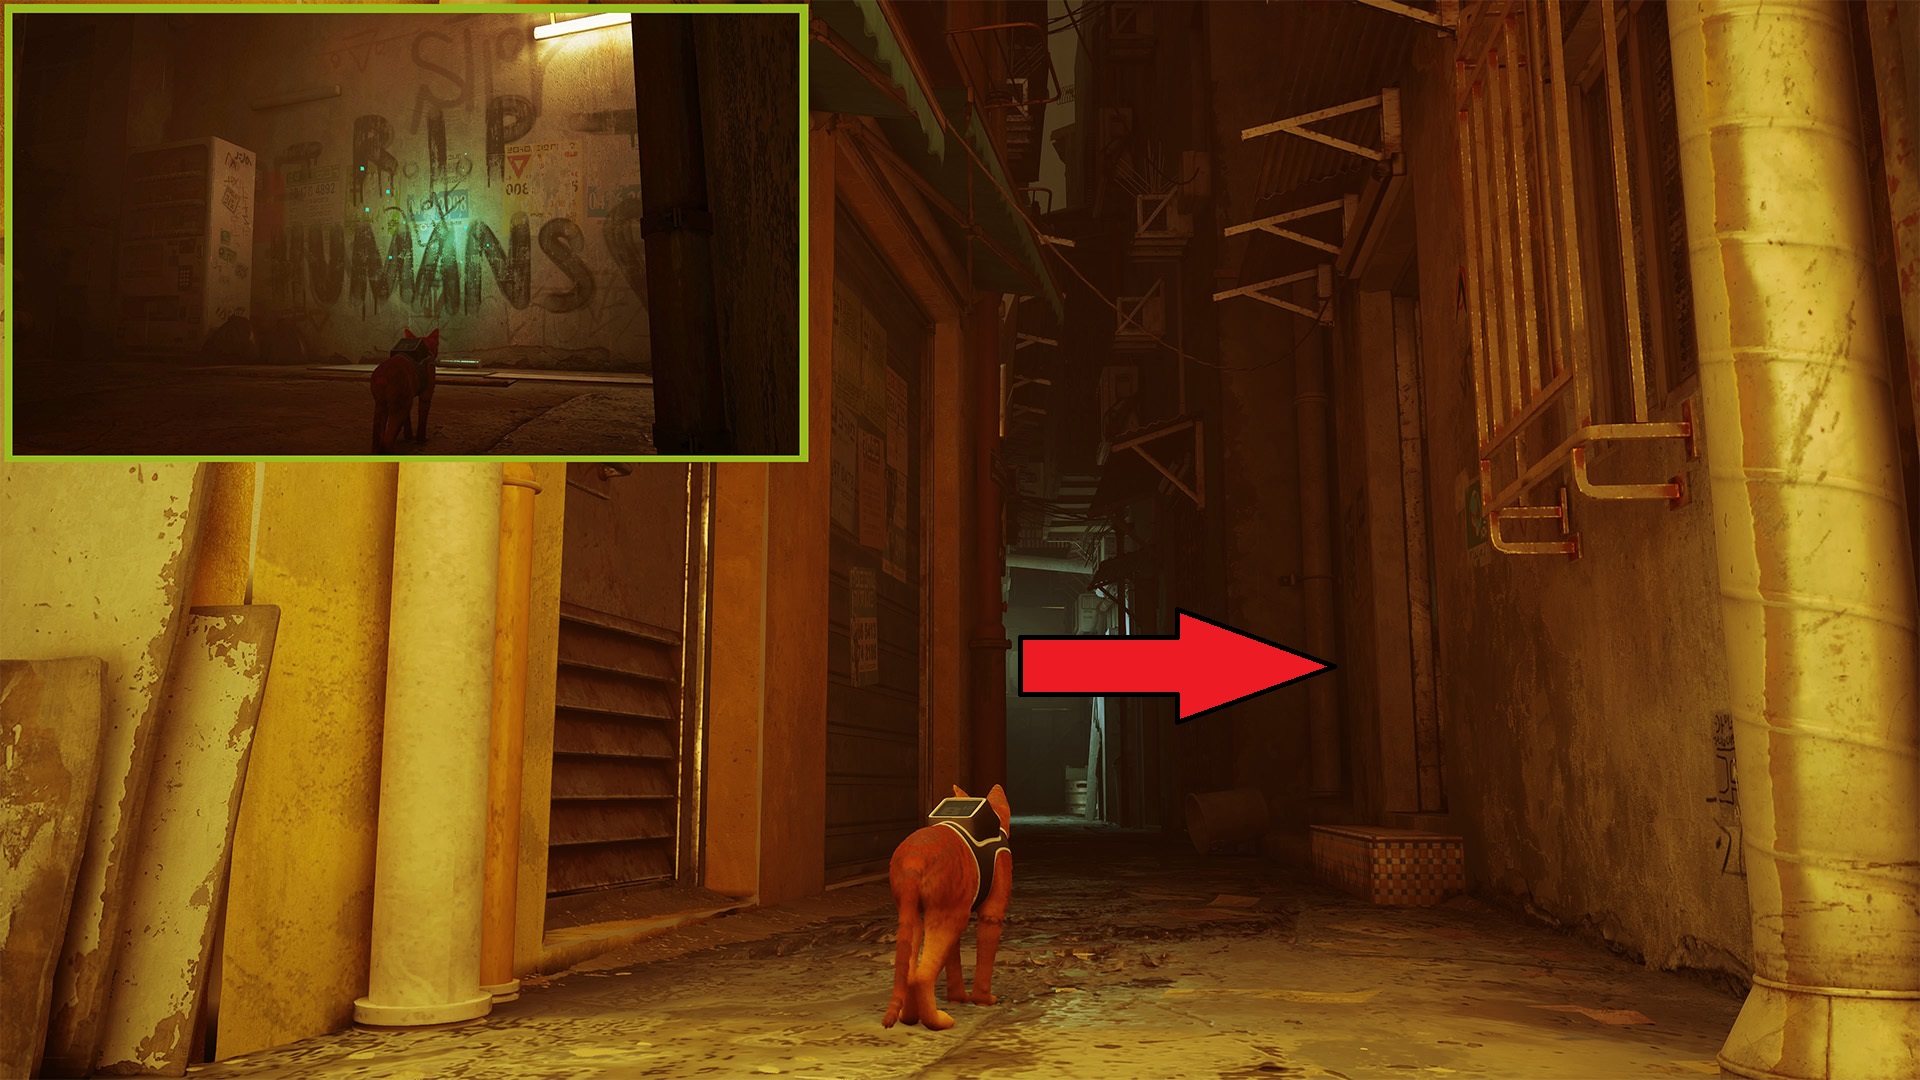
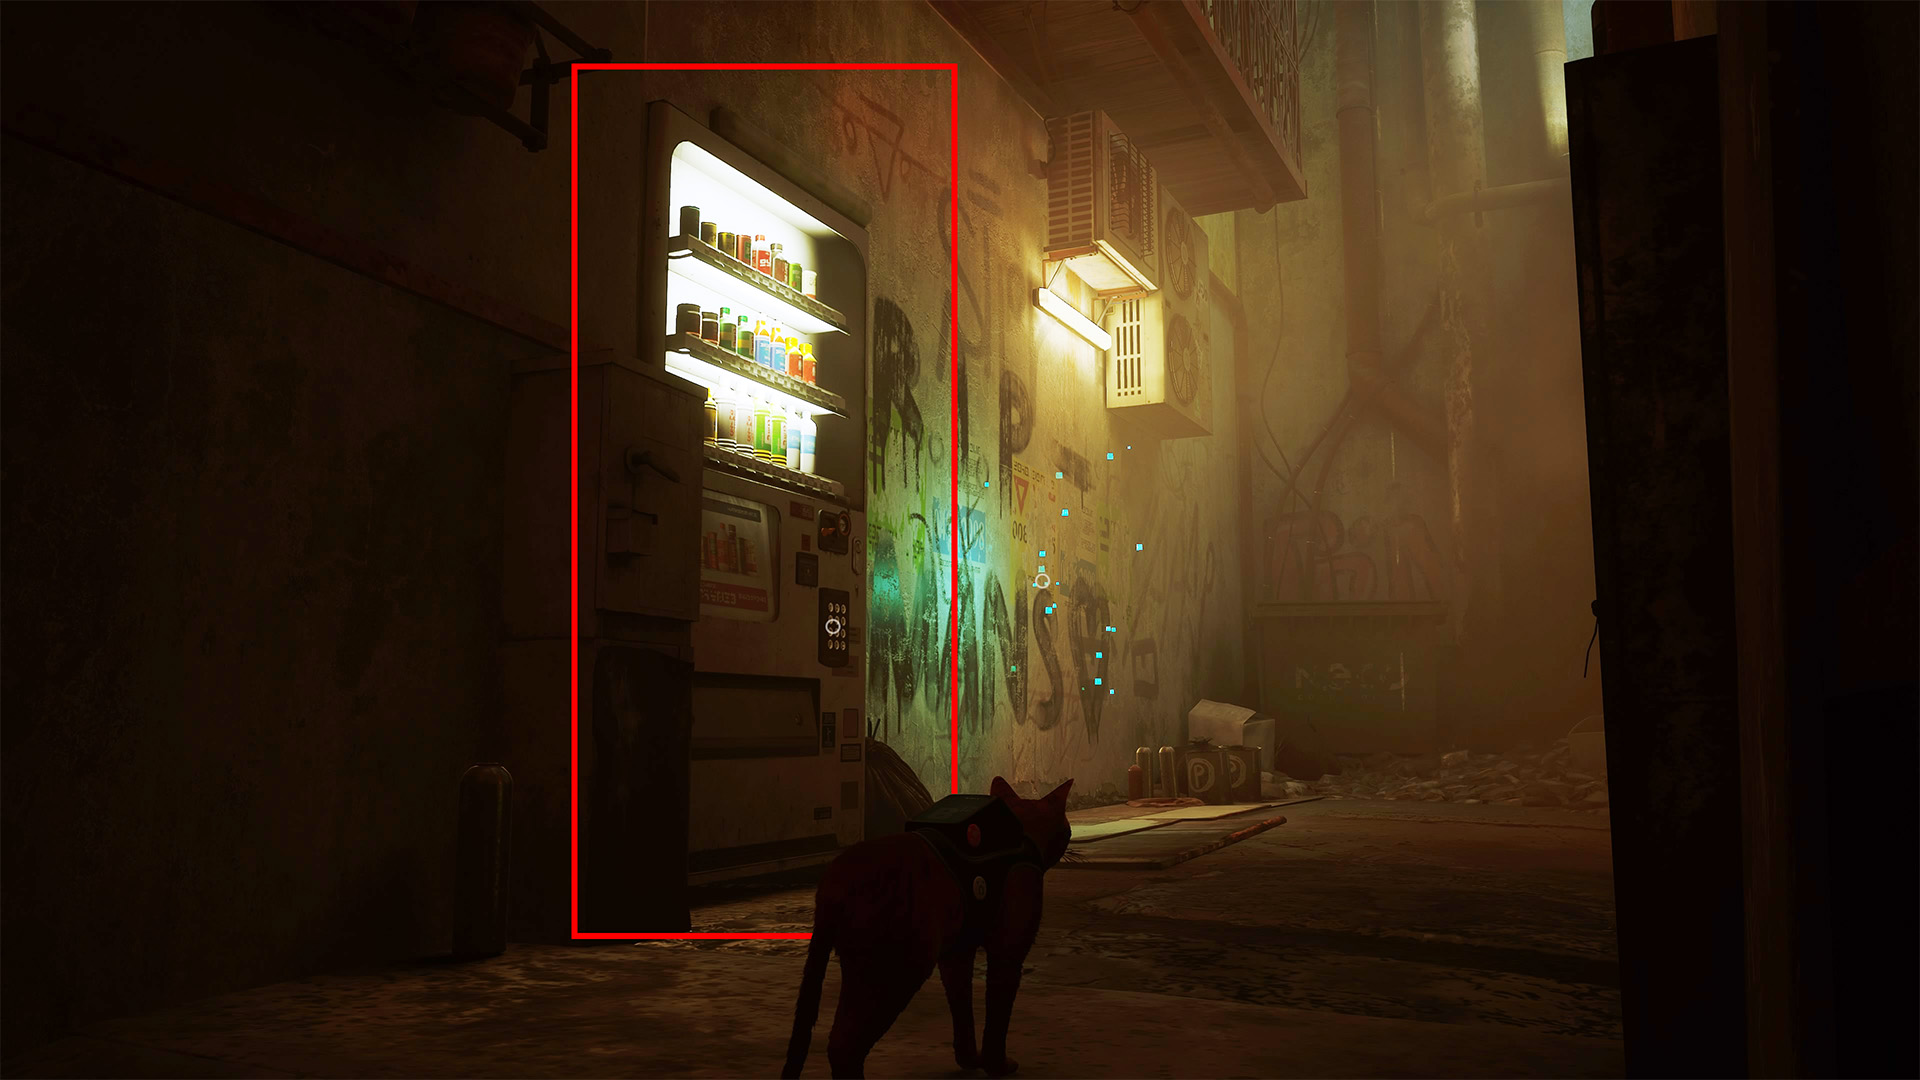
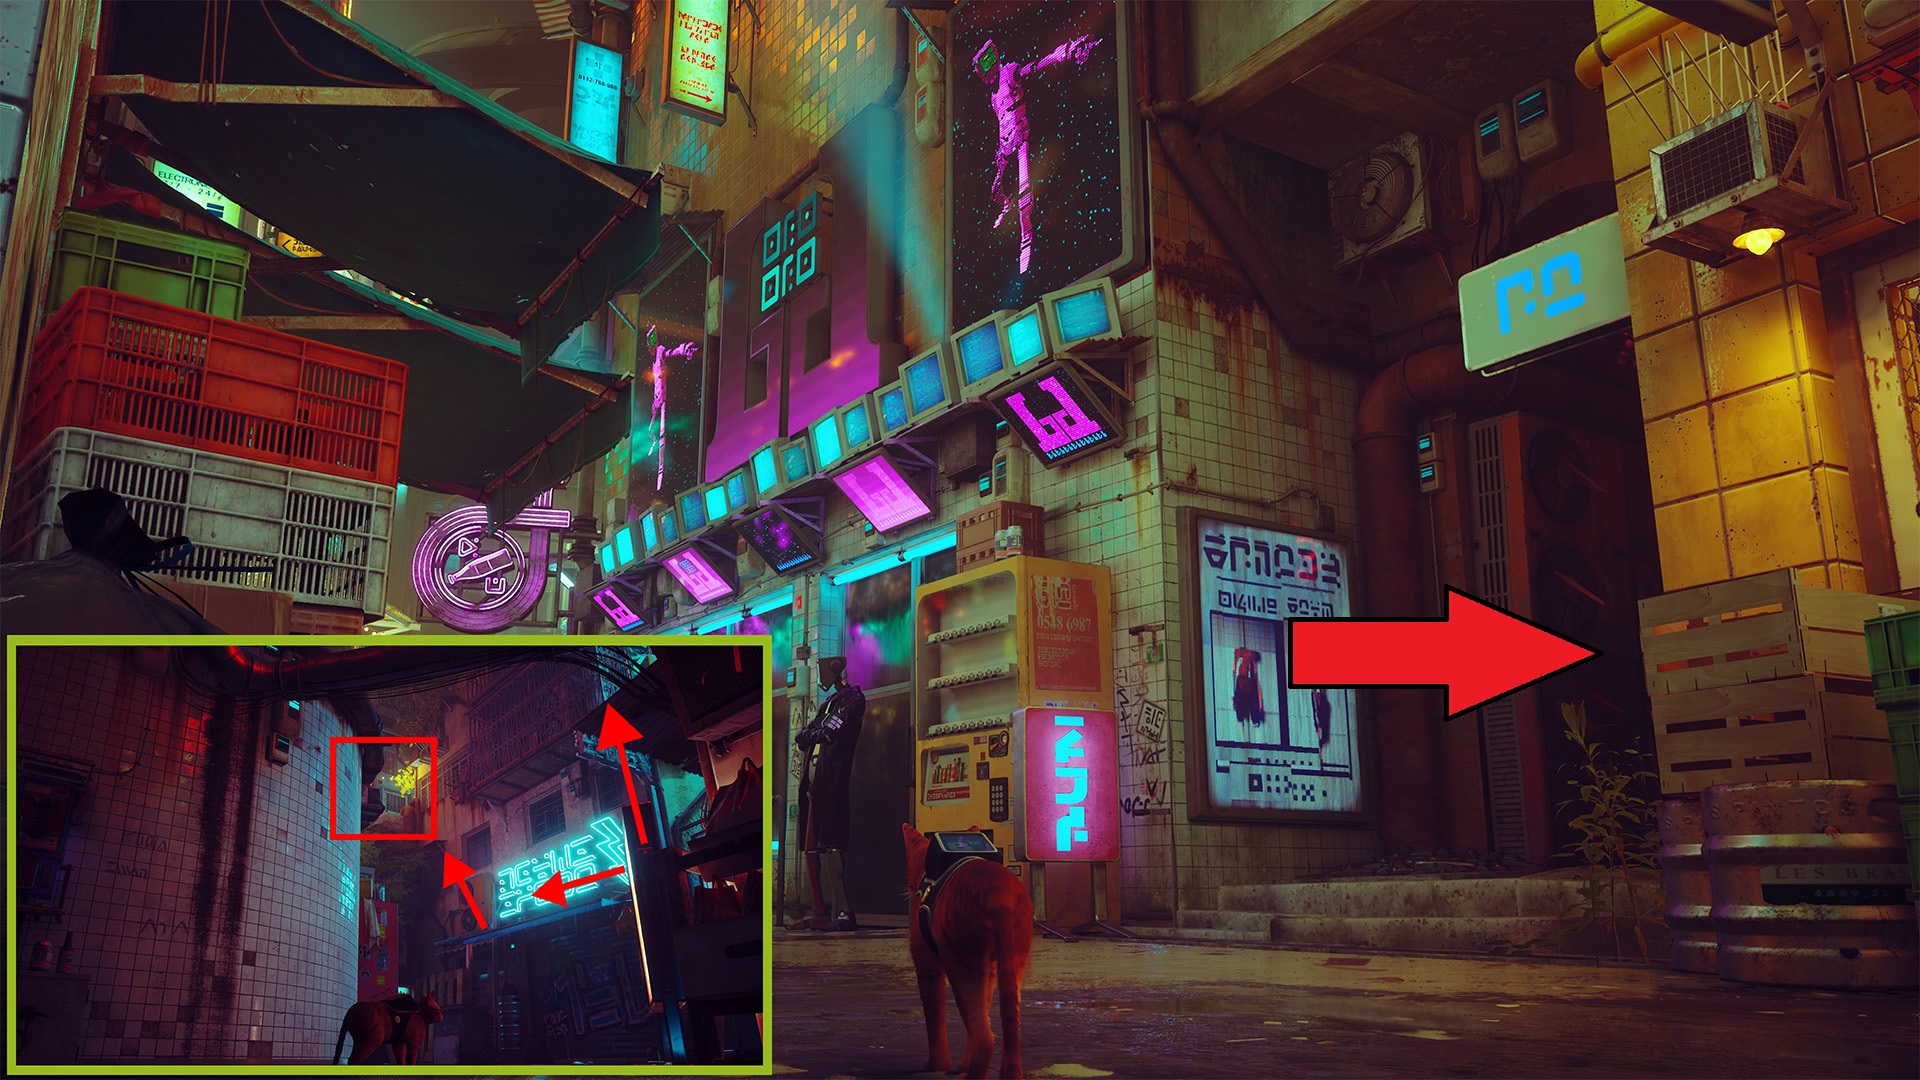
Memory 6/27: Leave Elliot Programming, and go right. Go right again at Grandma’s Clothing at the end, then left. You’ll see a light ahead, heading back to where you began the chapter. There will be a stairwell leading up on the right side of the alley. Go up, and interact with the “RIP Humans” mural on the left wall by the vending machine.
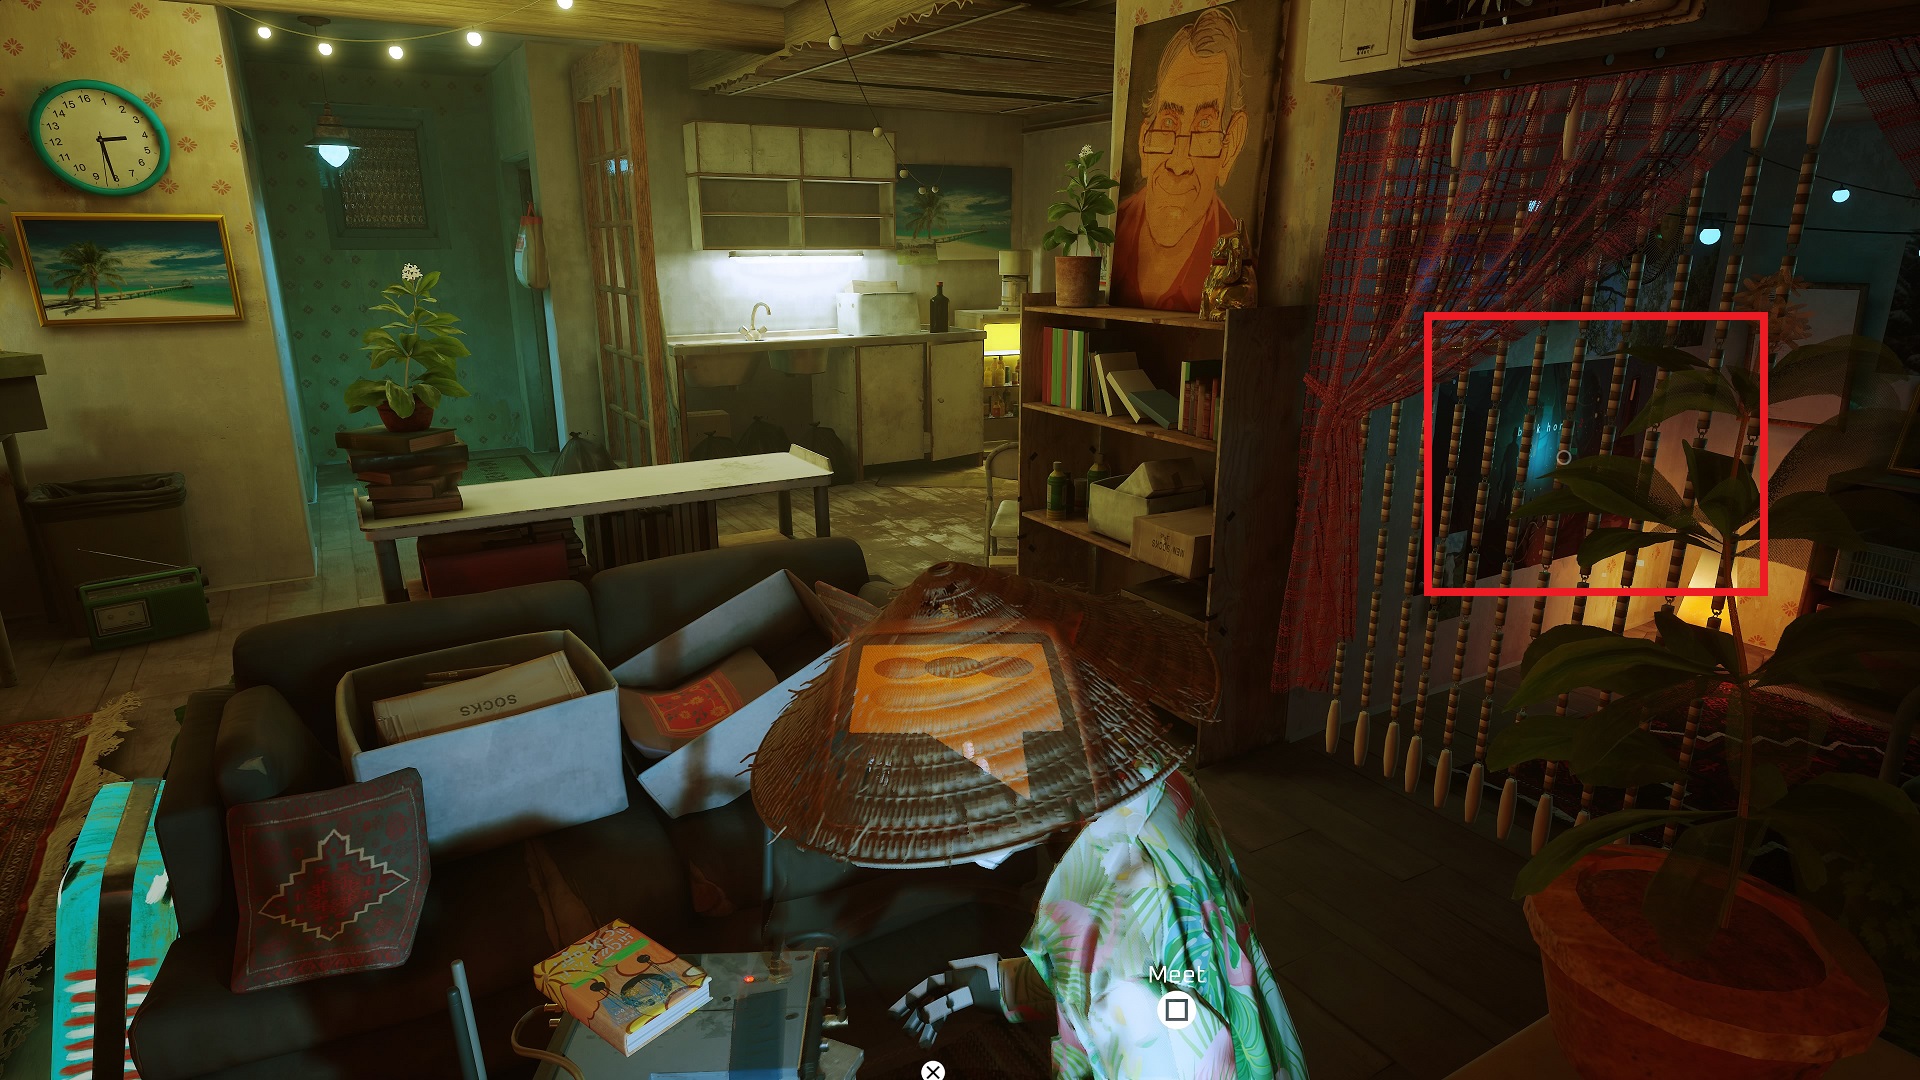
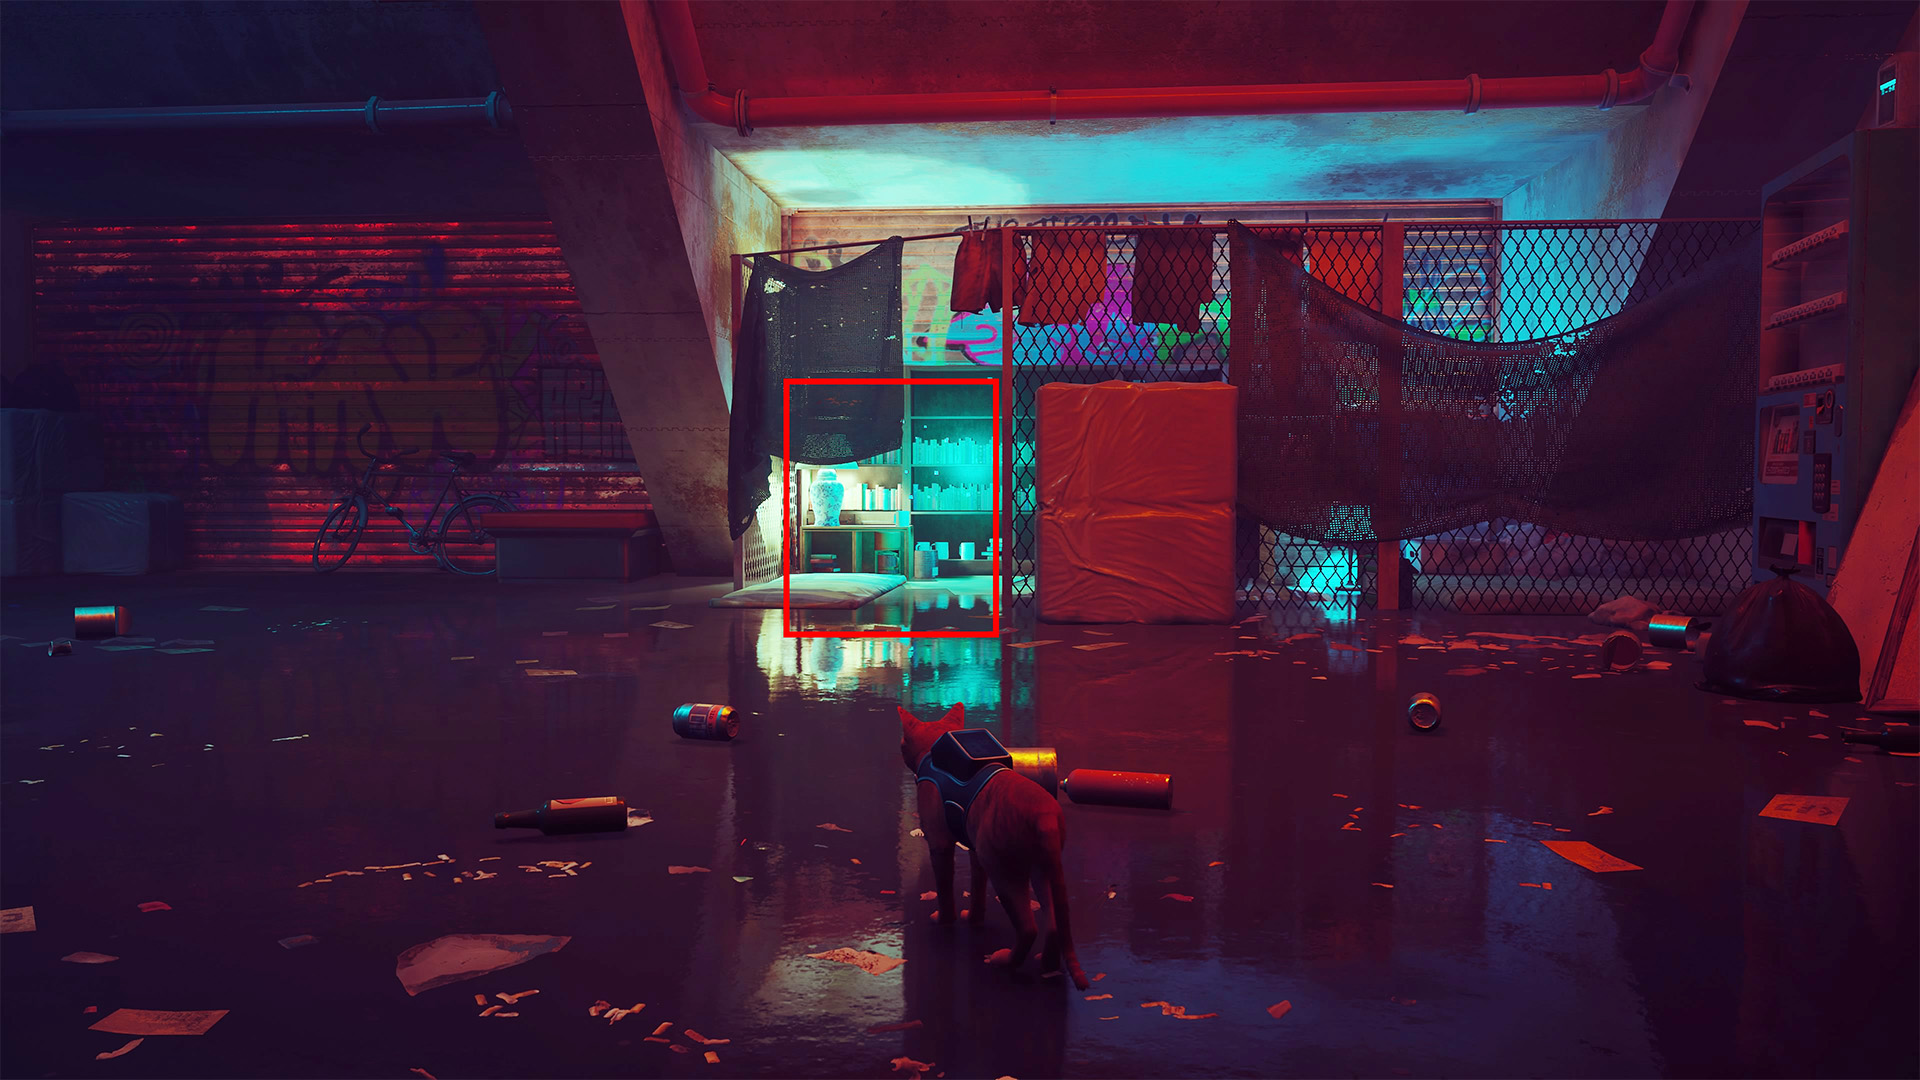
Memory 7/27: In Momo’s apartment, go past Momo into the bedroom behind the beads. Interact with the Back Home 2 poster on the left wall, opposite the bed. You can grab it after getting Momo’s notebook.
Memory 8/27: This memory is the painting of the Companion for sale at the marketplace near the Guardian. You’ll need three energy drinks to buy it. Here’s where to find each vending machine in The Slums.
The Slums Energy Drink Vending Machine Locations
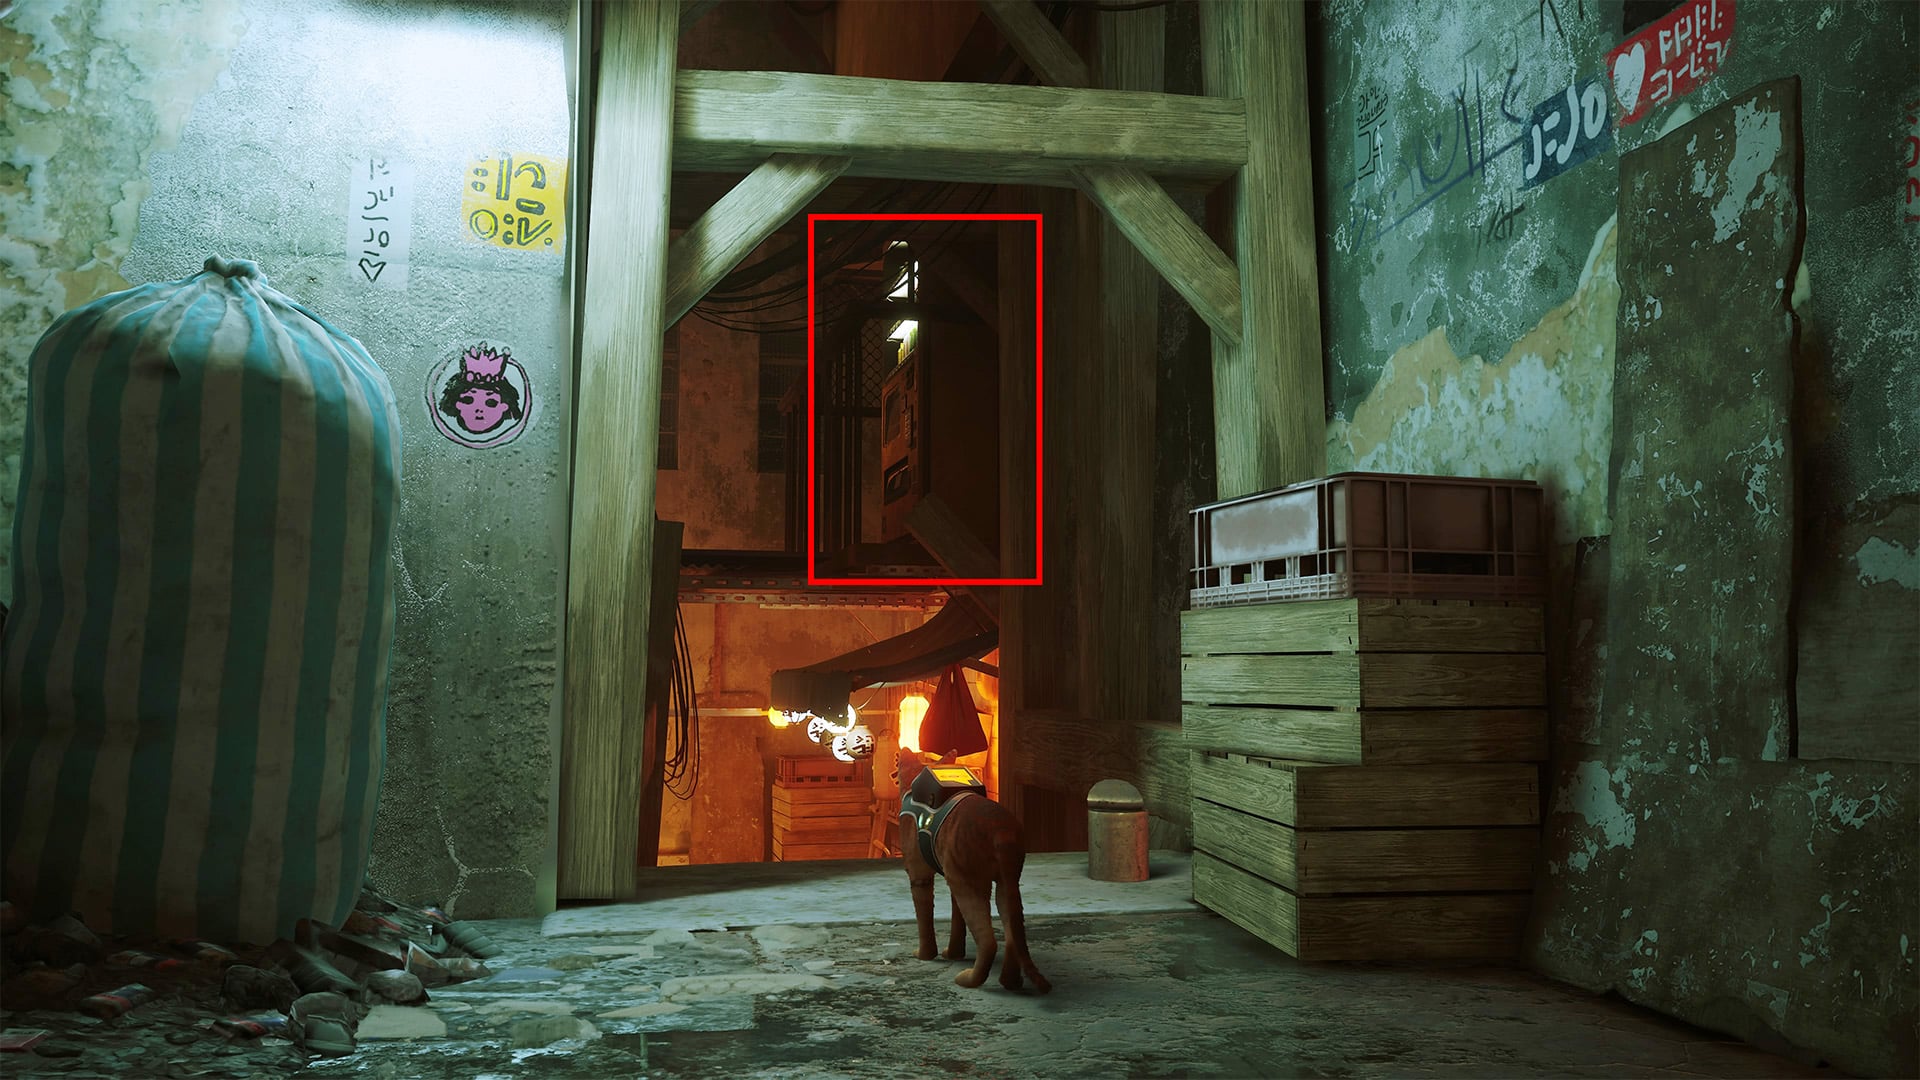
- The first energy drink vending machine is off of the alleyway at the start of the level, next to the RIP Humans memory mural. If in the alley facing as if you’re going into the Slums, there is a set of stairs leading up on the left side.
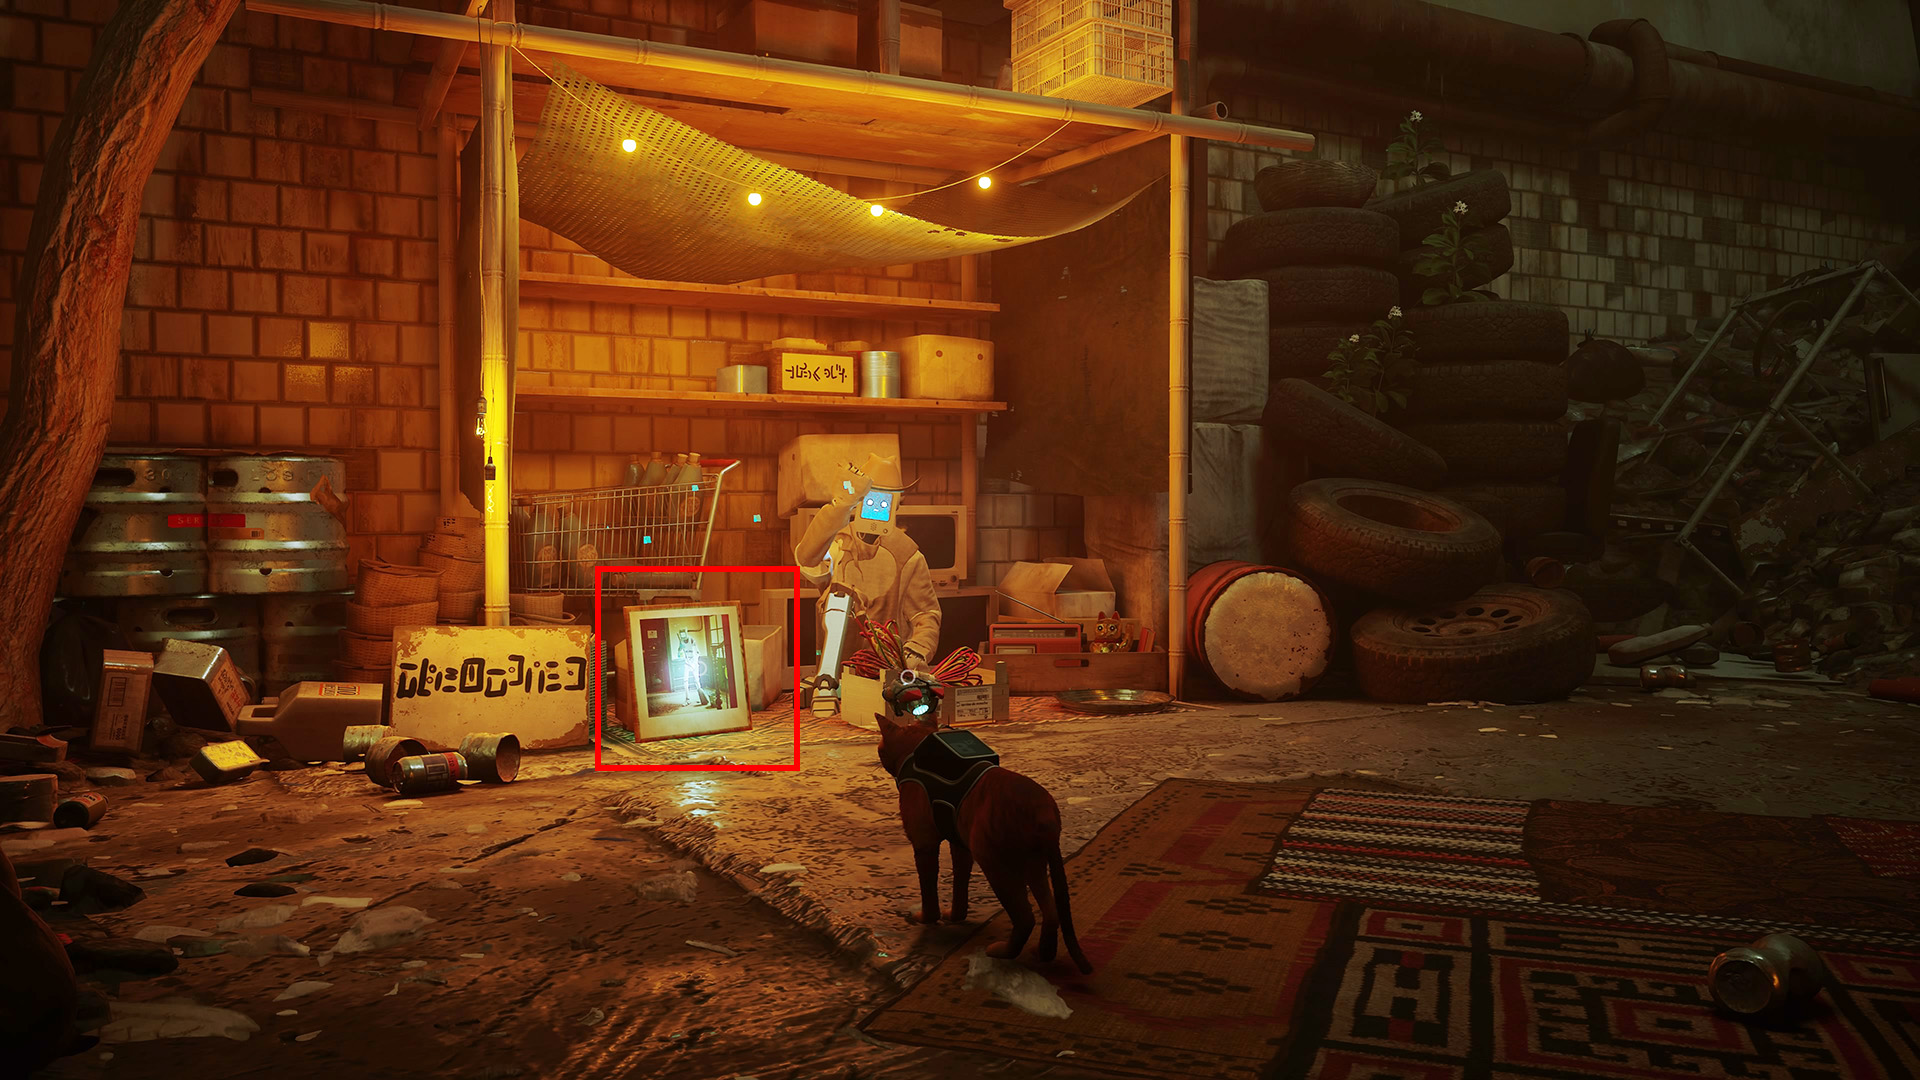
- Another is above Rozey. Go back down the steps you used to reach the vending machine above, and go left, then left again when it forks. Pass Rozey sitting on the left under the paper lanterns, and go up the stairs. Turn around at the top and look up.
- From that machine, climb straight up to the adjacent roof with a keg on it. Turn right for another vending machine on a nearby roof, the one with the couch and TV on it near Doc’s apartment.

- Finally, the last energy drink vending machine is to the left of the Guardian, down the steps and across from Morusque.
Rooftops — 3 Memories
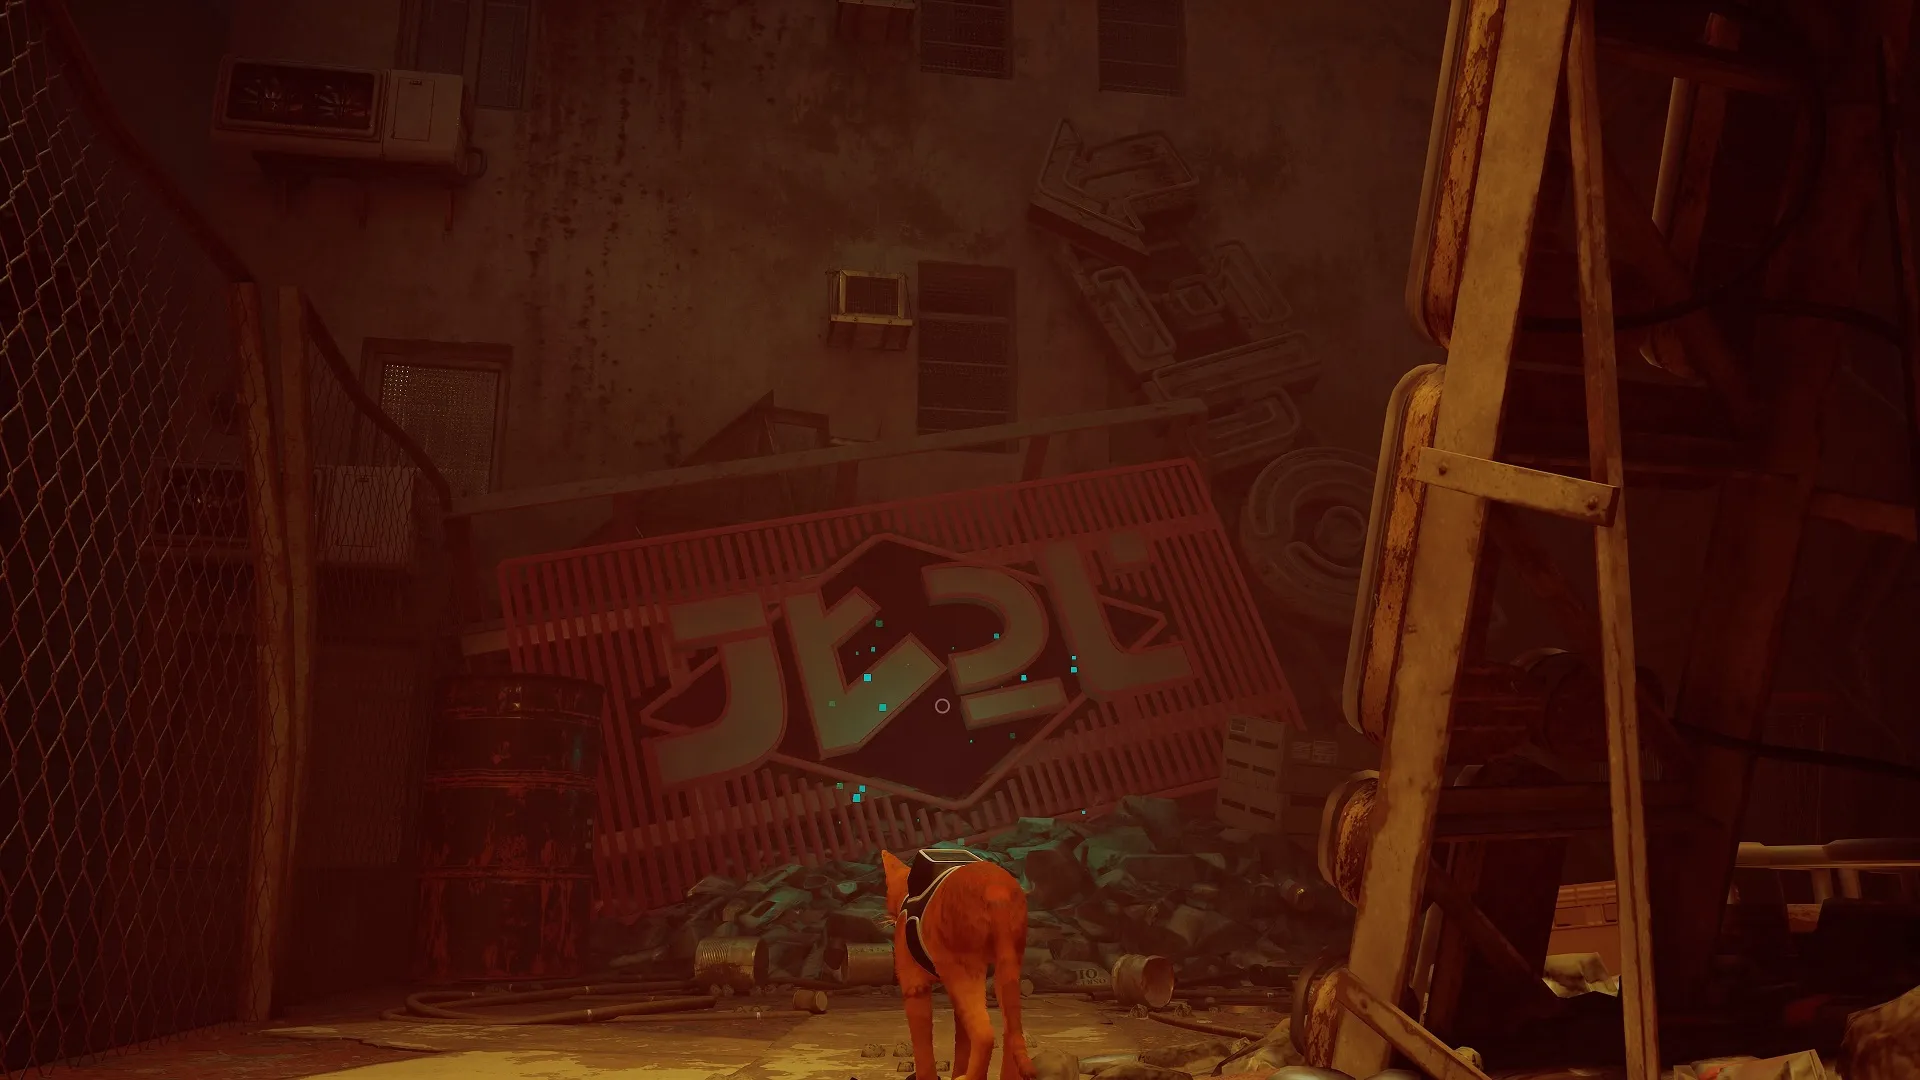
Memory 9/27: Follow the level through two areas of Zurk enemies. After, you’ll come to a section where you’ll need to jump on a large horizontal pipe, then up on a small AC unit, and finally up to a board hanging off the edge of a building with a fence on the left side. There will be a large, red, flickering sign directly in front of you. Interact with it.
Memory 10/27: Continue along, and pass over a large crane. Push a plank down to enter a building with construction materials and Zurk. Climb to the second story, and go all the way to the end, past the Zurk in the cage on the left. Interact with the Neco Corp sign behind the steel beams lying on the floor by the rot.
Memory 11/27: You’ll get this one automatically after going up the elevator and using the transceiver at the top.
Dead End — 3 Memories
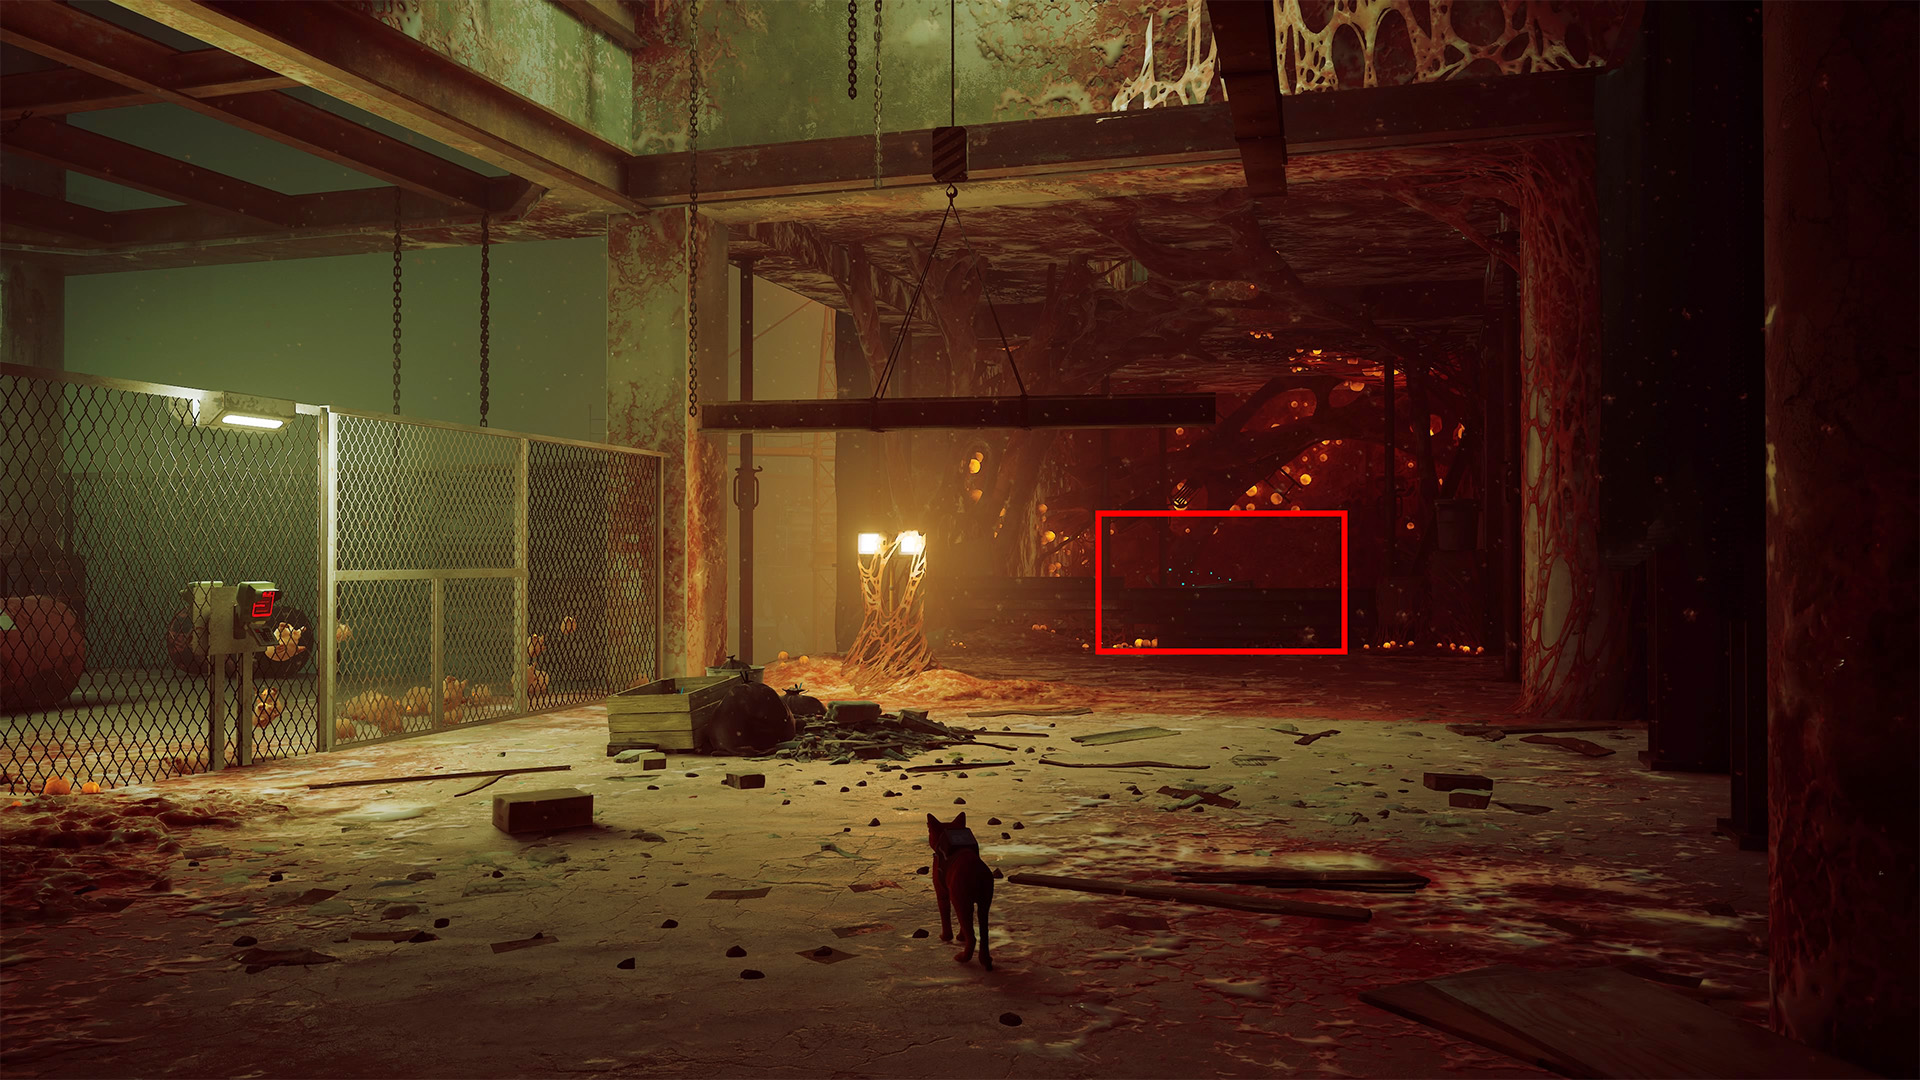
Memory 12/27: After Seamus opens the gate for you, go straight until the path breaks left and right. Go left, and inspect the roll-up door near the vehicle and red barrels at the end.
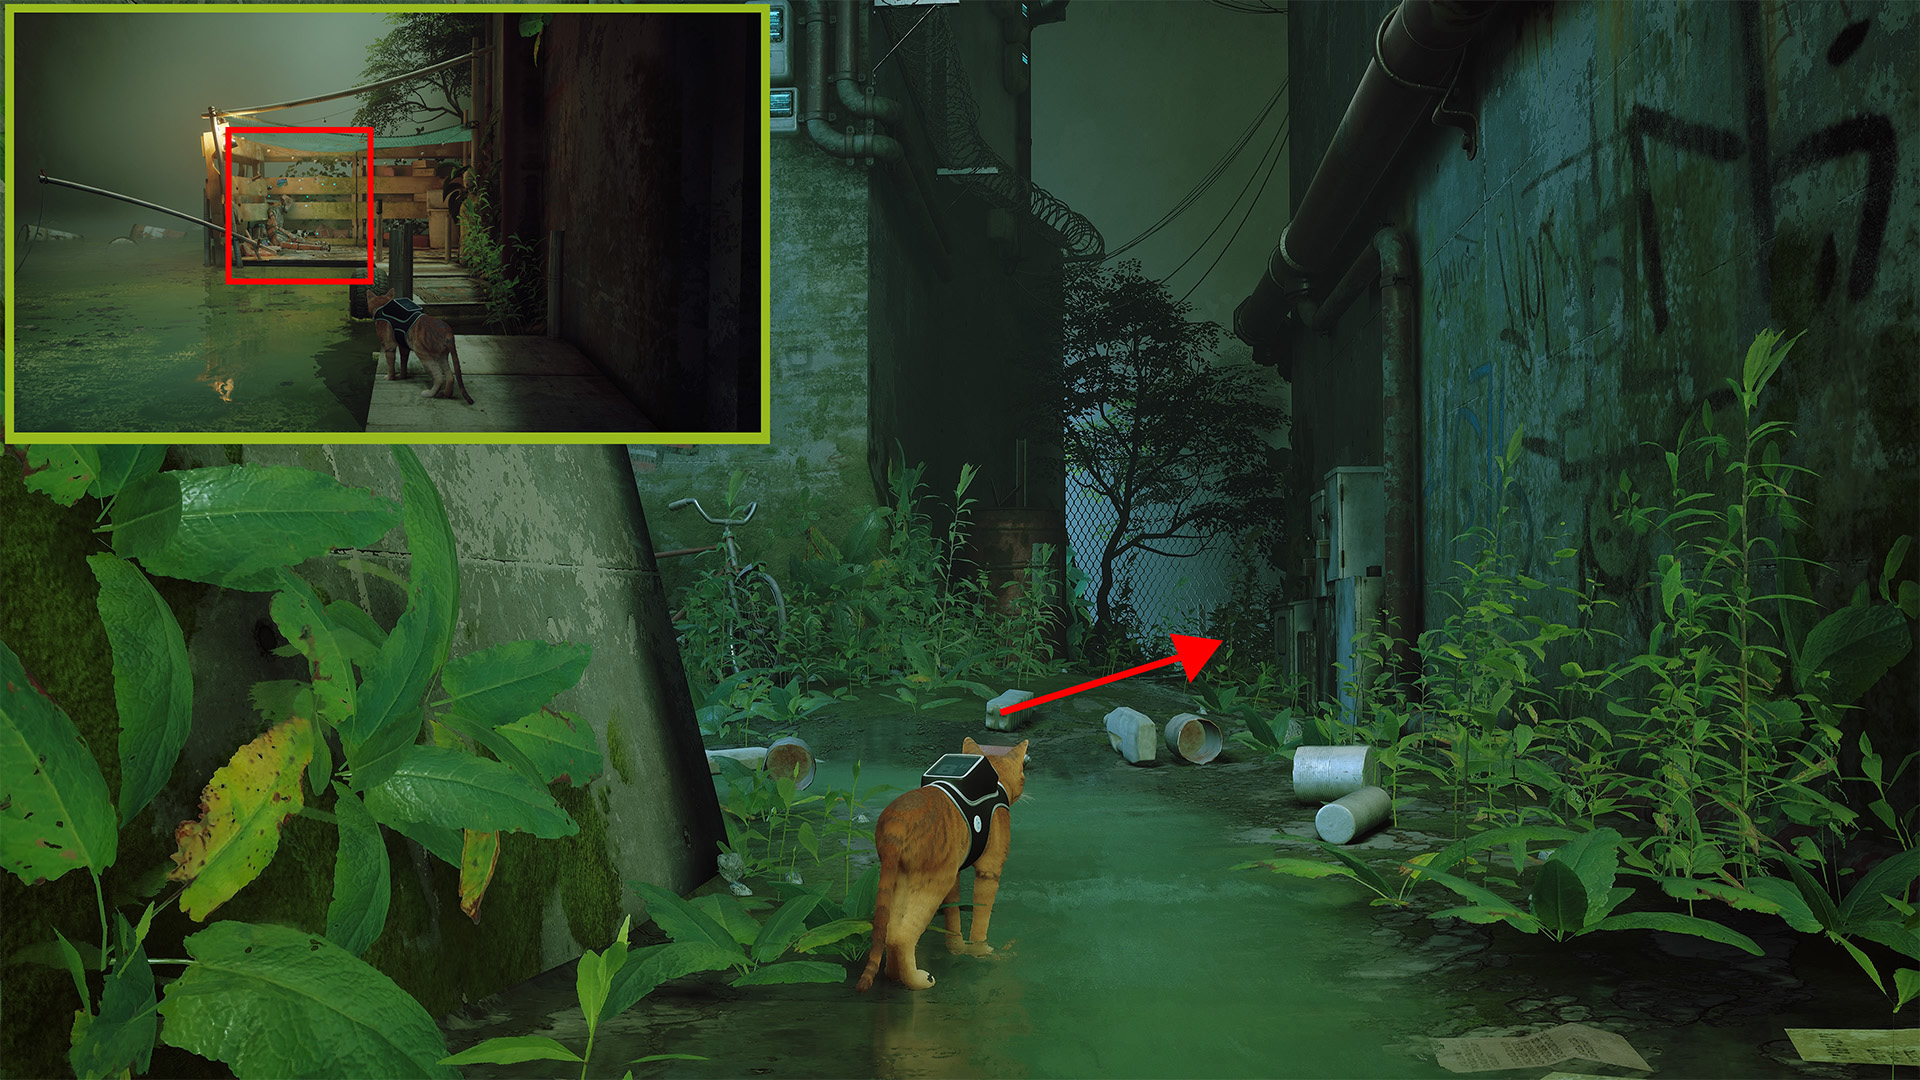
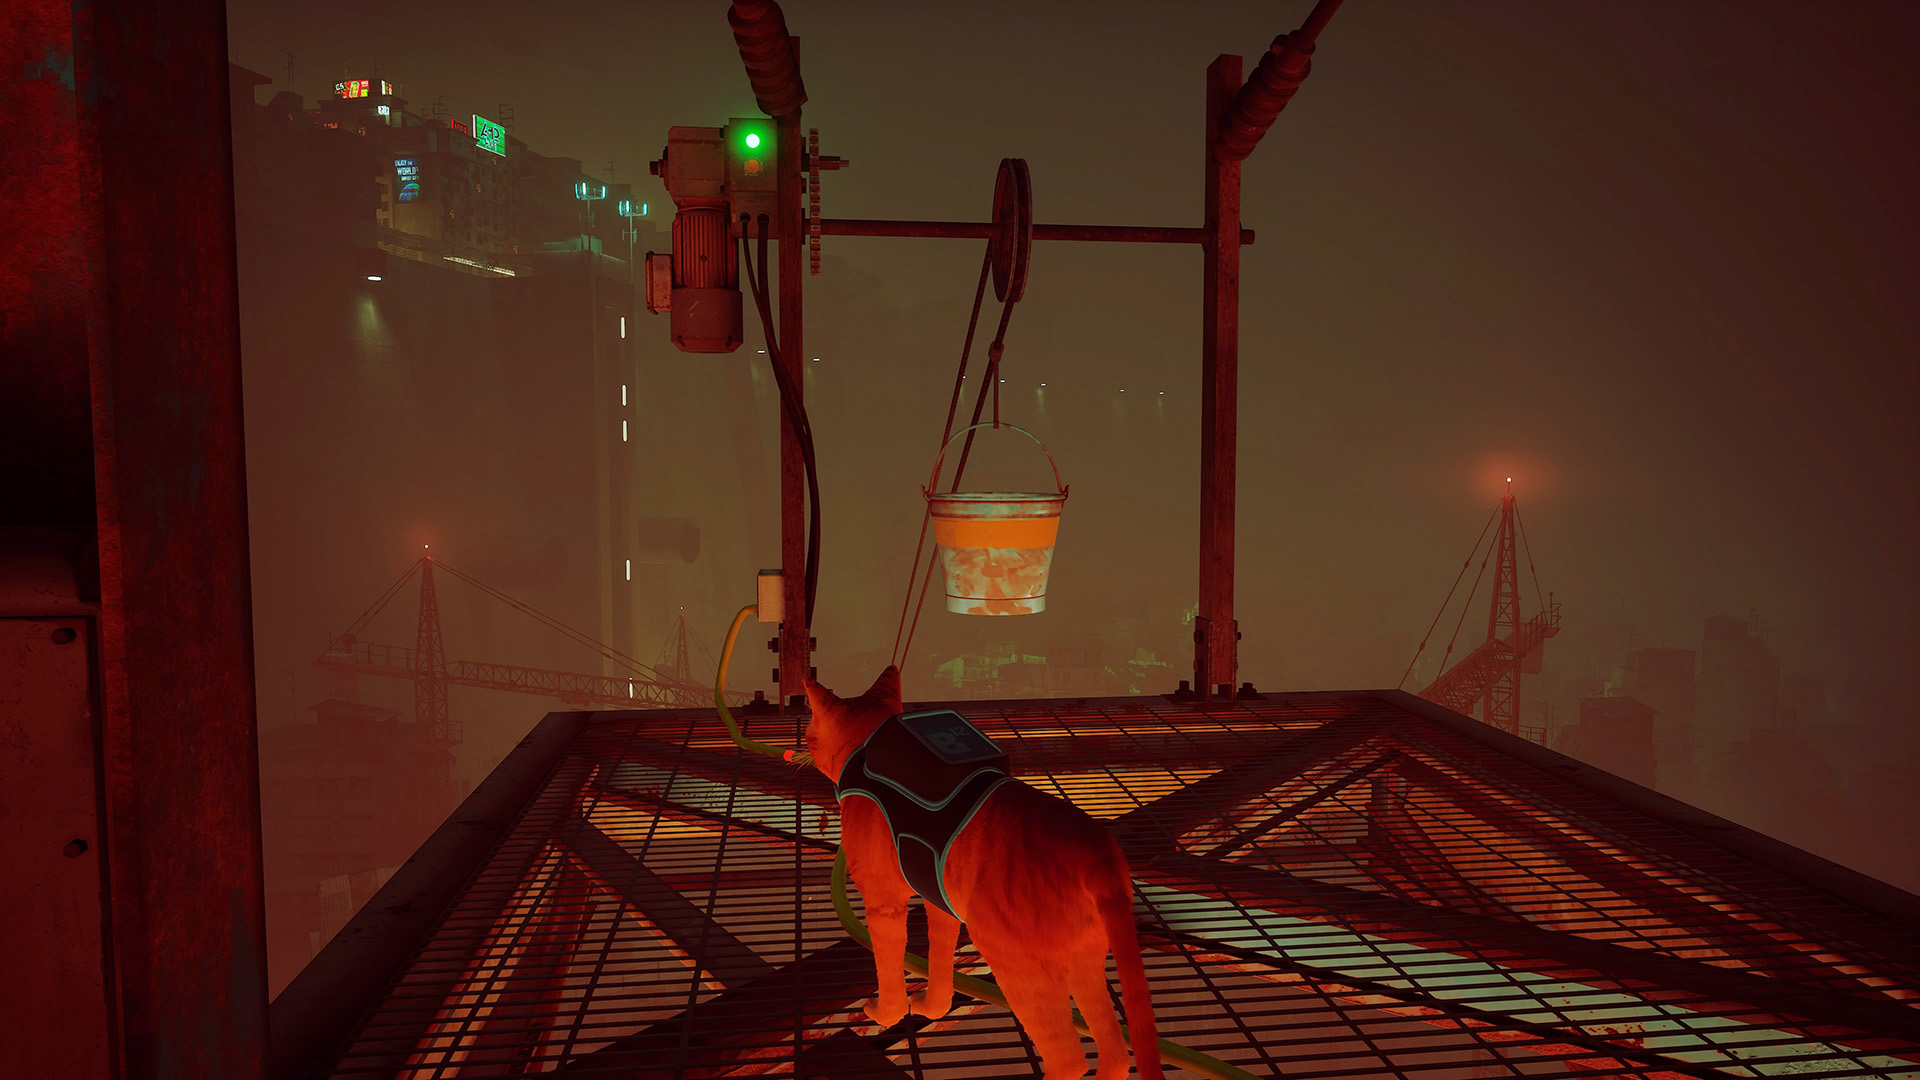
Memory 13/27: After the cart section and “big fall,” you’ll climb up some pipes and fans. At the top, go straight and through a break in the fence at the end. Turn right to see a dead robot on a dock with a fishing pole in green water. Interact with the robot.
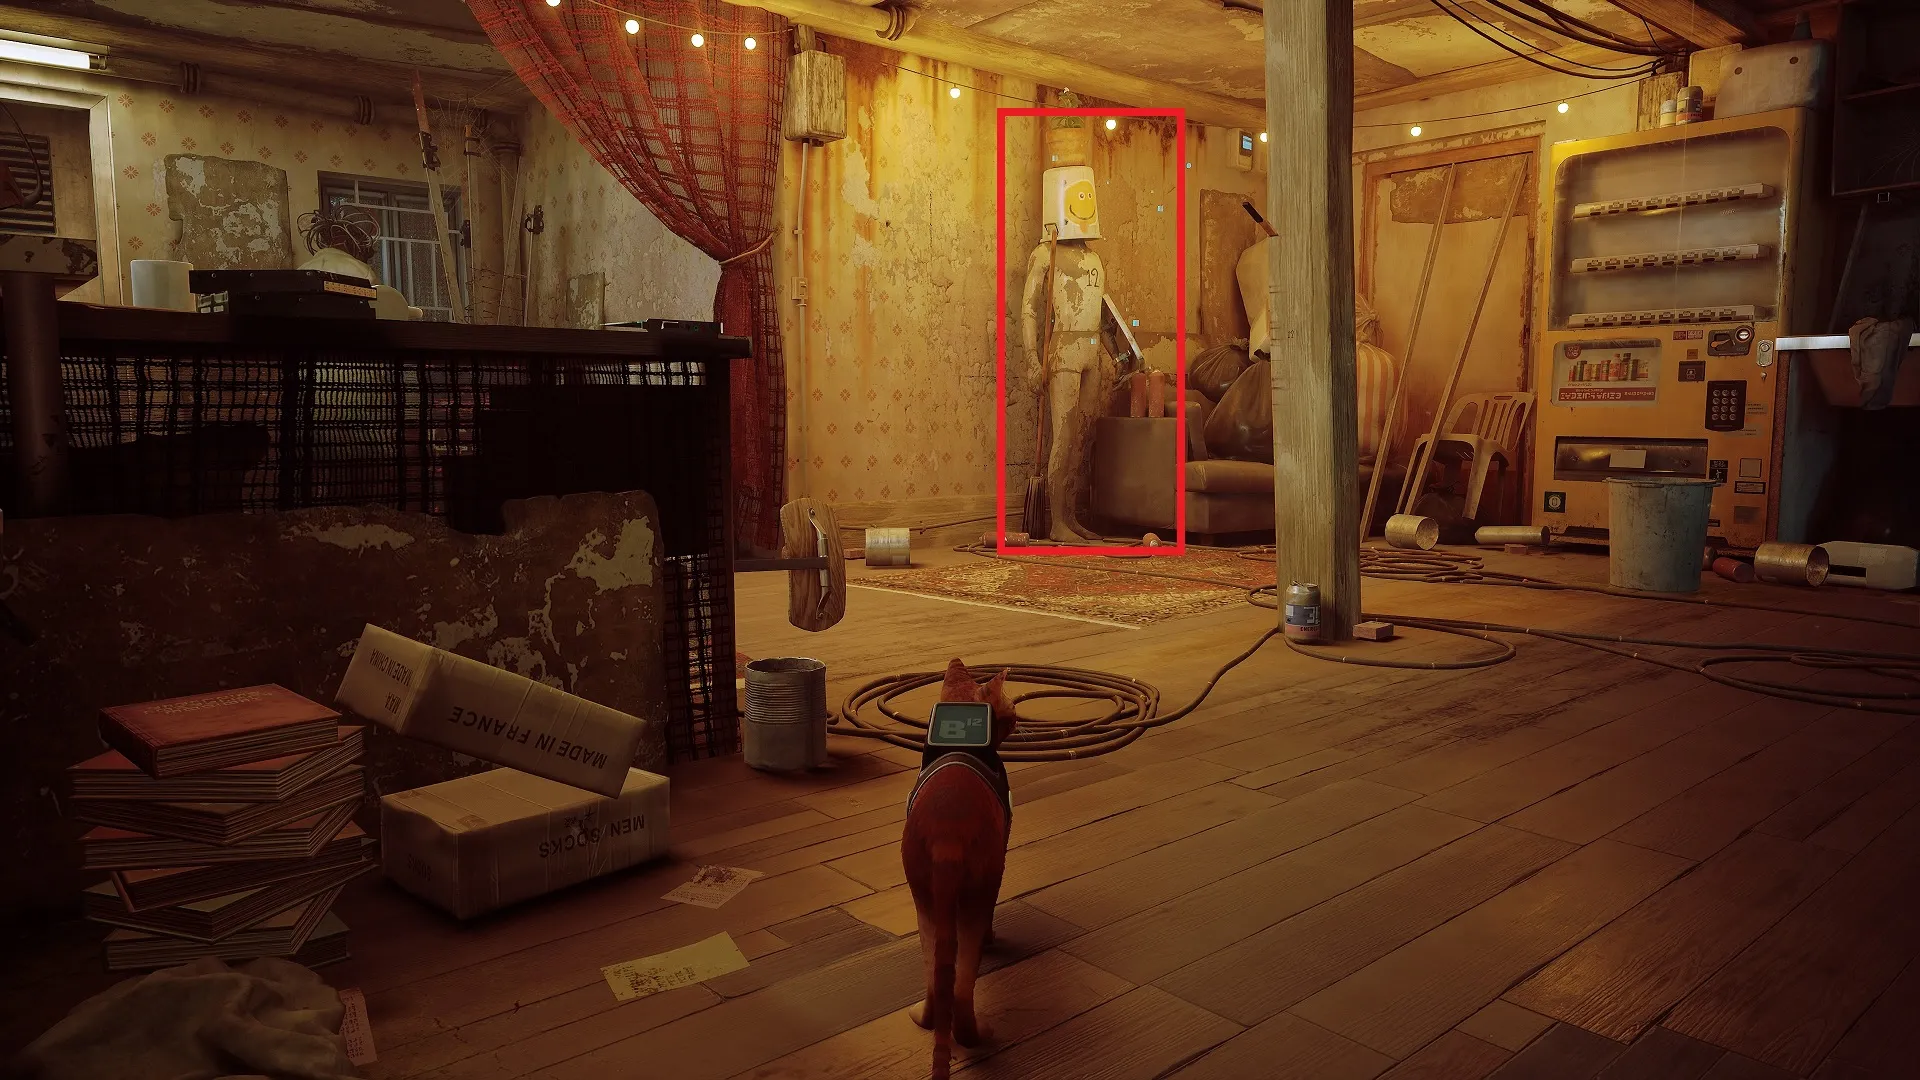
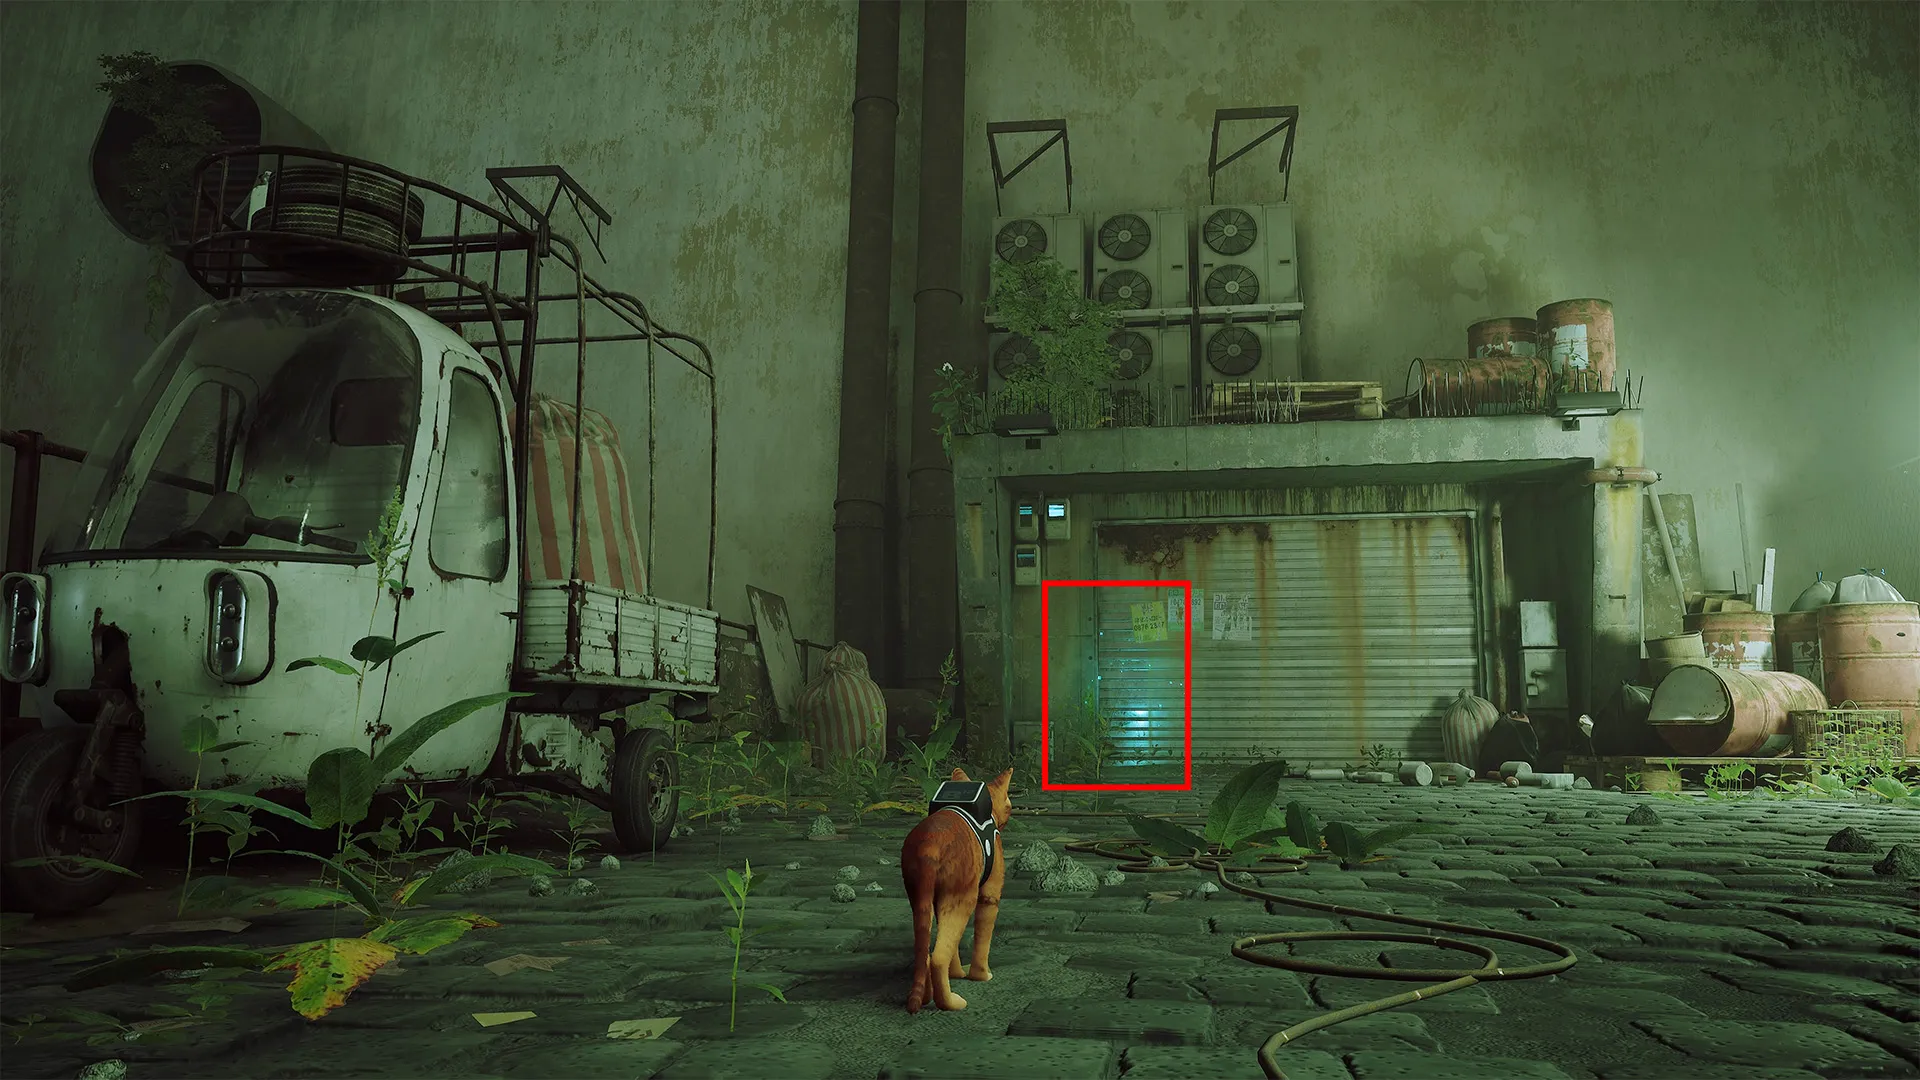
Memory 14/27: Soon after, you’ll need to fix a generator to continue. Follow the wire across a broken metal bridge and into a house. Go downstairs, and interact with the mannequin behind the Companion you meet. The mannequin has a bucket with a smiley face painted on it on its head.
The Sewers — 2 Memories
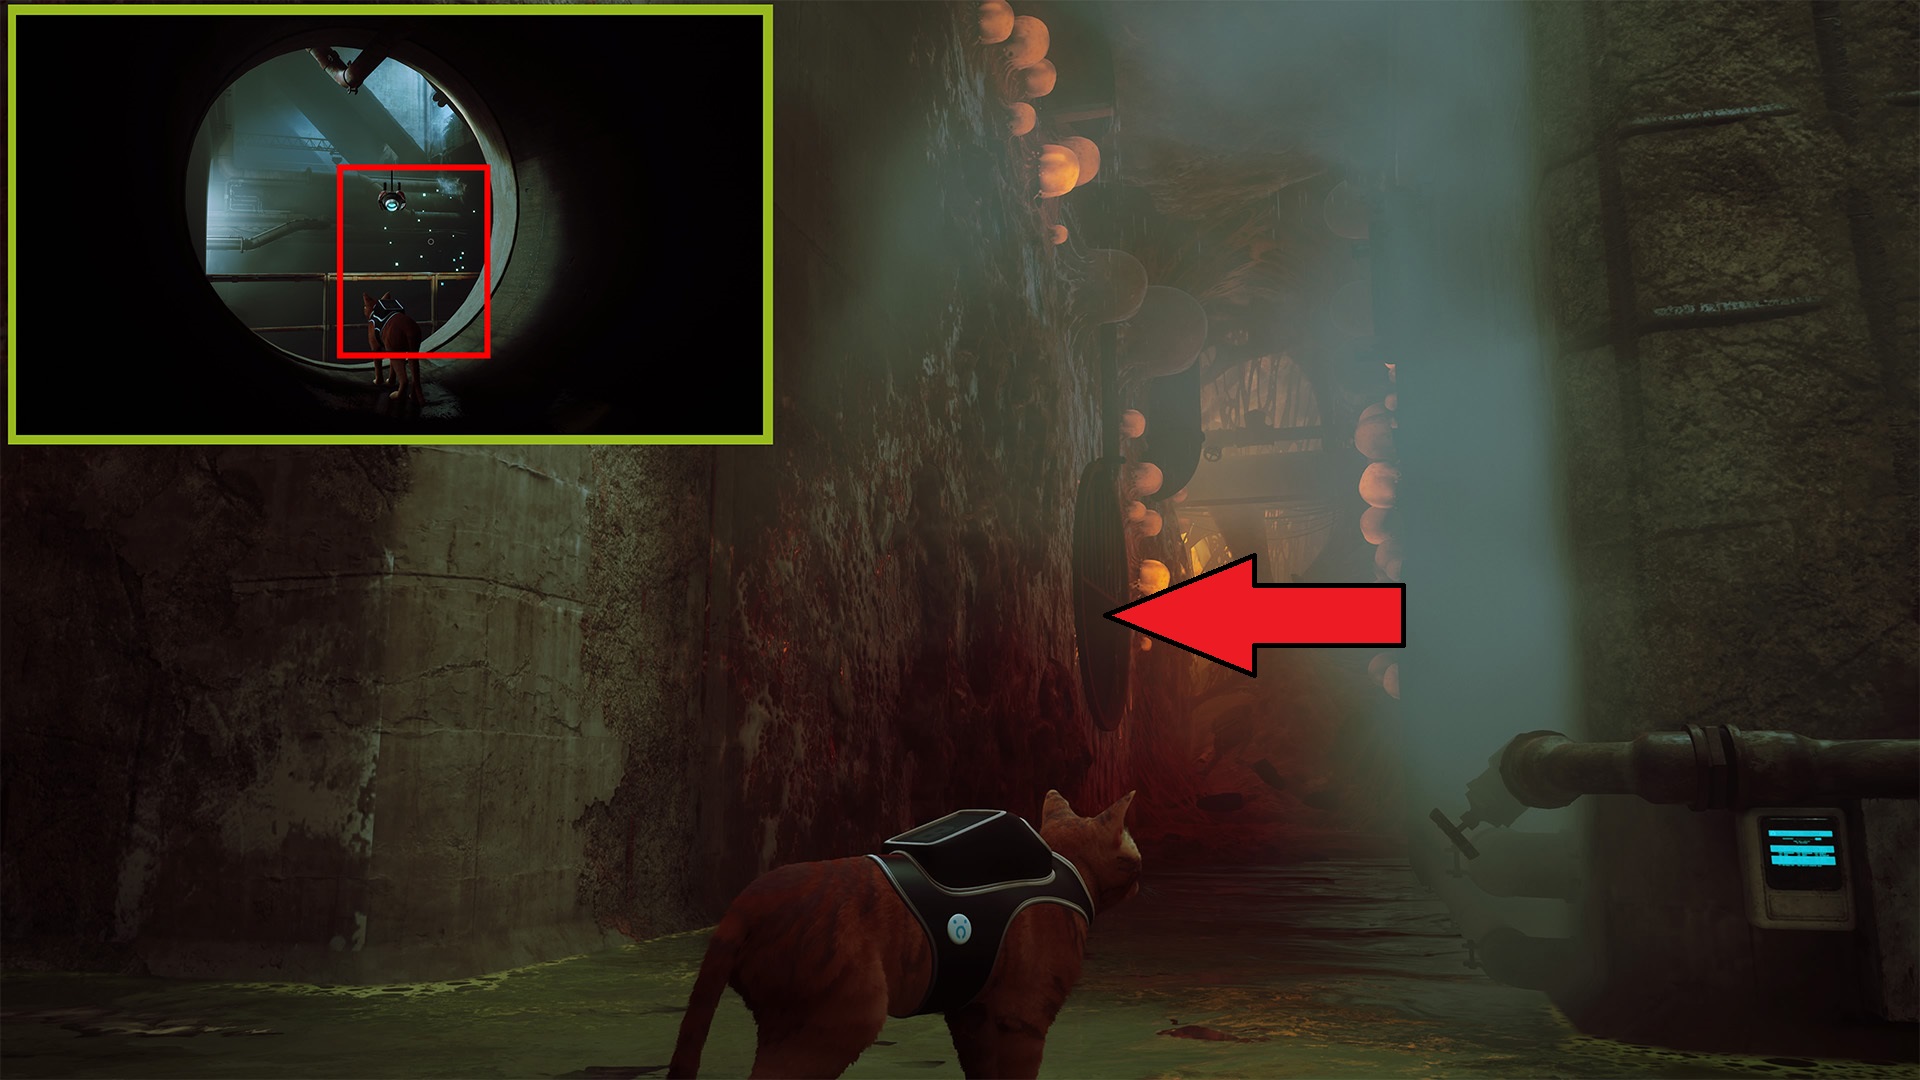
Memory 15/27: Momo will open a large round door for you and look for another way through. Follow the path ahead and up onto a catwalk. Enter a blue-lit room, and go down a ramp. Take the first left about halfway down the corridor. Destroy all of the Zurk egg sacs, and jump into the large pipe opening in the left wall. Follow it to the end, and interact with the railing.
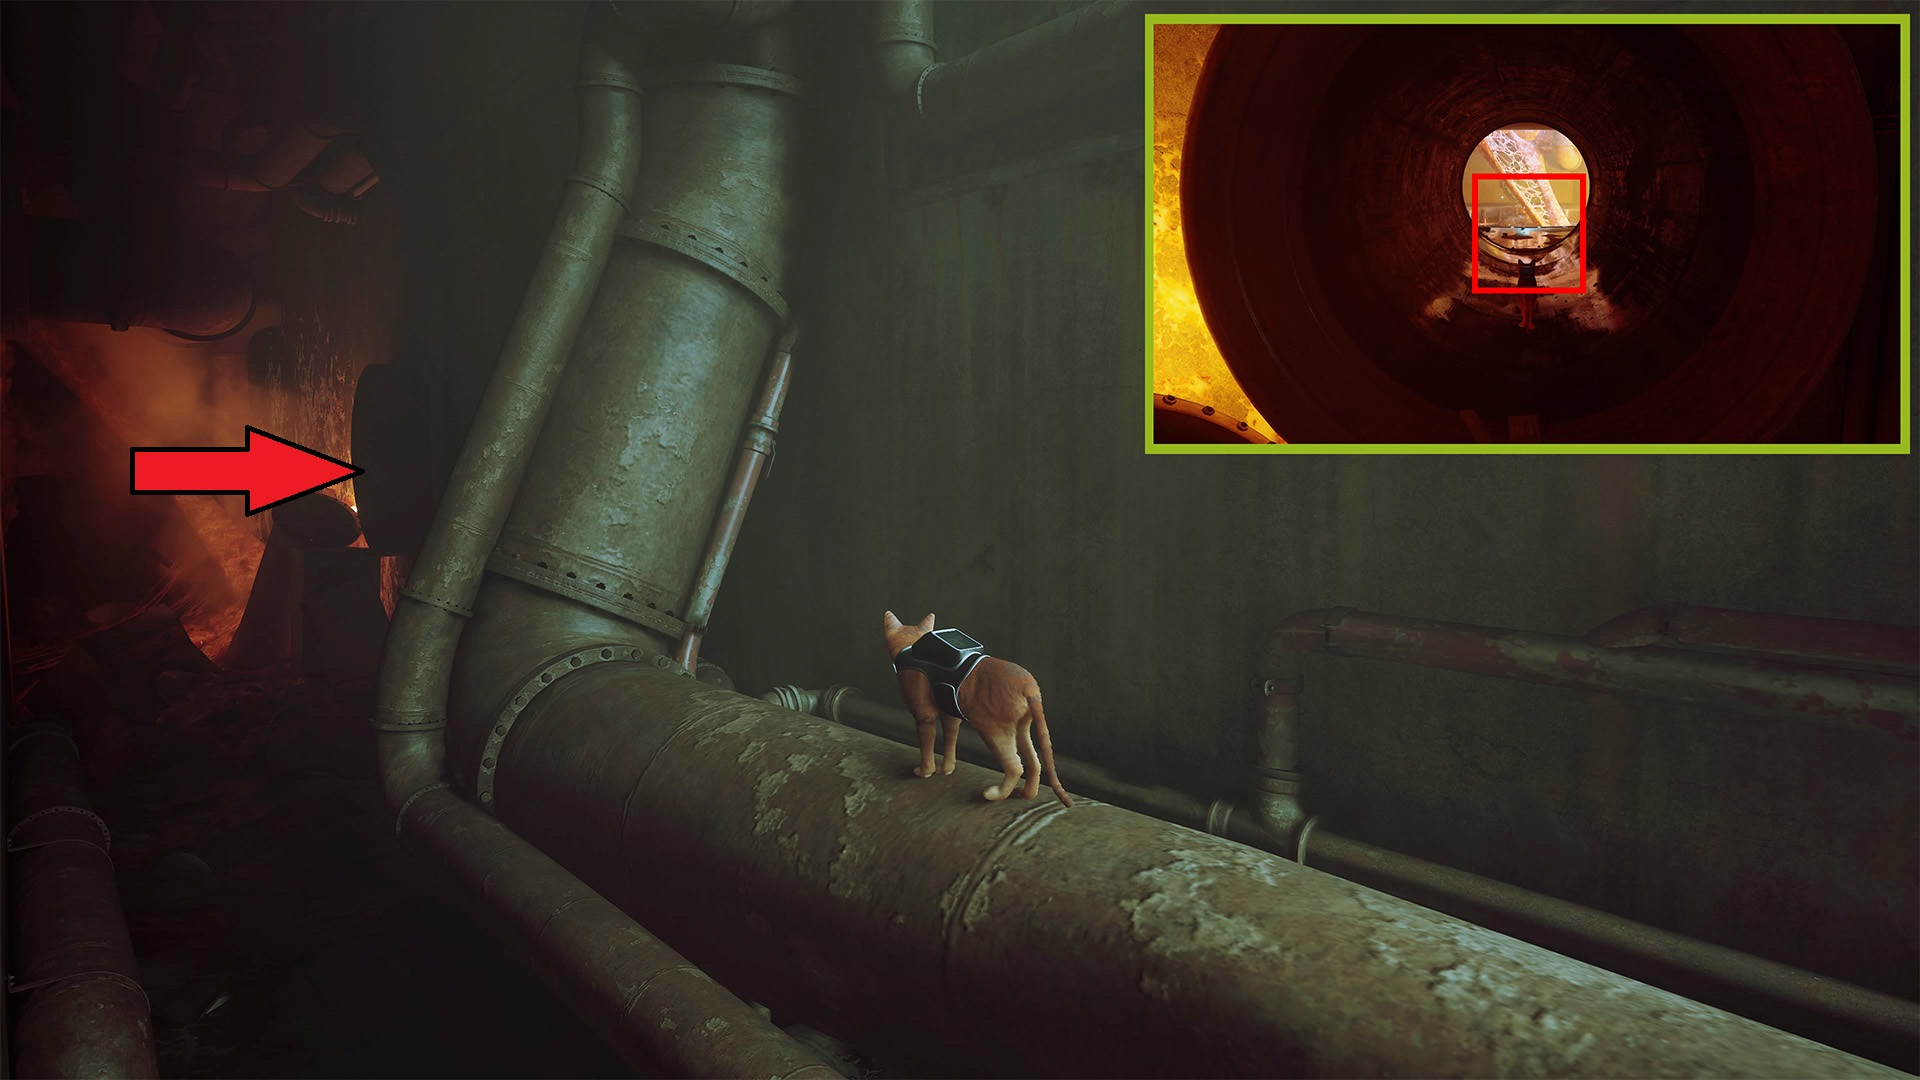
Memory 16/27: Go through the area with the eyes on the walls to the very end, and drop down onto a medium-sized pipe. Follow the pipe left, and jump over to a smaller pipe along the left wall. Follow the path down, across two barrels in the water, and up to an opening on the right. You’ll enter a silo with eyes at the top. Interact with the prompt near them.
Antvillage — 2 Memories

Memory 17/27: Cross the bridge into Antvillage to get this one automatically.
Memory 18/27: From there, take the ladder up, and pass the two robots playing a board game. There will be a robot watching TV at the next ladder; the memory is on the wall to the right of the robot, but you’ll have to return when B12 is ready. Keep climbing to the top, and interact with a Companion to move the story forward, then return to this area for the memory.
Midtown — 7 Memories
Memory 19/27: Enter the subway to get this memory automatically.
Memory 20/27: Follow the stairs up from the subway tracks. Go through the gap in the fence at the top, and turn right. Inspect the bookshelf in the makeshift room with the clothes hanging from the fence.
Memory 21/27: Exit that area, turn right, and go straight. Go up the steps where the Peacemaker is interrogating the Companion. Continue straight ahead toward the purple sign; just before it is an alleyway on the right with a Ramen Bowl sign in it.
Go down the alley until it opens up a bit on the right side near a vertical orange sign on the ground. Climb up the sign, then follow the path forward and left. Climb up again at the blue neon sign with the lightning bolt. You’ll eventually reach a concrete balcony and the memory at the top.

Memory 22/27:After picking up the battery in the Neco factory, return to the central square with the large hologram in the middle. Facing the hologram, with the hat shop on your right, you’ll notice the door to the security station (the building bathed in nauseating yellow light) is open. Go inside, and scan the picture of the Sentinel on the wall.
Memory 23/27: From there, enter the restaurant across from the security station; it’s the building with the tables out front and two Companions talking. Go to the back, and climb up the two mini-fridges under the fan and blue clock. Turn around, and jump over to the tiled wall separating the wash area and food prep area. Climb into the hole in the ceiling above you. Interact with the memory in the back left corner. Note: You can pick this up before getting the battery.
Memory 24/27: Now, go across the street to the barbershop, the building to the left of the hat shop. Inside, climb up the red couch on the left side (behind the “barber”), and climb into the narrow loft with the ladder leaning against it. Interact with the items in the back left corner. Note: You can pick this up before getting the battery.
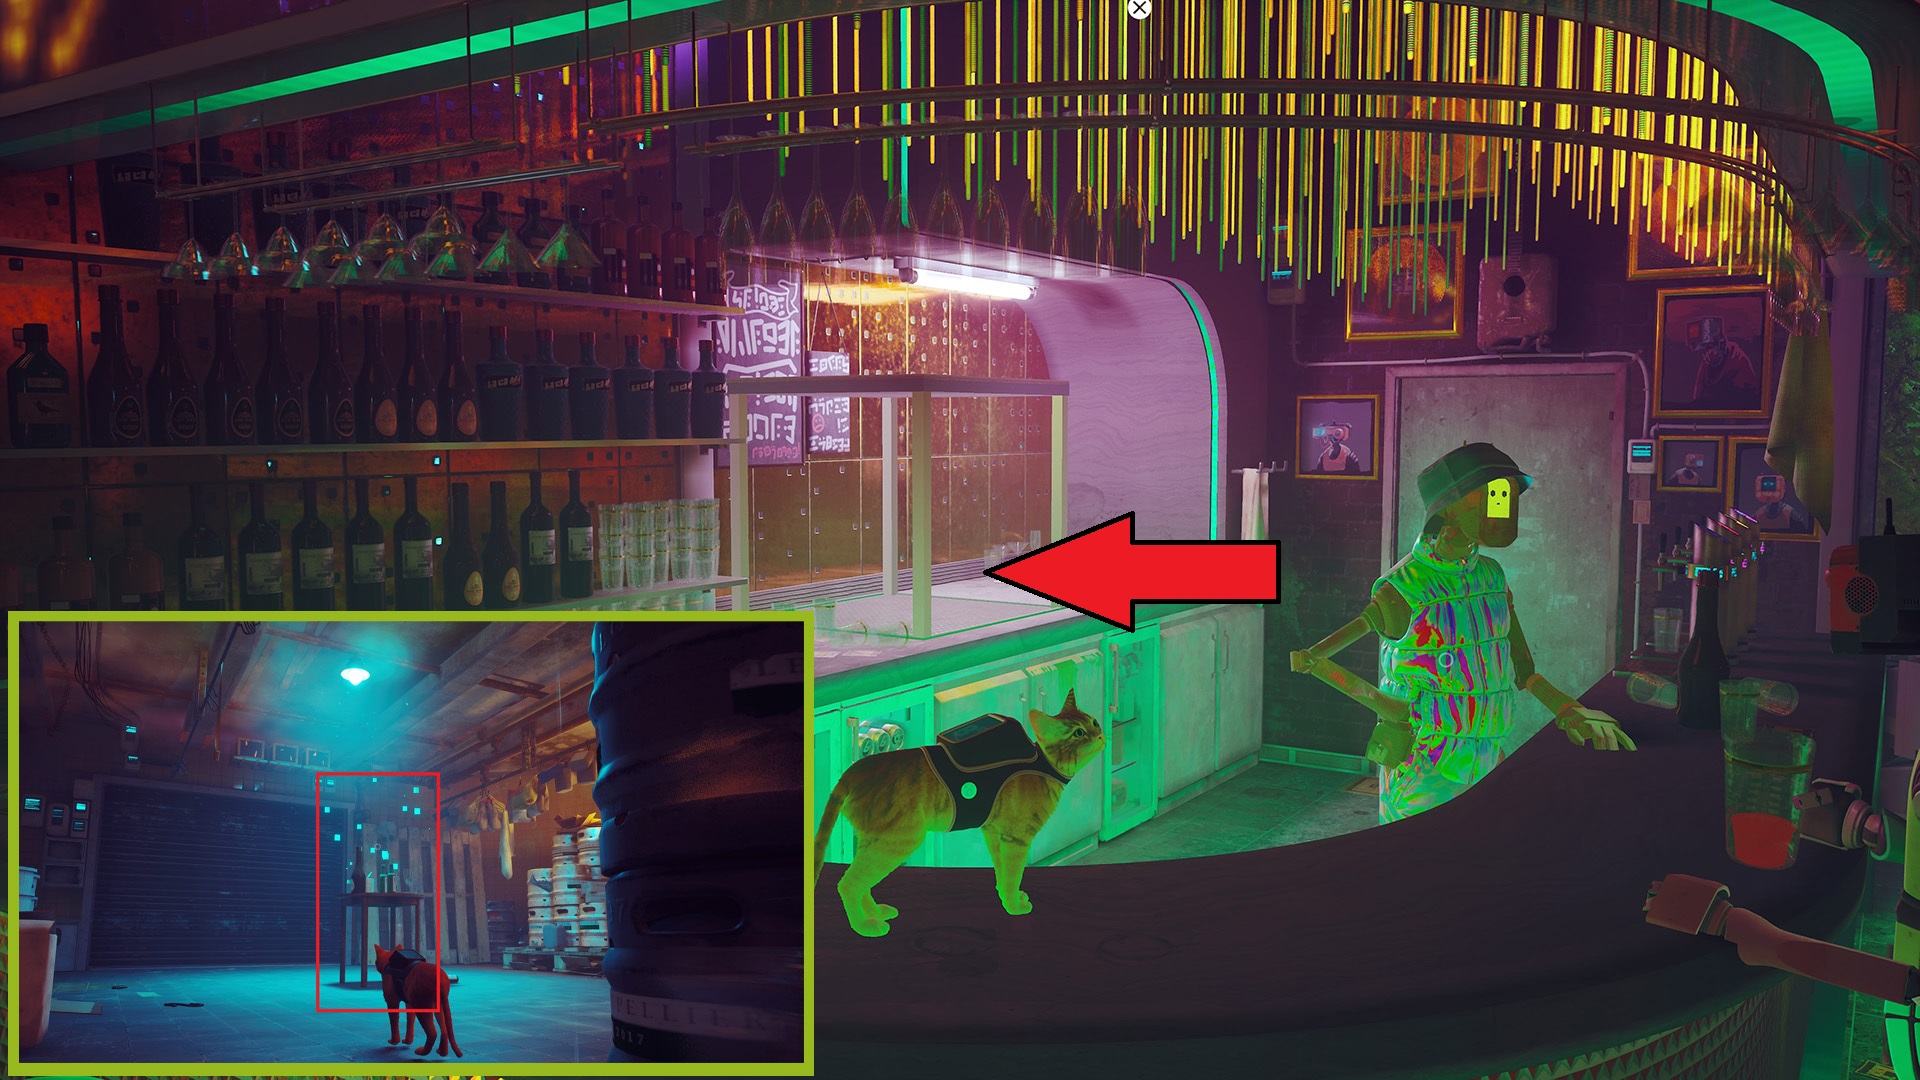
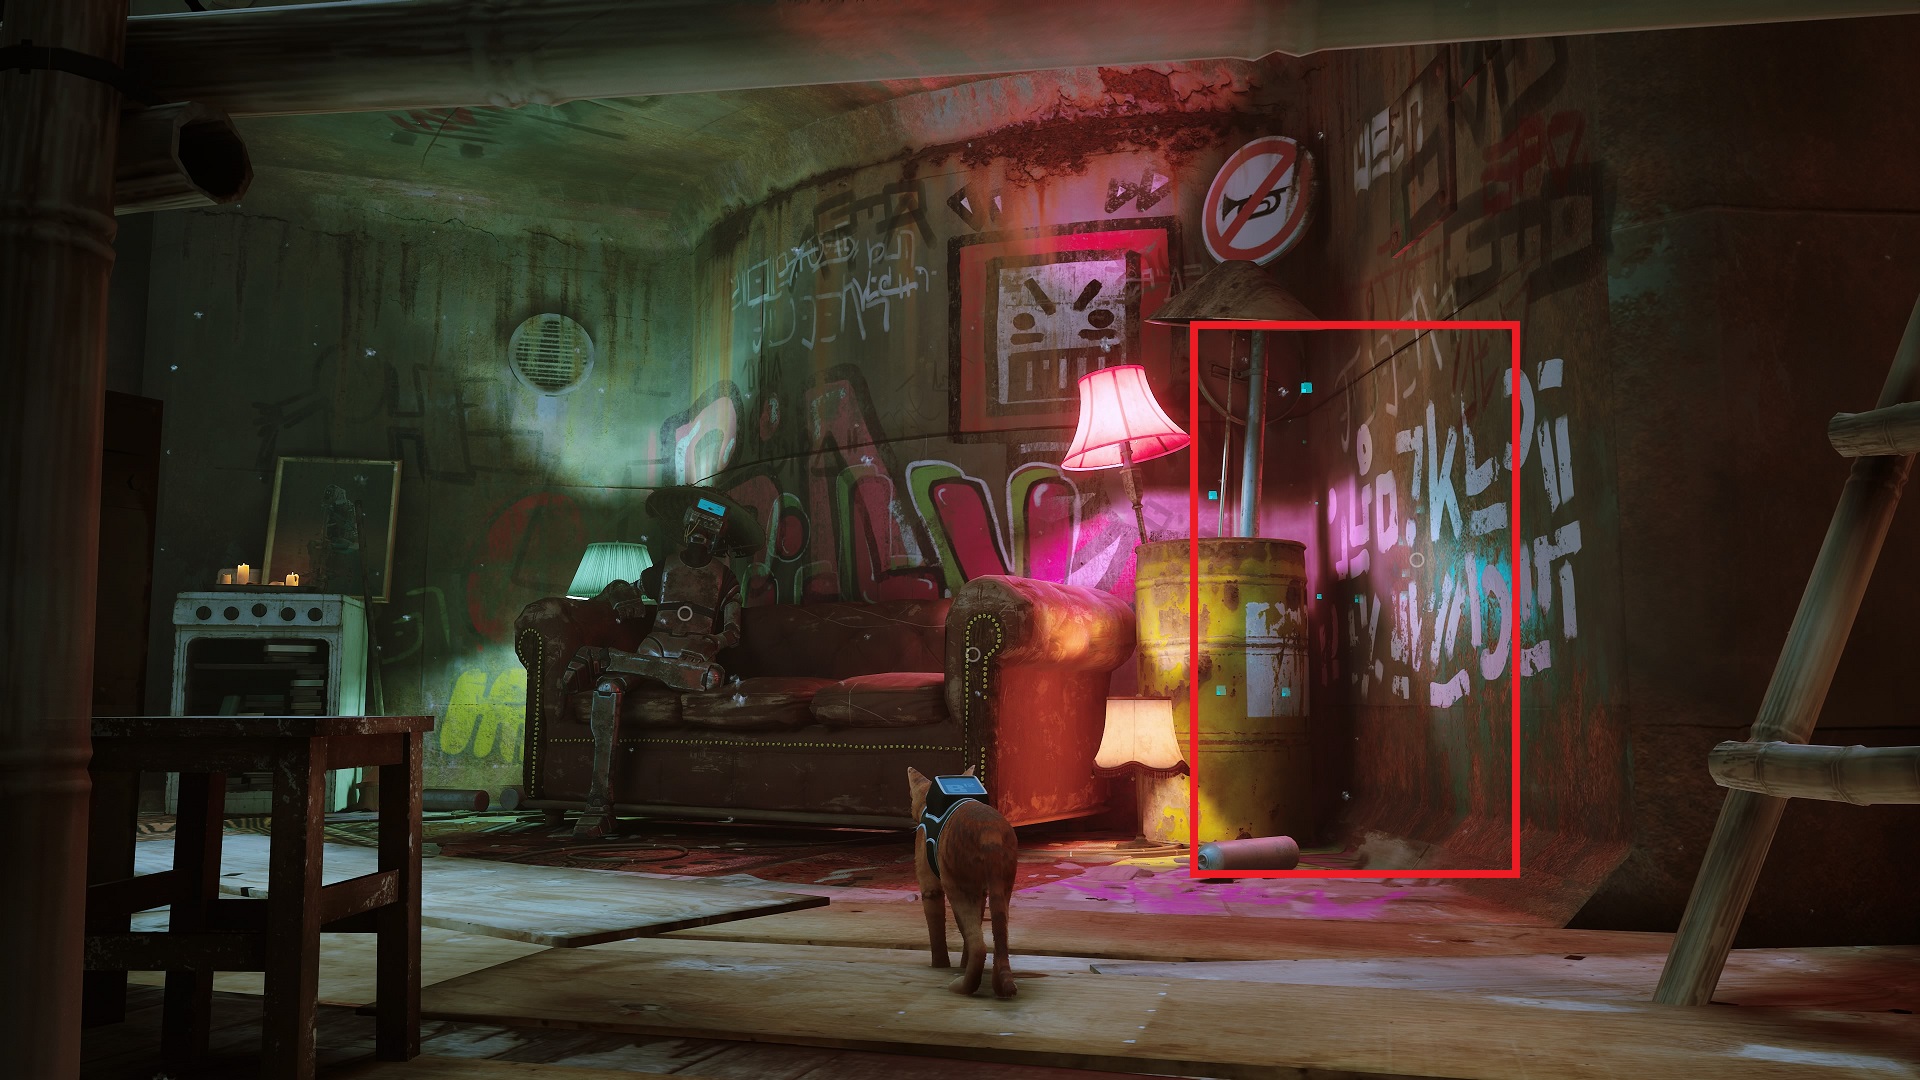
Memory 25/27: When you reach the Club, go behind the bar, and take the elevator in the counter between the drink bottles and the sink down. There will be a table with bottles on it in the center of the basement when you arrive.
Jail — 1 Memory
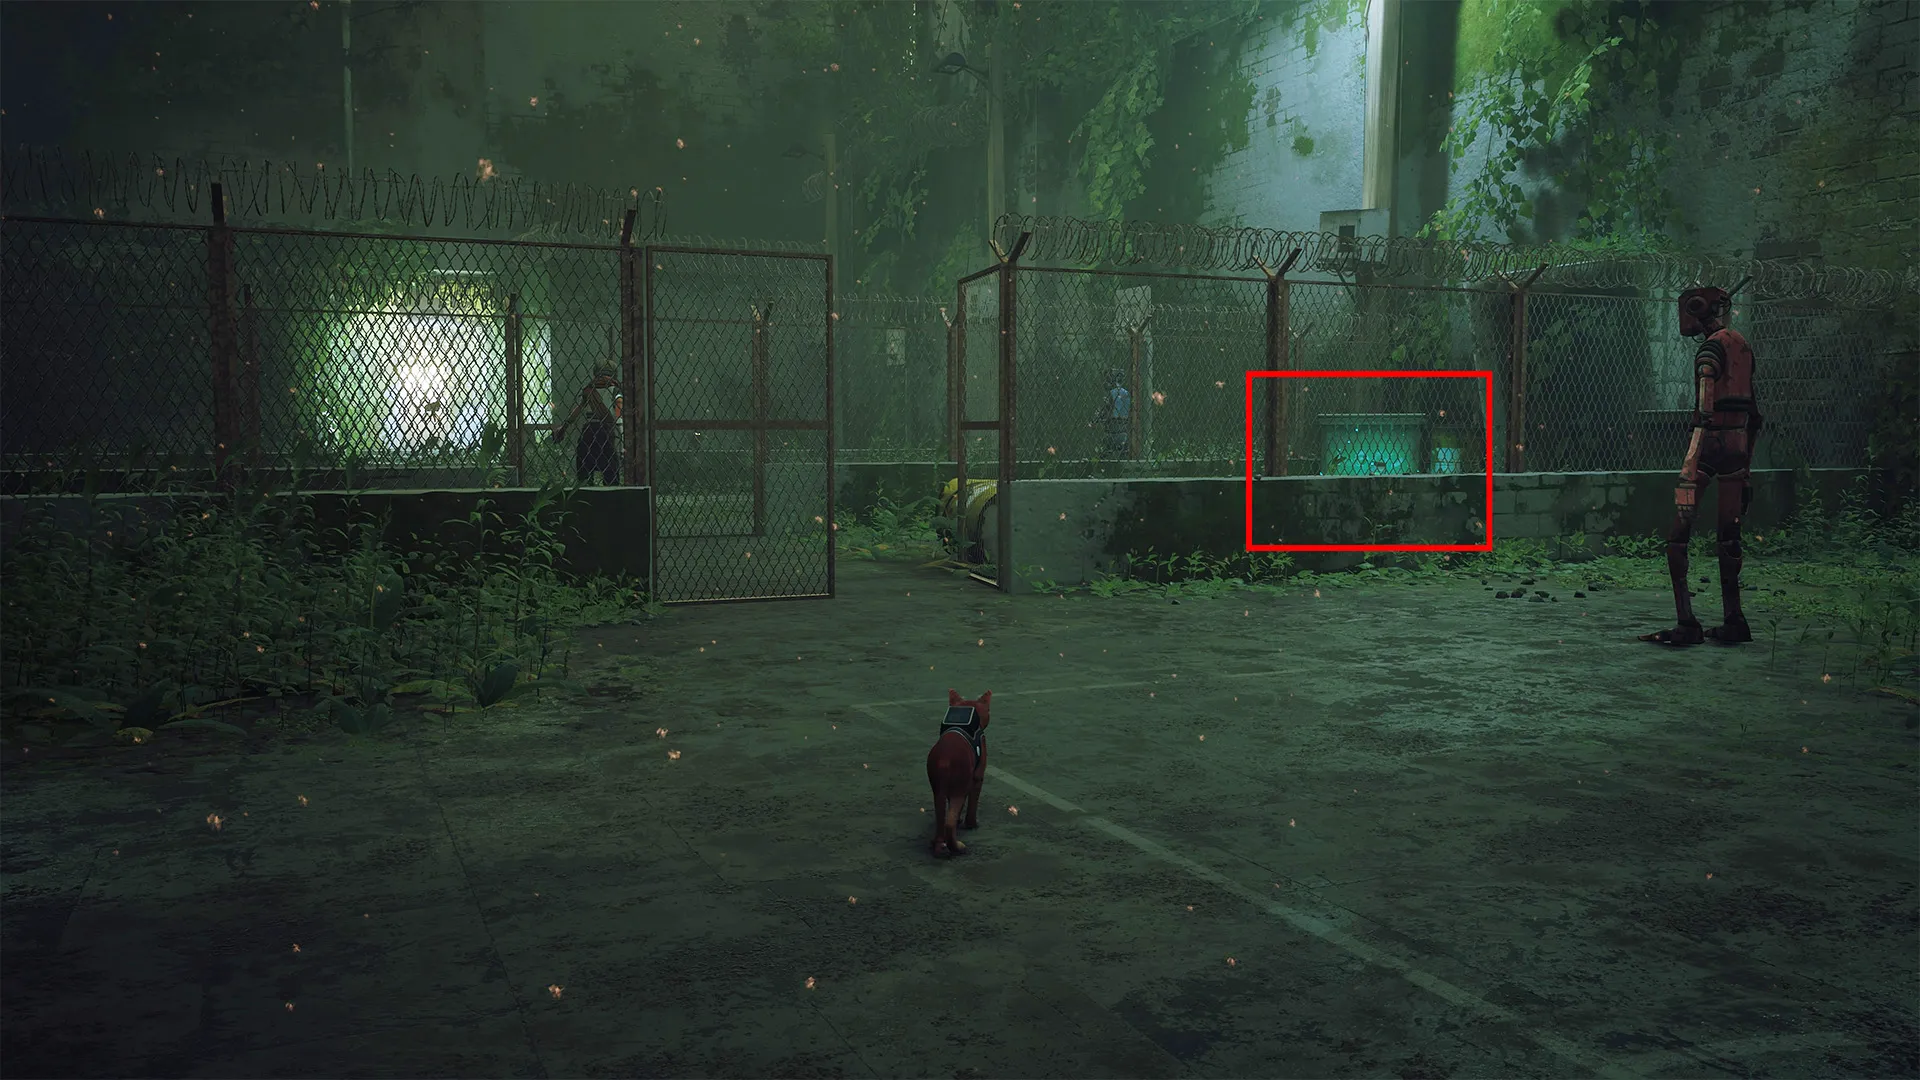
Memory 26/27: Rescue B12, go outside into the jail yard, and trap the first Sentinel for Clementine. After, she’ll open the first gate in the area to move forward. Turn right as you go through the gate, and pass the yellow barrels by the gate. Interact with the robot on the ground leaning against the refuse can in the back left corner.
Control Room — 1 Memory
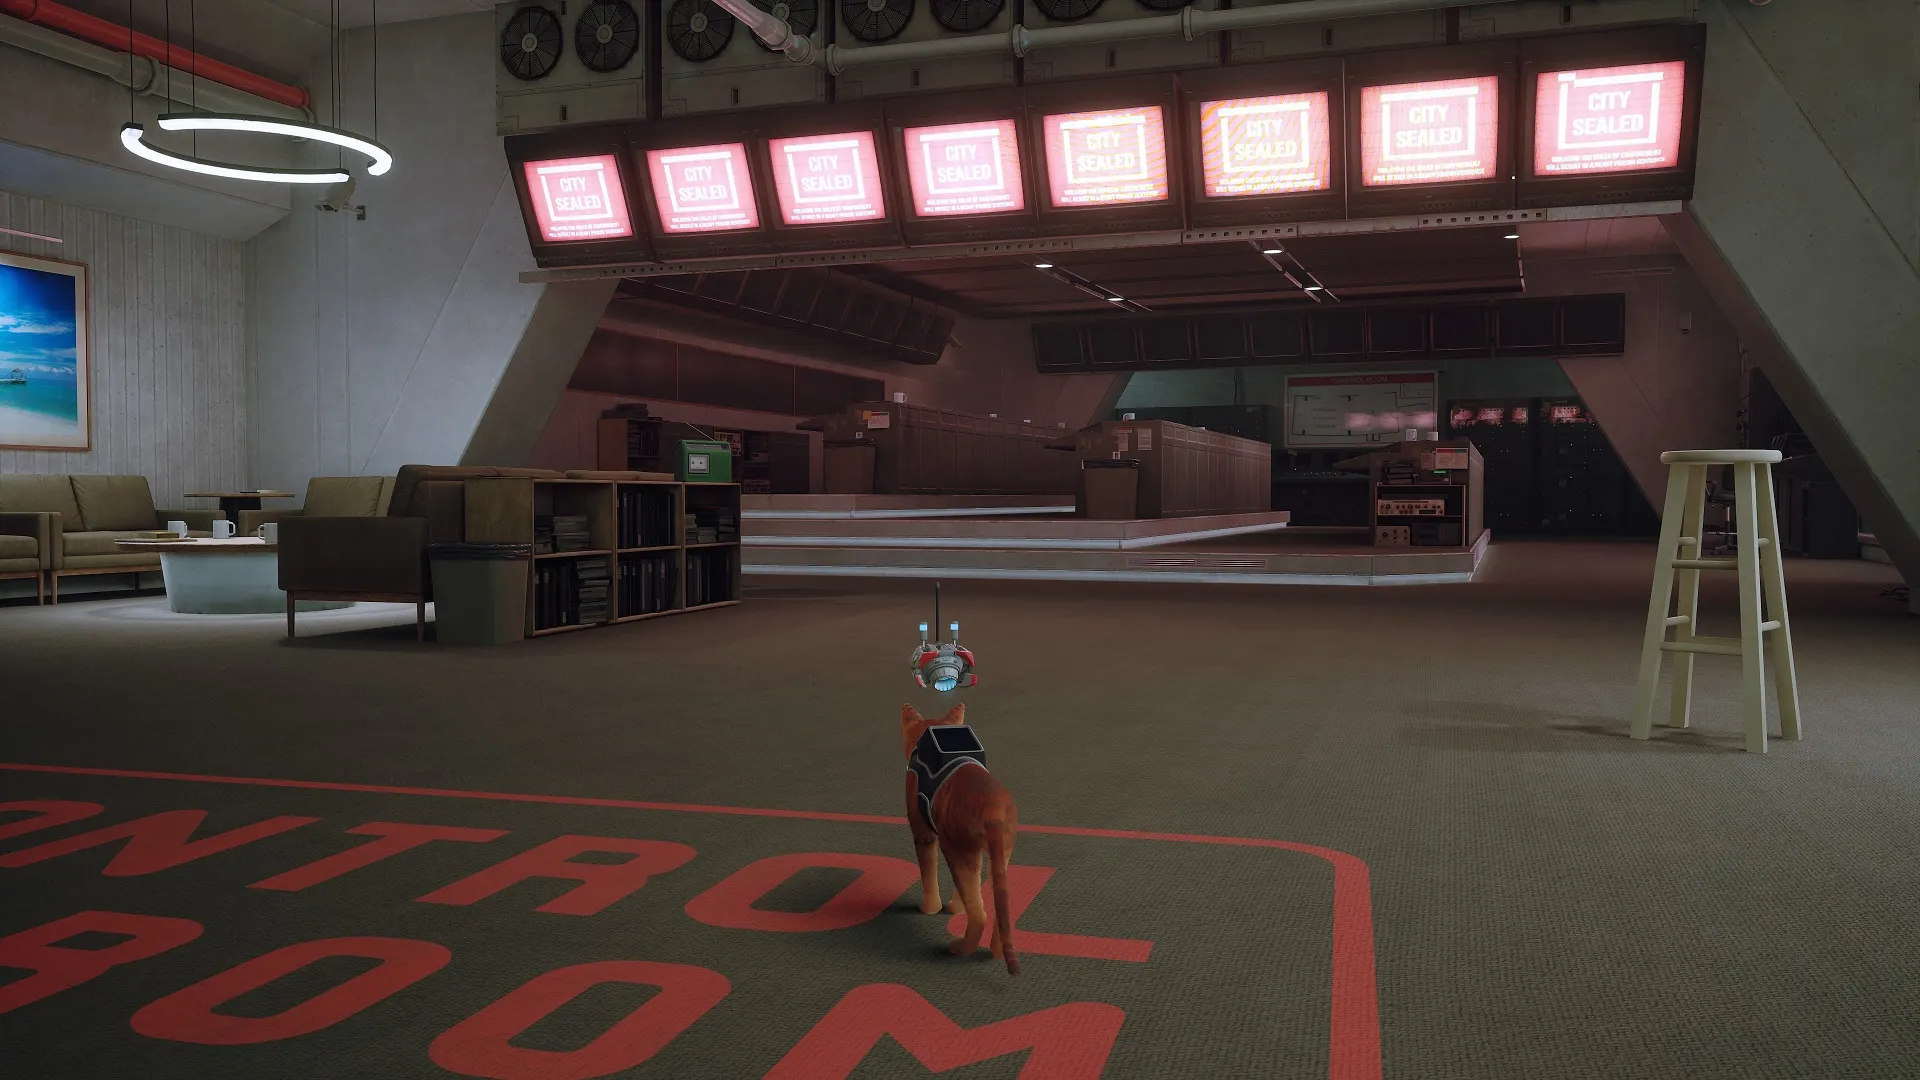
Memory 27/27: Enter the control room to get this one automatically.
Those are all of the memory locations in Stray. Now you know about B12’s tragic tale and the events that led to the state of the world around you. There are more collectibles to find on your journey, so be sure to check out our guides for Morusque’s music sheets and the game’s six hidden badges.


Published: Jul 19, 2022 11:52 am