To say the Stranger Things mobile game is better than I expected is a bit of an understatement — it’s a lot better of a free mobile puzzle adventure game than anyone could have thought it would be.
The first chapter of Stranger Things sets the tone for the rest, giving the player relatively easy puzzles and easing them into the flow of the game. You go through an area (dungeons), solving puzzles and whomping on enemies as you go.
This walkthrough will go through any notable tasks in chapter 1, The Lost Boys. This is the only chapter that does not make use of the overworld map, and the puzzles themselves aren’t too hard to figure out.
You can find a map of this chapter’s dungeon above the boss strategy section. With that in mind, let’s start with the walkthrough for getting through Hawkins National Laboratory.
Chapter 1 Walkthrough
Leave Hopper’s trailer and head south to start the chapter.
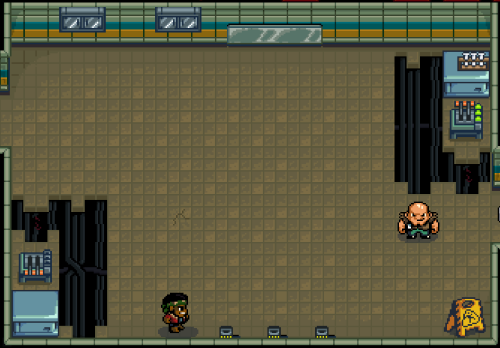
Talk to Powell to get the keycard. Grab it and head inside Hawkins National Laboratory. In this dungeon you can bash cabinets and barrels for money and hearts.
There are a few things you can interact with and smash in this room but all you need to do is get the keycard from the chest, then take the north door to the next room.
The next room has your first enemy encounter. Each of these guys takes two hits to be killed. Just tap to hit them, and make sure you do it before they hit you. Hopper charges toward anything he can hit if he has full health, which can make getting around easier.
Also make sure to punch the security camera on the north wall, which will count toward a heart piece.
Go to the right to flip a switch and nab some coins, then go back to the room the enemies were in and go up.
This is the room that leads to this dungeon’s boss. You can’t get in there for now, so head right.
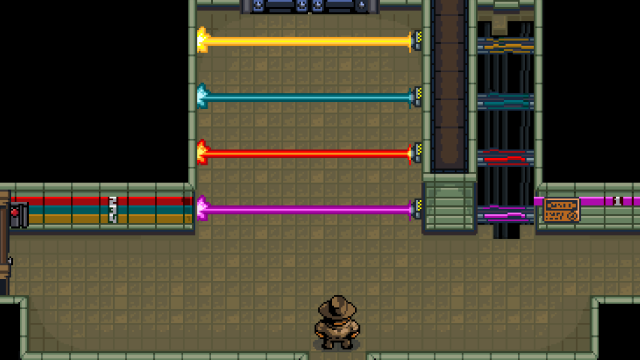
In the room next to the multicolor laser room is the first switch (purple) as well as another security camera, which can only be destroyed by Lucas.
Keep heading through this area (it’s mostly a straight-shot) until you get to the end. You can find both a keycard and another security camera that must be destroyed by Lucas here.
Go back to the room with the (now) 3 lasers and go through the left door using the keycard you just picked up. In this room dispatch the enemies and go up.
Two rooms up you find a room with three enemies and some lasers, two of the enemies having guns. You simply have to brute-force your way through these enemies and flip both switches to the north to get the keycard in this room.
Go down two rooms, then enter the left door using the keycard. Make your way through this room then head up.
This is your first taste of using the environment to win a fight, but it won’t be your last. The easiest way to deal with this guy is to get right next to him so he notices you, then immediately run to the switch on the bottom (making sure to trigger it from the top and not the right side) to get rid of him. Get the coins he drops and head upward to have Lucas join you.
Make sure to add Lucas to your party, then head back to the room that had three enemies and a keycard.

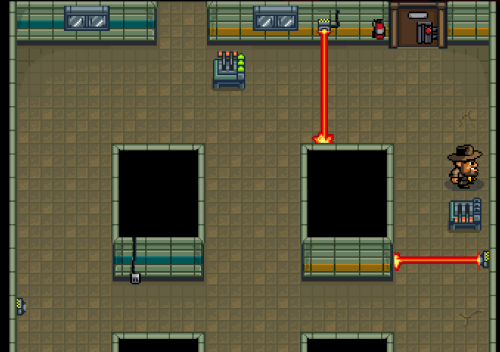
From here, first go through the left door and have Lucas shoot the switch to go through the next door and press the button to turn off the red laser.
Head back two rooms and have Lucas again shoot a switch Hopper can’t reach (pictured above), then head right.
The next room has three enemies, two of which have guns. You can have Lucas shoot them with his slingshot to make quick work of them and move onto the next room.
In this room, shoot the switch below the door you came through with the slingshot, and then shoot the enemy to get him to walk into the lasers and die. Lastly, shoot the switch on the far side of the room to open the next door.
Make your way through the next room to get to the next puzzle room. Below are the steps:
- Walk to the right and hit the switch on the right wall
- Use Lucas to shoot the switch you can’t reach
- Go to the bottom of the room and flip the switch there
- Use Lucas to shoot the first switch you flipped to turn all the lasers off
Then make your way to the next room, which also happens to be a puzzle room. There is also a security camera here for you to take out.
Let’s do this one step by step, too. It’s quite easy! Though if you do it the wrong way one of the enemies will chase you.
- Shoot the switch all the way to the right
- Shoot the enemy below you to get him to walk into the laser
- Shoot the switch all the way to the right and the one at the bottom left
- Shoot the second enemy
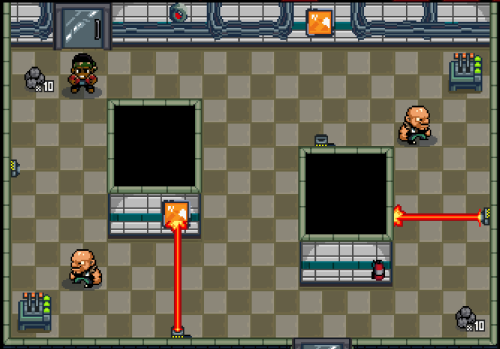
Head south to the next room and dispatch the enemies to get the next keycard. Use Lucas to press the blue laser control button, and destroy the security camera found in this room.
Head back up two rooms to the first puzzle room and use the keycard to get through the door to the top right of the room.
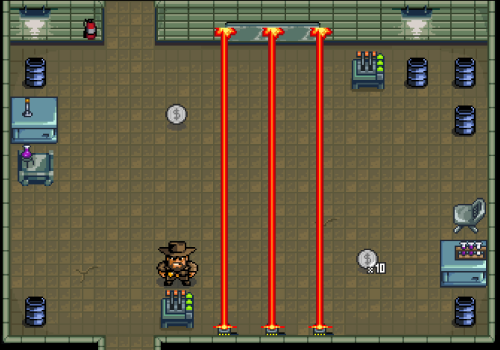
Go up two rooms to find two enemies, one with a gun and one immune to normal damage. Stay in the doorway and use Lucas’s slingshot to take out the enemy with a gun, then flip the switch at the far side of the room to have lasers take out the big guy. Lastly, have Lucas shoot the yellow button.
The way to this dungeon’s boss is now open. But if you want this area’s heart piece, you need to go back to previous rooms and destroy some security cameras using Lucas’s slingshot.
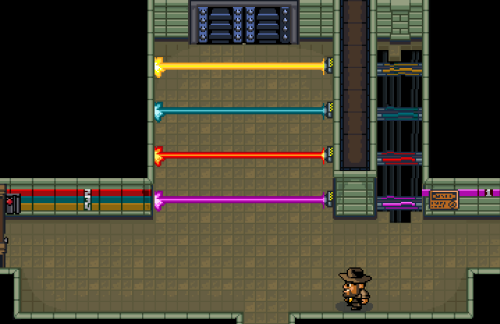
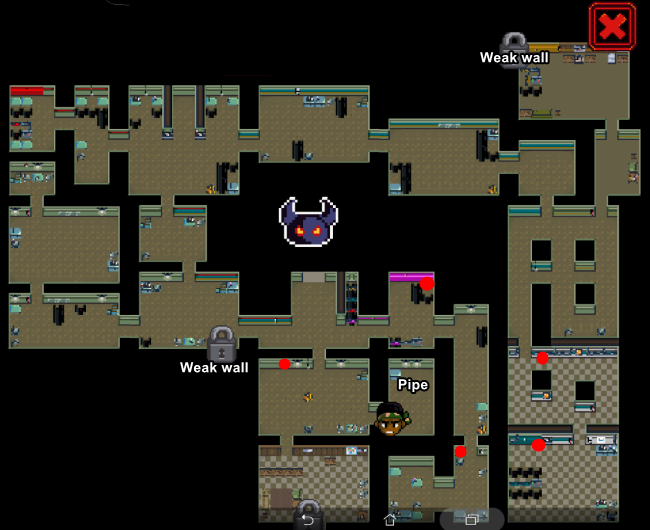
For reference, here’s a map of Hawkins National Laboratory. Security cameras are marked with red dots and areas meant to be accessed by other characters are marked using text stating what they are to avoid spoilers.
Chapter 1 Boss Strategy
The boss at the end of Chapter 1 in Stranger Things has a couple different phases, and they’re easy enough to figure out.
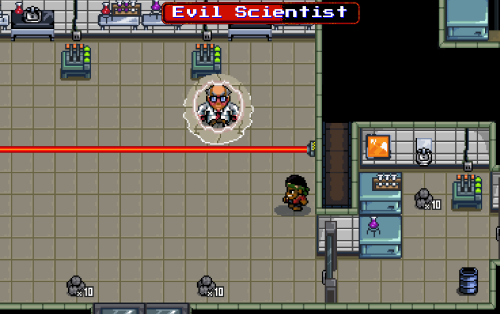
Here’s the fight step by step:
- Shoot the Evil Scientist until he gets into a defensive bubble
- Shoot one of the switches behind him, then go into its corresponding door and flip the switch inside
- Punch him a few times with Hopper
- Rinse and repeat steps 2 and 3
Once you’ve gotten the Eggo, go to the room to the left after you’ve defeated the Evil Scientist to get this dungeon’s VHS tape.
Once you’ve finished the Hawkins National Laboratory dungeon, you need to head outside (you can do this easily by opening your map and tapping “Exit Dungeon”) and go left and up to make your way off the property. Use Lucas’s slingshot to flip the switch to turn off the security laser and you are on your way.
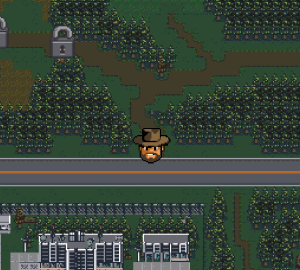
Head right until you come up on the entrance to the woods, and then enter Mirkwood. Be aware there are a lot of bird enemies here, which fly directly toward you.
While you’re in the Mirkwood, be sure to stop by the Castle Byers shack to the north to pick up Joyce’s keychain, and by the Byers house itself to give Joyce the keys and get another heart piece, as well as pick up a romance novel for Flo in one of the bedrooms.
Leave the house then head right and up to talk to Steve, who informs you Nancy has gone into the woods.
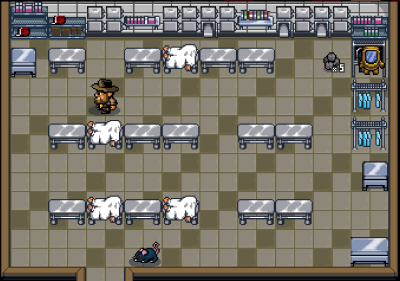
Before you do that, take a left and head to the next screen downtown to find the Morgue. Head inside and use Lucas to flip the switch to head to the back room and pick up the Hazmat Suit.
Now head back to Steve and take the path into the woods to the right.
From here you can go right into the Upside Down and end chapter 1.
That’s it for the chapter 1 walkthrough. Each chapter is more difficult than the last, so look out for walkthroughs for the rest of the chapters in the Stranger Things mobile game here on GameSkinny. Get hyped for season 2 later this month!


Published: Oct 10, 2017 07:55 pm