When playing Inner Void’s Chef: A Restaurant Tycoon Game — as with running a real restaurant — a big factor is creating the perfect menu. Any restaurant entrepreneur worth their salt knows that they need to offer the right things to bring in the customers. Generally, this means having a menu with some variety — and that means recipes.
When you first start playing Chef, the game will start you out with a reasonable amount of recipes allowing you to add items to every category on the menu, from appetizers and salads to desert and drinks. Of course, it’s important to remember that these are starter recipes. There’s nothing special about them and you’re going to want to change that as soon as you can.
That’s where we come in. In this guide, we’ll explain how to make the most out of your menu and attract the customers you desire using the recipe system. Of course, there are other factors to consider, such as location, but we’re not dealing with that here. For now, let’s concentrate on the food, beginning with…
Why recipes are so important
This may seem obvious. After all, in the real world, what a restaurant makes generally dictates its clientele and how much money you make. The right recipe, made using the right combination of ingredients can attract wealthy patrons willing to spend some serious dough — even if the ingredients themselves aren’t all that expensive.
The same is more or less true in Chef.
As noted above, the game starts everyone out with a selection of recipes — just enough to get them off the ground — but as you play, you’ll be able to unlock even more pre-set recipes by purchasing individual ingredients. Even more importantly, you’ll be able to create your own recipes. This is how you really make your restaurant stand out and assure you have enough of the right things on your menu to attract the clientele you’re going for.
It’s all about the ingredients
In Chef, there are several different types of customers available for you to cater to. Some of this will be determined by your location — industrial areas will attract more blue collar workers, theme parks will net you more tourists and families, etc. — as well as your pricing, but a big factor is the kinds of foods each group is attracted to. What attracts one type of customer will push another away.
For instance, white collar workers like seafood and higher end drinks but aren’t big on starches and cheap booze. On the other hand, blue collar workers love the starches and cheap booze but hate veggies and herbs.
The good news is that you don’t have to figure this out for yourself. Information on what each group likes can be found under the stats menu. (The little red button with the graph symbol.)
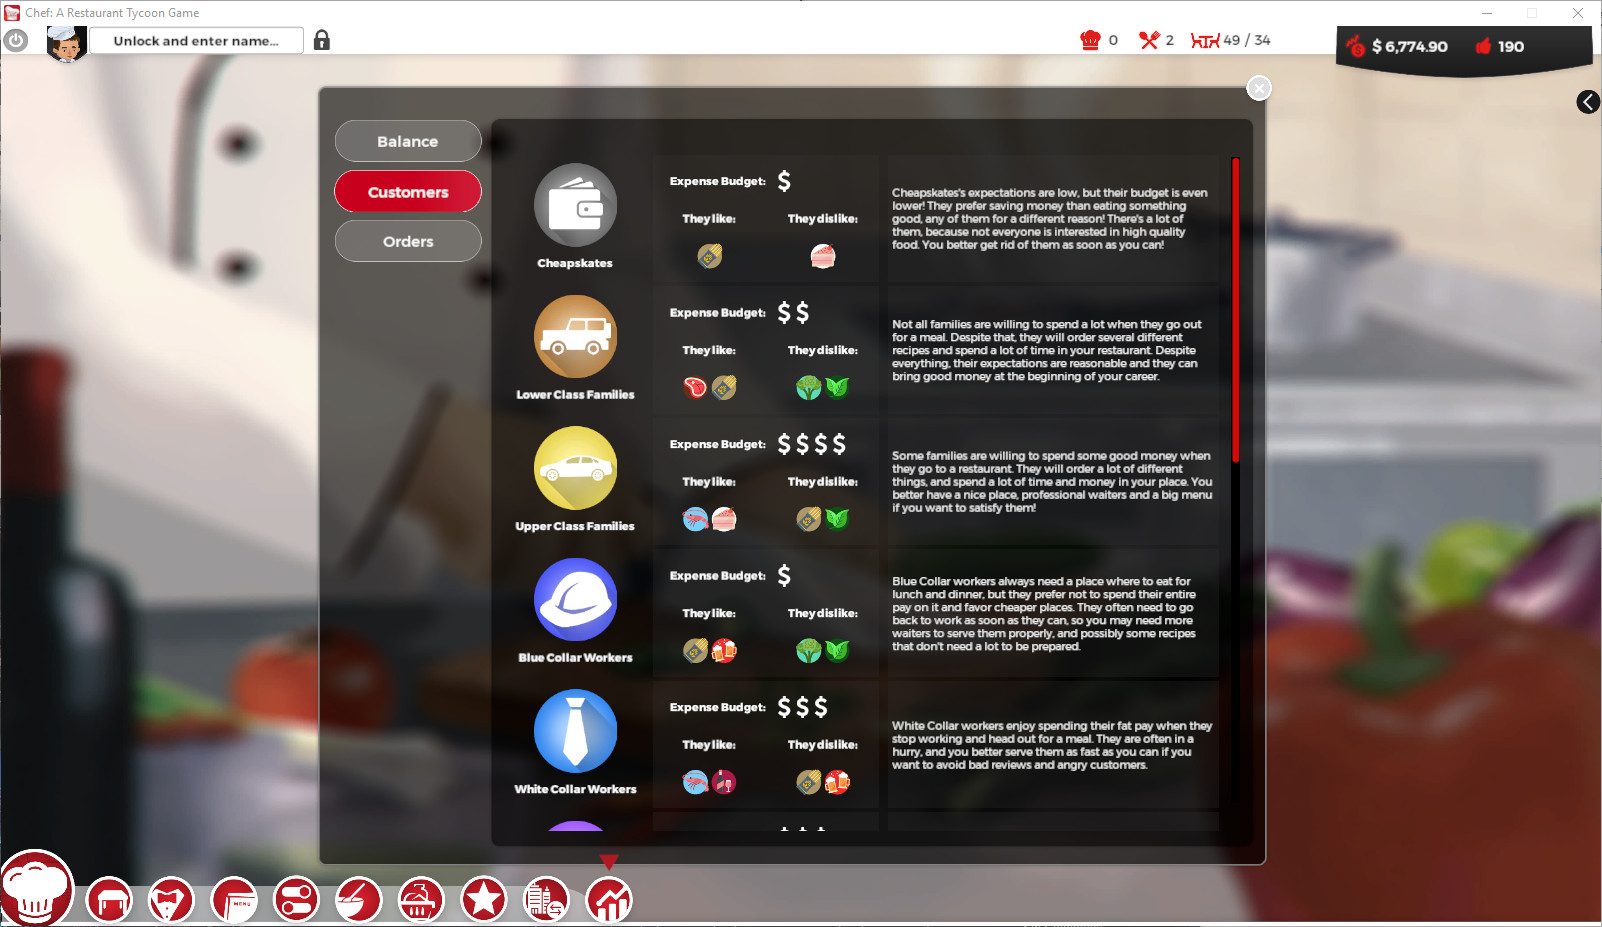
Armed with this information, you’ll be able to build recipes and, as a result, a menu that will attract exactly the customer base you’re looking for. Of course, it will take a little time, because you’re going to have to purchase the ingredients needed for these recipes using points earned at the end of each week.
The amount of ingredient points earned is indicated by the crossed fork and spoon symbol at the top of the screen. You’ll get ten every week to spend and, yes, they do roll over. So don’t worry about spending them all at once.
To purchase ingredients, you’ll need to access the ingredients menu via the bar at the bottom. It’s the button that looks a bit like a basket with things in it, in between the bowl and the star.
Types of ingredients
There are 11 different categories of ingredients to choose from in the menu. These are as follows:
- Vegetables: Any plant that’s not a fruit or an herb…lettuce, onions, asparagus, olives, garlic, tomatoes, etc
- Carbs: Also known as starches, so rice, noodles, bread, and so on
- Meat: Any animal that’s not found in the water — with the exception of maybe snails. Obviously this includes processed meats as well
- Seafood: Fresh water, salt water, shellfish, crustaceans, and cephalopods, they’re all here
- Dairy: Aside from the obvious raw items, this also includes cheeses, yogurts, and even bechamel sauce.
- Spices: This is anything that wouldn’t typically be eaten alone but adds flavor. It includes dried seasonings, fresh herbs, and even ginger and capers
- Fruit: All your basic fruits plus some exotic ones. And yes. Avoocado and cucumber are included
- Nuts: There aren’t a lot to choose from, but you have enough to create some interesting recipes
- Legumes: Or beans. Also includes soy sauce and soy milk.
- Other: This is a bit of a catch all. It includes everything needed for flavor, from stock to butter to olive oil to honey. It also includes base ingredients like flour and gelatin. Beverages like water and coffee exist here as well
- Alcohol: Beer, wine sake, brandy, and rum
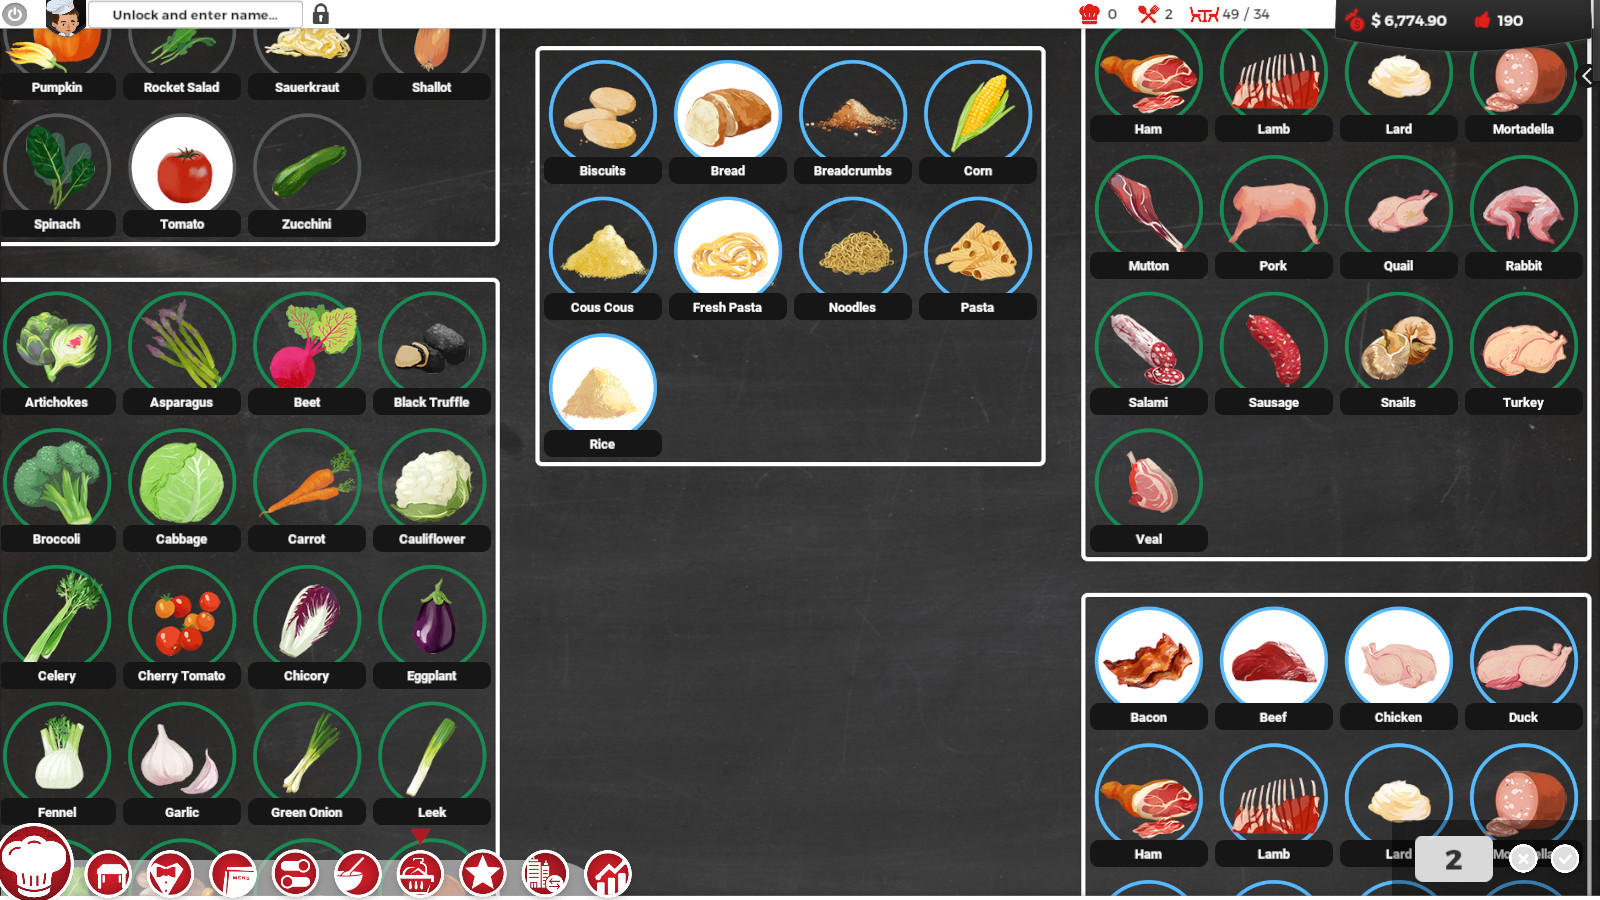
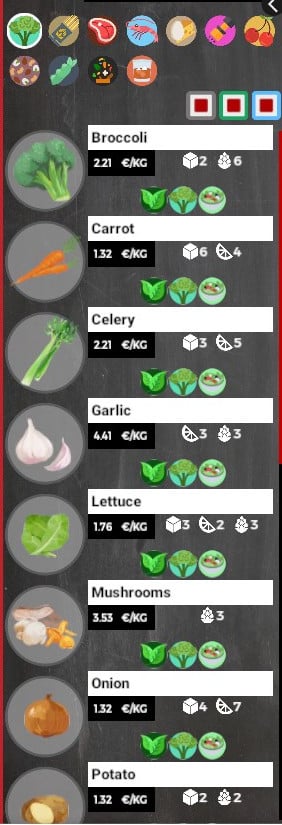
Ingredients in each of these categories can be purchased in one of three qualities — indicated by the color of the rings around them. Higher quality ingredients cost more points. You can see each of the quality levels in the image above.
- Low: Grey, costs 1 point.
- Mid: Green, costs 2 points.
- High: Blue, costs 3 points.
Higher quality recipes also increase what you pay for the ingredients when making a dish. This means that if you plan to use higher quality ingredients, you need to be prepared to charge more for them.
Keep the information available on customer preferences in the stats menu in mind when making this decision. Higher prices will drive away certain customer bases.
It’s also important to note that you do not have to buy low quality ingredients if you don’t feel you need them. You can easily skip right to mid or high. The one thing to keep in mind, however is that since each tier costs more, it will take you longer to accumulate a good variety of items — which means you won’t be able to create as many recipes up front.
After a few rounds of playing, I started buying high quality only, rather than wasting points on something I’d want to upgrade anyway.
Other factors
Before jumping into recipe creation, I’d like to address two other factors — skills and tools. Skills (which are found under the chef’s hat button) are a bit ambiguous at the moment, but it is important to know that they will have an affect on the quality of your recipes.
At the end of the week, when your receive ingredient points, you’ll also get skill points. These can be used in the skill menu to improve recipe quality. There are five main categories of skills — which are broken down into smaller groups. Each individual skill affects the quality and cooking time of a specific recipe type. Be sure to hover over and read the information on each skill before deciding to spend points on them.
A second factor is the tools available to you. Certain recipes can only be made using certain tools. You can’t grill on an oven or blend in a microwave. So, if you haven’t purchased the right appliance, you won’t be able to add items that require it to your menu.
There’s a pretty good chance you won’t buy everything available to you at the start of the game. And as time goes on, you’ll be able to unlock more appliances. So don’t worry about not having everything at once.
Building a recipe
Before we jump into the details of actual recipe building, I’d like to note that the game’s tutorial does a solid job of explaining things. If you’re someone who likes to figure things out for yourself, you can jump in and start toying with recipes easily.
So, with that in mind I’m going to do my best to avoid giving you the blow by blow of the tutorial itself and dig deeper into some of the things it just scratches the surface of.
Templates
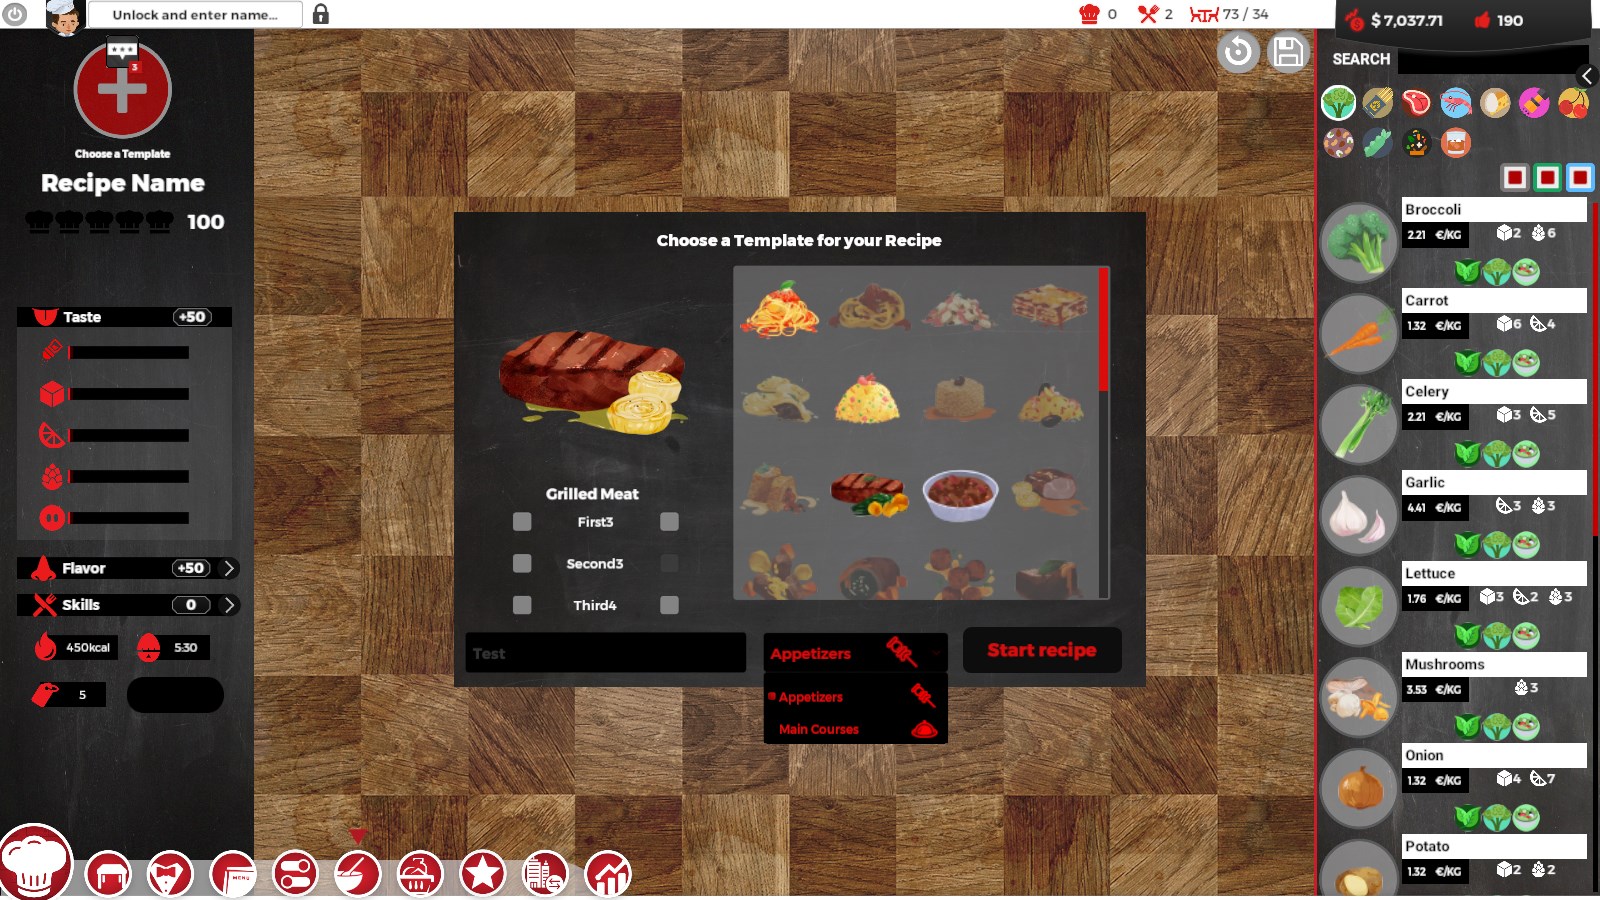
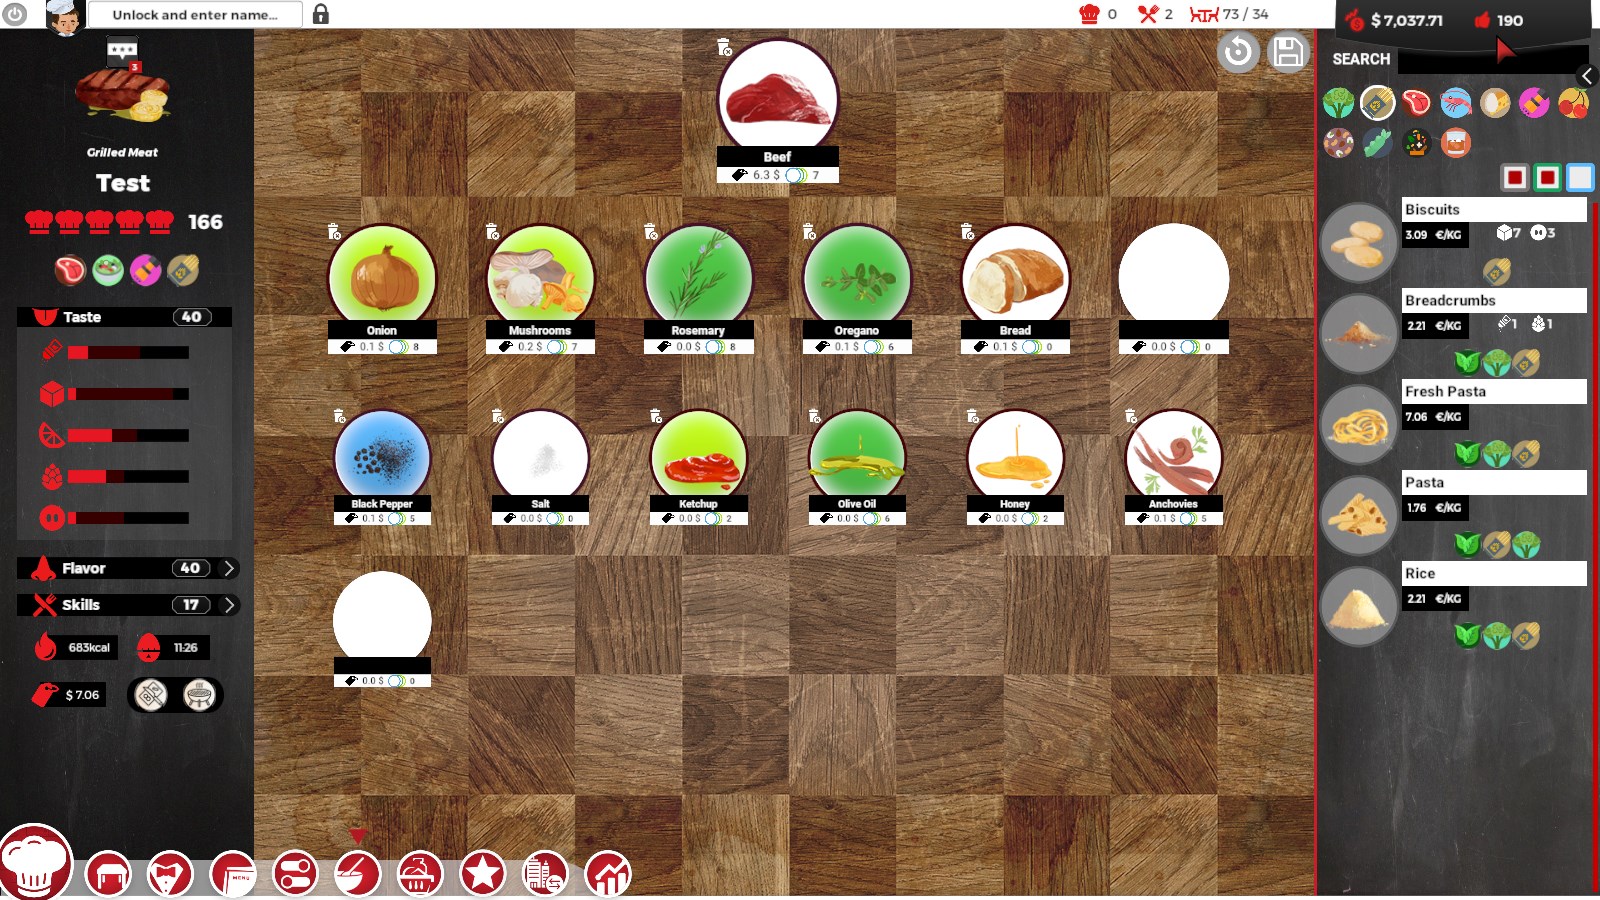
When you’re in the recipe editor, you’re going to start with a template. There, you choose the base of your recipe. In the example above, you’ll notice I’ve chosen a “grilled meat” option. I can do this because I have the necessary ingredients (meat), cooking implements (a grill), and skill level.
You’ll also notice I have a choice between using this as an appetizer or a main course. Not all recipes will give you an option as to where they go on the menu.
Once you’ve made basic decisions and and clicked “Start recipe,” you can get down to the fine art of creating the ultimate dish.
Taste and flavor
As the tutorial explains, recipe creation requires taste balancing and aroma matching. Your success with this will be indicated on the left hand side of the screen, with the Taste and Flavor indicators. The higher the number the better.
To match aroma, you’ll need to pay attention to what colors the circles of ingredients change to when you click on other items.
As an example. In the image above I’ve clicked on the beef ingredient at the top. You can now see how well each of the items below pair with it. Light green items like the onion and mushrooms are okay, dark green items are good, and blue items — of which there is only pepper — are great.
You’ll note that the Flavor number is currently 40 on this particular recipe, and might wonder where that comes from. Well, it’s a total based on how every single item pairs with every other item.
The food min-maxers among you can see the details by clicking on the arrow next to the Flavor number. This will pop out a small menu that tells you not only what’s working and what’s not, but exactly how much each item contributes to or takes away from the total.
(You can also get a similar rundown on how your Skills affect the recipe by clicking on the arrow next to it.)
Taste is determined a bit differently. You may have noticed in the image with the recipe template that the ingredients on the right had small symbols associated with them, each corresponding with a symbol under the Taste bar. These are your basic flavor components.
- Saltiness: The salt shaker
- Sweetness: The cube
- Sourness: The lemon wedge
- Bitterness: The… clove… maybe? (I’m not really sure what that is. It also looks like a tiny pine cone or maybe an artichoke)
- Fattiness: The little pig snout
You’ll also notice that each flavor component on an ingredient has a number next to it, indicating how much it will contribute to that portion of the recipe’s flavor.
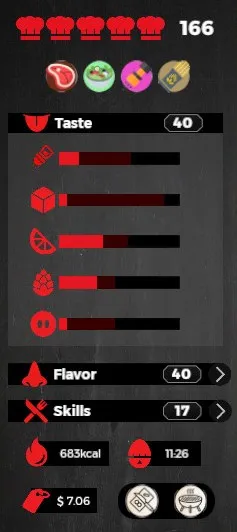
The trick here is that you don’t want any one flavor component to be too powerful as it will overpower the rest. Don’t worry. The recipe creator will let you know if you’ve gone too far with one component or another by putting a little exclamation point next to the offending flavor component’s bar.
Overall recipe rating
Looking at the above images, you likely noticed the five little chef hats at the top left. This is your Relative Recipe Rating. It’s “relative” because while it’s determined by the quality of your ingredients and their combination, it’s also based on your current restaurant level.
This means that as your restaurant level goes up, your rating on recipes you’ve already created will go down. At the moment, my test recipe has a really high rating, but if I want to keep my name out there, I will have to come back and make changes — or just create something new — periodically.
A few other things of note
The restaurant creation menu also includes other incredibly helpful bits of information. You’ll notice it tells you what types of ingredients it contains just under the recipe rating. This helps you assure you’re creating something your target customers will like.
Further down, it also gives you information on required temperatures and cook times. This information will actually change as you level up certain skills. In general, leveling the correct skills will bring both these numbers down.
Finally, there’s the price. This isn’t the price you’re going to sell at, but rather a base. Basically, it’s what the ingredients will cost you for each meal. So priced accordingly.
And there you have it, everything you need to know to create great recipes and build a menu that will really draw the right crowd. With the information you have here, your restaurant is sure to become the hot place in town — or the charming little diner you always wanted. It’s really up to you.


Published: Dec 19, 2018 01:44 pm