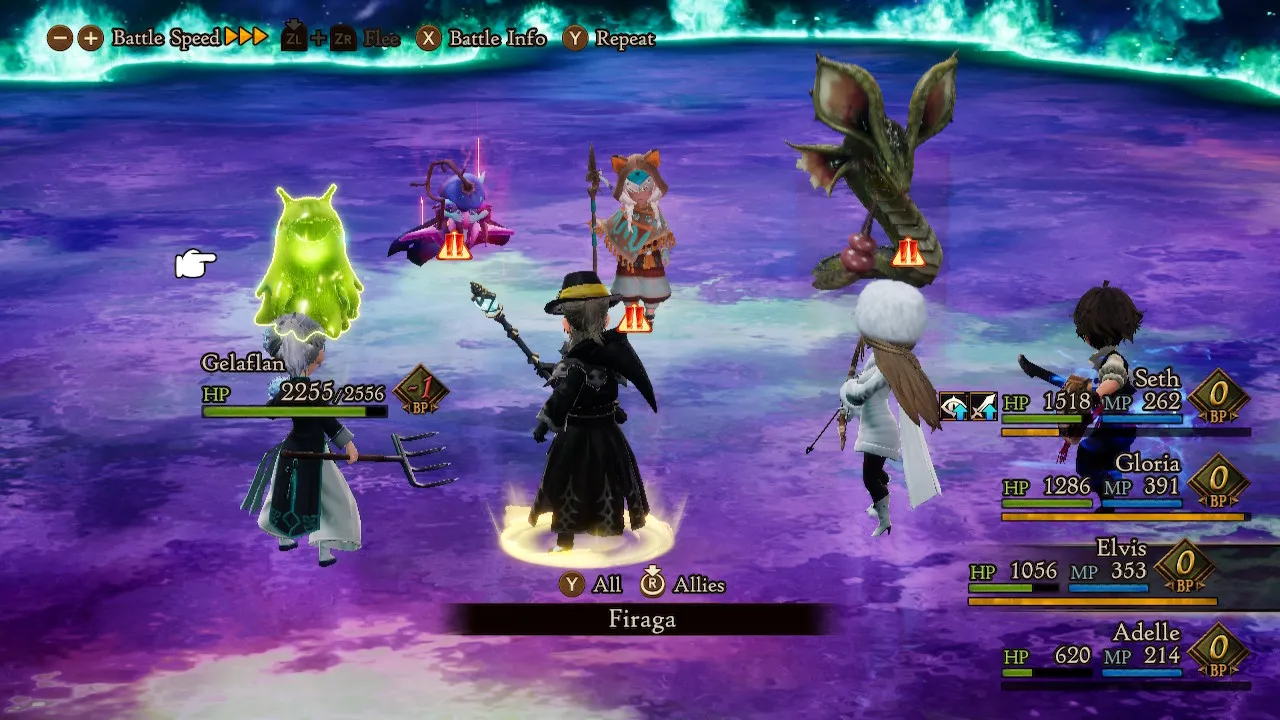
In Bravely Default 2, your characters can gain and equip magical Asterisks to learn talents from up to 24 widely varying jobs. You can use these to customize your party, specialize it for specific fights, set yourself up for more efficient farming, or simply give every character a different funny hat. There are a lot of options here, and some let you configure your party in ways that can potentially break the game over your knee.
Of the 24 jobs in the game, 21 are obtained over the course of a typical run. Two more are found through optional challenges in Chapters 1 and 3, and a third is tied to incredibly spoiler-laden endgame activities.
Here’s what to look for on your way through the game, as well as some tips to make your trip through BD2 a little easier. Note that there are small spoilers throughout this guide, mostly dealing with the sources of any given Asterisk.
Working Jobs for a Living
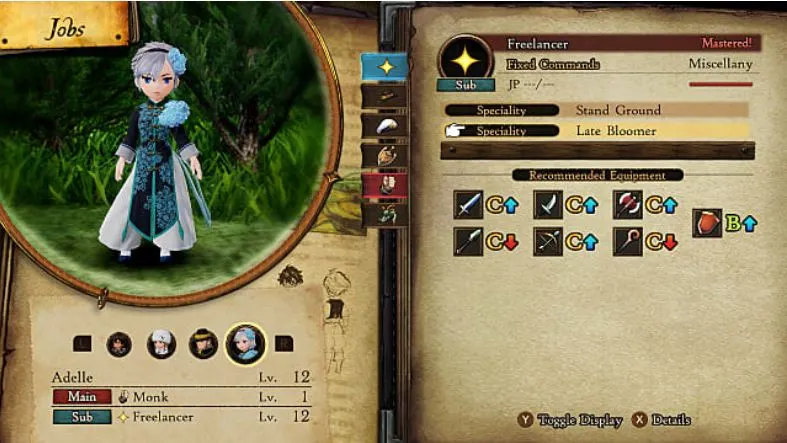
Each of your four main party members can equip a Main Job, which changes their character model, and a Sub-Job. The Main Job is the only one that can earn Job Points towards its next skill, while the Sub-Job gives you access to its job’s particular skill menu.
For example, if a character is currently running Monk/Freelancer, they use the Monk character model and earn JP towards Monk abilities. Their two fixed commands will be Martial Arts, from the Monk, and Miscellany, from the Freelancer.
This sets you up for the real meat of the system: using one job’s abilities with another job’s specialties to unleash new attacks. There are hundreds of potentially lethal combinations, and you’ll want to experiment to find them all.
It’s also worth noting that despite how the rest of the system works, passive abilities learned from various careers are not linked to those jobs. You don’t have to be running White Mage in either job slot to equip Solar-Powered.
Each job also has two Specialties, trademark passive abilities, that are granted at levels 1 and 12 of the job. They’re only active when a character has that as their Main Job.
Grindhouse
JP grinding is undeniably a part of Bravely Default 2, but it’s not quite as bad as you might expect. We even have some early game tips for farming.
The starting “generic” job, Freelancer, gains passive abilities that boost JP at level 9 and 12. While that first run up to job mastery can take a bit, you can equip both abilities after that point for a 170% multiplier to all earned JP. The game isn’t particularly stingy with JP to begin with, so the double bonus from Freelancer mastery can carry you a long way by the time you’re in Chapter 2 or 3.

As noted in our tips and tricks guide, you should also get into the habit of sending a boat out at the Exploration shop in every major town.
Whenever your Switch is in sleep mode, your boat will be on the prowl, looking for treasure, and can bring back Experience and JP Orbs that smooth out the course of leveling. For best results, leave your Switch in sleep mode for at least 12 hours between play sessions. (Use this time to sleep and eat. Health is important.)

The game also features a mechanic where you can fight successive battles, by herding overworld mobs together before you attack one or using Bait items to summon waves of monsters.
If you do that, you receive increasingly attractive multipliers to your final JP score for the fight. It can be particularly useful once you’ve out-leveled a given dungeon, since monsters that run straight away from you can be easy to herd into blind corners.
Weapon Proficiency
You’ve seen the graded ranks that each job has with every weapon type in the game, but aside from heavily influencing what you do and don’t equip, BD2 never tells you what they mean.
At time of writing, the best guess fans have is this: a character who equips a weapon gets that weapon’s bonus stats in an amount determined by the character’s current weapon proficiency.
- S: 135%
- A: 120%
- B: 100%
- C: 90%
- D: 80%
- E: 70%
While there are a couple of other mild incentives scattered throughout the skill list for certain jobs to use certain weapons — Vanguards want to have shields equipped, Beastmasters have an ability that doesn’t work without a spear — the proficiency bonus is a major factor.
General Notes on Jobs
Effects that work by adding a temporary modifier to a target’s stats, such as Protect, Shell, or Bards’ Singing, stack but cannot increase a stat beyond 200% of its base level. A single casting of one buff spell has a negligible effect, but a few in a row can change the tide of a fight.
Similarly, any debuffs that decrease a specific stat, such as Defang, cannot reduce a stat below 65% of its base value.
The first five Job levels get an Underdog Bonus to any earned JP in an appropriately challenging fight, i.e. any random encounter where the monsters didn’t run away from you. It’s not a bad idea to use a new dungeon as a job leveling field.
Every job in the game is initially capped at Level 12, but there’s a special challenge in Chapter 6 (massive spoilers) that raises it to Level 15.
Freelancer
Jack of all trades, master of none. While a low-level Freelancer is a weak combatant with a few useful utility skills, you eventually learn some of the most practical active abilities in the game.
Body Slam is a hard hitter that can drop a lot of same-level monsters in one shot, and Square One is an offensive dispel that makes many fights much easier. Early on, a Freelancer’s Treat ability is a good way to keep MP topped off for Black Mages and other fast-burning offensive casters.
Most importantly, at Level 12, a Freelancer provides a character with passive abilities worth a handy 1.7x boost to all JP earned. It takes up a total of 3 ability slots, so you’ll want to do some juggling before boss fights, but the extra JP adds up quickly.
It’s worth spending the extra time and/or JP Orbs in the first couple of chapters to make sure all of your characters have the Freelancer job up to at least Level 9.
- How to Get: Automatically given at the start of the game.
- Fixed Commands: Miscellany
- Specialty (Lv. 1): Stand Ground
- The Freelancer has a 50% chance of surviving a fatal injury with 1 HP, although it won’t kick in if they have 1 HP already.
- Specialty (Lv. 12): Late Bloomer
- The Freelancer receives +100 HP, +10 MP, +15 physical attack/physical defense/magical attack/magical defense, +4 restorative power, +2 speed, +3 aim, +2 evasion, and +1 critical strike for every other job the character has at Level 12 or higher.
- Weapon Proficiency: B with shields, C with everything else.
Abilities Acquired
- Lv. 1: Examine. Reveals a single target’s HP, weaknesses, and monster family. It’s free, but Magnifying Glasses exist and are cheap at item shops.
- Lv. 2: Treat. For 20 MP, restore 20% of a target’s HP and 10% MP. At points, it’s also possible for a character who Treats him- or herself to get more than 20 MP for the exchange.
- Lv. 3: Divining Rod. Displays the number of unopened treasure chests in an area in the bottom-right corner of the screen.
- Lv. 4: Forage. A free active command that makes a character scrounge for items mid-fight. It usually gives a free consumable item, from Antidotes or Echo Herbs, but can give Experience or JP Orbs at high job levels.
- Lv. 5: Dungeon Master. Equip this to nullify all terrain-inflicted damage for one character.
- Lv. 6: Lucky Charm. For 15 MP, boost the target character’s luck stat for five turns.
- Lv. 7: Self-Healing. Automatically cures poison, blindness, and silence when a fight ends.
- Lv. 8: Purge. For 20 MP, remove berserk, confusion, dread, charm, and doom from one target. This is one of the only methods in the game to remove doom, which can be a real pain in the neck in a few places.
- Lv. 9: JP Up. Equip this ability to multiply all earned JP by 1.2, including points from Orbs.
- Lv. 10: Square One. For 28 MP, remove status effects from a target. While this removes everything, including any inflicted status ailments, there are certain fights where it’s a must-have.
- Lv. 11: Body Slam. For 1 Brave Point, deal physical damage to a target based on the user’s encumbrance and delay the target’s turn. The higher the user’s Weight, the more damage this does, but keep a character’s aim stat up to avoid wasting turns.
- Lv. 12: JP Up and Up. For two ability slots, this multiplies all earned JP by 1.5, including points from Orbs. This stacks additively with JP Up.
- Lv. 13: ???
- Lv. 14: ???
- Lv. 15: ???
Job Combinations
A heavily-armored Vanguard or Shieldmaster can do a lot of damage with Body Slam. It’s one of the strongest single-target physical attacks in the early game, and isn’t outshone until you unlock a Monk’s Pressure Point.
Because of how difficult it is to remove doom/dread otherwise, having Freelancer as a sub-job is useful for your designated healer.
Black Mage
Your basic, no-frills offensive caster, the Black Mage is your first and best bet for exploiting fire, thunder, or water weaknesses. Its other benefit is its suite of useful regenerative abilities. Aspir Attack is a boon to many classes.
Unlike many other RPGs, Bravely Default 2 governs attack and healing magic with separate stats. A White Mage using Black Magic, or vice versa, won’t be particularly effective unless you compensate with appropriate gear.
While there are benefits to combining Black and White Magic on one character, like huge amounts of passive MP regeneration, a caster in BD2 is generally better off staying in their lane.
- How to Get: Felix has this equipped when he joins the party.
- Fixed Commands: Black Magic
- Specialty (Lv. 1): Regenerative Default.
- A Black Mage recovers a little MP whenever they use the Default command.
- Specialty (Lv. 12): High-Velocity Spells.
- The Black Mage’s attack spells can’t be nullified or absorbed. They can still deal half damage or get reflected.
- Weapon Proficiency: S with staves, B with daggers, C with shields, D or lower with anything else.
Abilities Acquired
- Lv. 1: Fire. A weak fire-based attack spell for 15 MP.
- Lv. 2: Blizzard. A weak water-based attack spell for 15 MP.
- Lv. 3: Thunder. A weak lightning-based attack spell for 15 MP.
- Lv. 4: Poison. Inflicts poison status on a single target. Like most other status ailments, this has a reasonably high base chance to not affect any target.
- Lv. 5: Lunar-Powered. When equipped, while adventuring at night, the character regenerates 4% MP on each turn at the end of their last action, unless that action ended the fight. They also receive bonuses to magical attack, evasion, and luck stats.
- Lv. 6: Fira. A medium-strength fire-based attack spell for 38 MP.
- Lv. 7: Blizzara. A medium-strength water-based attack spell for 38 MP.
- Lv. 8: Thundara. A medium-strength lightning-based attack spell for 38 MP.
- Lv. 9: Aspir Attack. When equipped, the Black Mage’s standard attack restores a small amount of MP, determined by the damage inflicted.
- Lv. 10: Firaga. A maximum-strength fire-based attack spell for 66 MP.
- Lv. 11: Blizzaga. A maximum-strength water-based attack spell for 66 MP.
- Lv. 12: Thundaga. A maximum-strength lightning-based attack spell for 66 MP.
- Lv. 13: ???
- Lv. 14: ???
- Lv. 15: ???
Job Combinations
Lunar-Powered and Aspir Attack are both worth learning for jobs that burn a lot of MP, such as Rangers or Vanguards. Many dungeons seem to be set in nighttime regardless of when you entered, which makes Lunar-Powered a slam pick.
White Mage
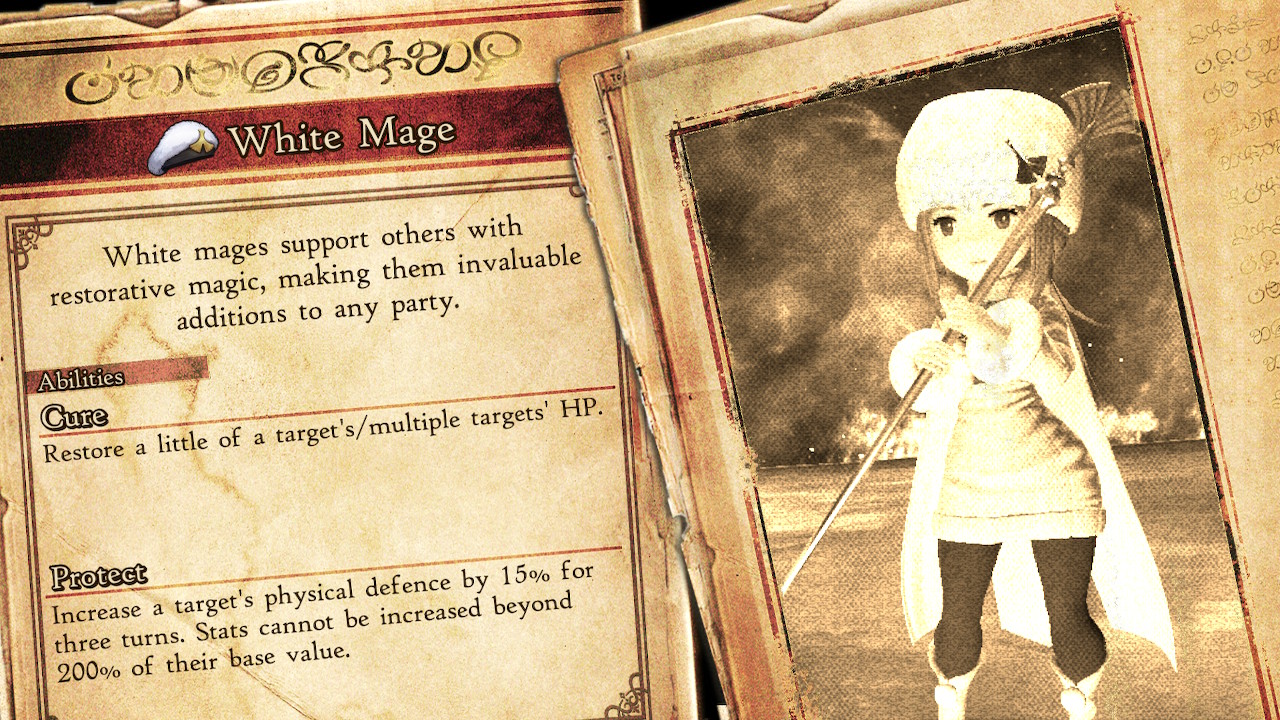
The opposite of Black Mages, White Mages have no offensive punch to speak of. They’re here to restore HP, remove status ailments, and cast buffs like Protect and Shell. Thanks to Angelic Ward, they’re also tankier than they might initially appear.
As noted above, Bravely Default 2 is one of the rare games that treats magical attack and restorative power as separate stats. A White Mage will never be a great offensive caster, even with Black or Red Mage as their Sub-Job.
BD2 also uses the old-school Final Fantasy undead rules. Spells that restore, steal, or regenerate health have the opposite effect on enemies with the Undead classification, so your designated healer turns into a murder machine when undead are on the field. Conversely, this also means that hitting an undead enemy with Drain Attack equipped can be counterproductive.
Better Than Ever is a weird ability that, with a little babysitting, can be incredibly effective. It only works if it heals a target to full; you can’t spam Cure spells on a healthy target to inflate a character’s health pool. You can do something like remove and equip accessories that boost HP before a fight, though, then open with a Benediction-boosted Curaga or a White Mage’s Special Attack and effectively double a target’s HP.
- How to Get: Defeat Selene in the Prologue.
- Fixed Commands: White Magic
- Specialty (Lv. 1): Angelic Ward.
- Any incoming damage has a 30% chance of being reduced by half.
- Specialty (Lv. 12): Holistic Medicine.
- Any helpful spell the White Mage casts automatically affects the entire party. This is the only method, outside of Special Attacks, to cure more than one target of status ailments at once.
- Weapon Proficencies: A with staffs, B with spears, bows, and shields, D or lower with everything else. A White Mage makes a decent designated archer until you can find the Ranger Asterisk.
Abilities Acquired
- Lv. 1: Cure. For 8 MP, restore a little HP to one target/the party.
- Lv. 2: Protect. For 11 MP, increase a target’s physical defense by 15% for three turns.
- Lv. 3: Shell. For 13 MP, increase a target’s magical defense by 15% for three turns.
- Lv. 4: Raise. Revive a KO’d party member and restore minimal HP.
- Lv. 5: Solar-Powered. The White Mage is empowered during the day, receiving boosts to aim, luck, and restorative power. They also regenerate 4% MP at the end of their combat turn, unless their action ends the fight.
- Lv. 6: Cura. For 28 MP, restore some HP to one target/the party.
- Lv. 7: Benediction. Take 15% of the caster’s max HP in damage to raise restorative power by 30% for three turns. A solid use of BP when you’re in a jam.
- Lv. 8: Basuna. For 22 MP, cure most status ailments on a single target.
- Lv. 9: Drain Attack. The White Mage’s basic Attack command heals the user for a small percentage of the damage inflicted.
- Lv. 10: Arise. For 95 MP(!), revive a KO’d party member with full HP.
- Lv. 11: Better Than Ever. A character who the White Mage heals to full HP gains the remainder of the restored amount as temporary HP. “Overheals” can come in very handy.
- Lv. 12: Curaga. For 60 MP, restore a significant number of HP to one target/the party.
- Lv. 13: ???
- Lv. 14: ???
- Lv. 15: ???
Job Combinations
Drain Attack can help physical-damage “glass cannons” like the Ranger and Berserker stay alive in the field.
Using Curaga with Better Than Ever can defray the high HP costs of some powerful skills, such as Flames of War, Flying Heel Drop, and Level Slash.
Solar-Powered is a boon to any class that depends on MP, and many dungeons seem to count as being set in the daytime.
Vanguard

You may not appreciate the Vanguard immediately, but the job comes into its own quickly in Chapter 1. Early on, it’s a tanky physical damage dealer with a couple of useful Earth-based skills, but Aggravate and Enrage make it shine.
It’s incredibly useful, particularly in boss fights, to control or at least strongly influence who’s getting attacked. It takes some of the randomness out of fights, and prevents your defensive casters from getting shellacked. It gets less useful in the late game as other jobs improve on its model, but the Vanguard will get you through to mid-game.
The Vanguard is relatively slow, although not as slow as the Shieldmaster, and burns MP quickly. Shield Bash and Stun can push off a target’s turns, but both skills’ HP cost can be a problem.
- How to Get: Defeat Dag in the prologue.
- Fixed Commands: Heroics
- Specialty (Lv. 1): Shield-Bearer.
- Equipping a shield doesn’t inflict speed, aim, or evasion penalties.
- Specialty (Lv. 2): Attention Seeker.
- Physical attack power and critical chance receive a bonus based upon the user’s chance of being targeted.
- Weapon Proficiency: S with axes, A with sword and shield, B with spears.
Abilities Acquired
- Lv. 1: Cross Cut. For 18 MP, hit a target with two attacks in a row.
- Lv. 2: Shield Bash. For 10% max HP, hit a single target with an Earth-type attack that delays their next combat turn.
- Lv. 3: Defang. For 12 MP, damage a target and reduce its physical attack by 7% for the next three turns.
- Lv. 4: Skull Bash. For 12 MP, damage a target and reduce its magical attack by 7% for the next three turns.
- Lv. 5: Pain into Gain. Any damage inflicted against the Vanguard while they aren’t Defaulting has a 30% chance of enhancing their physical attack by 1-3% for the rest of the current battle.
- Lv. 6: Aggravate. For the next three turns, the Vanguard’s chance of being targeted by enemy attacks goes up by 25%.
- Lv. 7: Sword of Stone. This is mostly useful for being one of the first Earth attacks you learn.
- Lv. 8: Shield Stun. For 25% max. HP, hit a target with your shield to greatly delay their next turn.
- Lv. 9: Defensive Offense. A character who uses the Attack command will receive 30% less damage from all incoming attacks until their next turn.
- Lv. 10: Enrage. For 24 MP, a single target’s next two attacks must be against the Vanguard. This always works, but doesn’t keep an opponent from doing something besides offense, such as Defaulting.
- Lv. 11: The Gift of Courage. The Vanguard gives a BP to another character. Note that you can go into BP hock to do this, but you can’t use Gift of Courage to bring a character out of BP debt early.
- Lv. 12: Neo Cross Slash. An expensive but effective two-hit physical attack, like Cross Cut but better. The 54 MP starting cost is steep, but it’s usually worth it.
- Lv. 13: ???
- Lv. 14: ???
- Lv. 15: ???
Job Combinations
Defensive Offense is useful for turning glass cannons into normal cannons. Otherwise-fragile damage dealers like the Ranger get a big survivability boost from this; conversely, jobs like the White Mage often won’t get much out of it.
The Vanguard/Shieldmaster combination takes a few turns to set up but creates a heavily-armored tank that intercepts incoming attacks and reflects half the damage to the enemy responsible. With Reprisal, Defender of the People, Pain and Gain, Enrage, and Aggravate, you’re a (slow-moving) death porcupine.
Monk
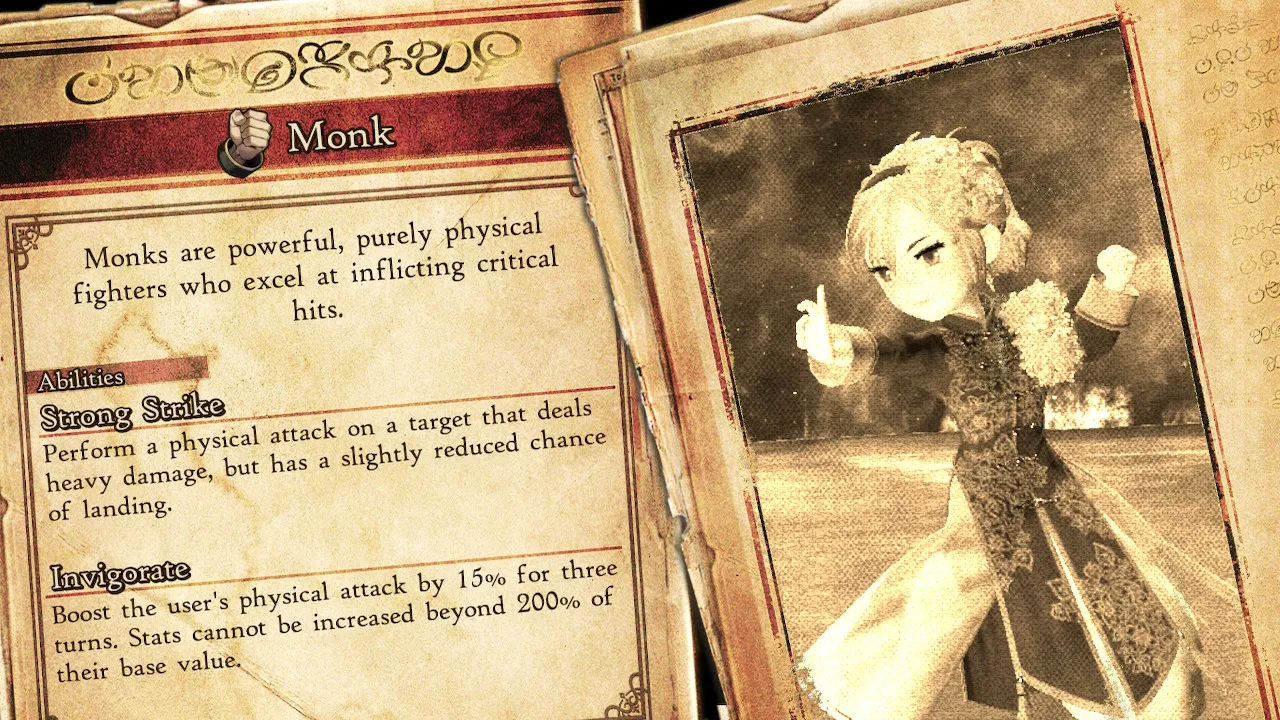
The Monk has some of the best HP progression in the game, and Bare-Knuckle Brawler boosts their attack power and free aim rating when fighting bare-handed.
The drawback is that a lot of the Monk’s best attacks, such as Flames of War, cost an increasingly significant fraction of max. HP, so it’s easy for a Monk to die. On the other hand, with Inner Alchemy and Mindfulness, the Monk is surprisingly self-sufficient.
Pressure Point is one of the best attacks in the game; it bypasses both high defense stats and the Default status. Focal Blast is expensive, and its stat debuff is random, but has similar utility. There are several fights, like Galahad’s demonic sidekick in Chapter 2, where Monks are your only realistic offensive option.
- How to Get: Defeat Prime Minister Horten in the Prologue.
- Fixed Commands: Martial Arts
- Specialty (Lv. 1): Concentration.
- Casting Invigorate, Inner Alchemy, or Mindfulness gives the Monk a stacking bonus to critical strike chance that lasts for the entirety of the current battle.
- Specialty (Lv. 2): Single-Minded.
- The Monk is immune to berserk, confusion, and charm, and using Martial Arts commands or Default speeds up the Monk’s next turn.
- Weapon Proficiencies: While it’s usually most effective to roll with Bare-Knuckle Brawler and fight unarmed, monks are A with staves and B with spears.
Abilities Acquired
- Lv. 1: Strong Strike. For 18% max HP, perform a high-damage physical attack.
- Lv. 2: Inner Alchemy. For 20 MP, restore 20% of the user’s HP and cure poison, blindness, and slow.
- Lv. 3: Bare-Knuckle Brawler. Boost the Monk’s physical attack by 80% and aim by 30% when both hands are empty.
- Lv. 4: Firebird. For 15% max HP, hit a single target with a fire-based attack which also reduces their fire resistance for the next two turns.
- Lv. 5: Qigong Wave. For 20% HP, launch an attack that ignores Default.
- Lv. 6: Mindfulness. For 1 BP, restore 15% MP and cure silence, dread, and contagion.
- Lv. 7: Flying Heel Drop. For 30% HP, perform a single-target physical attack.
- Lv. 8: Invigorate. For 20 MP, boost the Monk’s physical attack by 15% for the next three turns.
- Lv. 9: Tortoise Kick. For 10% HP, damage a target and delay its next turn.
- Lv. 10: Flames of War. For 35% HP, nuke a single target with fire-based damage until they glow.
- Lv. 11: Pressure Point. For 1 BP, hit a single target with a powerful physical strike that ignores physical defense/Default status. A really good way to deal with some otherwise annoying enemies.
- Lv. 12: Focal Blast. For 99 MP, nuke a single target with a physical attack and debuff it with a 20% loss to a random stat for the next four turns.
- Lv. 13: ???
- Lv. 14: ???
- Lv. 15: ???
Job Combinations
The 1-BP cost is killer, but Mindfulness is an easy way to give inefficient jobs like the Ranger some MP regeneration.
Firebird pairs well with a Black Mage’s attack spells.
A White Mage with Better Than Ever can defray the HP cost of the Monk’s better skills.
Bard

Indisputably the best “buff bot”, the Bard’s assortment of stat-boosting songs are a genuine asset in longer fights. It’s never a bad idea to have one when you’re about to take on a boss.
The unfortunate trade-off is that the Bard also has a high chance of being attacked. It’s best to pair them with a Shieldmaster or Vanguard for bodyguard purposes. The Bard also doesn’t have any offensive utility to speak of until Scream It Out.
- How to Get: Defeat Orpheus in Chapter 1.
- Fixed Commands: Singing
- Specialty (Lv. 1): Extended Outro.
- All Singing abilities last one round longer.
- Specialty (Lv. 12): Encore.
- Whenever the Bard sings, there’s a 25% chance that an additional song’s effect will kick in.
- Weapon Proficiency: B with bows, daggers, or staffs; C with shields.
Abilities Acquired
- Lv. 1: Don’t Let ‘Em Get to You. Spend 20 MP to reduce physical damage inflicted to the party by 15% for three turns.
- Lv. 2: Don’t Let ‘Em Trick You. Spend 20 MP to reduce magical damage inflicted to the party by 15% for three turns.
- Lv. 3: Step into the Spotlight. Spend 20 MP to increase a single target’s enemy attack chance by 20% for three turns. Use on your first turn to decoy enemies onto the tank.
- Lv. 4: Close Those Tired Eyes. For 12 MP, tries to inflict sleep on a single target.
- Lv. 5: Born Entertainer. Both Singing and Artistry abilities’ effects are increased by a percentage equal to the user’s level x15.
- Lv. 6: (Won’t) Be Missing You. Spend 18 MP to increase multiple targets’ aim rating by 5% for three turns.
- Lv. 7: Right Through Your Fingers. Spend 18 MP to increase the party’s evasion by 5% for three turns.
- Lv. 8: Hurts So Bad. For 38 MP, increase physical damage inflicted by multiple targets by 15% for three turns.
- Lv. 9: Work Your Magic. For 38 MP, increase magical damage inflicted by multiple targets by 15% for three turns.
- Lv. 10: All Killer No Filler. For 60 MP, increase the party’s critical hit chance by 15% for two turns.
- Lv. 11: Screamin’ It Out. For 54 MP, blast the entire enemy party with a typeless magical attack.
- Lv. 12: Shut Up and Dance. For 194 MP, force a target to act immediately after the user. This can’t force a character at negative BP to take an action, but it can speed up the rate at which they’re ready to act again.
- Lv. 13: ???
- Lv. 14: ???
- Lv. 15: ???
Job Combinations
The big thing holding a Bard back is its high enemy attack chance, so its utility is cut by its tendency to draw fire. Since Singing doesn’t draw on a specific stat, you can throw it on a heavily-armored character like a Shieldmaster to create the ultimate defensive fortress. Losing Extended Outro is a problem, but you can equip Born Entertainer to shore that up.
Jobs with high magical attack can do a lot of damage with Screamin’ It Out, which is useful for clearing out the riff-raff in random encounters.
Beastmaster
The “blue mage” of Bravely Default 2, the Beastmaster’s gimmick is ostensibly building a massive arsenal of captured monsters that can be unleashed in combat for a single move. This is a much easier proposition at higher levels with Beast Whisperer, when you can set-and-forget a talent rather than having to systematically capture enemies in every random encounter.
The real purpose of the Beastmaster, however, is breaking the game over your knee. Its second Specialty allows you to generate increasingly ridiculous stat bonuses for your character as you accumulate more monsters. In the endgame, the stat gains from Creature Comforts outshine much of what’s otherwise available to you.
Until that point, however, it’s worth noting that individual monsters’ abilities can be tactically significant or just hit like a freight train, which makes the Beastmaster a limited but potentially devastating member of the party.
Two particularly useful monsters to watch out for are Slepnir, which uses Acid Breath to inflict massive damage and a big defensive reduction on the entire enemy party, and Plague, which lets you attack a target’s MP directly with Soul Crush. The latter can be a game-changer against bosses, allowing you to wreck somebody who’d otherwise be an offensive powerhouse by crippling their ability rotation.
The Beastmaster also has high defense/magical defense growth, which makes it a solid pick for a tank.
- How to Get: Defeat Anihal.
- Fixed Commands: Taming
- Specialty (Lv. 1): Animal Rescue.
- When your HP falls to 20% or less, one of your captured monsters at random is deployed against the enemy.
- Specialty (Lv. 12): Creature Comforts.
- All stats are increased by the current number of monsters your party has captured.
- Weapon Proficiency: A with spears and bows, B with shields, and C or D with everything else.
Abilities Acquired
- Lv. 1: Capture. Try to add a target monster to your collection. It works best against enemies with low HP, but it may take a couple of tries. Bosses and humans are immune.
- Lv. 2: Off the Leash. Use one of your monsters as if it were an item. The effect varies by monster.
- Lv. 3: Staggering Swipe. For 19 MP, damage a target and delay its next action. One of the few examples of a skill of its kind that doesn’t cost HP.
- Lv. 4: Muzzle. Spend 12 MP to try and silence the entire enemy party.
- Lv. 5: Mow Down. For 21 MP, hit the entire enemy party with a medium-strength physical attack.
- Lv. 6: Mercy Strike. Spend 11 MP and hit a target with a physical attack. This cannot reduce a target’s HP below 1, setting them up for easy capture.
- Lv. 7: Raw Power. Every use of the Brave command increases the character’s physical attack by 10% until the end of the turn.
- Lv. 8: Spearhead. The user will act first in battle when they have a spear equipped. Doesn’t work if you’re caught off-guard by an enemy mob.
- Lv. 9: Mercy Smash. Like Mercy Strike, but moreso; costs 35 MP, does more damage, cannot inflict a lethal blow.
- Lv. 10: MP Saver. A one-slot ability that reduces all MP costs by 20%.
- Lv. 11: Beast Whisperer. Get a 30% chance of capturing any monster you get the killing blow on.
- Lv. 12: Off the Chain. Dispatch a monster to “brutally savage” a single target. Costs 2 BP.
- Lv. 13: ???
- Lv. 14: ???
- Lv. 15: ???
Job Combinations
It’s a little low-key, but other spear-using jobs like the Vanguard can get some use out of Spearhead. Starting the fight by acting first means they can set up their defensive measures much faster. Every caster gets some mileage out of MP Saver, particularly the Ranger, Bard, and White Mage.
Raw Power is immensely dangerous in the hands of a Berserker, Monk, or other physical-damage specialist.
Muzzle is incredibly useful in the hands of a Phantom or other job that raises the chance that you can successfully inflict a status. Due to how BD2 handles enemy AI, a silenced opponent will waste actions on spells they can’t cast.
Thief
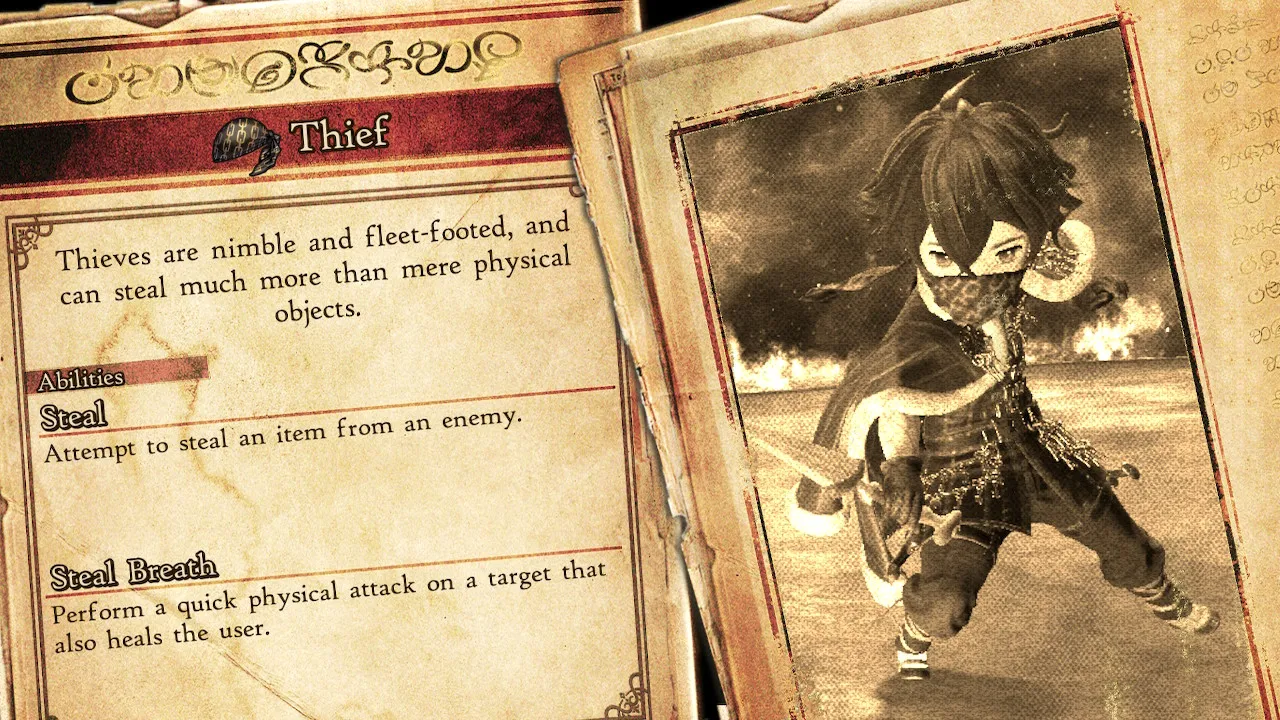
By itself, the Thief is useful for item farming and remarkably self-sustaining, but it struggles to hold up its end of a fight. With a healthy supply of damaging consumables (i.e. Bomb Fragments, Zeus’ Wrath, etc.) and the Attack Item Amp ability, a Thief can get some work done, but you’ll generally want to switch jobs if raw damage output is what you need.
Like a lot of jobs, however, Level 12 changes the game. Up to No Good gives a Thief a lot of potential damage output by relying on strong BP-cost skills like Pressure Point.
- How to Get: Defeat Bernard.
- Fixed Commands: Thievery
- Specialty (Lv. 1): Sleight of Hand.
- Any of your Stealing abilities that take stats, i.e. Spirit or Breath, can also strip a target of a beneficial effect and apply it to the Thief.
- Specialty (Lv. 12): Up to No Good.
- All Steal abilities’ costs are halved. Defaulting no longer generates BP, but all abilities that cost BP can be used by spending MP instead.
- Weapon Proficiency: A with daggers, B with swords, axes, bows, and staves. E with shields.
Abilities Acquired
- Lv. 1: Steal. Take your action to try and take an item from an enemy. Its success or failure seems to largely dependent on a character’s luck stat.
- Lv. 2: Steal Breath. Spend 27 MP to deal physical damage and heal the user by the same amount. Unlike similar effects from enemies, this can’t seem to steal more health than a target has.
- Lv. 3: Flee. Spend 20 MP to guarantee an escape, except for bosses.
- Lv. 4: Steal Spirit. Spend 15% HP to steal MP from a target.
- Lv. 5: Sky Slicer. Spend 1 BP to attack a target with a wind-imbued physical strike.
- Lv. 6: Steal Courage. Spend 2 BP to try and steal 1 BP from a target with a 50% success rate. Won’t reduce a target to less than zero BP.
- Lv. 7: Attack Item Amp. Damaging items inflict 50% more damage.
- Lv. 8: Mug. Attack command can steal items from a target.
- Lv. 9: Godspeed Strike. Spend 95 MP and attack a single target, with a bonus to attack power determined by the user’s speed. The target will take a little extra damage in a couple of turns.
- Lv. 10: Magpie. Gain a 25% chance of acquiring rare items when stealing.
- Lv. 11: You Snooze, You Lose. Spend 2 BP for a powerful physical attack that hits even harder against a sleeping target.
- Lv. 12: Rob Blind. Chance to get 2 items at once whenever you Steal.
- Lv. 13: ???
- Lv. 14: ???
- Lv. 15: ???
Job Combinations
A Berserker’s Indiscriminate Rage can be used in conjunction with Mug to let you Steal from entire enemy parties at once. Use Counter-Savvy and Magpie to improve your chances of survival and rare items, respectively.
Use a Freelancer’s Lucky Charm buff to amp the chance that Steal will succeed.
Since Steal Breath’s effectiveness is determined by the damage of an attack, you can use it with higher-damage jobs than the Thief to get a nice burst of self-healing. Just don’t use it on undead.
A Phantom’s Results Guaranteed specialty can raise the chance of a successful Steal to 100%, including a Steal Courage.
Combining Up to No Good with an ability with a BP cost, such as Pressure Point, turns a Thief into a damage powerhouse.
Gambler
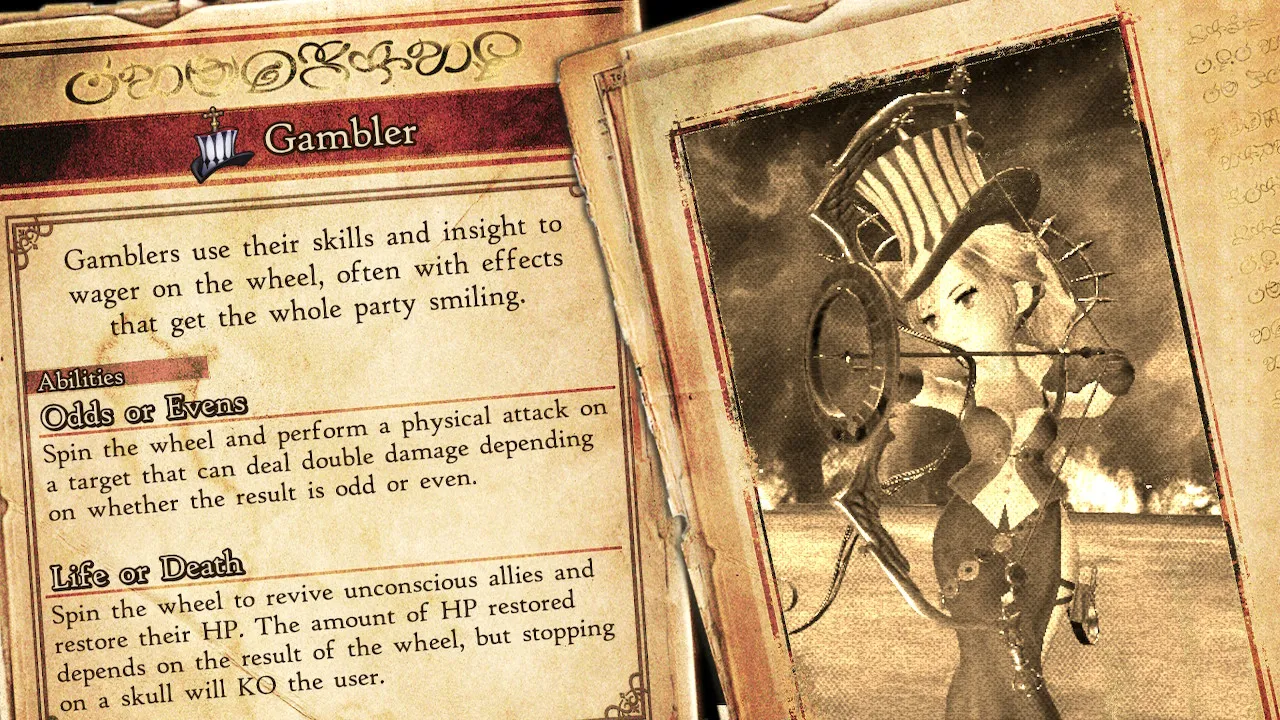
This is one of three optional jobs in the game, and can easily be missed if you never revisit Bernard’s gambling house in Savalon. It does require you to get into the B&D card game for a bit, as well as a tricky boss fight.
The job itself is a solid offensive magic-user with a number of abilities that cost money in exchange for admittedly impressive effects. You can burn stray BP on Spin the Wheel to gain regular infusions of pg, then cash out with High Roller to destroy an unwary target.
- How to Get: Complete side quest #24, Taking a Gamble, in Savalon.
- Fixed Commands: Gaming
- Specialty (Lv. 1): All or Nothing.
- Experience, JP, or pg earned after a fight will drop to zero, but every so often one of those currencies will be multiplied by 15.
- Ability (Lv. 12): Born Lucky.
- Roulette-based abilities get an extra slot, and abilities that can trigger extra effects (i.e. Shield Stun) are more likely to do so.
- Weapon Proficiency: A with bows, B with staves; not much else of use.
Abilities Acquired
- Lv. 1: Odds or Evens. Spend 200 pg to launch a physical attack against a single target that can randomly deal double damage.
- Lv. 2: Life or Death. Spend 666 pg to revive all KO’d party members and restore an amount of health based upon the wheel’s result. If you get a skull, the user gets KO’d instead.
- Lv. 3: Flash the Cash. Spend 50x user’s level pg to deal 130% that damage to a target. This bypasses defense and Default.
- Lv. 4: More Money. A one-slot passive ability that increases after-battle pg by 10% by every party member who has this equipped.
- Lv. 5: Spin the Wheel. Spend 1 BP to spin, and receive 77x the result in pg.
- Lv. 6: Elemental Wheel. Spend 300 pg to randomly attack a random number of targets with a random assortment of elemental effects.
- Lv. 7: Triples. Spend 500 pg to perform a single-target physical attack. This may inflict triple damage.
- Lv. 8: Night Shift. Non-roulette abilities can trigger extra effects are more likely to do so at night.
- Lv. 9: Bold Gambit. Spend 777 pg and spin the wheel. If it comes up 10, all allies or enemies may earn 3 BP.
- Lv. 10: Rare Talent. Receive a 10% increase of your chance for rare item drops for every party member who has Rare Talent equipped.
- Lv. 11: High Roller. Spend 10,000 pg to break somebody’s legs. This inflicts high physical damage to a single target.
- Lv. 12: Dealer’s Choice. Spend 1 BP to trigger an assortment of random effects.
- Lv. 13: ???
- Lv. 14: ???
- Lv. 15:???
Job Combinations
Equip a Berserker’s Free-for-All ability and send a Gambler Berserk for free attacks. This can waste a turn if the Berserk Gambler casts Flash the Cash, but you might also get a free High Roller.
Berserker
The Berserker comes along right when it starts to feel like the party could use a strong physical damage dealer. With an axe in hand, the Berserker can speed you through a lot of random encounters.
The real draw here is Unshakable Will, a one-slot ability that renders the user immune to any status ailment that causes a loss of player control, such as paralysis, confusion, sleep, and charm. (It doesn’t prevent anything that just makes life harder, though, such as blindness or silence.) It’s worth grinding every character up to Berserker level 9 as quickly as possible.
The Berserker’s physical attack stat goes up by 50% while berserk, but their physical defense drops by 30%. It’s worth noting, however, that Unshakable Will works just as well against Vent Fury’s berserk state as it does against an enemy’s attempt to inflict the status. If you try casting Vent Fury with Unshakeable Will equipped, you just waste the turn and the MP.
Obtain: Defeat Prince Castor.
Fixed Commands: Savagery
Specialty (Lv. 1): Pierce Default. The Berserker deals full damage to Defaulting targets.
Specialty (Lv. 12): Rage and Reason. The Berserker can pick actions freely half the time while berserk.
Weapon Proficiency: Axes at S, which means it’s not worth using anything else.
Abilities Acquired:
Lv. 1: Crescent Moon. For 1 BP, land a physical attack on the entire enemy party at once.
Lv. 2: Vent Fury. For 18 MP, the Berserker goes, well, berserk for three rounds, automatically attacking a random target for extra damage. Unshakable Will renders you immune to this.
Lv. 3: Double Damage. Spend 55 MP for a single big physical hit.
Lv. 4: Water Damage. Spend 32 MP for a single water-imbued physical attack.
Lv. 5: Bloody-Minded. A one-slot ability that makes it impossible for the user’s physical attacks to be dodged, but the Berserker takes damage from each attack. That backlash damage cannot reduce the Berserker’s HP below one.
Lv. 6: Free-for-All. Equip this ability and any abilities used while a character is berserk have no cost.
Lv. 7: Shell Split. For 16 MP, reduce a target’s physical defense by 5% for four turns.
Lv. 8: Scale Strip. For 18 MP, reduce a target’s magical defense by 5% for four turns.
Lv. 9: Unshakable Will. Equip this ability to grant a character immunity to sleep, paralysis, dread, berserk, confusion, charm, and freezing.
Lv. 10: Level Slash. Spend 30% of the Berserker’s maximum HP to deliver a powerful physical attack on all enemy targets.
Lv. 11: Indiscriminate Rage. Equip this ability and the user’s regular attacks hit the entire enemy team, but at the cost of a significant speed penalty.
Lv. 12: Amped Strike. Spend 120 MP to deliver a powerful physical single-target attack.
Lv. 13: ???
Lv. 14: ???
Lv. 15: ???
Job Combinations:
Basically everybody wants Unshakable Will. Starting in Chapter 2 when every rando in the overworld has an AoE that can cause paralysis, being able to set a one-point ability to ignore it is worth every second you spend on this.
Indiscriminate Rage has a few interesting possibilities. Thieves can use it with Mug to steal from entire enemy parties at once.
Red Mage
Being a jack-of-all-trades doesn’t tend to pay off for its own sake in Bravely Default II, and the Red Mage is no real exception. While the Red Mage gets a few genuinely useful spells, like easy ways to deal magical wind and earth damage, their low magical attack and MP growth hampers them from the jump. They do have some nice magic defense, though, and the fixed output of Heal spells makes them useful against undead opponents.
A designated caster will still want to spend some time as a Red Mage to pick up Magic Critical, and tanks may get some use out of Revenge, but all in all, this is one of the least interesting jobs in the game by itself.
The Nuisance Specialty lets the Red Mage tack on status ailments to elemental attack spells. Which ailments correspond to which element is determined by the following chart:
- Fire: berserk, doom
- Ice/water: freeze, poison
- Thunder: paralysis, confusion
- Wind: sleep, silence
- Earth: slow, stop
- Holy/light: blind, charm
- Dark: dread, contagion
Obviously, this isn’t anything you can depend upon. By default, status ailments have a very low chance to work when you use them, so on its own, Nuisance tends to be a footnote rather than a tactic.
If you employ the right combo abilities, though, things can get interesting. A lot of bosses in BD2 aren’t outright immune to status ailments, so if you use Results Guaranteed to raise the chance of paralyzing or silencing them, you can get away with murder.
Obtain: Defeat Roddy.
Fixed Commands: Red Magic
Specialty (Lv. 1): Nuisance. All attack spells cast by the Red Mage can also inflict a status ailment on their targets. See above.
Specialty (Lv. 12): Chainspell. All spells cast by the Red Mage are automatically cast twice at no additional cost.
Weapon Proficiency: Keep a sword (A) in a Red Mage’s hand. Failing that, they’ve got daggers, bows, and staves at B.
Abilities Acquired:
Lv. 1: Stone. For 15 MP, cast an earth-aligned spell against one or all targets.
Lv. 2: Aero. For 15 MP, cast a wind-aligned spell against one or all targets.
Lv. 3: Heal. Spend 14 MP to restore a flat 1000 HP to a single target.
Lv. 4: Stonera. For 38 MP, cast a powerful earth-aligned spell against one or all targets.
Lv. 5: Aerora. For 38 MP, cast a powerful wind-aligned spell against one or all targets.
Lv. 6: Healara. Spend 36 MP to restore 2000 HP to a single target.
Lv. 7: Magic Critical. A one-slot ability that enables magical attacks to have the chance to inflict critical hits.
Lv. 8: Revenge. Equip this 1-slot ability and the user has a 25% chance to gain 1 BP whenever they’re attacked.
Lv. 9: Healaga. Spend 49 MP to restore 3000 HP to a single target.
Lv. 10: Stonega. Spend 66 MP to cast a massive earth-aligned spell against one or all targets.
Lv. 11: Aeroga. Spend 66 MP to cast a massive wind-aligned spell against one or all targets.
Lv. 12: Disaster. Spend 100 MP to launch a powerful single-target earth/wind spell.
Lv. 13: ???
Lv. 14: ???
Lv. 15: ???
Job Combinations:
The Salve-Maker’s Status Conscious ability increases the chance for Nuisance to kick in. A surprising number of enemies, including bosses, are still vulnerable to paralysis, so this can give you a leg up in a tough spot.
Revenge is a useful ability for tank characters to have in their back pocket, particularly the Shieldmaster.
Ranger
A rare glass cannon that isn’t an offensive caster, the Ranger is an MP sponge that brings a lot of single-target damage to the table. Its arsenal of Slayer attacks lets you dish out heavy and consistent, if expensive, damage against a single target at a time. Since most of the bosses in the early game are human, having a Ranger along for the ride can help chew through a lot of HP pools.
The Ranger’s drawbacks include being a single-target specialist, low defense, no way to generate MP short of shotgunning Ethers, and low HP growth.
Obtain: Defeat Lily in Chapter 2. You’ll feel great about it.
Fixed Commands: Hunting
Specialty (Lv. 1): Barrage. The more successive actions performed in a turn, the more damage the Ranger inflicts.
Specialty (Lv. 12): Apex Predator. You gain one BP every time you inflict a critical hit or a killing blow with one of your Slayer abilities.
Weapon Proficiency: As most of the job’s abilities suggest, you’re “supposed” to use a bow (S) with the Ranger. They aren’t half bad with daggers, though.
Abilities Acquired:
Lv. 1: Bug Slayer. Spend 28 MP to perform a physical attack on a target, which will do extra damage against Insects.
Lv. 2: Plant Slayer. Spend 28 MP to perform a physical attack on a target, which will do extra damage against Plants.
Lv. 3: Shadowbind. Spend 14 MP to attempt to paralyze a single target.
Lv. 4: Beast Slayer. Spend 28 MP to perform a physical attack on a target, which will do extra damage against Beasts.
Lv. 5: Aquatic Slayer. Spend 28 MP to perform a physical attack on a target, which will do extra damage against Aquatic monsters.
Lv. 6: Counter-Savvy. Equip this ability and the character automatically evades physically-based counterattacks.
Lv. 7: Quickfire Flurry. Spend 7% of the character’s maximum HP to perform 5-8 physical attacks in a row. Paralyzed targets take extra damage.
Lv. 8: Humanoid Slayer. Spend 28 MP to perform a physical attack on a target, which will do extra damage against human opponents.
Lv. 9: Who Dares Wins. With this ability equipped, the character becomes immune to blindness and gains increased critical strike chance when they have 1 BP or higher.
Lv. 10: Sloth Hunter. Double-tap a single target with physical attacks. A slowed target takes significantly increased damage.
Lv. 11: Undead Slayer. Spend 28 MP to perform a physical attack on a target, which will do extra damage against Undead enemies.
Lv. 12: Demon Slayer. Spend 28 MP to perform a physical attack on a target, which will do extra damage against Demons.
Lv. 13: ???
Lv. 14: ???
Lv. 15: ???
Job Combinations:
A Black Mage’s Aspir Attack helps remedy the Ranger’s high MP consumption in the field.
Apex Predator works well with BP-hungry sub-jobs like the Monk, who can convert the free BP from Slayer kills into big Pressure Point damage.
None of the Slayer skills require a bow, so Ranger is a useful sub-job for any physical damage-dealer.
Shieldmaster
The Vanguard’s even slower older sibling. The Shieldmaster becomes very handy in the mid- to late game, replacing the Vanguard’s manipulation of enemy attacks with just straight-up leaping in front of people to take hits.
Obtain: Defeat Horatio.
Fixed Commands: Shieldcraft
Specialty (Lv. 1): Protect Ally. If a critically-injured party member comes under attack, the Shieldmaster automatically takes the hit for them, and suffers the damage as if they were Defaulting at the time. This doesn’t work if the Shieldmaster is paralyzed, asleep, stopped, or otherwise prevented from taking actions.
Specialty (Lv. 12): Chivalrous Spirit. The Shieldmaster regains a small amount of MP and generates 1 BP whenever they cast Protect Ally, Bodyguard, or Defender of the People.
Weapon Proficiency: S-rank with Shields, B with spears and axes.
Abilities Acquired:
Lv. 1: Bodyguard. When used, the Shieldmaster will automatically jump in front of the target ally to take incoming enemy attacks for them, suffering the damage as if the Shieldmaster was Defaulting.
Lv. 2: Dual Shields. With this ability active, a character can equip a shield in each hand, and gains a 100% bonus to their aim rating.
Lv. 3: Blinding Flash. Just like Horatio, spend 14 MP to try to inflict blindness on the entire enemy party.
Lv. 4: The Courage to Resist. With this ability equipped, Defaulting doesn’t generate BP, but removes all status ailments besides slow, stop, and doom.
Lv. 5: Crushed Ice. Spend 44 MP to deal a single-target physical attack. It does bonus damage against frozen targets.
Lv. 6: Reprisal. Spend 40 MP. For the next five turns, any opponent who attacks the character in any way will automatically suffer 50% of the damage they inflict.
Lv. 7: Defender of the People. Until the character’s next turn, they intercept up to three single-target attacks launched against the party.
Lv. 8: Heavy Hitter. Spend 1 BP to perform a single-target physical attack that deals damage according to whatever’s equipped in the character’s left hand. If it’s a shield, this can hurt.
Lv. 9: Bumblewhacker. Spend 44 MP to deal a single-target physical attack that deals bonus damage against a confused target.
Lv. 10: Fast Hands. This useful ability converts speed penalties from weapons or shields into speed bonuses.
Lv. 11: No Guts, No Glory. With this equipped, your physical/magical defense goes up as you accumulate BP, but lower if you go below zero BP.
Lv. 12: The Gift of Wisdom. Donate 33% of your maximum MP to a single target. If you’re at or below 33% MP and try to cast this, you’ll give away all the MP you have left.
Lv. 13: ???
Lv. 14: ???
Lv. 15: ???
Job Combinations:
As noted above with the Vanguard, the combination of it and the Shieldmaster can create a spiky death porcupine effect.
Reprisal’s backlash damage is typeless and goes right through enemy vulnerabilities. You can exploit it with high-HP, low-defense characters like the Monk to become a masochistic damage sponge.
—
That’s it for our Bravely Default 2 jobs guide for now. We’ll be updating this article with more information in the coming weeks, so be sure to bookmark it for easy use!


Published: Mar 15, 2021 03:56 am