One of the most iconic late-game monsters in the Monster Hunter series, Zinogre makes his triumphant return in Monster Hunter Rise. He still hits like a falling grand piano, is fond of applying paralysis and plenty of stun, and any first-time hunter will enjoy at least a few carts back to camp before they figure the sucker out.
This guide will cover all of Zinogre’s attacks, weaknesses, and what you get for taking him down.
How to Fight and Beat Zinogre in Monster Hunter Rise
The biggest tips we can give about fighting Zinogre are staying at his side and not overestimating how long his attacks take to land. The Mega Thunder Slam™ has a big windup, and even an un-buffed dodge has plenty of invincibility frames to avoid it, giving you ample opportunity for damage. If the slam hits, though, it can easily be a one-shot.
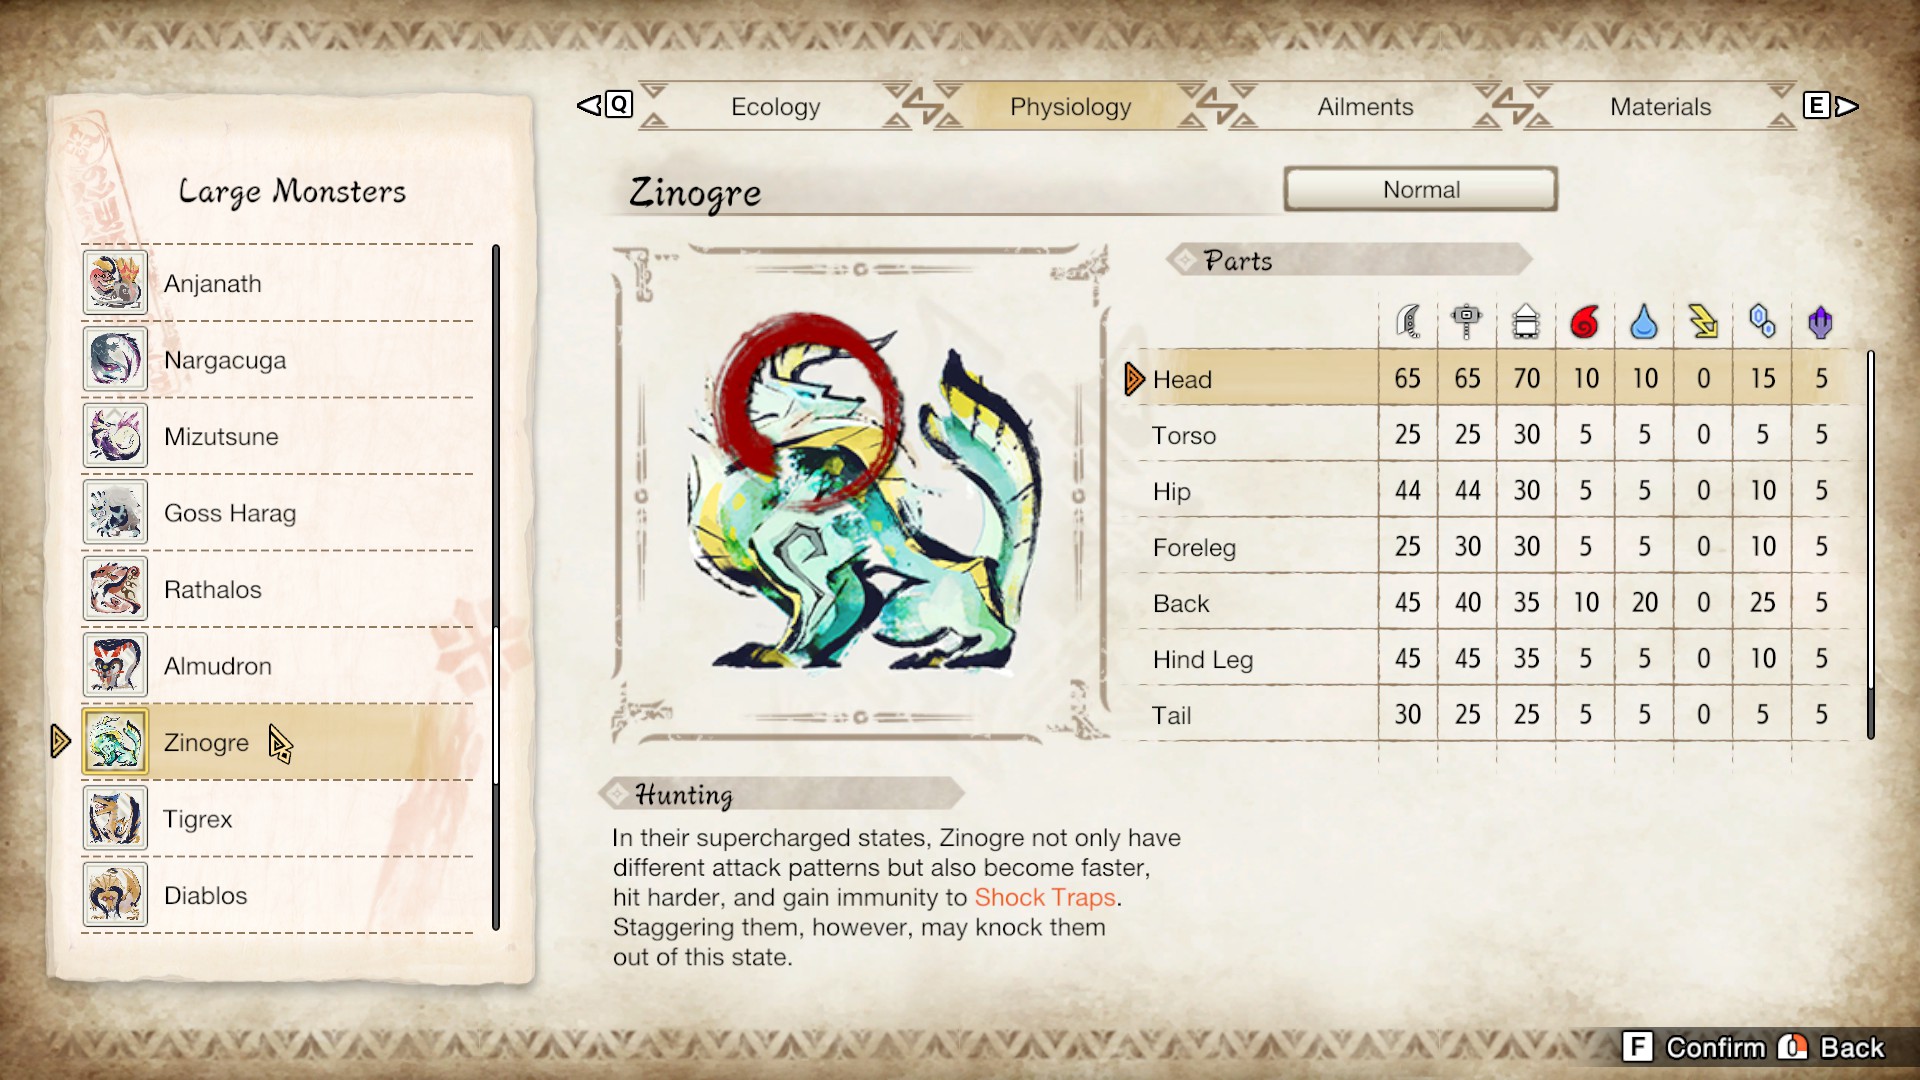
Zinogre is immune to Thunder damage, but both Blast and Iceblight are solid statuses to apply. Zinogre is weak to Ice attacks, but unlike Barioth or Volvidon, only his back has any significant vulnerability. Both Fire and Water are also good options, but given Zinogre’s place as a late-game powerhouse, neither is tremendously effective.
Oddly, Thunderblight isn’t off the table, but Zinogre cannot be paralyzed no matter how much you apply the effect. Blunt weapons are best, but there isn’t a ton of separation between the Hammer or something like the Greatsword or Longsword as far as resistances are concerned.
Zinogre’s Attacks in Monster Hunter Rise
Many of Zinogre’s attacks come out quickly but have a lot of recovery. He’s also incredibly mobile, using dodges and far-moving attacks to be anywhere but where you can damage him.
He also tends to string multiple moves together when enraged, meaning just because you avoided his first hit, there won’t be two-to-four other attacks afterward.
Zinogre Attack 1: Mega Thunder Slam™
This attack only comes out when Zinogre is enraged and his fur electrified, but it’s his most powerful move. He’ll start by charging you once or twice, then jump high. After about a second of hangtime, he’ll come slamming down in a massive explosion, shockwave, and burst of electricity.
This attack takes a lot out of Zinogre, and he’ll be lying in the crater for around six seconds before taking another two to get back on his feet. Dodging directly into the slam itself is risky, but if you’ve spec’d into Evade Window, you can roll through the hitbox and have that full eight or so seconds of damage time.
Zinogre Attack 2: Spinning Tail Slap
Zinogre will briefly curl up to gather strength, then spin 360 degrees, his tail extended. Avoiding this attack requires you to dodge directly into the tail swing or to be out of its way however possible. Blocking or using weapon abilities are good options as well.
Zinogre Attack 3: Tail Slap Lightning Ball
Usually reserved as a mid-range attack, Zinogre has two versions of this move: standard and enraged. The standard variant sees him jump backward and slam his tail down, sending out a single ball of lightning that travels in an arc toward you.
If he’s enraged, Zinogre sends out four lightning balls that travel outward in an expanding circle. Getting hit with any of them will send you flying, inflict Thunderblight, and deal heavy damage.
Zinogre Attack 4: Electric Roar
If he’s enraged or building up to it, Zinogre can let out an electrified roar that causes knockback and inflicts Thunderblight. Before the attack occurs, Zinogre will take a large breath with a specific animation. If he looks like he’s gathering air and electrical motes, dodge or otherwise move backward.
Zinogre Attack 5: Rearing Lunge
Zinogre gets back on his haunches and launches himself forward. Both the lunge and slam at its end have a hitbox, and while powerful, the lunge doesn’t travel very far. It also doesn’t have effective tracking, so you can either dodge to the side, use a weapon ability to block or avoid it, or simply run to the side.
Zinogre Attack 6: One-or-Two Slam, with or without Lightning
This attack is a simple slam with one of its foreclaws. If Zinogre isn’t enraged, it will only use a single hit, but he can slam twice while enraged. If his fur is empowered with lightning, there is a longer hitbox that also inflicts Thunderblight. Zinogre likes to use this attack as part of his combo strings, so be aware that it can appear when you least expect it.
Zinogre Attack 7: Butt Tail Slam
Zinogre only uses this attack if you’re directly behind him, and it looks like he’s more annoyed you’re there than him actually trying to properly attack. He’ll stand perfectly still and raise his tail, then slam it into the ground behind him the way a horse swishes its tail to swat away a fly. The attack does minimal damage (by Zinogre’s standards) and is easy to dodge or block.
Zinogre Attack 8: Shoulder Check
Another “get away from me” attack, Zinogre will briefly pull his shoulder back, then thrust it forward and send anything it hits flying several meters away. This attack has a huge hitbox, and when the windup is done, the attack comes out surprisingly fast, so it’s liable to hit you at least once, even if you see it coming.
Zinogre Attack 9: Tail Slam
A larger, far more damaging version of the butt slam mentioned above, Zinogre launches himself in the air and does a complete front flip. When he lands, his tail slams hard into the ground, dealing heavy damage and sending out a shockwave around the tail. This attack has good tracking, so don’t expect to avoid it easily.
Zinogre Attack 10: Charging Slam
Another attack with a big windup, Zinogre gets back on its haunches, charges forward, and slams down a good distance away. There’s not much tracking here, but its hitbox covers Zinogre’s whole body, from head to tail, so even if you’re above or to the side of him, if he so much as grazes you, expect to go flying. The hitbox also lingers until Zinogre comes to a complete stop, so be careful you don’t get clipped by the last few frames of the animation.
Zinogre Attack 11: Line of Lightning
The other purely elemental attack in Zinogre’s arsenal, he will raise his head in a howl, sending out a line of lightning directly in front of him. Dodging to either side of the line is easy enough, but if it does manage to catch you, you’ll be on your behind, afflicted with Thunderblight and without about half of your health bar.
Zinogre Rewards and Gear in Monster Hunter Rise
Both Low and High Rank Zinogre gear is great for progression, but the High-Rank gear is especially good, even into the endgame. Sadly, it won’t carry you into meta gear as the Elder Dragon equipment has exclusive perks and Charm slots to spare, but until you start taking on the likes of Teostra and Valstrax, Zinogre armor will be a good friend.
Low-Rank Zinogre Materials
![]()
- Zinogre Shell
- Target Rewards: 21%
- Capture Rewards: 15% (x2)
- Broken Part Rewards: –%
- Carves: 34% (Body), 17% (Tail)
- Dropped Material: 29% (x2), 50% (x1)
- Zinogre Shockfur
- Target Rewards: 31%
- Capture Rewards: 29%
- Broken Part Rewards: 30% (Back)
- Carves: 25% (Body)
- Dropped Material: –%
- Zinogre Shocker
- Target Rewards: 21%
- Capture Rewards: 25%
- Broken Part Rewards: 70% (Back), 10% (Foreleg)
- Carves: 18% (Body)
- Dropped Material: –%
- Zinogre Tail
- Target Rewards: 8%
- Capture Rewards: 12%
- Broken Part Rewards: –%
- Carves: 80% (Tail)
- Dropped Material: –%
- Fulgurbug
- Target Rewards: 17% (x2)
- Capture Rewards: –%
- Broken Part Rewards: –%
- Carves: –%
- Dropped Material: 20%
- Zinogre Plate
- Target Rewards: 2%
- Capture Rewards: 3%
- Broken Part Rewards: 3% (Both Horns)
- Carves: 1% (Body), 3% (Tail)
- Dropped Material: 1%
- Zinogre Horn
- Target Rewards: –%
- Capture Rewards: 16%
- Broken Part Rewards: 97% (Both Horns)
- Carves: –%
- Dropped Material: –%
- Zinogre Claw
- Target Rewards: –%
- Capture Rewards: –%
- Broken Part Rewards: 70% (x1) (Foreleg), 20% (x2) (Both Forelegs)
- Carves: 22% (Body)
- Dropped Material: 10%
- Wyvern Tear
- Target Rewards: –%
- Capture Rewards: –%
- Broken Part Rewards: –%
- Carves: –%
- Dropped Material: 50%
High-Rank Zinogre Materials
![]()
- Zinogre Carapace
- Target Rewards: 21%
- Capture Rewards: 15% (x2)
- Broken Part Rewards: –%
- Carves: 33% (Body), 10% (Tail)
- Dropped Material: 31% (x1) 49% (x1)
- Zinogre Electrofur
- Target Rewards: 33%
- Capture Rewards: 29%
- Broken Part Rewards: 30% (Back)
- Carves: 24% (Body)
- Dropped Material: 40%
- Zinogre Shocker+
- Target Rewards: 23%
- Capture Rewards: 25%
- Broken Part Rewards: 70% (Back), 10% (Foreleg)
- Carves: 17% (Body)
- Dropped Material: –%
- Zinogre Tail
- Target Rewards: 4%
- Capture Rewards: 7%
- Broken Part Rewards:–%
- Carves: 80% (Tail)
- Dropped Material: –%
- Fulgurbug
- Target Rewards: 12% (x3)
- Capture Rewards: –%
- Broken Part Rewards: –%
- Carves: –%
- Dropped Material: 15% (x2)
- Zinogre Plate
- Target Rewards: 5%
- Capture Rewards: 5%
- Broken Part Rewards: 7% (Both Horns)
- Carves: 3% (Body), 7% (Tail)
- Dropped Material: 3% (x1), 1% (x1)
- Zinogre Jasper
- Target Rewards: 2%
- Capture Rewards: 3%
- Broken Part Rewards: 3% (Both Horns)
- Carves: 1% (Body), 3% (Tail)
- Dropped Material: 1%
- Zinogre Horn+
- Target Rewards: –%
- Capture Rewards: 16%
- Broken Part Rewards: 90% (Both Horns)
- Carves: –%
- Dropped Material: –%
- Zinogre Claw+
- Target Rewards: –%
- Capture Rewards: –%
- Broken Part Rewards: 70% (x1) (Foreleg), 20% (x2) (Both Forelegs)
- Carves: 22% (Body)
- Dropped Material: 10%
- Wyvern Tear
- Target Rewards: –%
- Capture Rewards: –%
- Broken Part Rewards: –%
- Carves: –%
- Dropped Material: 15%
- Large Wyvern Tear
- Target Rewards: –%
- Capture Rewards: –%
- Broken Part Rewards: –%
- Carves: –%
- Dropped Material: 35%
Zinogre Armor Set Bonuses
Zinogre armor is all about boosting damage and stamina management, with a larger emphasis on damage. Most players will focus on the Helm and Mail, where the damage-focused skills live, but the other three pieces are usable in certain situations.
Low-Rank Zinogre Armor Skills
- Zinogre Helm: Latent Power x1 (Increase affinity after time in combat) Critical Eye x1 (Flat Affinity Increase)
- Zinogre Mail: Latent Power x1, Critical Eye x1
- Zinogre Braces: Constitution x1 (Decreases Stamina usage during block, dodge, etc.)
- Zinogre Coil: Latent Power x1
Zinogre Greaves: Constitution x2
High-Rank Zinogre Armor Skills
- Zinogre Helm S: Latent Power x1, Weakness Exploit x1 (Weak spot attacks dealing yellow damage numbers have increased affinity)
- Zinogre Mail S: Latent Power x1, Weakness Exploit x
- Zinogre Braces S: Latent Power x1, Constitution x1
- Zinogre Coil S: Latent Power x1
- Zinogre Greaves S: Latent Power x1, Constitution x2
That’s all you need to know about best boy Zinogre, as angry as he is majestic. For further help with Rise, check out our other Monster Hunter Rise guides here on GameSkinny.


Published: May 31, 2022 09:36 pm