
God of War Artifacts are strewn across the various regions of Midgard. These collectibles will help you complete Labors (in-game mini-quests), and they can be sold to vendors for money if you so choose.
There are 45 Artifacts to collect in God of War for PC and PS4. This locations guide will show you exactly where to find all of them. In my playthrough, I picked several Artifacts up before taking screenshots, but they will be in the places highlighted in the pictures below. Once you find them all, you will get the Curator trophy/achievement.
Click the links below to jump to specific sections:
All God of War Artifact Locations
Wildwoods: Lost and Found (4 Artifacts)
Lost and Found Artifact #1: Backyard
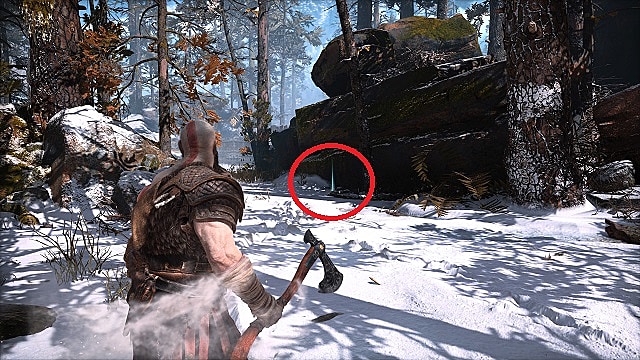
Right after you tell Atreus to begin hunting at the beginning of the game, he’ll set off toward a wooden gate in the back yard of your home. As you go toward it, you will pass between a rock and a cliff on the right-hand side of the area. Look against the cliff and you find will the first Artifact.

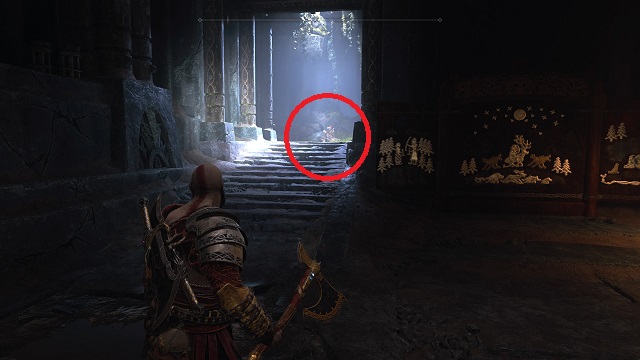
Lost and Found #2: First Set of Stone Stairs
Shortly after you pass through the wooden gate mentioned above, you’ll come to an area that has a set of stone stairs in it. The second Artifact can be found just to the left of the stairs. It’s in the open.
Lost and Found #3: Down the Chain by the Waterfall
Go up the stairs and cross the bridge. Here you’ll have your first battle. Defeat the Draugr and proceed forward toward the life stone in front of you. Take a right and climb the cliffs straight ahead (the waterfall will be on your left).
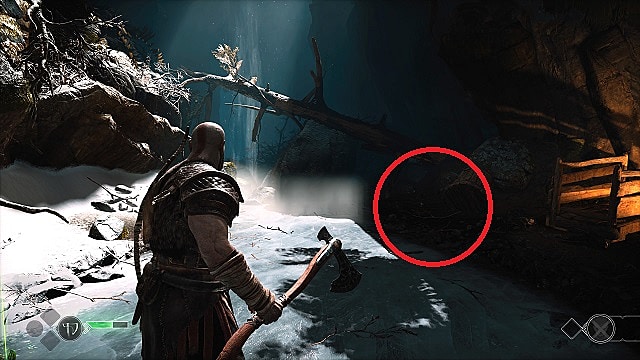
Once on top of the cliff, you’ll see a chain to your right. Climb down that and defeat the wolves below. Turn left and you’ll find this Artifact to the right of the fallen tree next to a bucket.
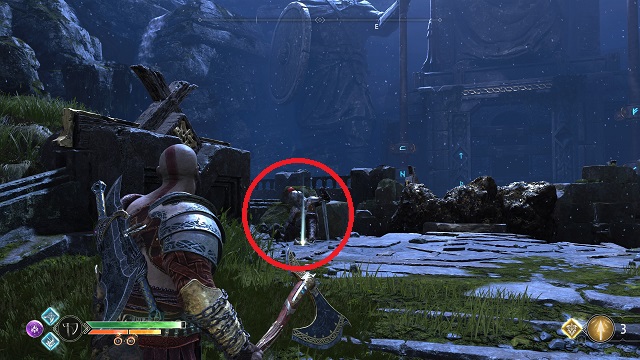
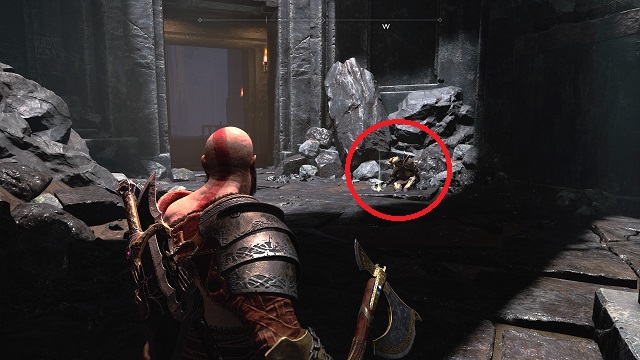
Lost and Found #4: In the Ruins
Eventually, you will come to some ruins. You’ll cross another broken bridge and go down some stairs. There, you’ll fight another cadre of Draugr. After you’ve dispatched them, go to the door with the life gem in front of it. Go through that door and fight the wolves and Draugr outside.
Look along the right cliff face and you’ll find the last Artifact.
River Pass + Witch’s Cave: Faces of Magic (9 Artifacts)
Faces of Magic Artifact #1: After the Reavers
It’ll be quite a long time before you come across this Artifact. You’ll find Nornir chests and Lengedary chests along the way. But when you fight your first true human adversaries — reavers — you’re close.
Defeat them and climb up the chain. Cross over the gap along the wall (you’ll shimmy across), and once on the other side, use the chain on that side to climb down into the opening you just crossed.
Go straight ahead and follow the path to the end. The collectible is on the dead body.

Faces of Magic #2: Past Brok on the Bridge
From the first Artifact, go back the way you came and climb up. Go to the bridge, help Brok cross, and defeat the enemies. Then, with Brok’s shop in front of you, take the path to the right.
Go all the way to the end and drop down along the right. This collectible will be on the dead body there.
Faces of Magic #3: After the Ceiling Puzzle
Right after you escape the deadly ceiling puzzle, the third Artifact will be right in front of you. You can find it on the dead body against the right-hand wall.
Faces of Magic #4: After the Cutscene with Atreus
Right after the last collectible, you’ll boost Atreus up over a ledge and a cutscene will begin on the cliffside. After this cutscene ends, turn left to find this Artifact at the edge of the area.

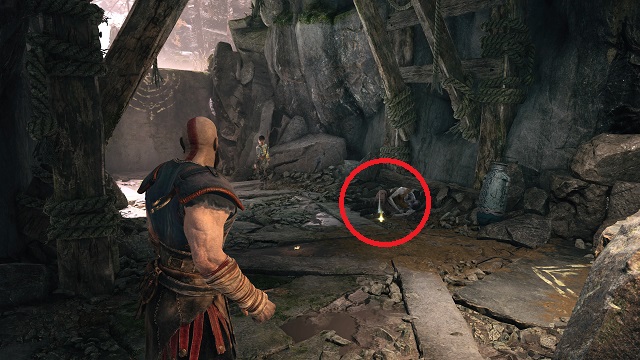
Faces of Magic #5: Inside the Sand Puzzle Cave
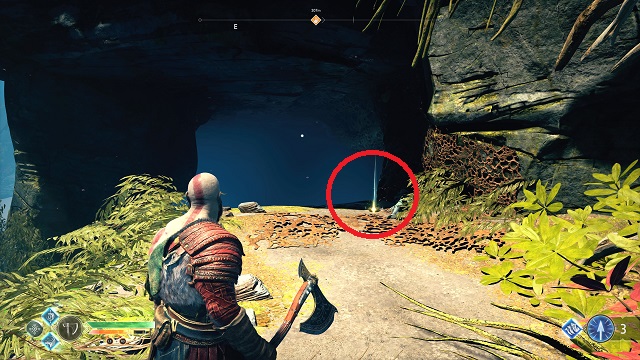
After you solve the sand puzzle, go into the cave and turn left at the fork. Climb up the ledge. The collectible Artifact is in the puddle between the runes.

Faces of Magic #6: In the Ruined Village
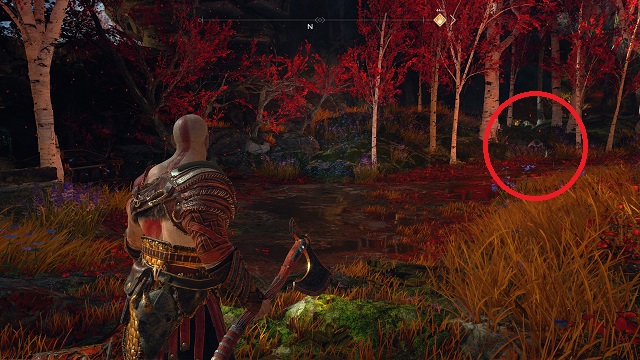
Not long after exiting the cave, you’ll come to a ruined village. There is a hut to the far left of the area that is on fire. Look behind that house to find this Artifact on a dead Centurion.
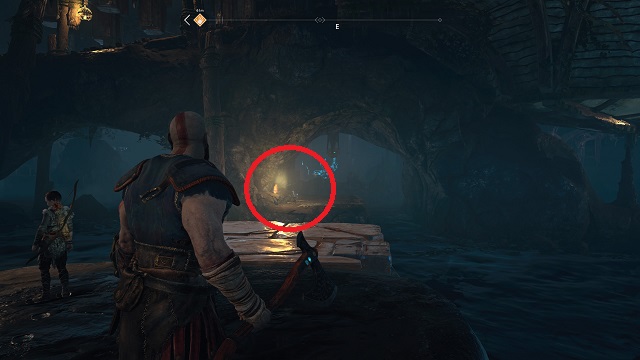
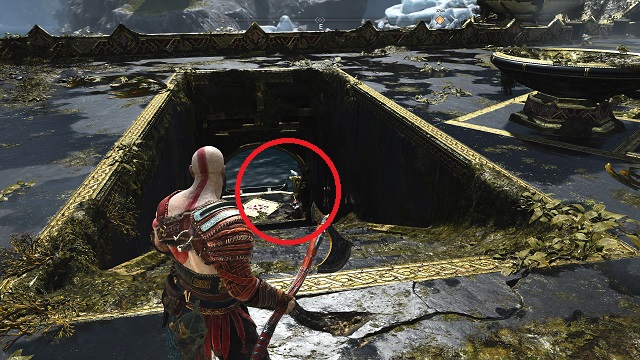
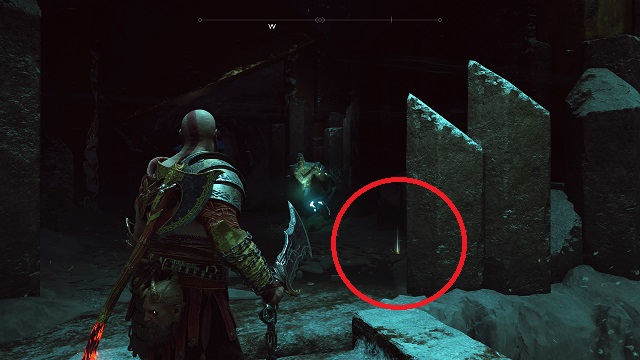
Faces of Magic #7: In the Witch’s Cave Beneath the Bridge
After entering the witch’s cave and defeating the nightmares, go into the corridor to the left of the pulsating red door. Drop down and push the huge pallet of rocks into the water to your left. Jump across. You’ll find this Artifact on the dead body.
Faces of Magic #8: Climb out of the Well in the Witch’s Cave (Cannot Find on First Visit)
To climb out of the well, you’ll need to have access to Atreus’ sap-burning ability. But when you revisit the Witch’s Cave later and exit through the well behind the red sap gate, you will find this Artifact down the path and on the right — just before the opening into the grotto area.
Faces of Magic #9: Continue Across the Grotto and Up the Cliff with the Chain (Cannot Find on First Visit)
This Artifact is further into the grotto from Artifact 8. As you continue down the path, you’ll come into the grotto field. After fighting a handful of enemies, look for the chain on the far side of the area. Once at the top, the collectible will be on the left side of the path. Be wary — there are two Heavy Draugr here.
Alfheim: Spoils of War (6 Artifacts)
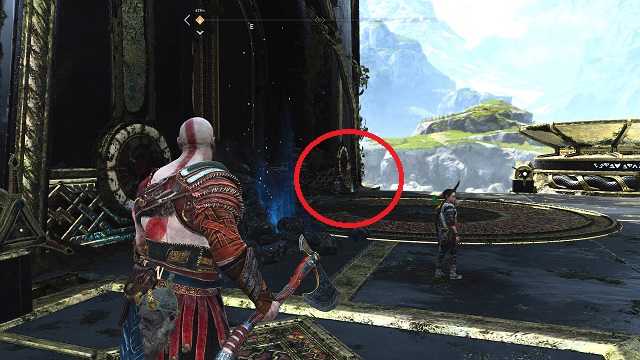
Spoils of War Artifact #1: Light Elf Shore Broken Road
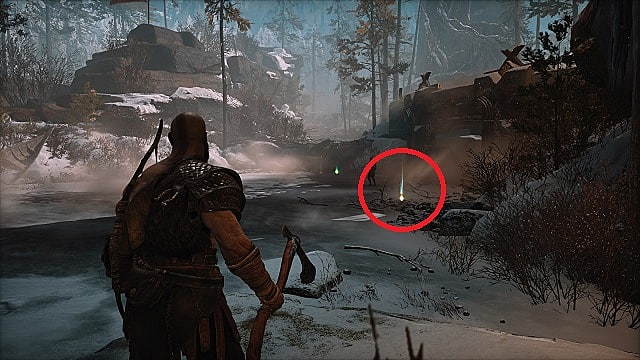
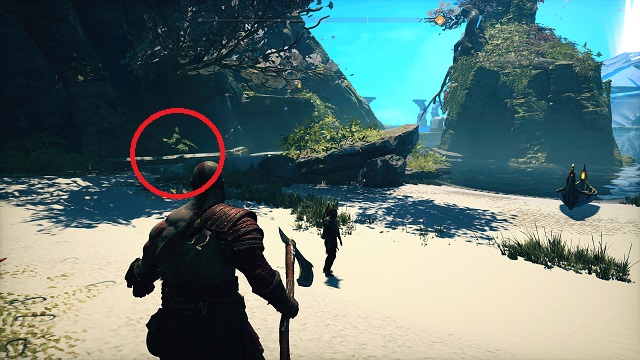
When you first land on Light Elf shore, you’ll need to take care of a few enemies before you can start finding collectibles and Artifacts. But once you’ve rid yourself of the vermin, face the boat and look left. On the other side of the wall shown above, you’ll find a broken road. The first Artifact in Alfheim is there.
If you don’t already know how to get to Light Elf Shore, you can reach when entering the Lake of Light by turning left and hugging the coast.
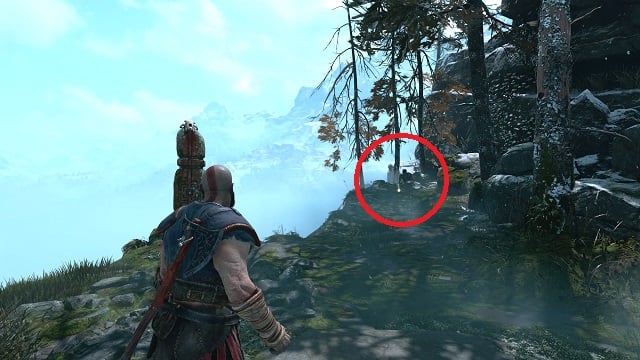
Spoils of War #2: Light Elf Sanctuary Cliff
This Artifact will take a moment to get because it’s on a cliff that’s unreachable until you go through the entire area (don’t worry, the area isn’t large). Dispatch the enemies and follow the path from the beach straight ahead. When it forks left and right, go right through the gate held together by the nodes.
Tip: To get through the nodes, throw your ax through the bottom portion of the gate. Then turn the handle and recall your ax as the gate lifts. The throw your axe to destroy the top node.
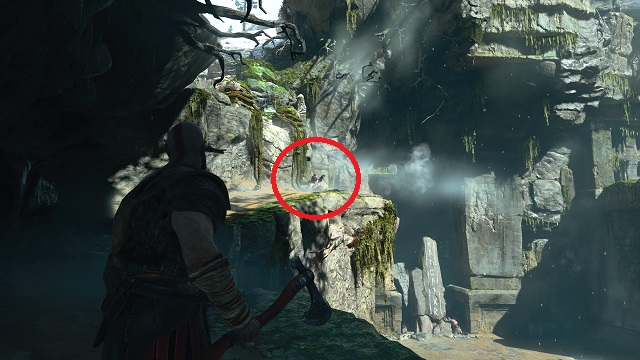
Once through the gate, go right along the path. You’ll need to break a few more nodes on your way, but you’ll eventually come to a cliff overlooking the beach where you began. Clear the nodes here to reveal the second Artifact.
Note: If you don’t know how to get to Light Elf Sanctuary, just get in the boat from Light Elf Shore and go right as far as you can. Then turn right and follow the channel around. You’ll find the shore and can dock there.
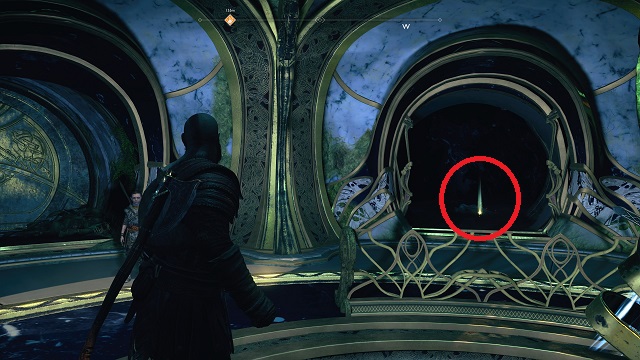
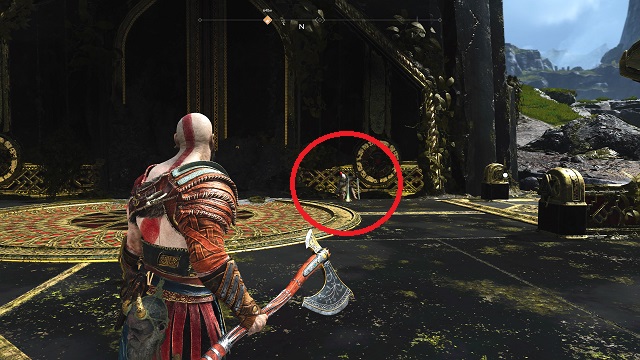
Spoils of War #3: Ringed Temple Trench — Restoring the Bridges
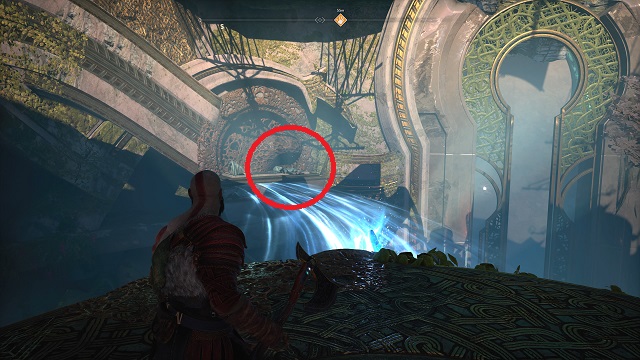
The first big objective you’ll have when entering The Ringed Temple Trench will be reactivating the bridges. It will take time to do this, so be patient, but you’ll eventually come to a platform that has a Legendary Chest and a node you must freeze to free the light.
An Ancient will spawn and fight you, but once you’ve dispatched him, turn your back to the chest and the node — and look to the left of the area. On the platform there, you’ll find the third artifact.
Spoils of War #4: Return to the Trench in the Dark
It won’t be until you try to leave Alfheim’s Ringed Temple for good that you’ll find another Artifact (it’s a good 30 minutes or so from Artifact 3, so don’t worry). Once you reach the top of the Ringed Temple and realize your boat is nowhere to be found, you’ll need to descend into the temple’s first area again.
As soon as the elevator gets to the bottom, turn right and go into the room there. You’ll find Artifact 4 on a dead body in the room.
Spoils of War #5: Further Into the Dark
Move into the main area of the Ringed Temple to fight a Revenant in the dark. Once you’ve defeated him, go into the room on the left and remove the crystal from the ceiling. After your fight with the Draugr, this Artifact will be in the top corner cell.
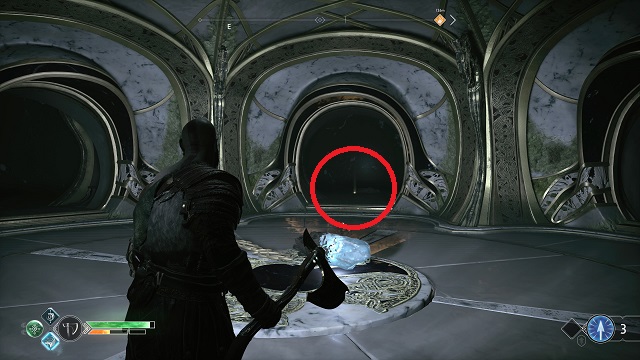
Spoils of War #6: Use the Wheel to Lower the Floor Again
If you’re getting all of the collectibles in God of War, you would have most likely already gotten the Nornir Chest in the main area of the Ringed Temple. Go to the wheel that lowers the floor and lower both sides. Go through the room straight across from you.
When you enter the room with the wheel, the cells will now be open. Defeat the Draugr and find Artifact 6 in the room directly across from the wheel.
The Mountain: Bottoms Up (6 Artifacts)
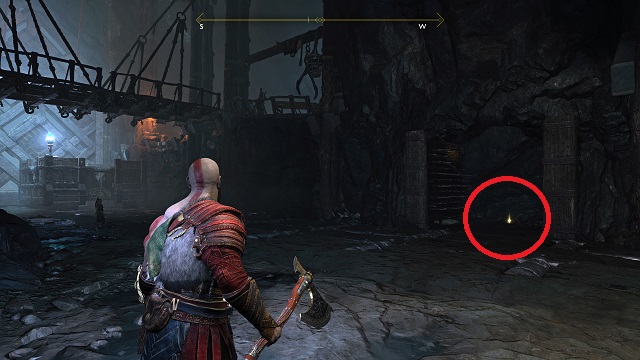
Bottoms Up Artifact #1: Inside the Mountain: After First Revenant
After you’ve beaten the first Revenant, climb up the ledge and dispatch the Draugr here. After you’ve done that, go to the far side of the area (away from the Nornir Chest) and break through the brittle wood along the wall toward this Artifact.
You’ll open a room with a table in it. Behind the table is a Centurion and an Artifact.
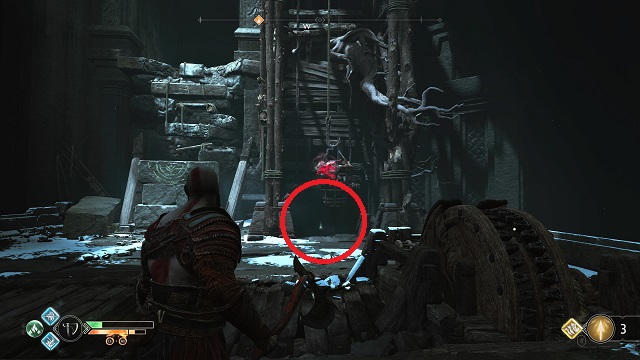
Bottoms Up #2: After Pushing the Large Cart in the Mining Area
Eventually, you’ll reach a mining area. To ascend the mountain, you’ll need to activate the lift — but as expected, the lift breaks. You’ll need to find another way to this Artifact.
As you explore, you’ll come across a large cart. Push ahead to your destination. But before leaving completely, make sure to check inside the room that’s now exposed. Inside you’ll find the second Artifact.
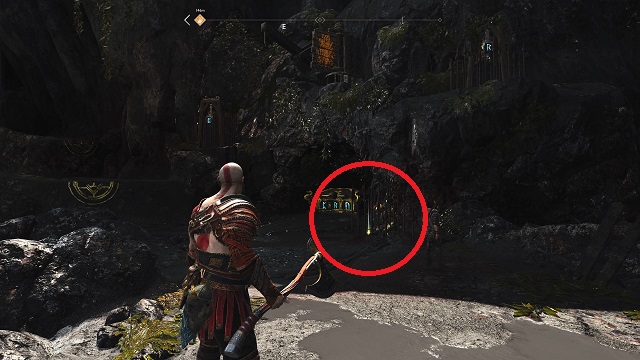
Bottoms Up #3: At the Bucket, After You Get Shock Arrows
After you get shock arrows, you’ll continue your ascent. After leaving Sidnir’s shop, you’ll come upon a wooden structure tangled in roots that sits at the end of a bridge. Remove the roots with shock arrows.
There will be a wheel here to raise and lower a bucket full of sap. Look behind the bucket for this collectible Artifact.
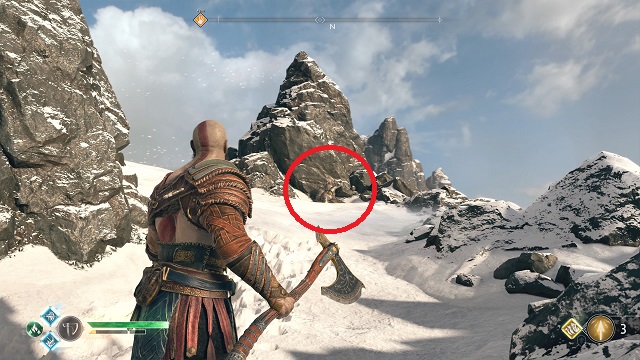
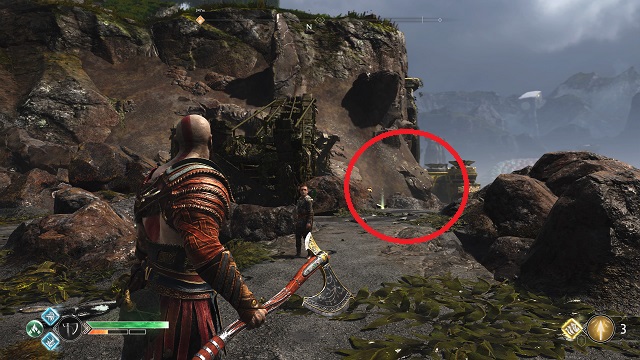
Bottoms Up #4: At the Summit, to the Left of the Blocked Doors
Once you reach the summit, you will be met with blocked doors. You’ll have to climb up the side to continue. But before doing that, go left toward this Artifact.
Just when the path begins to turn right, take another left. There, leaned against a rock, you’ll find a Centurion with this collectible Artifact.

Bottoms Up #5: Inside Mining Area Behind Red Sap Door (Cannot Find on First Visit)
When you return to the large open mining area in the Mountain, turn left as you enter. Destroy the red sap door. Inside, you’ll find a chest and the Artifact.
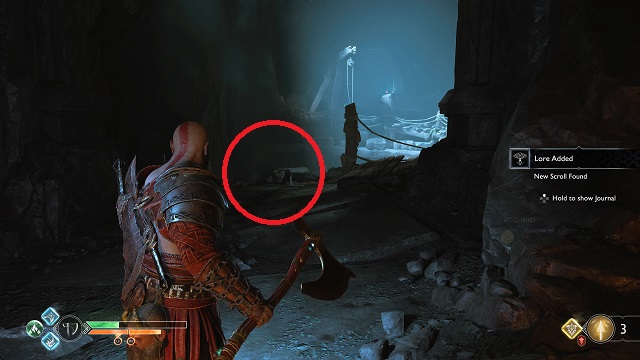
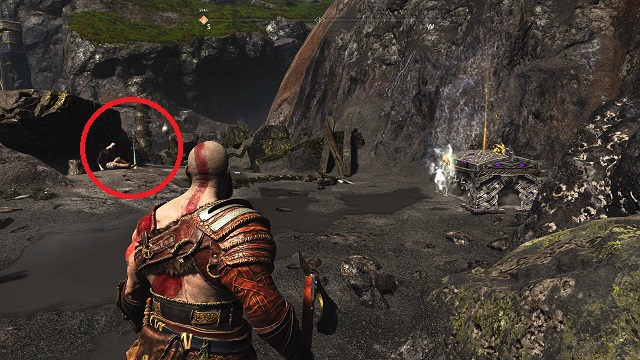
Bottoms Up #6: Right on Your Path to the Summit
From Artifact 5, continue your journey to the summit. It will be some time before you reach the next Artifact, so don’t worry.
Eventually, you’ll fight a Frost Ancient. After defeating him, continue along the path and climb up the ledge. Directly in front of you will be a scroll and the Artifact. The body is on the edge of the precipice.
Lake of Nine: Abandon Ship (9 Artifacts)
For these Artifacts, we’ll start with Tyr’s Bridge and then move clockwise around the Lake of Nine to make things easier. We would suggest grabbing all of these — as well as the Legendary Chests and Nornir Chests found here — before speaking to the World Serpent. After speaking with Jormungandr, the water levels in the Lake of Nine will decrease, making the exact steps in this guide very difficult to follow.
Abandon Ship Artifact #1: Tyr’s Bridge, After Leaving Brok’s Shop
Leave Brok’s shop. With the doors behind you, turn left and head toward the staircase leading down. At the bottom, you’ll find a dead Centurion with this collectible Artifact.
Abandon Ship #2: Lookout Tower’s Spike Trap
You can get to Lookout Tower by going to the end of Tyr’s Bridge and turning right. Once you’re on the shore, you’ll notice both an Artifact and a Nornir chest. The artifact will be in a spike trap, as will be the three seals for the Nornir chest.
Look above the Nornir Chest, and you’ll see a turnable pole. Throw your ax at it to lower the spikes and get the Artifact (and reveal the chest’s bell seals).

Abandon Ship #3: Atop Nilfheim Tower
Take the boat to Nilfheim Tower (again moving clockwise on the Lake of Nine map). Exit and take the elevator up. The Artifact will be on a corpse next to a Mystic Gateway.
Abandon Ship #4: Behind the Rock Outcropping at the Isle of Death
Dock the boat and climb to the top of the cliff. Defeat the enemies here, and then look back to where you originally climbed up. To the right, you’ll see an outcropping of rocks. Inside will be a red container. Blow this up with your ax to reveal the Artifact.
Abandon Ship #5: On the Cliff at Forgotten Caverns
This area of the Lake of Nine has a lot going on: You can get an Artifact, a Legendary Chest, a Raven, and a Nornir Chest here. But let’s focus on the Artifact.
Once you dock, defeat the enemies. Go right and climb the chain to get on top of the cliff. Turn left. You’ll see a Legendary chest and to the left, sitting against a rock, you’ll also see the Artifact.
Abandon Ship #6: Atop Helheim Tower
Super easy. Take the elevator to the top and turn right for this Artifact.
Abandon Ship #7: Atop Alfheim Tower
Another easy one. Take the elevator up and look straight ahead for this collectible Artifact.

Abandon Ship #8: After Fighting the Revenant at Stone Falls
Dock and then go straight ahead. Move through the gate and fight the Revenant. After defeating it, look to the ruins on the right side. Near the back, there will be a ledge. Climb that and turn left to find the Artifact on a corpse.
You can also find a Legendary Chest here.
Note: I could not immediately dock at Stone Falls, and there was also no docking icon. If you run into this little glitch, just come at the shore head-on and hit “O”. It should allow you to dock and search for the Artifact.

Abandon Ship #9: Past the Dead Giant at Cliffs of the Raven
Dock and defeat the enemies. Go left along the shore, past the dead giant. You’ll see an area marked for climbing along the cliff face. Look up and destroy the wood above, then boost Atreus. After he knocks down the chain to your left, climb up and look straight ahead. You’ll see a Legendary Chest on your left — and the Artifact will be around the bend to the right.
Helheim: Family Heirlooms (5 Artifacts)
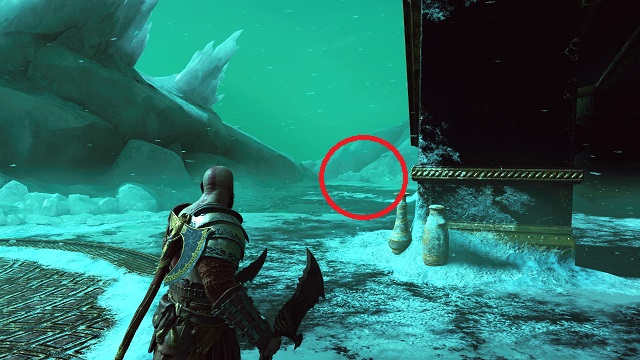
Family Heirlooms Artifact #1: At the Beginning of the Area
As soon as you enter Helheim from Brok’s shop area. Turn right and look along the far ice wall. The Artifact will be there.

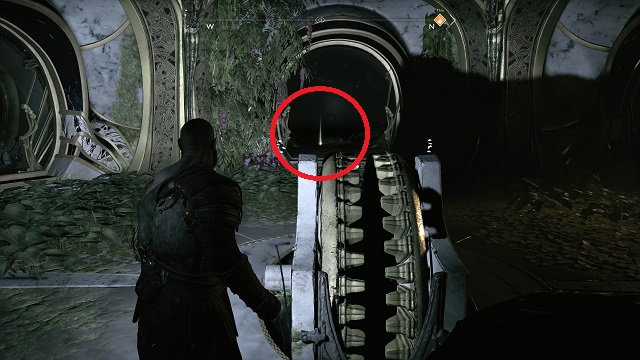
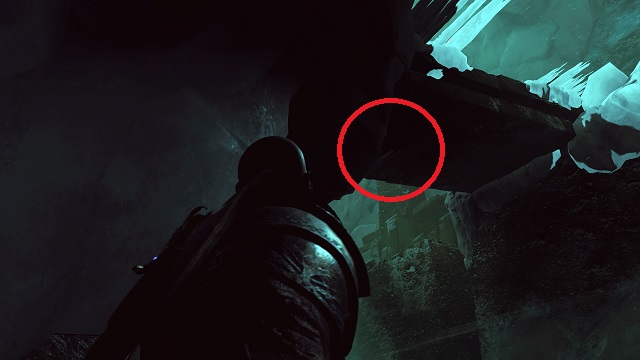
Family Heirlooms #2: On the Way to the Fighting Pit Area — at the Top of a Pillar
When you first visit Helheim, you’ll continue down the path from Artifact 1 and eventually come to a set of huge locked doors. You’ll venture left and shimmy along an ice wall.
Next, you’ll climb across two large pillars and make your way down. As soon as you make it to the bottom, turn left toward the pillar between you and the opposite wall. Go around the backside and destroy the brambles at the top for Artifact 2.
Family Heirlooms #3: At the Bridge After the Fighting Pit
From Artifact 2, go forward through the fighting pit (this is where you first fight the large party of reavers in Helheim). Climb up and continue along the path. As you pass under the bridge, look up. Destroy the brambles to get this collectible.
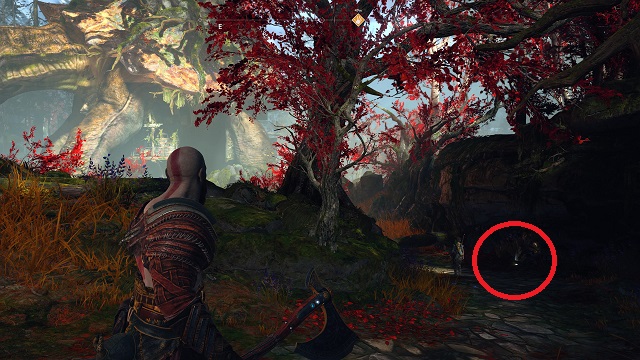
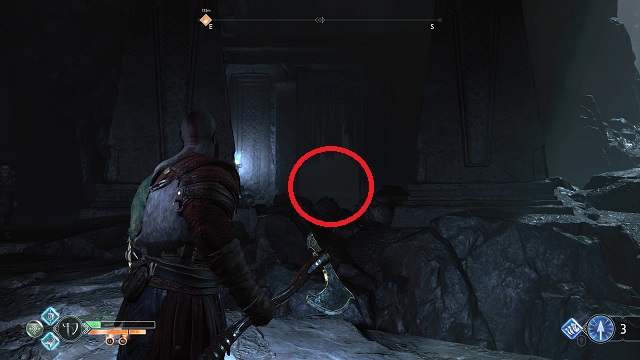
Family Heirlooms #4: Behind the Red Sap Door (Cannot Find on First Visit)
You’ll need Atreus to get this artifact.
When you return to Helheim, follow the path from the entrance all the way to the main area before the boss fight. The two stone structures you navigated following the boss will be here. Go to the second one. Destroy the red sap door at the far end of the left gangway.
The Artifact will be just inside to the right, in front of the statue. There will also be a Raven in the rafters above.

Family Heirlooms #5: Further Down Into the Hidden Area
From Artifact 4, continue down the corridor and take the elevator. Get off at the bottom and go up the left staircase. Look on the ground behind the brazier. There is also a Raven above the window in this area.
Veithurgard: Horns of Veithurgard (6 Artifacts)
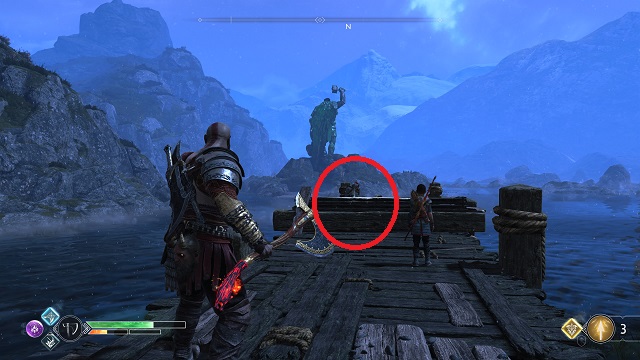
Horns of Veithurgard Artifact #1: On the Pier to the Left of Where You Dock
After you’ve gone through the pass to reach Veithurgard, east of the Lake of Nine, you’ll get to another boat and continue into Veithurgard proper. After you dock, defeat the enemies and go to the end of the pier for this Artifact.
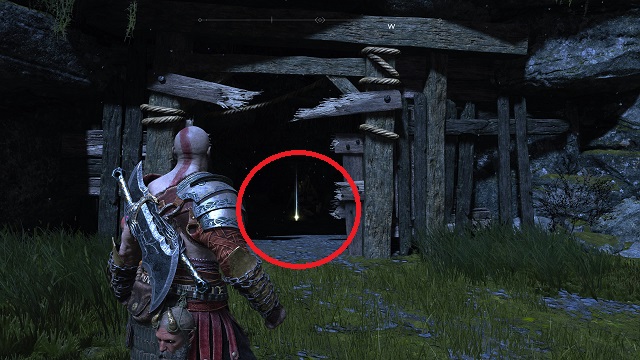
Horns of Veithurgard #2: Up the Cliffs on the Right Side of the Area
For the next Artifact, go from the dock to the right side of the area. Along the shore, jump over a log, and you’ll find a chain. Pull it and lock it into place. The mechanism is hidden in the top right of the screen in the shadow of the cliff.
After locking the chain into place, go back and take an immediate right. You’ll find a gate in the cliff face, which should now be open. Go through and continue up. Turn right at the top and drop down again. Continue right and you’ll come to a set of breakable boards. Inside is the Artifact.
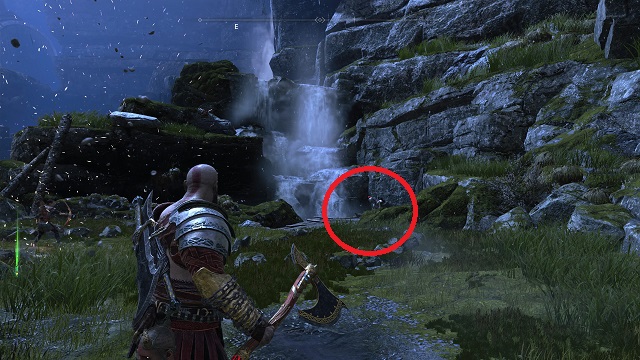
Horns of Veithurgard #3: At the Waterfall by the Dragon
From Artifact 3, climb down the left side to return to the original area. Now it’s time to go forward, toward the dragon. As you make you way up, be sure to avoid his devastating breath.
Once you make it to the dragon, he’ll stop spewing electric death your way. Turn left and head toward the waterfall. There, against a pile of rock, you’ll find a dead soldier with this collectible.
Horns of Veithurgard #4: On the Bridge to the Left of the Waterfall
From the waterfall, go left a short way. At the steps of the bridge, turn right. You’ll find a dead Centurion along the left side, just before the gap, with this Artifact collectible.
Horns of Veithurgard #5: Inside Veithurgard Fortress
Once you make it into Veithurgard fortress, dispatch the enemies that meet you. After, you’ll notice a shrine directly in front of you. To the left of that are some stairs. The Artifact is at the top against the rubble in the back. Be wary of the enemy that pops out of the right hallways at the top of the stairs.
Horns of Veithurgard #6: After Draining the Water in Veithurgard Fortress
From Artifact 5, continue along the path. Go right and destroy the red pot to create a shortcut and get the Legendary Chest in front of you. Go left and kill the enemies. Turn the lever in front of you to drain the area ahead. Drop down and this last collectible will be on the Centurion there.
Related guides:
- Everything You Need to Know About the Frozen Flame
- The Very Best Runic Attacks in God of War
- Where to Find Smoldering Embers
- Where to Find Anchor of Fog
And there you have it! All of the collectible artifacts and their locations in God of War. Some were definitely harder to find than others, but now that you have that Curator Trophy in your collection, the journey was well worth it. Make sure to check out our other God of War guides to find all of the game’s Nornir Chests, Raven locations, and Shrines!


Published: Apr 20, 2018 12:14 am