Sniper Elite V2 Remastered has two different types of collectibles: gold bars and wine bottles. Just as in the original Sniper Elite V2, there are only 37 wine bottles in the game, there are 100 gold bars.
Of course, some gold locations are harder to find than others, with some levels being particularly troublesome. Find them all, though, and you’ll be rewarded with the Gold Rush trophy/achievement.
This guide will show you exactly where to find each gold bar in the game. We break things down by mission, providing screenshots for every location. The video at the top of this guide will also show you how to snag them as well if that’s easier. We did speed the video up just a tad since it was originally 58 minutes and figured you’d rather not sit through it all.
If you’re looking for all of the game’s wine bottles, we have a guide for that as well. If you want to see why we said the game is starting to show its age, be sure to head over to our V2 Remastered review.
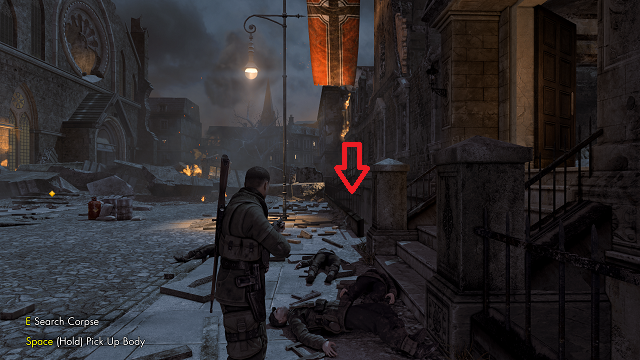
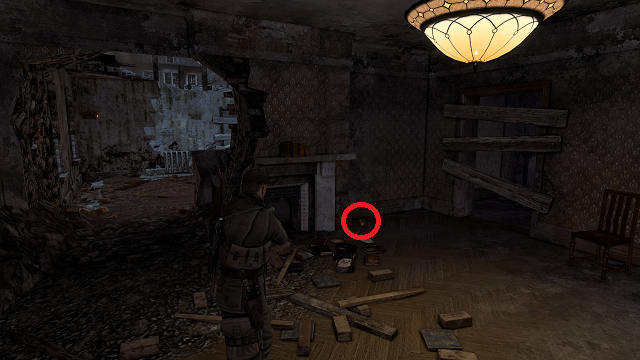
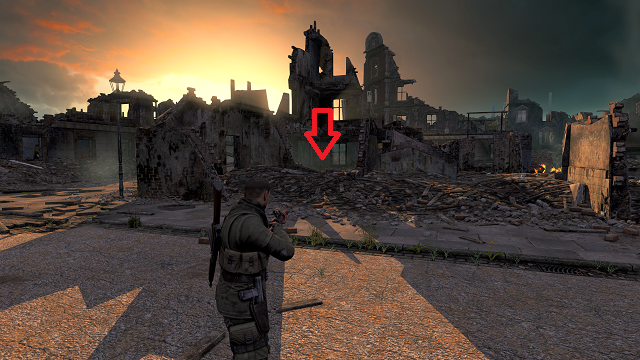
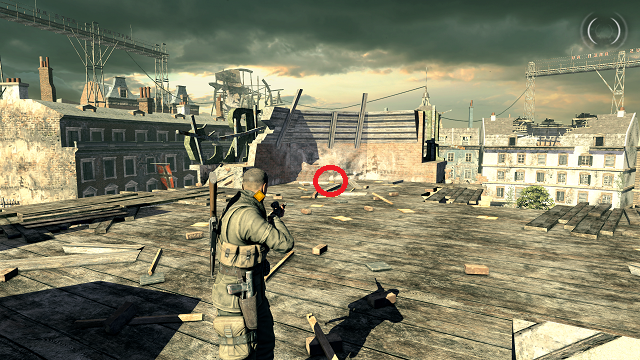
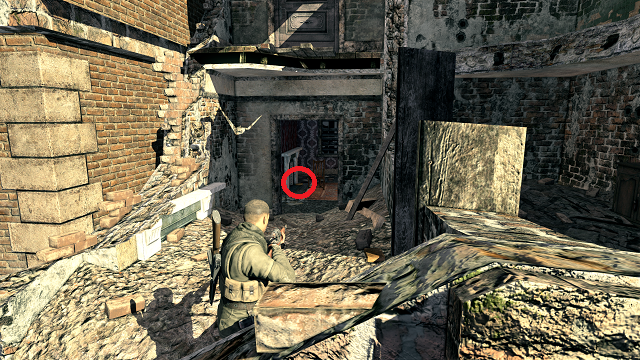
Mission 1: Schoneberg Convoy
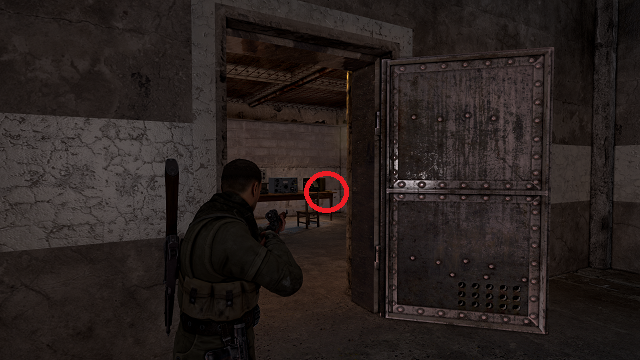
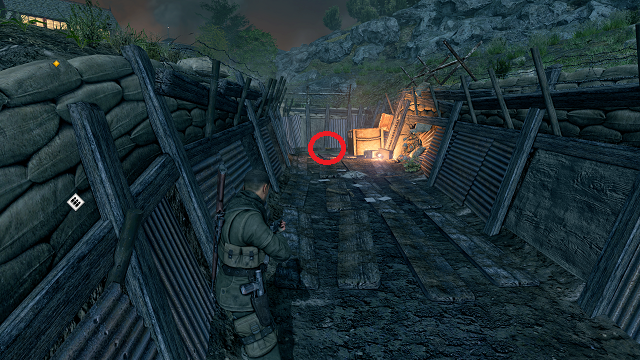
Gold Bar 1
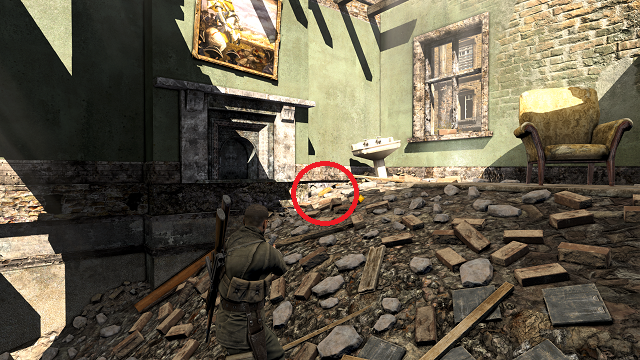
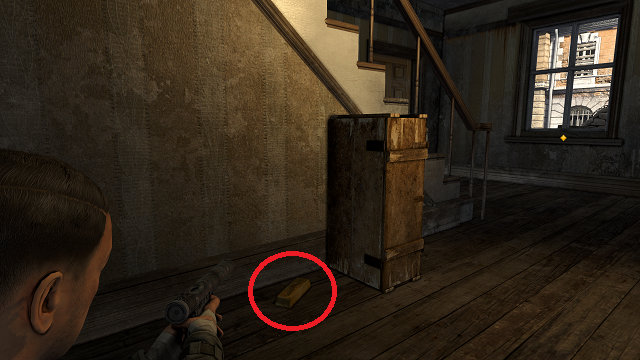
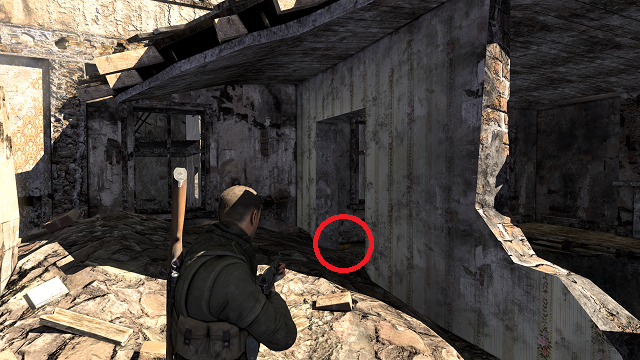
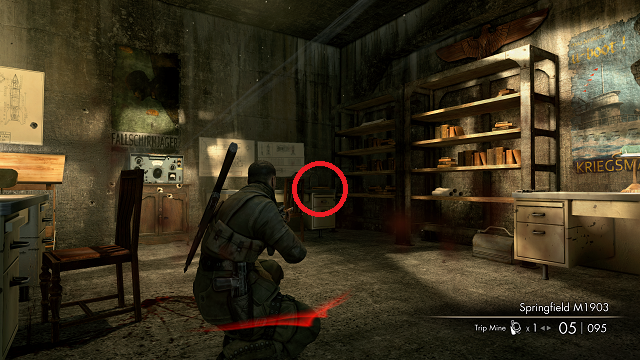
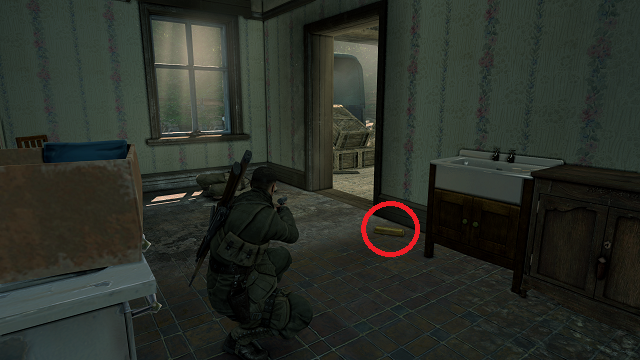
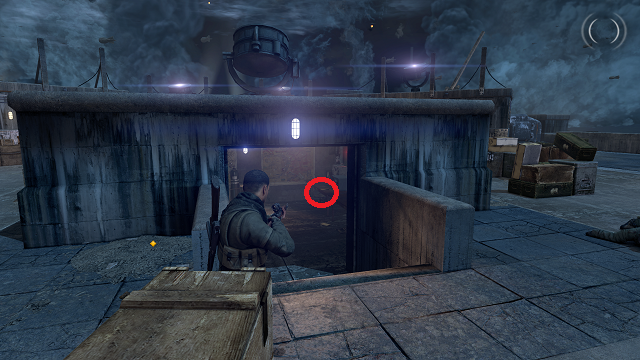
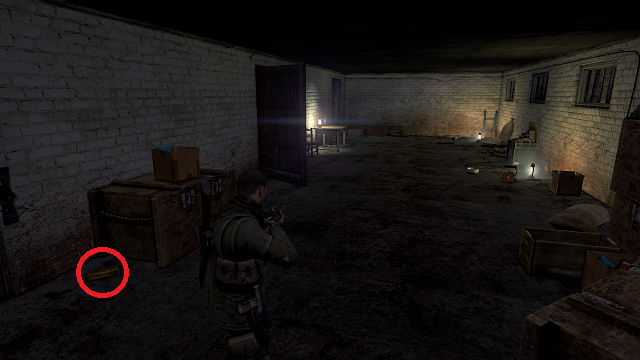
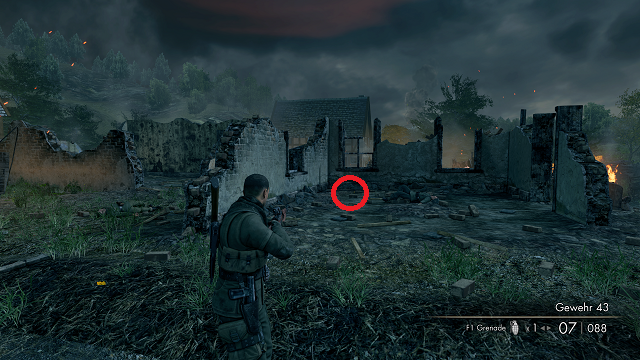
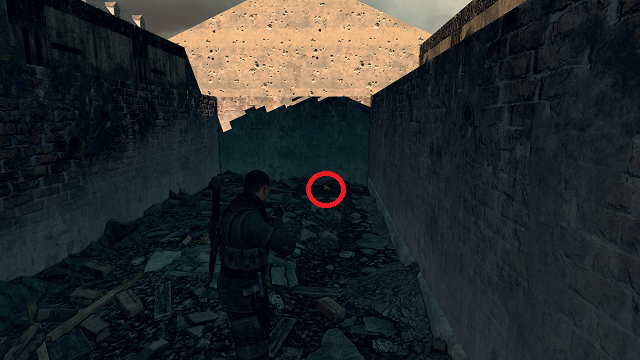
From the beginning of the level, kill the first enemy. Continue past him, staying to the left of the truck. Hug the side of the street and continue forward, minding the two soldiers standing the middle of the road. Go into the building ahead with the propaganda poster on it.
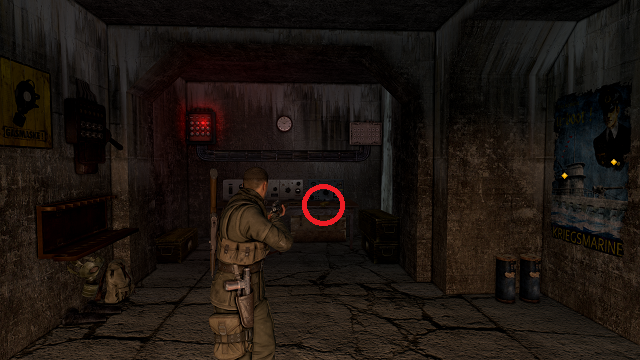
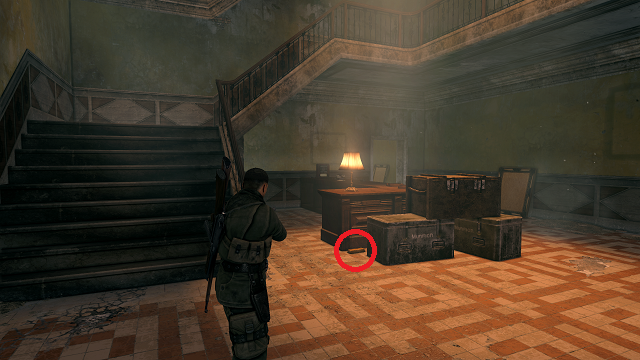
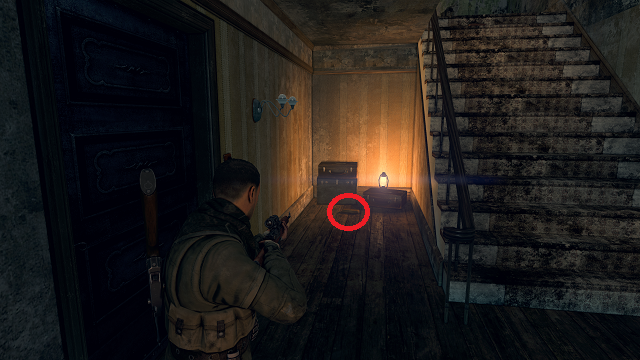
Once inside, go straight back and follow the path to the right. When the path ends, the gold bar is between the fireplace on the left side of the room and the sink in the back left corner of the room.
Gold Bar 2
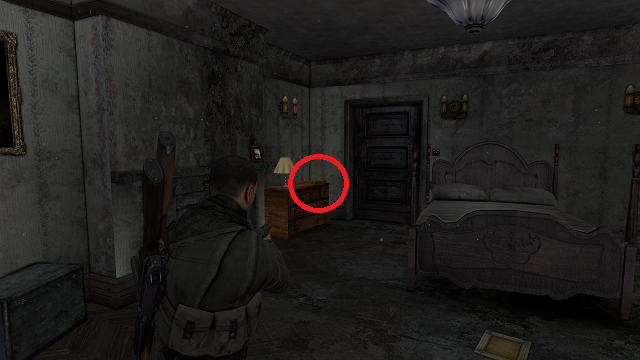
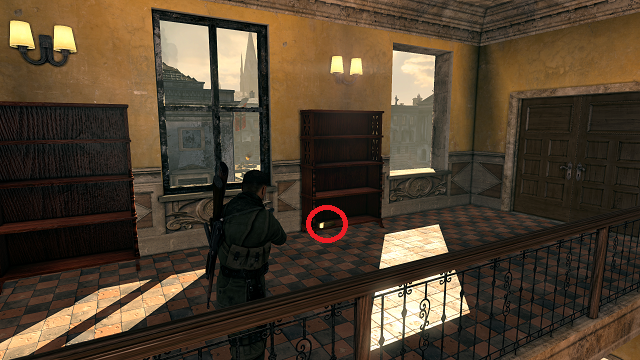
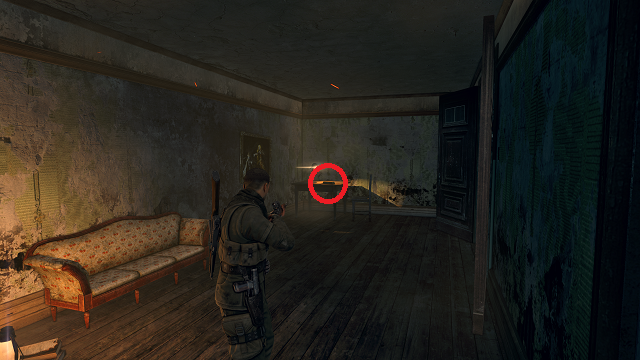
From the first gold bar, go back out to the street and take a left. Take out the soldier, and go toward the objective marker. Once inside the next house, take an immediate left. The gold bar is along the back left wall. It is on top of a dresser across from the bed.
Gold Bar 3
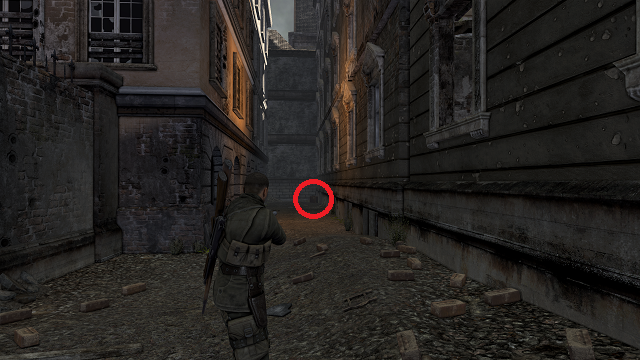
From the last gold bar, continue toward the objective by going upstairs. Follow the path and kill the patrolling guard. Go right and drop down to the left in the next room.
Once you land, immediately turn right and go into the alley. Turn right and follow the alley all the way down. At the end, there will be a briefcase along the right wall and the gold bar.
Gold Bar 4
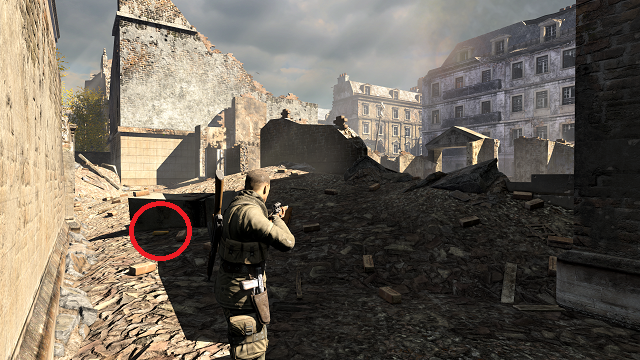
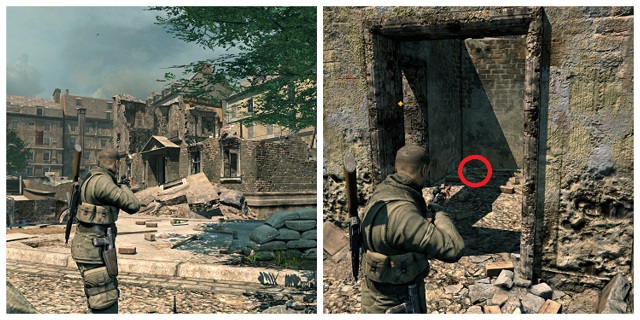
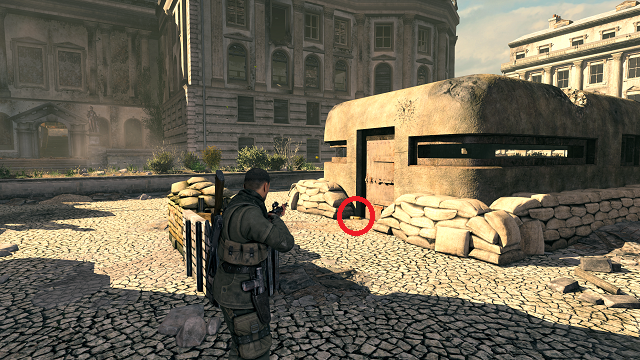
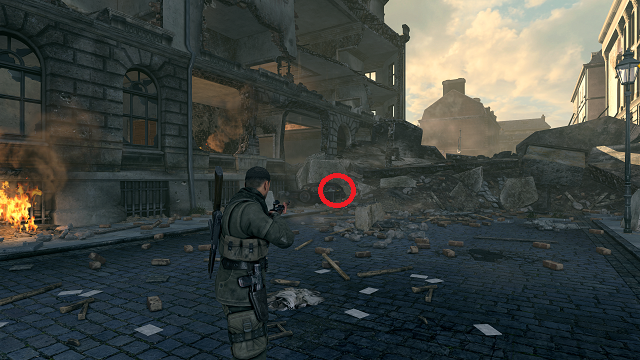
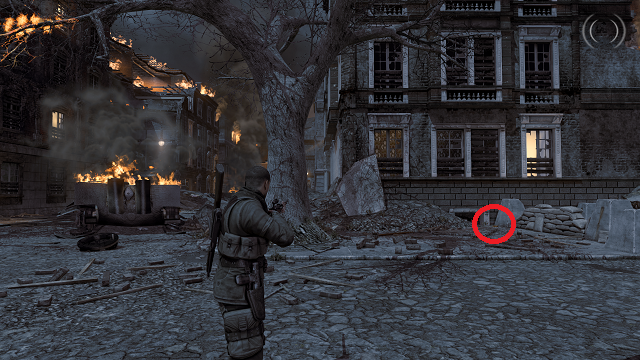
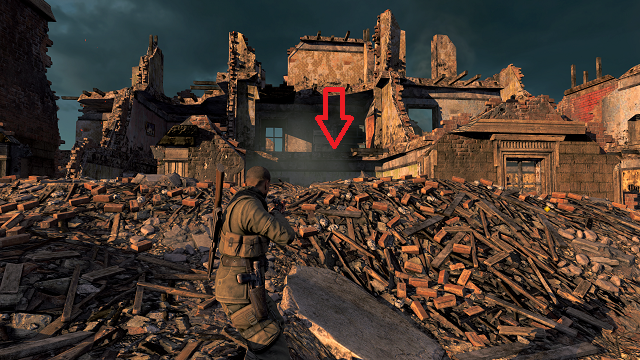
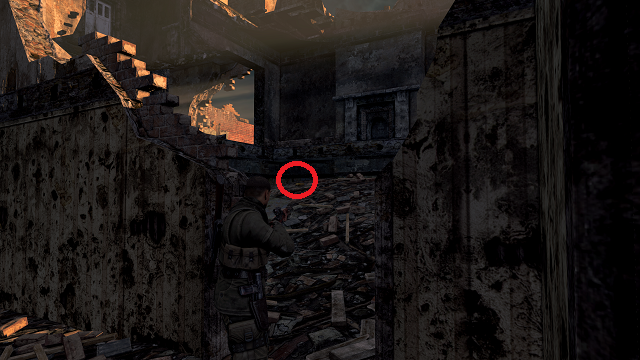
Go to the right-hand side of the area, into the ruins behind the small, triangular arch.
Once inside the ruined area, go all the way to the back and look behind the ruined column lying on the ground. The gold bar is behind it.

Gold Bar 5
Go toward the objective marker in the next building (the one with the large flag hanging on the side). To the left is a ruined area. Inside that area is a car. The gold bar is on the left headlight of the ruined car.
Gold Bar 6
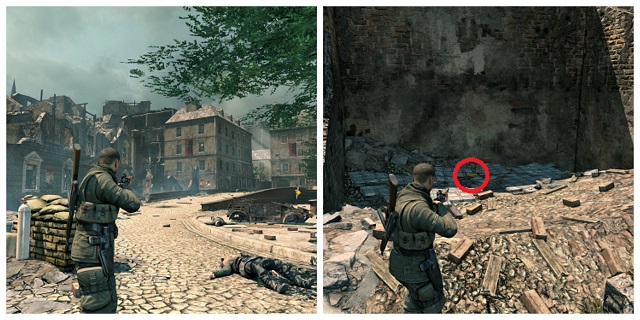
Now, go into the building and past the ammo cache. Take an immediate left and go downstairs. Follow the small path around to the right to find the next gold bar hiding behind an upstanding crate.
Gold Bar 7
Go back upstairs and continue along past the guard. As soon as you drop down, look to the right to see a broken refrigerator on the ground. The next gold bar is behind it.
Gold Bar 8
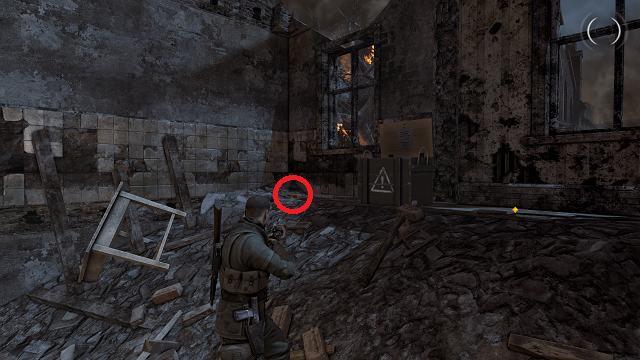
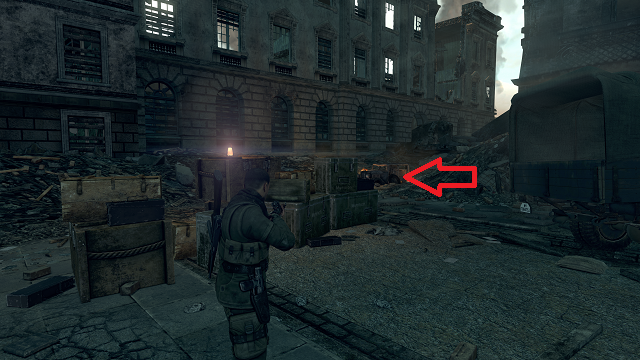
Enter the next area and stay on the left side of the street. Follow the street almost all the way down. Eventually, you’ll see a bistro on the right side of the street, as well as the car on which you’re supposed to attach an explosive. Go into the building to your left, just across from it.
Once inside, immediately turn right, then left. When you enter the second room, turn left. There is a small armoire and a briefcase on the ground. The gold bar is on the ground behind the briefcase.
Gold Bar 9
When you reach the top of the building (just before climbing up to the vantage point), go through the door ahead of you, past the ammo cache. Turn left and go into the room ahead. Just inside the room, there is a chair to the left. The gold bar is on the chair.
Gold Bar 10
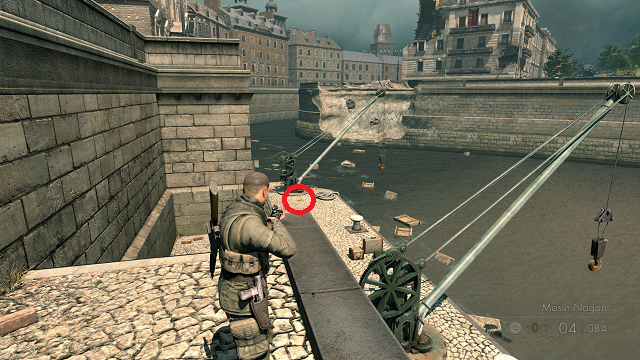
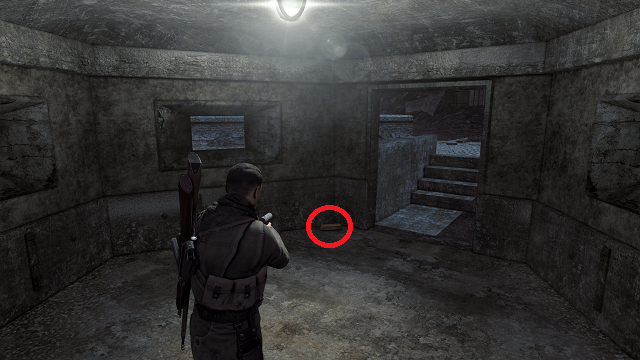
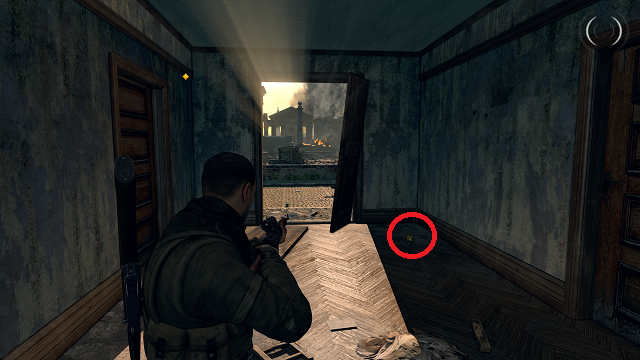
Take out the target and the remaining enemies. Once the area is clear, take a right from the vantage point, go through the door, through the whole in the wall ahead, and descend toward the street.
At the first drop down, turn around and go through the door. The gold bar is just inside the door to the right.
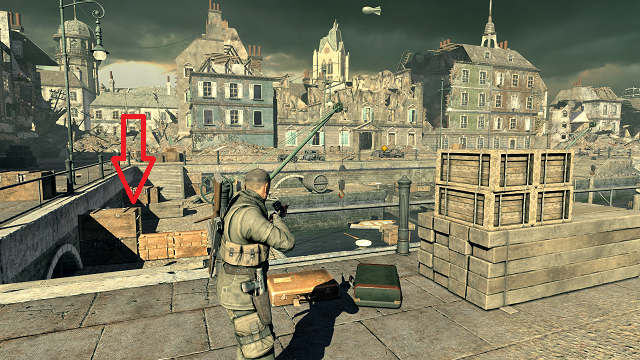
Mission 2: Mittelwerk Facility

Gold Bar 1
From the first tower, go to the house on the right (the one closest to the V2 rockets being fired). If you go in the back of the building, look immediately to your left upon entering. The gold will be in the toilet. If you come in from the front, turn left, go past the bunks, and then turn right to find the toilet.
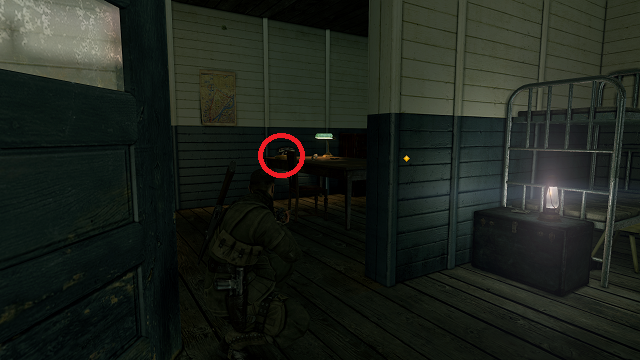
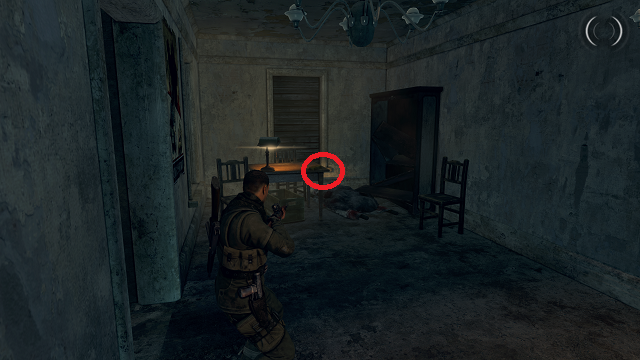
Gold Bars 2
If you come in the back of the house, go past the first gold bar and through the bunk area. The gold bar is next to a lamp and phone on the desk.
If you come in the front of the building, immediately turn right and go into the room with the desk.
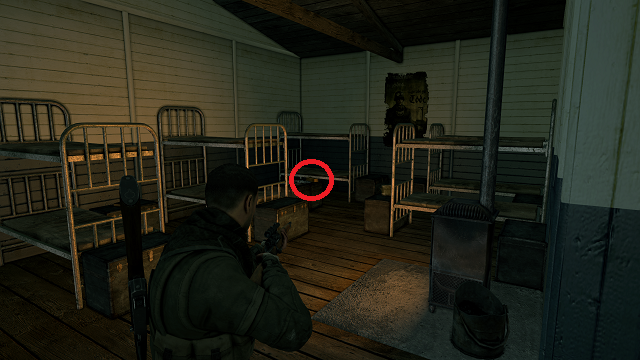
Gold Bar 3
This gold bar is in the house on the left of the area. Go in the house and immediately turn left. Go into the bunk room, and the gold bar is in the back on a crate.
Gold Bar 4
This gold bar can be found in the second tower in the area (next to the V2 rockets being fired). It’s on a crate in the tower.
Gold Bar 5
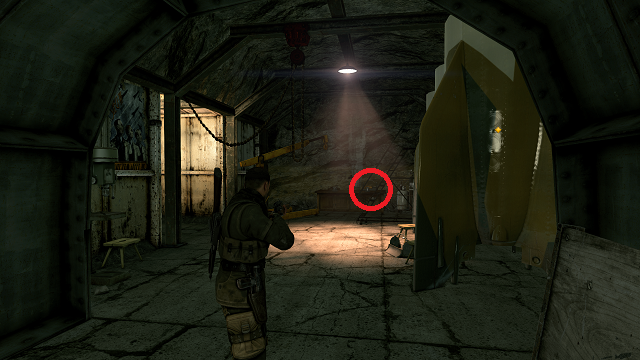
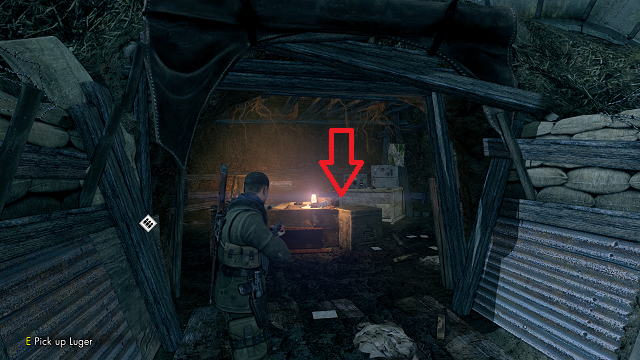
This gold bar is in the Nord Tunnel, just inside the machine gun nest. When you enter the machine gun nest, turn left to find the gold bar on the desk in the back by the radios.

Gold Bar 6
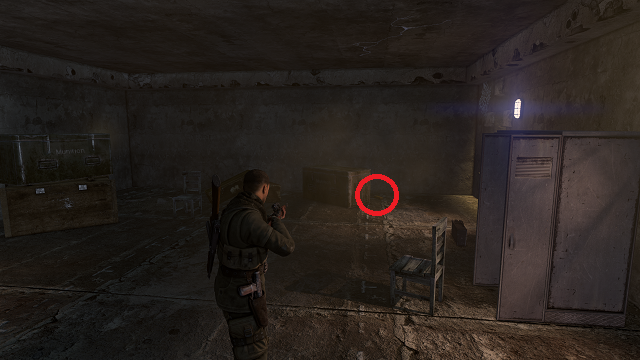
From the last gold bar, follow the corridor and cross the first major intersection into Corridor 38. Keep going down until you reach a cargo elevator on your right. The gold bar is behind the boxes in the elevator.
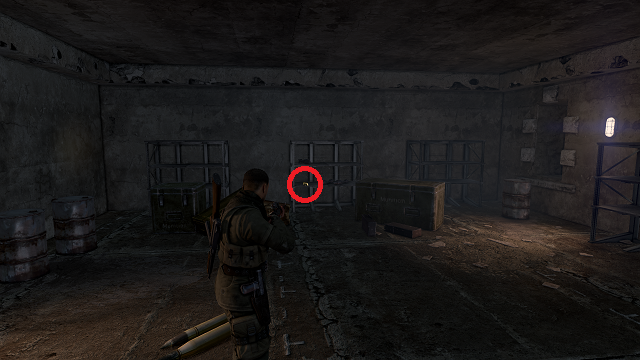
Gold Bar 7
From there, go back into Corridor 38 and continue down (go right out of the elevator). At the end of Corridor 38, turn left and continue down to Corridor 39. Once in Corridor 39, take the second entrance on the left. The gold is next to a lamp on a desk in the back.
Gold Bar 8
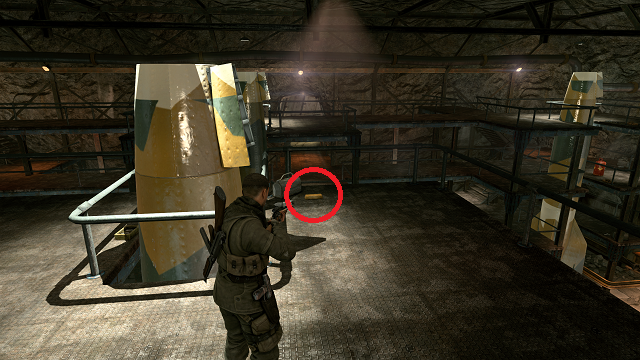
For these next three gold bars, you’ll need to plant the explosives in the previous section to move forward to Schwaiger’s Office. Go toward the office, and go to the top of the scaffolding on the right side. At the very top, go to the V2 rocket in the middle. The gold bar is on the ground next to a toolbox.
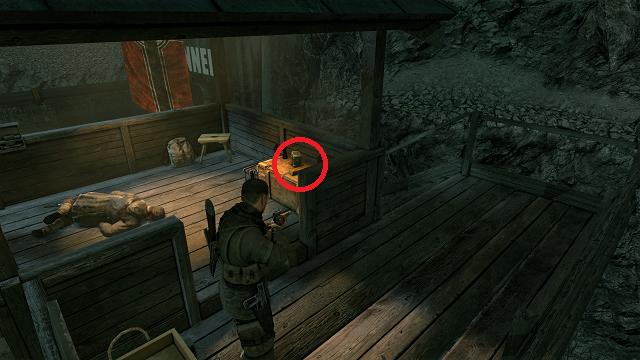
Gold Bar 9
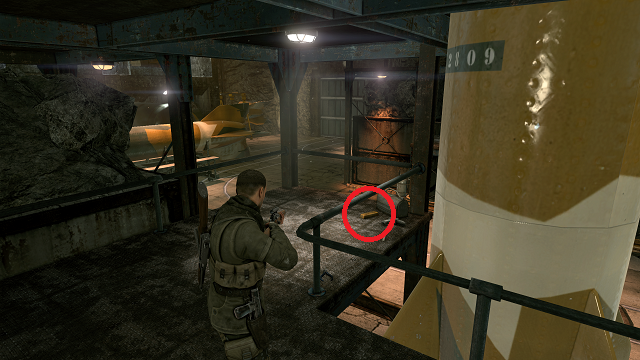
Go to the scaffolding on the other side. However, only go up the stairs once (to the middle level). Turn right and go to the far end.
Looking at the office, the gold is on the ground at the end of the scaffolding next to a toolbox.
Gold Bar 10
This gold bar is in the office. You have to trigger the story section to get it off the desk in the far back-left corner of the room.
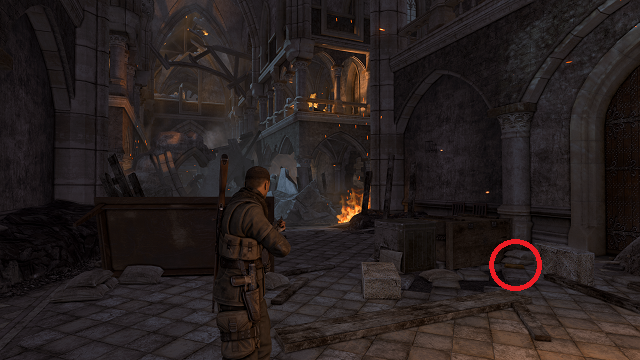
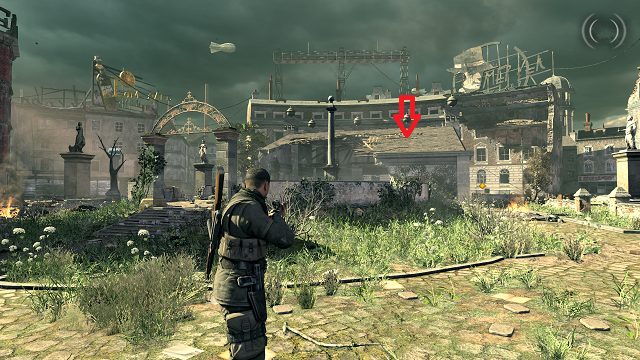
Mission 3: Kaiser-Friedrich Museum
Gold Bar 1
When you start the level, you’ll be in a house above an open area full of Russian soldiers. Jump down from the house and make your way into the open area to reach the objective ahead.
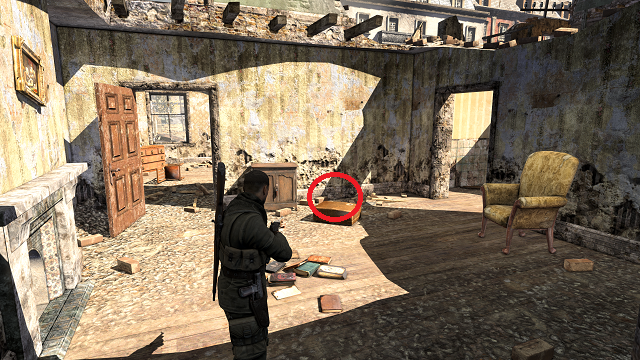
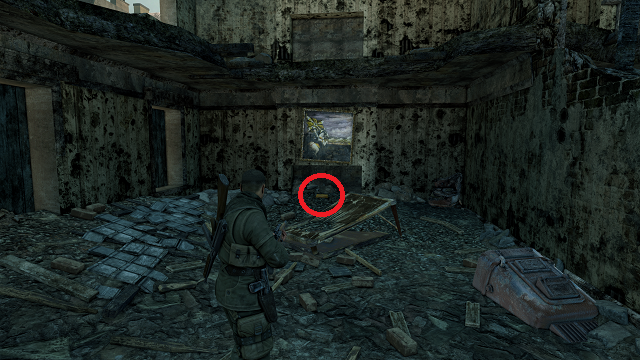
Once you reach the open area, there is a line of buildings on your left. Enter the first building you come to. Once inside, take the first right. Continue straight down the hallway and into the next room. The gold bar is underneath the painting of the soldier on a horse.
Gold Bar 2
Continue down the street toward the objective. When you enter the next house, immediately turn right. Go through the room into the next. Turn left to find the gold bar on the small armoire inside.
Gold Bar 3
From the second gold bar, take the stairs down into the cellar. Kill the two guards and go outside. Follow the alleyway. As you round the corner, you’ll see a guard at the far end. You can go ahead and snipe him without alerting anyone.
When you reach the door at the end of the alleyway, there is a box sitting beside it. The gold bar is on the ground behind the box.
Gold Bar 4
Go inside the building and up the stairs. There is a truck backed up to the door. There is a room to the left and a guard. Just inside the room on the left-hand side is the fourth gold bar. It’s sitting on the ground.
Gold Bar 5
From there, go upstairs and grab the Mosin Nagant. After the cutscene, the truck that was blocking the door before will be gone. Go across the street and climb into the first window. Go straight ahead and then turn right. Climb up and go straight, then climb up again. Turn right. The gold bar is to the left of the stairwell.
Gold Bar 6
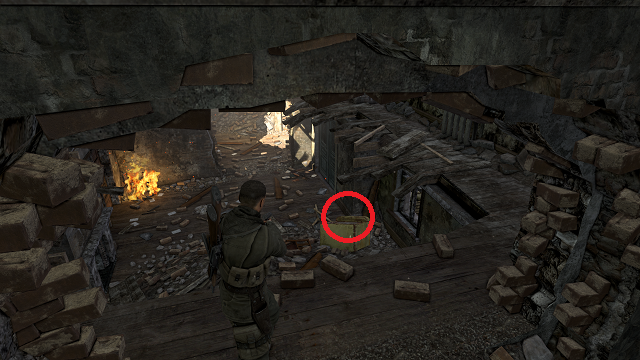
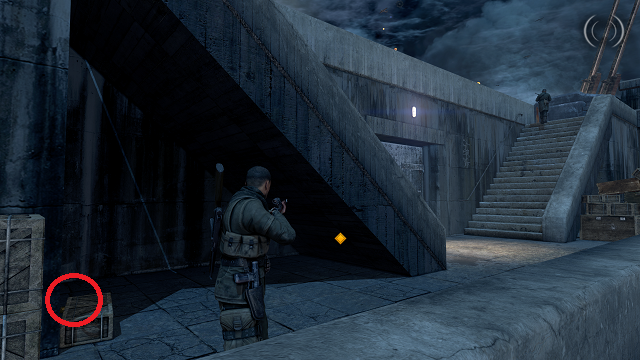
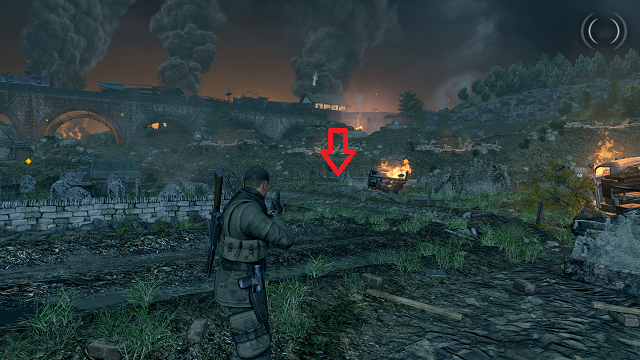
Go down to plant the explosives on the bridge. However, before you do so, look for the crane near the bridge. The gold bar is on the ground right in front of it.
Gold Bar 7
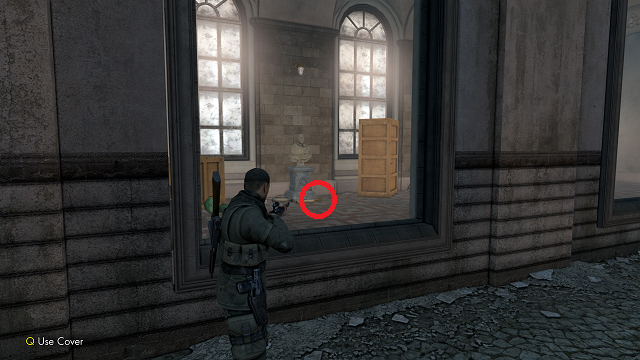
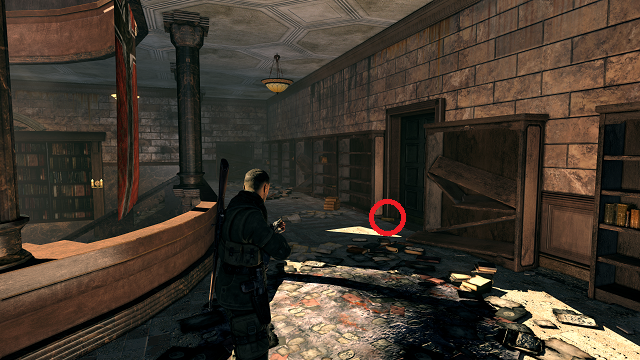
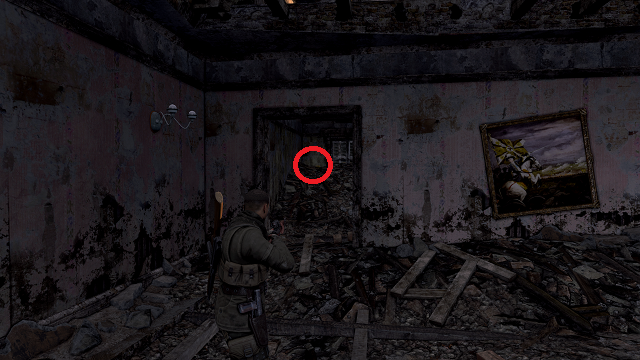
This gold bar is inside the museum. There’s no easy way to get to this one if you’re sneaking. You just have to be slow and methodical. However, we will tell you the shortest path to it.
When you enter the museum, turn left. Follow the path all the way down. Turn right and vault through the opening. Vault through the next opening on your left, go behind the two statues, and vault through yet another opening in front of you. Turn left, vault through another opening, and find the gold bar on the ground in front of a statue bust.
Gold Bar 8
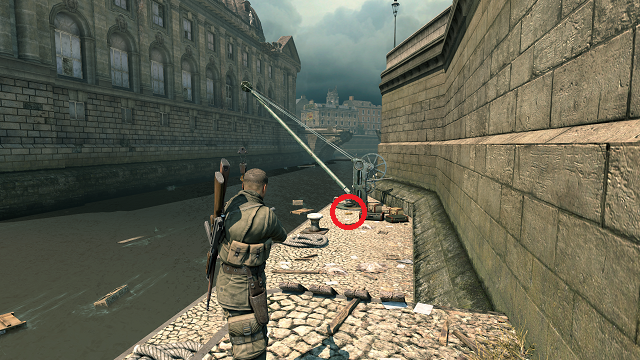
Climb to the top of the museum and destroy the bridge. Now climb down and take out the two Nazi soldiers that stand in your way. The boarded up gap on the right side of the hall is now open.
Kill the German soldiers and descend the scaffolding to the street below. Cross the bridge and turn right immediately. The next gold bar is in front of the second crane next to the river below.
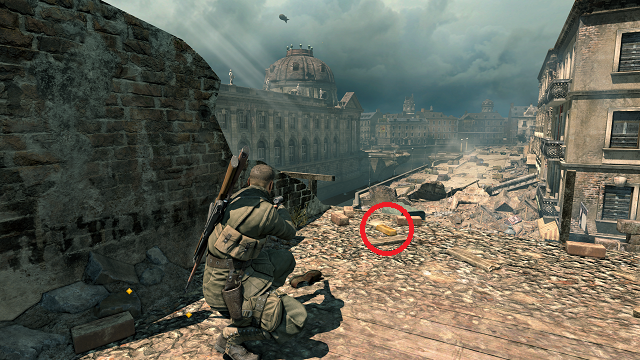
Gold Bar 9
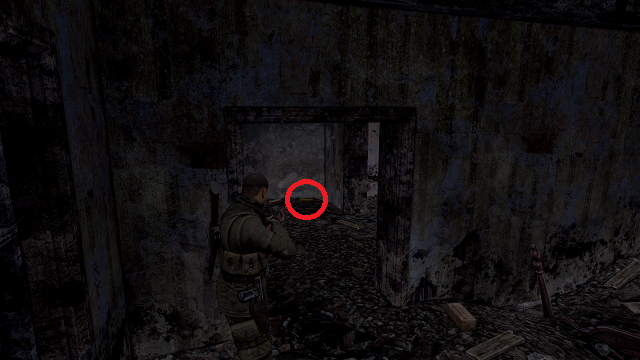
As you make your way toward the objective from the river, you’ll quickly run into another contingent of Nazis. Some will be on foot, while others will man machine guns in the back of the area. Kill them all, then go to the ruined building on the right-hand side.
Go inside and pass the stairs. Go through the next doorway and turn left. The gold bar is on the ground.
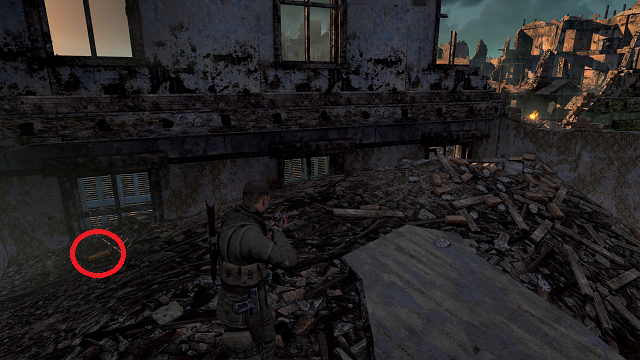
Gold Bar 10
Now go to the second ruined building on the far left side of the street. Go into the room in the far, back right. The gold bar is on the ground there.
Mission 4: Opernplatz
Gold Bar 1
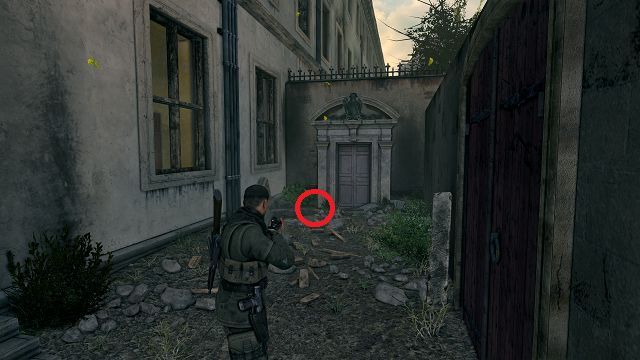
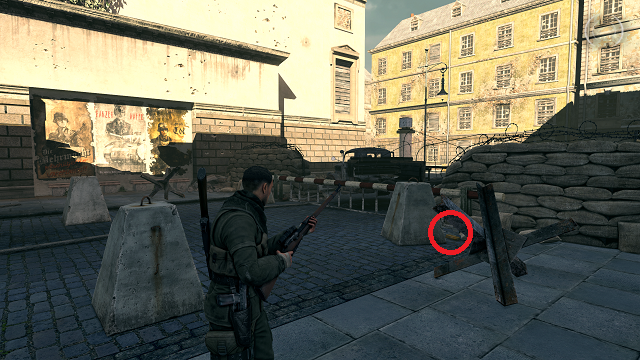
This gold bar is near the beginning of the level. As you make your way toward the objective on the main street, a patrolling guard will exit an alleyway to your right. Let him pass and turn into the alley. Go all the way down. The gold bar is on the ground, just left of the purplish door at the end.
Gold Bar 2
From the last bar, go inside the building to your left. When you enter the main room with the patrolling guard, take him out. There is a counter and some crates to your right. The gold bar is on the floor below the counter and the lamp.
Gold Bar 3
From there, go up the stairs to the third floor. There are two wardrobes against a set of windows. The gold bar is on the bottom shelf of the wardrobe on the right.
Gold Bar 4
Once you make it out into the courtyard on your way to the vantage point, you’ll notice two bunkers on either side of the huge horse statue in the middle of the area. Go around the bunker closest to you. Go to the side facing the horse statue, and find the gold bar lying on the ground in front of the bunker door.

Gold Bar 5
From there, go to the left side of the courtyard. There are two cargo trucks. In between them is a set of crates. To the left of the big crate, underneath the one leaning against it, you’ll find the next gold bar.
Gold Bar 6
From the trucks, go to the very back left corner of the courtyard. You’ll see a roadblock with sandbags and other field fortifications. Behind the small concrete pillar closest to the sandbags on the right side is the gold bar.
Gold Bar 7
Now go along the backside of the courtyard, all the way across to the right side. When you reach the rubble blocking your path, you’ll see a bombed out car next to a building on the left. The gold bar is in the back seat of the car.
Gold Bar 8
Now go toward the objective marker. When you enter the building, there is a large staircase in front of you. Two soldiers will come down the stairs, one from each side. Kill them and go up the right stairwell. There is a door on the left side. The gold bar is in front of it.
Gold Bar 9
Now continue toward the objective again. Quickly, you’ll reach another room with a staircase. Pass it, hug the left-hand wall, and go toward the back of the room. The gold bar is on the floor in the back corner.
Gold Bar 10
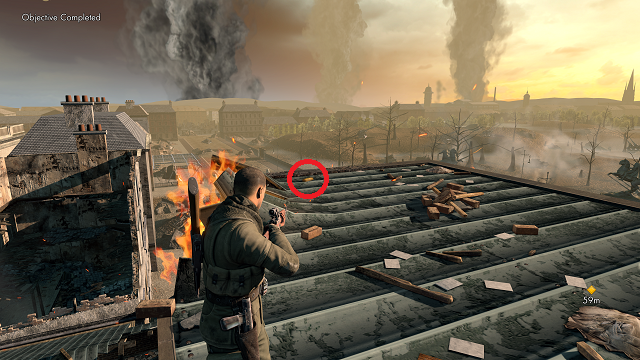
Now go up the stairs. Turn left at the top. The gold bar is in the blown out window. You can’t miss it.
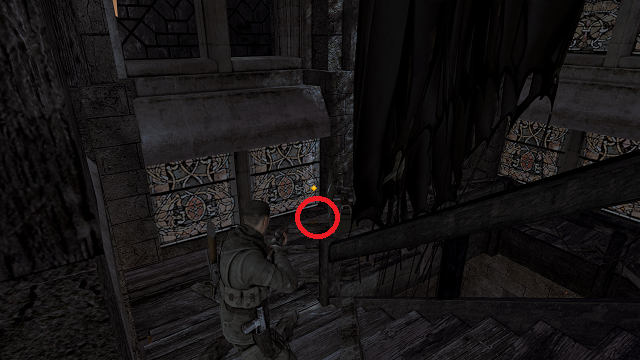
Mission 5: St. Olibartus Church
Gold Bar 1
Destroy the first tank at the start of the level, or sneak past if you can. Whichever you choose, go to the left of the tank and the large tree next to it. The gold bar is along the barricade along the left-hand side.

Gold Bar 2
Now backtrack to the objective marker and go into the house it’s telling you to go into. Go up the stairs and follow the path around to the left. Eventually, you’ll come to a dead end. Turn left to find the gold bar on the ground in the rubble.
Gold Bar 3
Now go back downstairs and go past the stairs toward the back of the house. Exit the house and go diagonally into the next house, which has a fire burning on its lower floor.
Go inside the room with the fire and turn left, then turn right in the next room and continue across to the stairs. At the stairs, turn right, then left again. Head through the door on the left in the next room, and you’ll see an ammo box in front of you. The gold bar is on the ground to the left of the ammo box.
Gold Bar 4
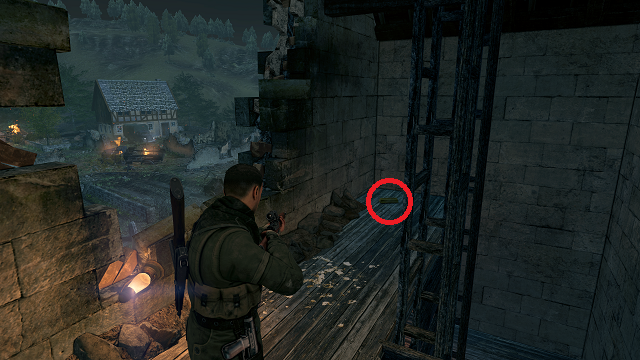
When you exit the house, you’ll see a bunker directly in front of you. Go inside to find this gold bar just inside the entrance to the right.
Gold Bar 5
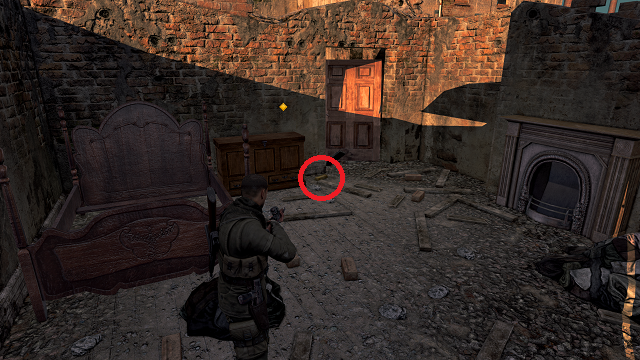
This one’s easy to miss. Exit the bunker and turn right. Instead of going into the house in front of you, go past it to the small square beyond. As soon as you enter, you’ll see an almost completely destroyed house on your left; all that’s left is the staircase and a bit of the frame. The gold bar is behind the staircase.
Gold Bar 6
Now turn around and go back the way you came. With the bunker in front of you, go toward the entrance of the building on your right. However, don’t go inside just yet. Instead go into the narrow passage just past it. At the end, you’ll find the gold bar on the ground along the left-hand side.
Gold Bar 7
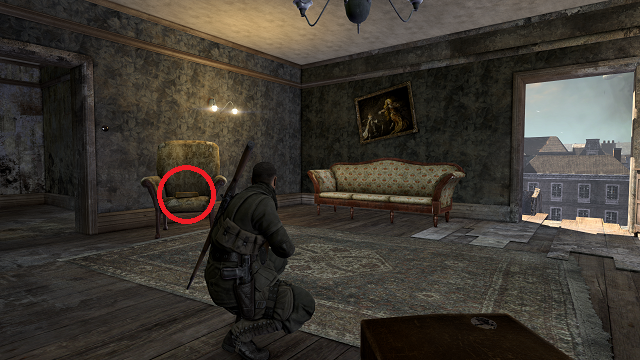
Now turn around and go into the building. Turn left, take out the guard, and continue along the path. When you enter the room with the brightly lit chandelier, turn left. The gold bar is on the ground to the right of the fireplace.
Gold Bar 8
Now enter the church and go straight to the very back. Turn left once you pass the overturned table. The gold bar is on the ground behind the crate.

Gold Bar 9
Climb up to the third floor and turn right toward the large, broken window. Go straight up to it and look on the floor to the right for the gold bar.
Gold Bar 10
Climb to the top of the tower and pick up the Gewehr 43. After the cutscene, look behind the ammo crate to your right. The gold bar is behind it.
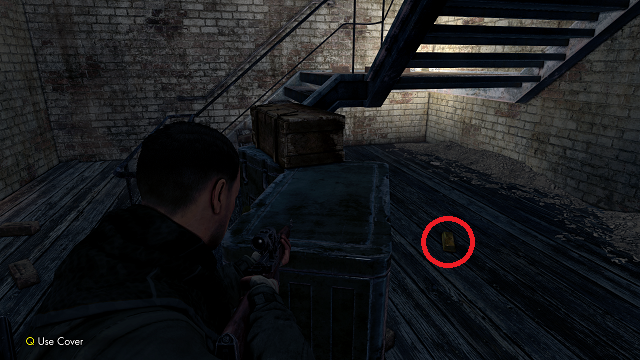
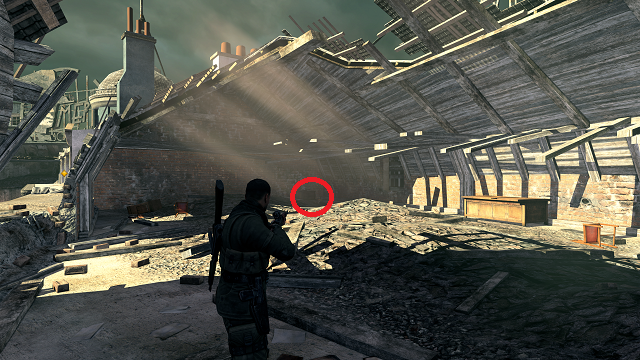
Mission 6: Tiergarten Flak Tower
Gold Bar 1
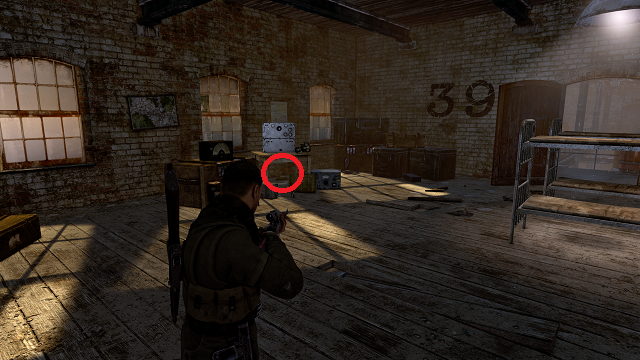
At the start of the level, kill the two guards and continue toward the objective marker. Kill the guards in the open area of the warehouse and cross over to the other side. Go into the room with the furnace ,and take the stairs down. Enter the next doorway and turn right. You’ll be in Room 39.
There is a crate and a table on the left-hand side of the room. The gold bar is underneath the table.
Gold Bar 2
Go to the bottom floor of the same building and exit. Russian and German soldiers will be fighting in a square ahead. In the middle of the square there is a machine gun nest. To the left of that nest is a building, and the bottom floor is Room 58. In the back right corner of this room is the gold bar.
Gold Bar 3
The same building has a set of stairs on the outside of it (you passed them as you mad your way into the square). Take them up, and climb into the same building. Follow the path until you see a descending stairwell on your left. Go down.
At the bottom, you’ll find the third gold bar of this mission underneath the stairs.

Gold Bar 4
Follow the path and exit the building. You’ll be on the far-left side of the flak tower entrance. There is a bunker directly in front of you. The next gold bar is inside, on the floor, behind a crate.
Gold Bar 5
For the next gold bar, you want to be on the far-right side of the flak tower. When you get there, look for another rectangular bunker. Behind it is a red and white guardhouse. The gold bar is in the guardhouse opening.
Gold Bar 6
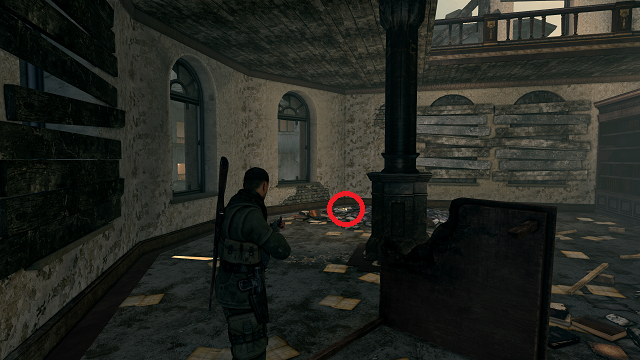
Go inside the flak tower. Go to the left when you enter the first large room. You’ll find an office with its door open. The gold bar is on the right-hand side of the table at the back of the room.
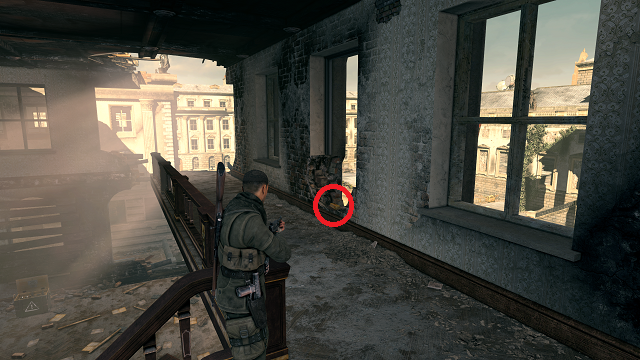
Gold Bar 7
Climb the stairs on the opposite side of the large room, and turn left. Then turn right. Turn right again, and continue down the hall. Take the second door on your left. The gold bar is in the back left corner of the room behind a crate.
Gold Bar 8
Go up to the third floor. When you exit the stairwell, turn left. Then take your first left. When inside the room, turn left one more time. The gold bar is on a rack against the wall.
Gold Bar 9
Once you’ve reached the roof, turn left. Hop over the crates, and turn left. The gold bar is under the stairs.
Gold Bar 10
There is a bunker on top of the roof, in the middle. Go inside. The gold bar is on a desk on the right-hand side of the bunker.
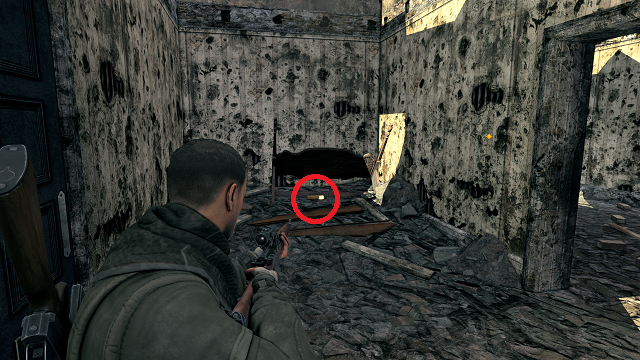
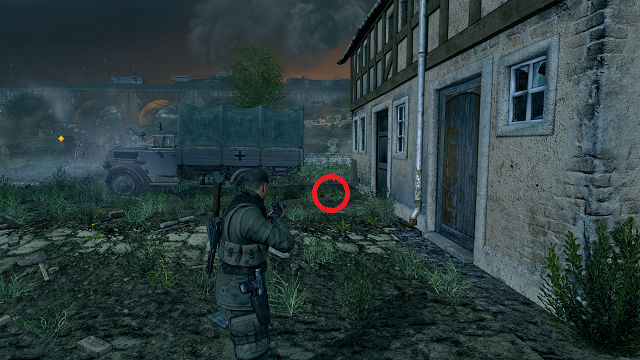
Mission 7: Karlshorst Command Post
Gold Bar 1
From the beginning of the level, go past the smoldering crater in front of you. There is a ruined car to your right. There is a ruined building across from that.
Go into the ruined building and climb over the wall in front of the red door. The gold bar is below the door, on the other side of the wall.
Gold Bar 2
Continue down the main street. At the first intersection, turn right, and go into the ruined house. Go into the doorway ahead of you, and turn right. The gold bar is on the floor.
Gold Bar 3
Go back out to the intersection, and go straight ahead. There is a ruined car in front of you on the right-hand side of the street. To the right of that is a gap in a wall. Go through it.
Go through the doorway in front of your, and turn right. Then turn right again to enter another room. The gold bar is on the ground in the back left corner.
Gold Bar 4
Reach the fuselage of the plane downed in the street. The tip of the fuselage is pointing at an opening in the ruins just past it. Go through it, and drop down.
Follow the short path into a basement. When you enter, turn right. There is a crate on your right. The gold bar is on the ground behind the crate.
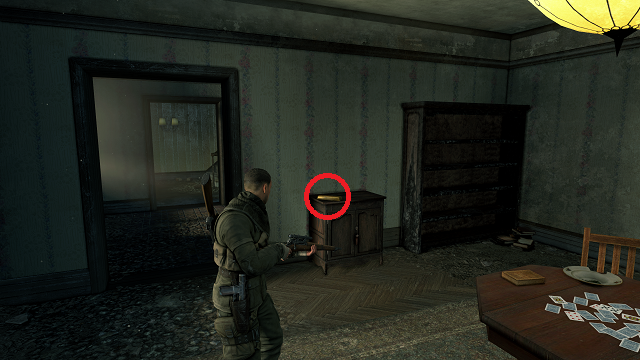
Gold Bar 5
Go back outside. At the next intersection (which is close), turn left. Go to the very end. Go into the last building on the left. The walls inside will be pink, and there is a painting of a soldier on horseback on the wall.
Go through the door to the left of the painting to find the gold bar against the back wall in front of you.

Gold Bar 6
Go back out onto the street and take an immediate left. Go into the building ahead.
Take the first right. Go through the door, and immediately take a right. Once inside, the gold bar is in the back left corner on the ground.
Gold Bar 7
Exit that house and take a left to go further down the street. Go inside the last house on the right. When you enter, immediately take a right, and continue through the broken doorway in front of you. The gold bar is in the back left corner on the ground.
Gold Bar 8
Now head to the command post, your main objective after taking out the tank. Facing the command post, there is a truck on your right. To the right of that, there’s a house almost buried in ruins. Go inside. Go up stairs. Go through the door in front of you, and take an immediate left. The gold bar is on the floor in the back of the room, next to a small bedside table.
Gold Bar 9
Go back outside and to the ruins in the square. As soon as you can turn left into the ruins, do so. The gold bar is in the corner on the ground in front of you.

Gold Bar 10
Go into the command post, and go downstairs. Take the second right into the sleeping quarters. The gold bar is behind the door.
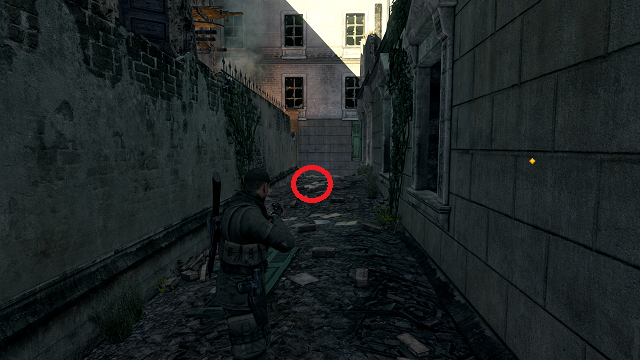
Mission 8: Kreuzberg Headquarters
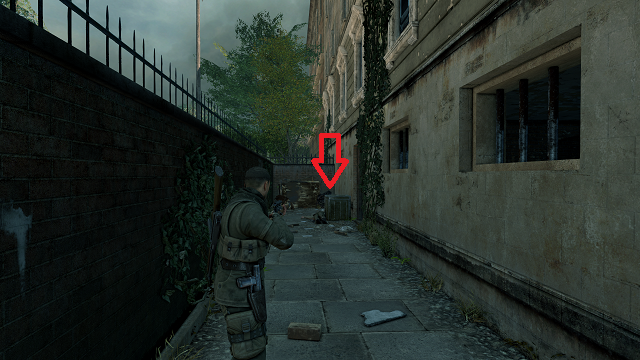
Gold Bar 1
Exit onto the street and deal with the Russian and German soldiers. With the canal on your right, continue down the street. At the intersection, there is an opening to go down to the canal. At the end of the stairs leading down, there is a pile of crates. The gold bar is behind those crates.
Gold Bar 2
Grab the last bar, and go up the stairs leading to the street on the opposite side of the canal. More enemies will spawn. After taking them out, go past the ruined car and motorbike. Go into the house on the left side of the street (there is another ruined car right in front of the entrance).
Inside, take an immediate left into a small room. The gold bar is on the ground in the back of the room.
Gold Bar 3
When you reach the street leading to the underground tunnel, you will see a soldier walk out from a side path to the left. Go down that path. The gold bar is near the end in the middle of the path.
Gold Bar 4
When you exit the tunnel into the square, there is a red brick building to your left. Use the rubble next to it to climb up. Go all the way to the top of the building. The gold bar is on the roof, on the opposite side of the stairs you’ll use to reach the roof.
Gold Bar 5
Exit the building, and go straight over to the ruined building in the middle of the square. You will see a stack of crates against the front wall of the building. Use those to climb onto the roof and claim the gold bar.
Gold Bar 6
Now go inside the same building from the front. There are tunnel entrances on your right and left. Go down the one on the right. At the very end, the gold bar is on a crate on the right-hand side.
Gold Bar 7
Now go into the left tunnel. At the bottom of the stairs, the gold bar is lying on the ground on the right-hand side.
Gold Bar 8
After you search the first building for documents (where you find Wolf’s escape plan) and kill all of the soldiers outside, go to the objective marker. Climb up into the building with the red flag hanging from it. There is a room with a fireplace directly in front of you. The gold bar is in the fireplace.
Gold Bar 9
Now climb to the top of the building. When you reach the end of the stairs, turn right. The gold bar is on a shelf on the left-hand side of the room.
Gold Bar 10
After finding the map, you’ll be forced to go along a ledge to escape. Eventually, you’ll get off the ledge and enter a room. The gold bar is in the back right corner of the room.
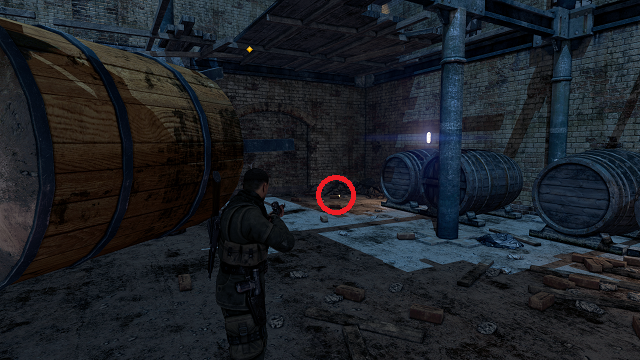
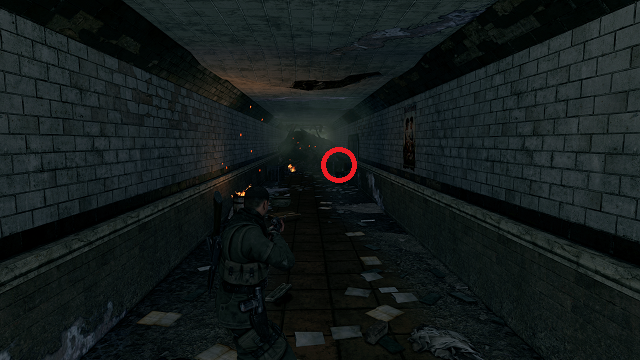
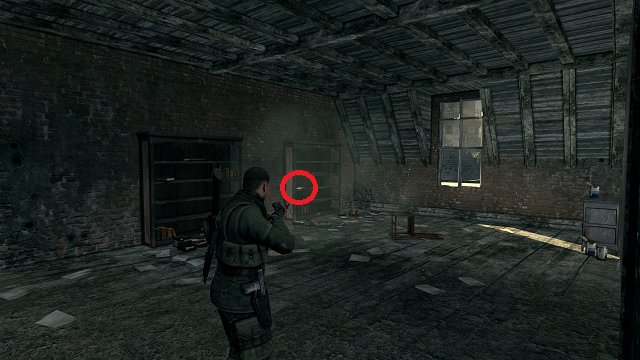
Mission 9: Kopenick Launch Site
Gold Bar 1
From the beginning of the mission, exit the ruined building in which you start, and turn right. Go through the small corridor between the buildings.
In the next open area, there is a truck with its lights on to the right. The gold bar is behind the truck.
Gold Bar 2
The truck’s lights are shining on a wall in front of it. Go along the right side of the wall and through the window of the next building in front of you. Jump through and turn left. The gold bar is on the ground.
Gold Bar 3
From there, go toward the trenches in the distance. There are two flaming trucks on the right-hand side of the road. Go past the second one, which is next to a ruined house. Directly after, next to a crate and a barbedwire fence, you’ll find the next gold bar.

Gold Bar 4
From there, go into the church. The gold bar is underneath a pew. If you come in from the front of the church, the pew is on the right-hand side (as in the screenshot). If you come in from the side, the pew is on the left-hand side (as in the video).
Gold Bar 5
Go through the side door in the vestibule of the church. Climb up the ledges to the top. The gold bar is to the right of the hole in the wall.
Gold Bar 6
When you enter the trenches, take the first right. Follow the path until you reach the bunker on the left with the two guards. Kill them and continue right. Follow that path all the way to the end. There is a machine gun nest on your right. The gold bar is just inside the nest.
Gold Bar 7
Leave the machine gun nest. Turn left and then immediately right. Go all the way down the path to find the next gold bar on the ground.
Gold Bar 8
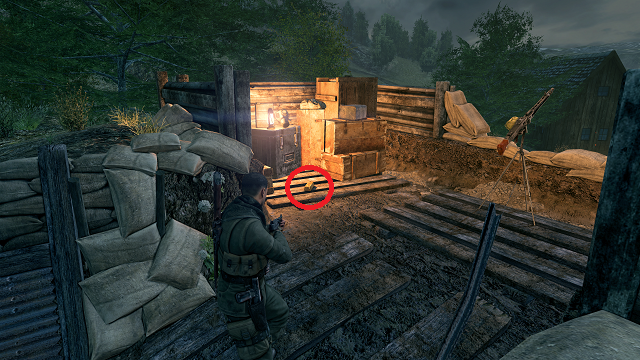
From there, go left and all the way down the corridor to the officer’s bunker. There is a desk there with a kerosene lamp and some papers on it. The gold bar is behind the desk.
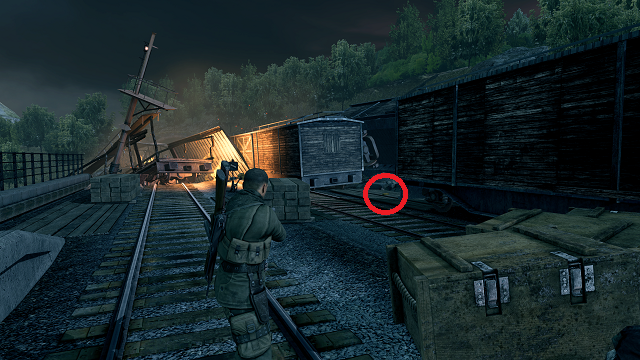
Gold Bar 9
When you reach the rocket control room area/train station, continue past the control room building on your left. Look for the gap in the train cars to your right. The gold bar will be there.

Gold Bar 10
Ascend the stairs to reach the second story of the rocket control room/train station. The gold bar is in the back right corner of the room.
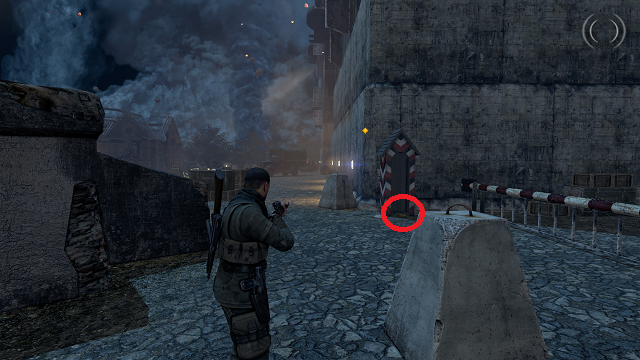
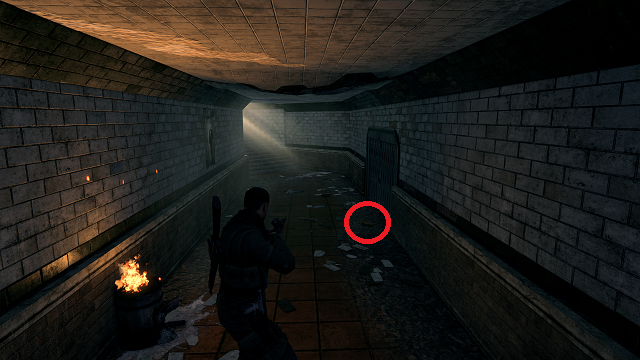
Mission 10: Brandenburg Gate

Gold Bar 1
Near the beginning of the level, you’ll see a tunnel on the left-hand side of the street. Go inside. The gold bar is on the floor on the left-hand side.
Gold Bar 2
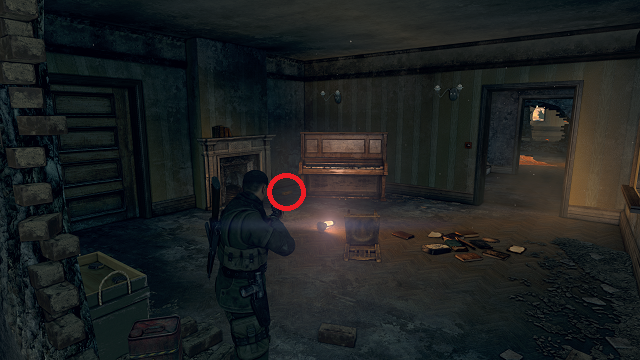
Exit the tunnel by going straight ahead from the last gold bar. Reach the street above and turn right. Looking straight down the street, there is a building on the right with a large propaganda poster on it at the top. Go into that building and follow the path to the very end.
You’ll climb up onto the second floor and come to a room with a kerosene lamp and a piano. The gold bar is to the left of the piano.
Gold Bar 3
Exit that room and go down the stairs you just passed. At the bottom, turn right and then right again. The gold bar will be in an alcove next to the stairs.
Gold Bar 4
Now turn around and go past the stairs into the next room. The gold bar is on a table at the far end.
Gold Bar 5
Go back out onto the street, and turn right. Go past the truck and the ammo boxes and crates stacked behind it. You’ll see a fiery car to your right. The gold bar is inside the car.
Gold Bar 6
When you enter the square with the Brandenberg Gate, stay to the left side of the area and enter the first building you can. It will have a green, copper eagle above the entrance. Go in, and turn around. The gold bar is behind the door.

Gold Bar 7
Exit that building and continue left, hugging the perimeter of the area. You’ll eventually come to a tent on the far left side of the area. The gold bar is on a crate inside the tent.
Gold Bar 8
Now go to the gate. When you get there, you’ll see two guard houses on either side. The left one will take you to your objective. However, go inside the right one first. Climb the stairs to the top to find the gold bar.
Gold Bar 9
Go inside the left guardhouse. Turn left as soon as you enter. The gold bar is on the desk.
Gold Bar 10
Climb to the top of the Gate. The gold bar is on the roof to the left.
—
And that’s it, all of the gold bars in Sniper Elite V2 Remastered. Kick back, count your money, and spend it wisely. For more, check out our other Sniper Elite V2 Remastered guides.


Published: May 13, 2019 10:01 am