
Courses in New Pokemon Snap are unlocked and leveled up by the Professor Mirror gives to your photos. You’re able to get points for each Pokemon in four different ways. Each is given a star grade that matches up with different interactions you can force using the various tools you have available. The most complex and hardest to discover are the New Pokemon Snap 4-Star photo interactions.
These New Pokemon Snap 4-Star photo interactions sometimes take several steps to unlock and are often found later in the game as you progress. For this New Pokemon Snap guide, we will discuss how to unlock these 4-Star interactions with every Pokemon.
We have guides on how to get these interactions on further islands. Check out how to get all 4-Star interactions on Maricopia and Voluca, and how to get all 4-Star interactions on Durice and Aurus.
How to Unlock Every Pokemon’s 4-Star Interactions
Capturing the Perfect Photo
First of all, to maximize your points, you’ll need to know what New Pokemon Snap is looking for in each photo. This is broken down into six categories:
- Pose
- Size
- Direction
- Placement
- Other Pokemon
- Background
Pose is in reference to whether or not a Pokmon is doing some sort of interaction or is moving in a unique way. A good Size score comes with keeping the Pokmon within the frame as close as possible.
Direction has to do with which way the Pokmon is facing, with it looking at you giving a higher score. Placement deals with whether the target is centered in the frame.
Other Pokemon obviously is a bonus if you have additional Pokemon pictured. And finally, the Background is determined by what’s behind Pokemon in the shot.
Focusing on these categories will allow you to get better and better pictures. These pictures are graded on the following scale:
- Bronze Stars: Less than 2,500 points
- Silver Stars: 2,500-3,500 points
- Gold Stars: 3,500-4,000 points
- Diamond Stars: 4,000+ points
Once you’ve mastered the perfect photo, you can move on to getting the right interactions to happen to maximize the number of points you can earn.
4-Star Interactions List for Florio & Belusylva
The following list information on how to get 4-Star photo interactions with 79 pokemon on Florio & Belusylva. We will have guides outlining the criteria for getting 4-Star photo interactions with other pokemon on other islands soon.
- #001 – Vivillon – Jungle (Day) – Take the alternate swamp route and throw an Illumina Orb at the Aipom to the right. The Aipom should cut the tall grass in front of the cave, where Monsoon Pattern Vivillons will be waiting. Toss an Illumina Orb at one. Capture it leaving the cave.
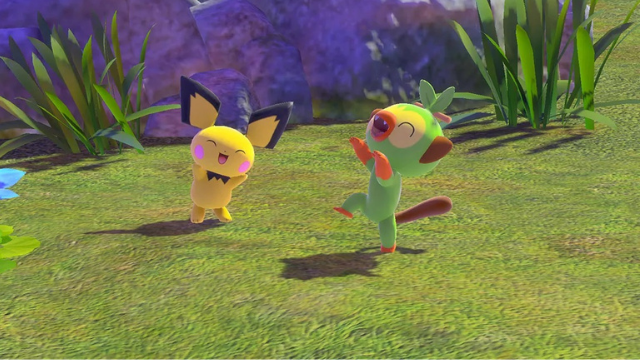
- #002 – Pichu – Park (Day) – Throw a Fluffruit at Pichu while it’s hiding in the Flower Field. Capture it wearing the Flower Crown.
- #003 – Grookey – Park (Day) – Play music while Grookey is running by the sign at the start of the course. Capture it hitting the sign with its stick.
- #004 – Scorbunny – Park (Night) – When Scorbunny jumps on the sign at the beginning of the course, hit it with an Illumina Orb. Capture it kicking with blue flames.
- #005 – Bouffalant – Park (Day) – At the Flower Field, hit Bouffalant with an Illumina Orb. Capture it bucking while it has a Flower Crown on.
- #006 – Pidgeot – Park (Night) – Feed Pidgeot a Fluffruit by the Bouffalant at the start of the course and by the Bidoof dam. It will block your path when entering the Flower Field. Capture it “smiling” at you.
- #007 – Tangrowth – Park (Night) – Hit Tangrowth with an Illumina Orb while it’s asleep at the start of the course. Capture it stretching its arms out.
- #008 – Emolga – Park (Day) – Where you see a pile of apples under a tree, throw a Fluffruit there to lure an Emolga over. Capture it electrocuting the fruit.
- #009 – Wurmple – Park (Day) – By the Bidoof dam, a few Taillow will fly out of a bush on your left. Take a picture of at least one of them. Around the corner on the left, you’ll see Taillow fighting with Wurmple. Hit Wurmple with an Illumina Orb. Capture it spraying poison at Taillow.
- #010 – Murkrow – Park (Night) – Throw a Fluffruit to Murkrow. Capture it eating it.
- #011 – Caterpie – Park (Night) – Before entering the Flower Field, play music by the sign to get four Caterpie to poke their heads out. Capture them doing this.
- #012 – Heracross – Park (Night) – Hit Pinsir’s mound with an Illumina Orb. Use your scan multiple times until the Heracross falls out of the tree. After you turn the corner by the Bidoof dam, you’ll see Heracross fighting Pinsir. Capture it fighting.
- #013 – Pinsir – Park (Night) – Hit Pinsir’s mound with an Illumina Orb. Use your scan multiple times until the Heracross falls out of the tree. After you turn the corner by the Bidoof dam, you’ll see Pinsir fighting Heracross. Capture it fighting.
- #014 – Dodrio – Park (Day) – Throw a Fluffruit to Dodrio. When it throw it in the air, if it doesn’t catch it in its mouth, it’ll start fighting with itself. Capture the heads fighting.
- #015 – Ducklett – Park (Day) – A Ducklett is flying by the Bidoof fam. Capture it flying.
- #016 – Swanna – Park (Night) – Play music as soon as the flying Swanna lands and wait for the Swanna and Duckletts to fly away. Capture the Swanna.
- #017 – Bidoof – Park (Day) or (Night) – Throw a Fluffruit into the hole at the top of the dam. Capture it sticking its head out.
- #018 – Taillow – Park (Day) – By the Bidoof dam, a few Taillow will fly out of a bush on your left. Take a picture of at least one of them. Around the corner on the left, you’ll see Taillow fighting with Wurmple. Hit Wurmple with an Illumina Orb. Capture it getting hit by the poison.
- #019 – Torterra – Park (Night) – Hit a Torterra with a Fluffruit. Capture it yawning.
- #020 – Magikarp – Park (Day) – When entering the Bidoof dam area, you’ll see a Pidgeot on the hill to your left. Hit it with a Fluffruit to get it to perch in the tree where Hoothoot sleeps. Take the alternate route over the dam and throw a Flouffruit at Magikarp to get it to jump. Wait for Pidgeot to swing around and grab Magikarp. Capture it carrying Magikarp.
- #021 – Hoothoot – Park (Night) – Play music while Hoothoot is perched in the tree. Capture it flying away.
- #022 – Comfey – Park (Day) – As you enter the Flower Field there will be Crystablooms all around. Activate one near a Comfey, and while it’s lit up, play music. Capture it dancing around.
- #023 – Florges – Park (Day) – Play music near it so it uses Petal Blizzard. Capture it doing this.
- #024 – Combee – Park (Night) – When entering the Flower Field, you’ll see a Crystabloom immediately to your right. Hit it with an Illumina Orb, which should send a Combee flying away. Then hit the Crystabloom in the center of the field on the right with an Illumina Orb. This should summon Vespiqueen. Once she arrives play music. Capture the Combee dancing.
- #025 – Vespiqueen – Park (Night) – When entering the Flower Field, you’ll see a Crystabloom immediately to your right. Hit it with an Illumina Orb, which should send a Combee flying away. Then hit the Crystabloom in the center of the field on the right with an Illumina Orb. This should summon Vespiqueen. Once she arrives play music. Capture the Vespiqueen directing.
- #026 – Sylveon – Florio Illumina Spot – Wake up the hiding Sylveon at the beginning of the course. It’s to the right up on a hill. Hit it with an Illumina Orb and wait for it to be close to Meganium. When Meganium activates the Crystabloom, Sylveon will jump for joy. Capture this.
- #027 – Shaymin – Park (Day) Post Credits – When entering the Flower Field you’ll see a Crystabloom to the right in the middle of the field. Hit it with an Illumina Orb to disturb the Shaymin sleeping by it, which will make it run to the Crystabloom on the left. Feed it a Fluffruit and then hit it with an Illumina Orb. Capture it jumping for joy.
- #028 – Meganium – Florio Illumina Spot – Near the end of the course, Meganium will walk under a tree. Scan multiple times to cause a Hoothoot to fall out and hit Meganium in the head. Capture its reaction.
- #029 – Eevee – Research Camp – Take the alternate route through the lab and wake up Eevee by hitting it with an Illumina Orb and then scanning. Next, scan the TV in the lab to release some Cutifly. Hit them with a couple of Illumina Orbs to get Eevee to chase them. Once Eevee quits chasing them, if you hit it with an Illumina Orb, it’ll sit down. Capture it doing this.
- #030 – Pikachu – Research Camp – Lure Pikachu to the NEO-ONE with Fluffruit and then throw an Illumina Orb at it. Capture its reaction.
- #031 – Cutiefly – Research Camp – Lure a Cuitefly to a Crystabloom and activate it with an Illumina Orb. Capture its reaction.
- #032 – Bunnelby – Research Camp – When the Bunnelby is hiding in the holes, hit it with an Illumina Orb and then hit it with a Fluffruit. Capture its reaction.
- #033 – Stoutland – Research Camp – Lure Stoutland to the middle of the camp with Fluffruit. Knock Eevee off the table with a Fluffruit. Capture Stoutland playing with Eevee.
- #034 – Starly – Research Camp – Feed a Starly two Fluffruit. Capture it waving.
- #035 – Meowth – Research Camp – Lure Meowth with Fluffruit to the deck to get Rattata out. Then, lure it to Sudowoodo. Capture it scratching Sudowoodo.
- #036 – Audino – Research Camp – Lure a Cutiefly to Audino with Fluffruit, play music so they start dancing, then hit Audino with Illumina Orb to knock it off balance. Capture its reaction.
- #037 – Rattata – Research Camp – Activate the Crystabloom by the firepit to get Rattata to run away and play music when it reaches the center of the route. Capture it dancing with whatever other Pokémon have been lured there.
- #038 – Trubbish – Research Camp – Activate the Crystabloom by the firepit to get Trubbish to run away and play music when it reaches the center of the route. Capture it dancing with whatever other Pokémon have been lured there.
- #039 – Sudowoodo – Research Camp – Activate a Crystabloom when Sudowoodo gets close and play some music. Capture it dancing.
- #040 – Dedenne – Research Camp – Take the alternate route into the lab, where you’ll play music to get Dedenne to electrocute the computer. Capture this.
- #041 – Aipom – Jungle (Day) – Take the alternate swamp path and throw an Illumina Orb at the Aipom. Capture it cutting the grass.
- #042 – Bounsweet – Jungle (Night) – Play music at the start of the course to lure the Bounsweet to Ariados’ big web. Wake up Ariados by hitting it with multiple Fluffruit. Capture Bounsweet’s reaction.
- #043 – Metapod – Jungle (Day) – Play music near any Metapod to get it to use Harden. Capture this.
- #044 – Beautifly – Jungle (Day) – Hit the Venusaur at the start of the course hiding behind the tree on the right with Illumina Orbs when Beautifly gets close. Capture it feeding on Venusaur’s flower.
- #045 – Arbok – Jungle (Night) – Hit Arbok with Fluffruit until it falls out of the tree. Capture it falling.
- #046 – Yanmega – Jungle (Night) – Play music before the alternate swamp route to scare Yanmega out of the bushes. Take swamp path and play music again to lure out the Ariados. Hit Ariados with an Illumina Orb to help it win the fight. Capture this.
- #047 – Pikipek – Jungle (Day) – After the swamp, throw a Fluffruit into the hole of the tree on the left. A Pikipek will grab the Fluffruit and fly it to its nest at the large tree with the Toucannon. Capture it taking the fruit to its nest.
- #048 – Toucannon – Jungle (Night) – Hit the Crystabloom in the tree with an Illumina Orb. When it goes out, hit it again. Do this three times until the Toucannon and Pikipek start to fly away. Capture them flying.
- #049 – Ariados – Jungle (Night) – Play music at the start of the course to lure the Bounsweet to Ariados’ big web. Wake up Ariados by hitting it with multiple Fluffruit. Capture Ariados’ reaction.
- #050 – Morelull – Jungle (Night) – Hit the Crystabloom in the tree with an Illumina Orb. A Morelull should release its spores. Capture this.
- #051 – Slaking – Jungle (Night) – Feed Slaking a Fluffruit at the beginning of the course, which should make it run off. Then lure it out of the woods to the right of the pond with music. Capture it on the rock.
- #052 – Venusaur – Jungle (Day) – Hit the Arbok with a Flufflruit to get it out of the way at the start of the course. Then lure the Arbok to the Venusaur with Fluffruit, wake up Venusaur with a scan so they fight, which should cause Venusaur to run away. Once at the end of the course, activate the Crystabloom on the rock in the center of the pond and immediately play music. Capture Venusaur jumping in the pond.
- #053 – Liepard – Jungle (Night) – Knock the Arbok out of the tree with Fluffruit to scare out a Liepard. Before the swamp path on the right is an open area where a Liepard is—hit it with an Illumina Orb so it runs off. On the path to the right of the swamp, you’ll see the Liepard in a tree. Play music so it jumps down. Hit it with an Illumina Orb once it’s back on the ground. Capture it on its hind legs.
- #054 – Wooper – Jungle (Day) – Play music at the start of the course by the sleeping Slaking to lure the Bounsweet out. Scare away the Arbok with a Fluffruit so that Wooper will run out of the bush. Capture Wooper with Bounsweet.
- #055 – Quagsire – Jungle (Day) – Capture Quagsire jumping into the pond at the end of the course.
- #056 – Swampert – Jungle (Night) – Take the swamp path on the left and quickly hit Leafeon with Fluffruit to get it to also enter the swamp. Play music so the Ariados drop down and scare the Leafeon into the water. Swampert will jump up. Hit it and Leafeon with Illumina Orbs to get them to splash around. Capture this.
- #057 – Ledian – Jungle (Night) – Take the alternate path under the big tree to the ground level. Hit the Crystabloom down there with an Illumina Orb to bring out some Ledian. Feed Ledian a Fluffruit. Capture this.
- #058 – Sobble – Jungle (Day) – Take the alternate path behind the waterfall and hit the Sobble back there with a Fluffruit. Capture it crying.
- #059 – Leafeon – Jungle (Day) – Take the alternate path behind the waterfall and hit the Sobble back there with a Fluffruit. Wait for Leafeon to walk up to it. Capture it crying.
- #060 – Mew – Jungle (Night) – When Mew is near a Morelull, play music so they release their spores. Capture Mew sleeping.
- #061 – Trevenant – Forest – Use scans to get an Espurr to run close to a Trevenant. Capture Trevenant picking up the Espurr.
- #062 – Espurr – Forest – Use scans to get an Espurr to run close to a Trevenant. Capture Espurr being picked up by the Trevenant.
- #063 – Shiftry – Forest – Knock Shiftry out of its tree in the Spring Area with a Fluffruit and use an Illumina Orb to get it to use Gust. Capture this.
- #064 – Kecleon – Forest – In the Autumn Area, knock Kecleon out of one of the leaf piles using a Fluffruit. Capture its reaction.
- #065 – Deerling – Forest – In the second foggy area, hit each Crystabloom on the right with an Illumina Orb, luring the Deerling down the path. At the end, capture it jumping for joy with Espurr.
- #066 – Sawsbuck – Forest – First, take the alternate route in the third area to the sunny spot. Scan immediately to bring Espeon down and feed it a Fluffruit. Hit Espeon with several Illumina Orbs while it runs off. Around the corner, hit the Crystabloom in the middle of all the Deerling and Sawsbuck with an Illumina Orb, summoning the Autumn Form Sawsbuck. Use Fluffruit to gather all four Swasbuck together and play music to get them to howl. Capture them all together doing this.
- #067 – Unfezant – Forest – At the end of the Summer area, feed the Unfezant in the nest a Fluffruit. Capture this.
- #068 – Drampa – Forest – In the first area, hit Espeon with an Illumina Orb. Halfway through the Summer area, hit the Drampa on the right with an Illumina Orb. In the second foggy area, take the alternate path on the right to the sunny spot. Follow the Drampa and hit the Bulbasaur on its back with a Fluffruit once you’re at the end of the course and it jumps off. Capture Drampa’s reaction.
- #069 – Pancham – Forest – In the first area, hit Espeon with an Illumina Orb. Halfway through the Summer area, hit the Drampa on the right with an Illumina Orb. In the second foggy area, take the alternate path on the right to the Sunny area. Capture Pancham riding on Drampa’s head.
- #070 – Bulbasaur – Forest – In the first area, hit Espeon with an Illumina Orb. Halfway through the Summer area, hit the Drampa on the right with an Illumina Orb. In the second foggy area, take the alternate path on the right to the Sunny area. Capture Bulbasaur riding on Drampa’s back.
- #071 – Serperior – Forest – In the Autumn area, throw Illumina Orbs at Serperior and play music. When it walks over to Deerling it’ll use Leaf Storm. Capture this.
- #072 – Applin – Forest – In the Autumn area, lure Deerling on your left to the Applin under the tree using Fluffruit. Wait for Applin to come out of the apple. Capture this.
- #073 – Bewear – Forest – In the Ruins area, hit a Bewear with several Fluffruit until it starts to chase you. Capture this.
- #074 – Gardevoir – Forest – In the Winter Area, repeatedly hit Gardevoir with Illumina Orbs to lure it to the Deerling by the Crystabloom. Hit the Crystabloom with an Illumina Orb and Gardevoir will make white leaves on a tree. Capture this.
- #075 – Ninetales – Forest – Take the alternate path to the Winter area and repeatedly hit Gardevoir with Illumina Orbs to lure it to the Deerling in the open area on your right. Feed the Deerling and while it’s eating hit it with another Fluffruit to make it upset. This will summon the Ninetales. Hit the Ninetales with an Illumina Orb and then a Fluffruit to have it unleash purple flames. Capture this.
- #076 – Lotad – Forest – In the Sunny area, hit the first Lotad with a Fluffruit and then play music to get them to stack on top of each other. Capture this.
- #077 – Espeon – Forest – Hit Espeon with an Illumina Orb as it runs down the path. Capture this.
- #078 – Celebi – Forest – In the ruins area, hit the flying Celebi with an Illumina Orb, which will make it disappear. Further ahead when you’re under the tree, throw Fluffruit to the right where you see apples on the ground to lure Celebi there. It will eat and then disappear. Hit it with an Illumina Orb while it’s sitting on the pillar. When it gets up to greet the other Celebi, play music. Capture their reaction.
- #079 – Milotic – Belusylva Illumina Spot – After you go over the branch, hit Milotic on the head with an Illumina Ob to get it to use Surf. Capture this.
That’s every 4-Star interaction for each Pokemon on Durice and Aurus Islands. If you’re looking for more interactions, be sure to check out the interactions for the Durice and Aurus Islands or Maricopia and Voluca, and our guide for Maricopia and Voluca Islands. For more on New Pokemon Snap, check out our other guides.


Published: May 20, 2021 04:15 pm