Sniper Elite 4 is all about killing Nazis in creative and inventive ways. But it’s also about finding (often obscure) collectibles strewn about the map, something the Sniper series is infamously known for. One of those collectibles is the Stone Eagle.
Each map in Sniper Elite 4 has three Stone Eagles hidden in out-of-the-way places, both high and low. A veritable scavenger hunt, finding these deadeye collectibles can be a huge time sink.
But instead of you doing all the work yourself, we’ve done the heavy lifting so you don’t have to. Below are all the locations for each Stone Eagle in SE4. Once you’ve collected all of them, you’ll be awarded the “A Bird in Hand” achievement.
Read ahead for all deadeye locations in the Sniper Elite 4 campaign, co-op missions, and “Kill Hitler” DLC.
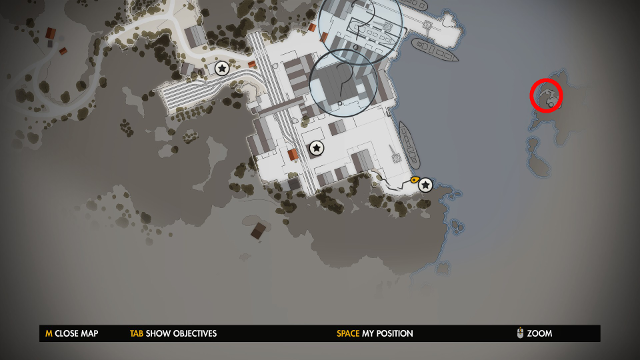
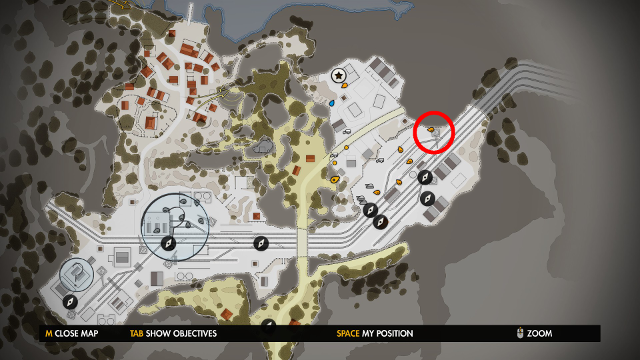
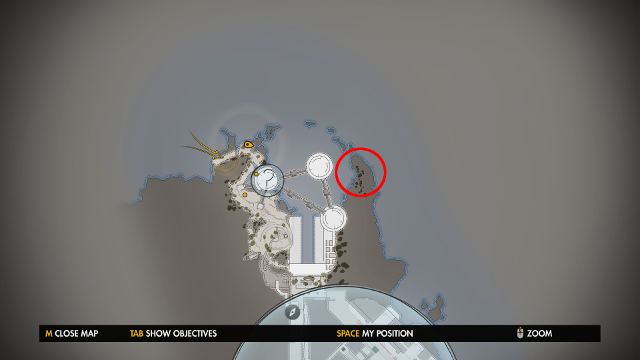
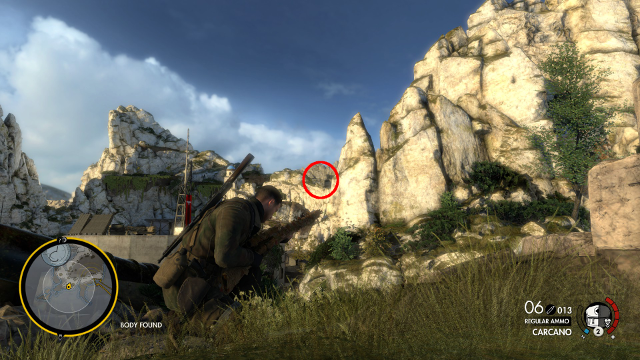
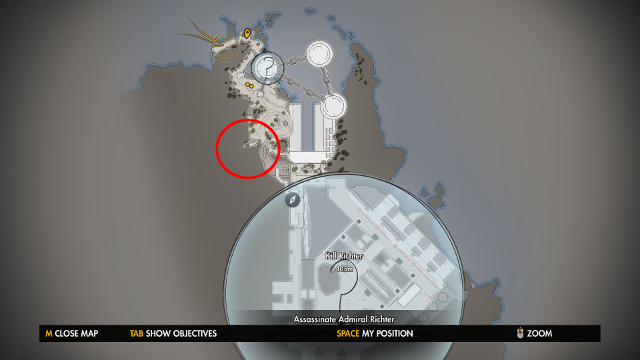
San Celini Island Stone Eagle Locations
Stone Eagle #1
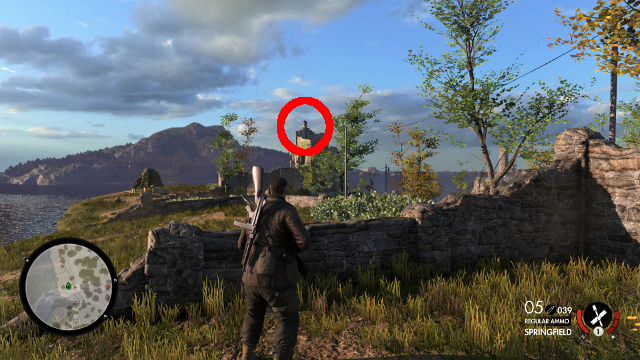
After you’ve gone through the first tutorial section of the mission and emerged into the map proper, go past the first tower (the one Karl says would make a good vantage point), and head left along the cliffside by the coast. There will be a single soldier ahead of you, who you can make quick work of if need be. Look to the top of the ruined tower ahead of you. You’ll see your first Stone Eagle perched on top.
Stone Eagle #2

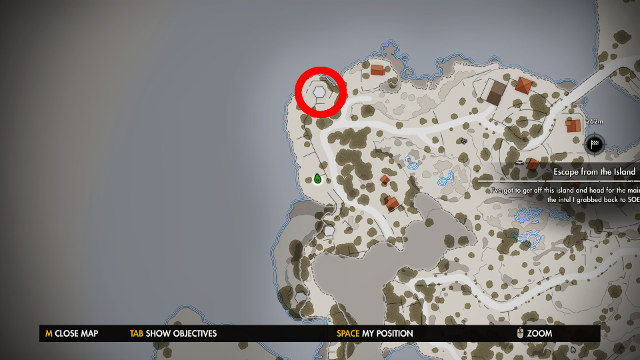
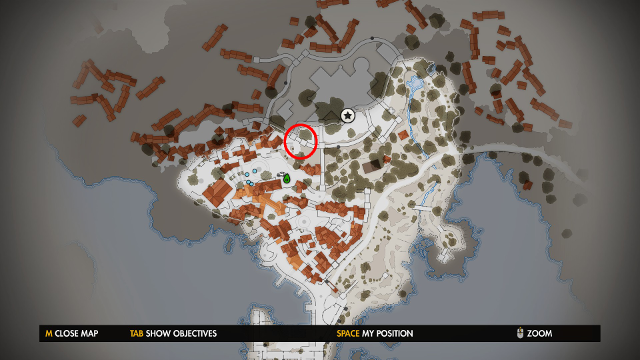
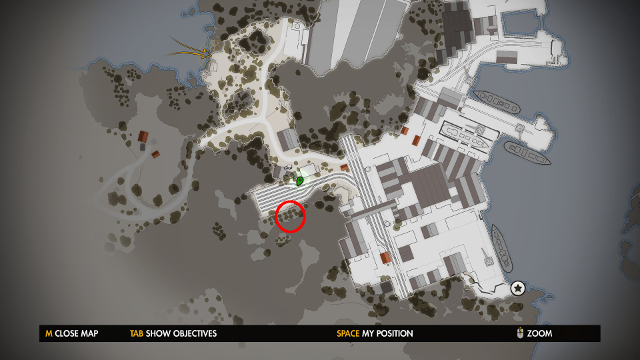
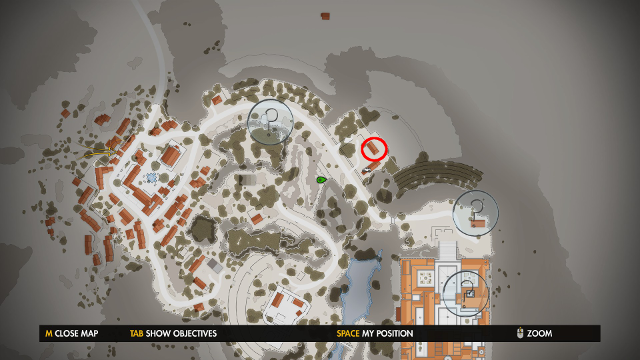
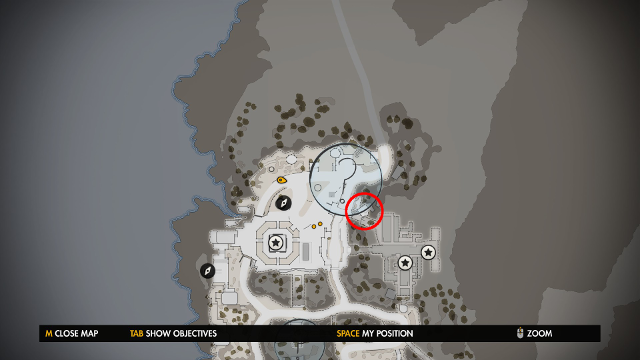
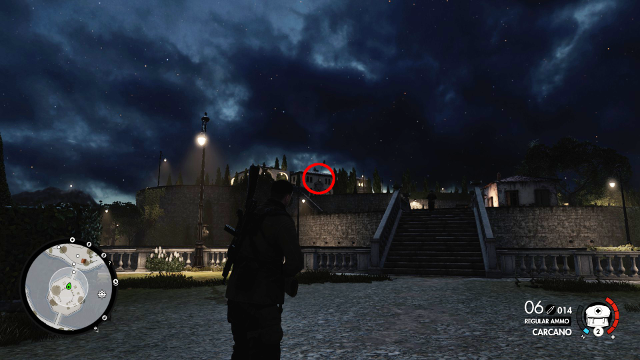
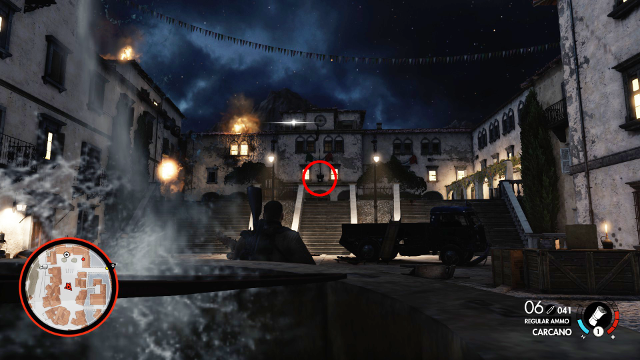
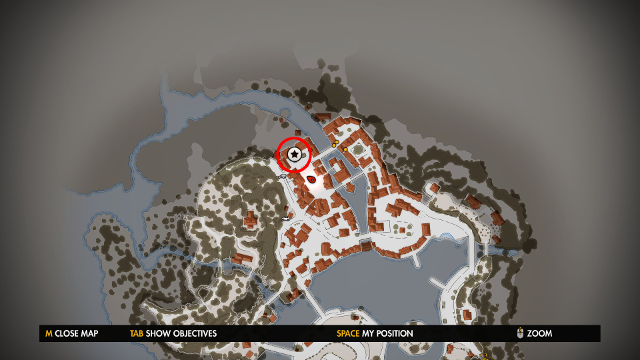
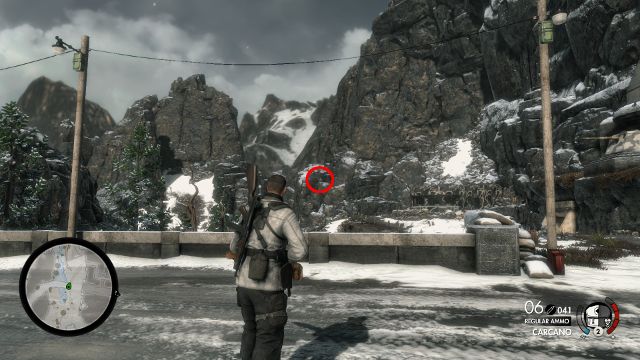
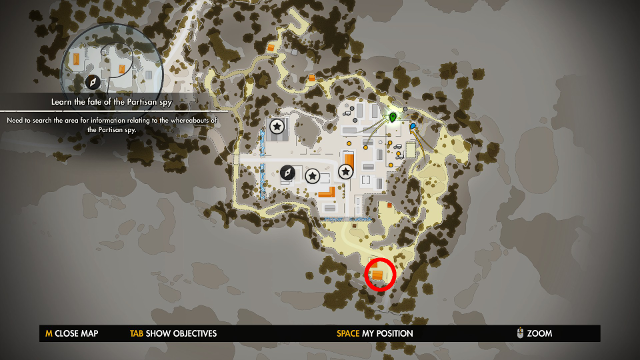
Stone Eagle 2 can be found in the southeast corner of the map. If you’re going through the San Celini mission clockwise from Stone Eagle 1, you will pass over a bridge on the map’s western side, through a town in the map’s northern section, and stop at an encampment on the map’s southern mountainside. From the map point shown, look for a nearby tower in the southeast. Your second Stone Eagle is perched on top.
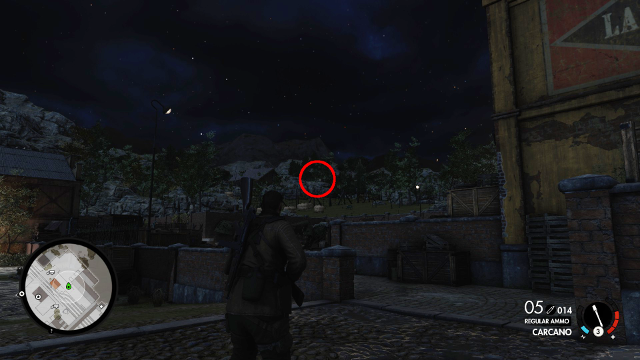
Stone Eagle #3


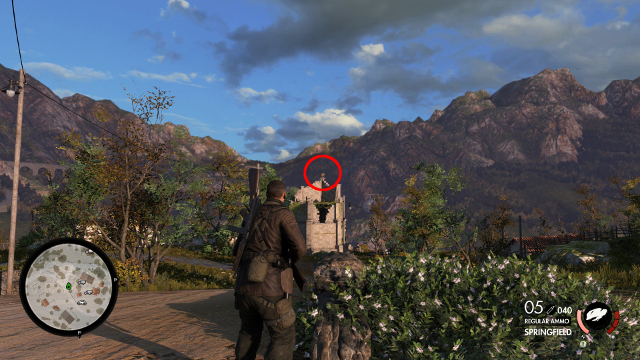
From Stone Eagle 2, continue going clockwise around the map, going through the encampment you’re currently in. Going along the main road, you’ll come to a position on the left with supplies, two Nazi soldiers, and covered spotlight. From this position, look southwest, toward the docks at the bottom of the map. You’ll see another tower (an aqueduct will be in the distance behind it). Look toward the top of the tower, where you’ll find your third and final Stone Eagle for Sniper Elite 4‘s first mission.
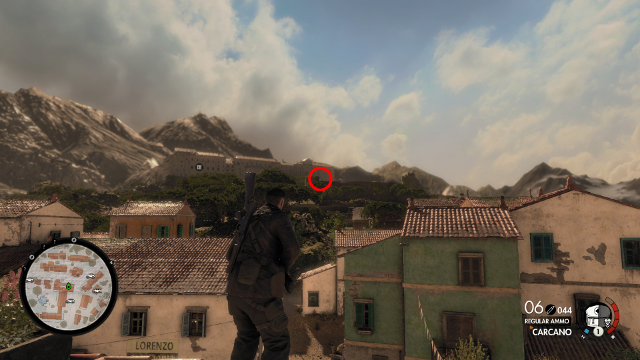
Bitanti Village Stone Eagle Locations
Stone Eagle #1
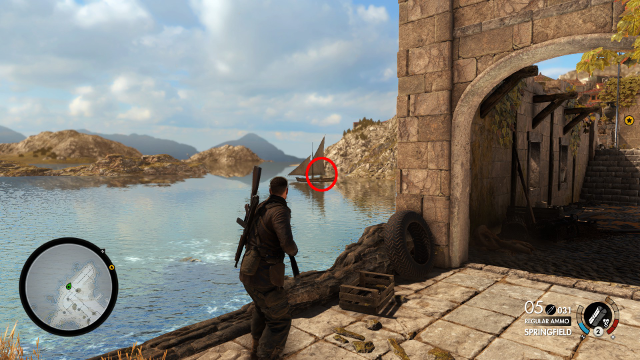
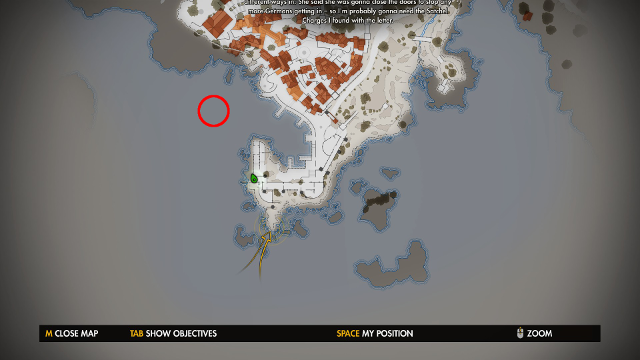
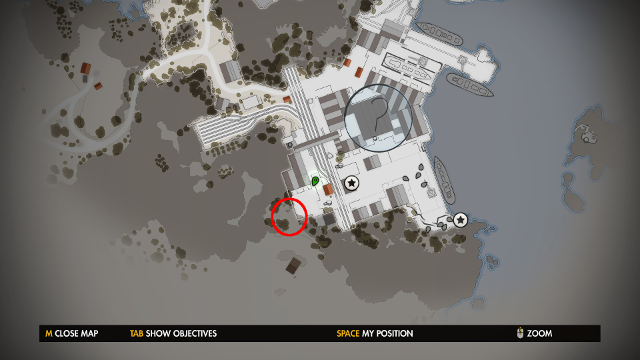
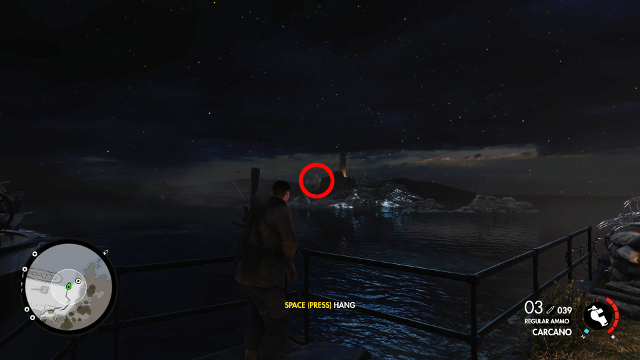
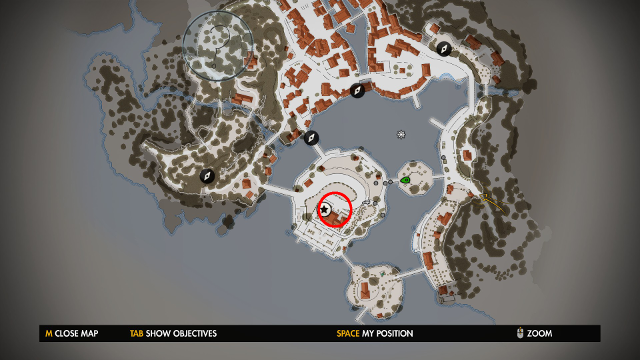
For your first Stone Eagle of the Bitanti Village mission, go left along the coast from mission start. As you go through the ruins along the coastline, you’ll quickly go up a flight of stairs. When you reach the top, look left (out into the bay) to see a boat in the distance. Zoom in with your sniper rifle to find your first Stone Eagle sitting on the aft of the ship.
Stone Eagle #2

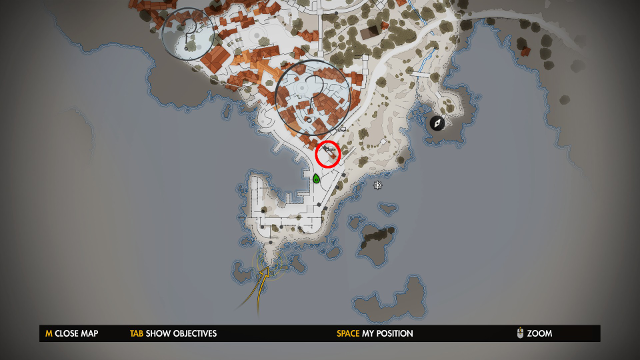
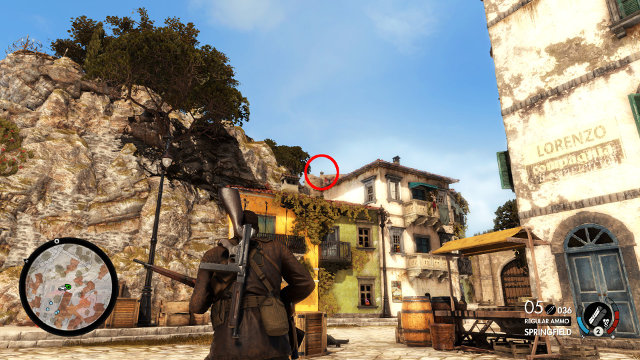
From Stone Eagle 1, go immediately right, through the harbor. But be careful: there is a contingent of Nazi soldiers hiding in the cargo here. Once you’ve cleared the area of enemies, you’ll come to the edge of Bitanti, the village the mission is named after. At the archway pictured above, look for a nook at its zenith. There you’ll find your second deadeye target for this mission.
Stone Eagle #3
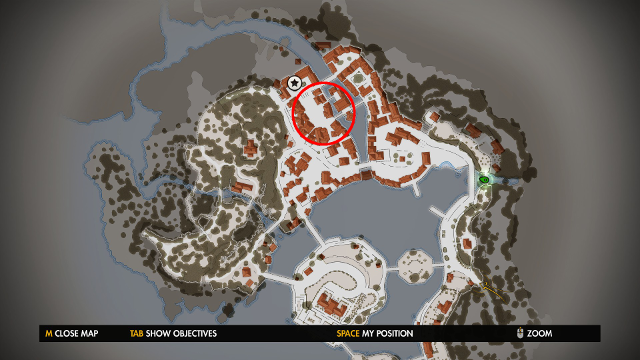
From Stone Eagle 2, go through Bitanti until you reach the section of town (near the graveyard) where Partisan and Nazi forces are engaged in battle. You’ll probably want to help clear out a few enemies before zeroing in on this Stone Eagle — but once you get a clear shot, your third Stone Eagle of Bitanti Village can be found perched atop the northwest parapet of the map’s northern castle.
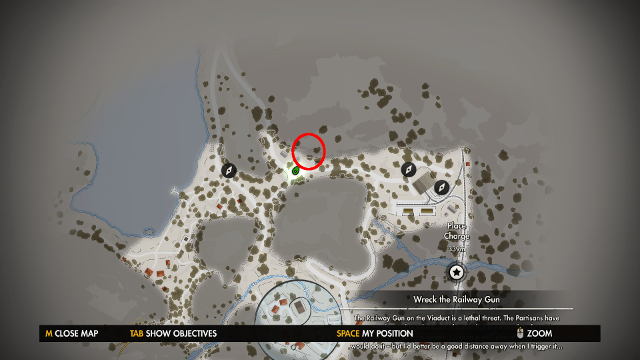
Regilino Viaduct Stone Eagle Locations
Stone Eagle #1
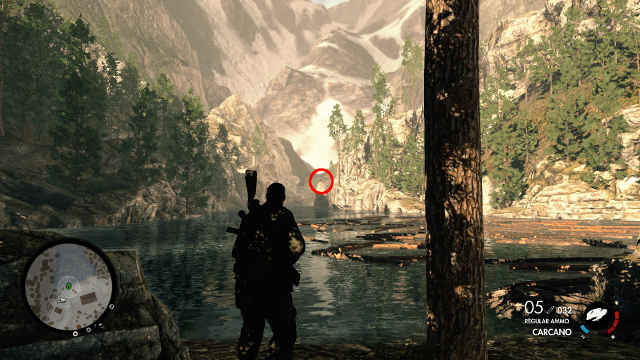
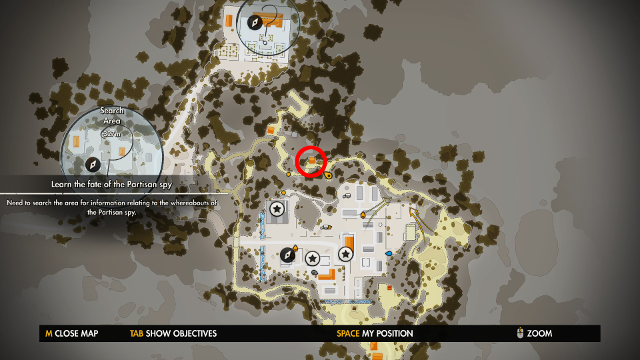
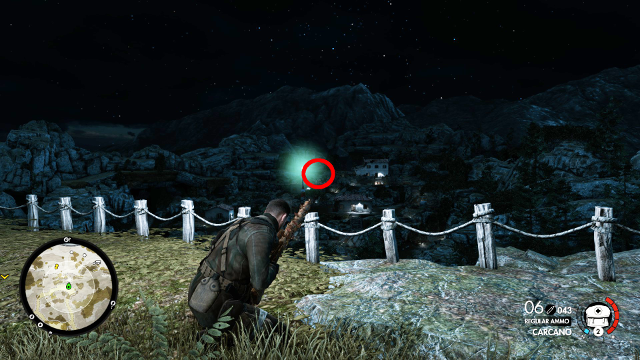
From mission start, climb down the set of three ladders to the forest floor below. Continue right along the edge of the map and cross over the bridge at the creek to the east. Continue east and head toward the encampment ahead. Be careful: there are seven soldiers and an officer in this area. Keep along the eastern edge of the map until you come to a lake. Look out onto the lake and you’ll find your first Stone Eagle perched on a rock outcropping at eye level.
Stone Eagle #2
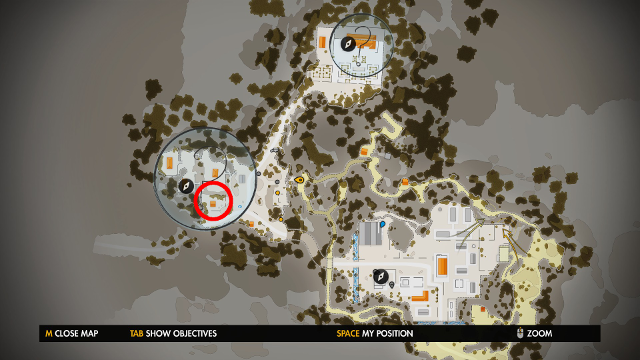
For your second Stone Eagle, you’re going to want to backtrack and head toward the northwest section of the map, just east of the second checkpoint in that region (the one up on the hill with the three trucks you have to destroy). Once you reach your destination, stand directly between the second and third shelters in the encampment and look up between two dead trees. Your second Stone Eagle will be perched on the rock outcropping above.
Stone Eagle #3
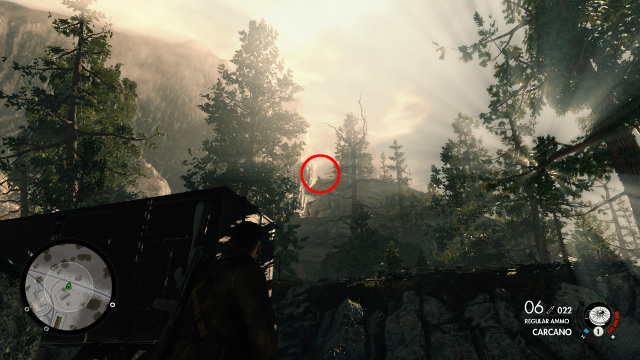
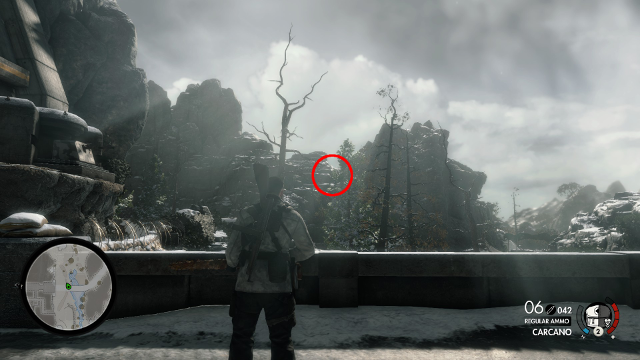
For your third Stone Eagle of the Regilino Viaduct mission, head east after Stone Eagle 2, toward the large base in the northeast of the map (just barely southeast of the “Place Charge” objective marker). Near the railroad tracks, look east into the woods. There, perched high on an outcropping of rock, you’ll find your third and final deadeye target of the mission.
Lorino Dockyard Stone Eagle Locations
Stone Eagle #1
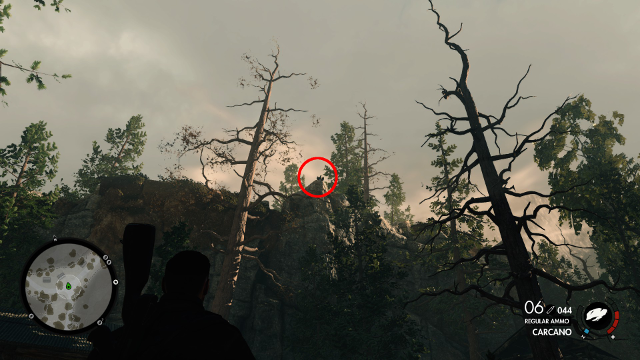
At the start of the mission, head right along the western edge of the map. This area is filled with guards and there’s a pillbox and minefield along the way, so be careful. After you pass through the heavily guarded checkpoint, head toward the railyard and the first “Disable Searchlights” objective. Climb onto the roof of the building with the searchlight on top of it and look into the woods just south of the railyard. There, at eye level, you’ll find your first Stone Eagle perched atop an outcropping of rock.
Stone Eagle #2
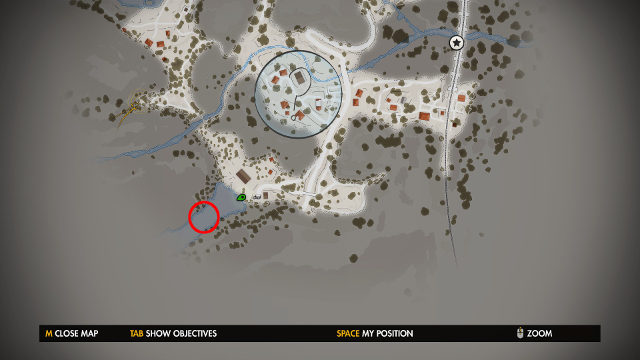
From Stone Eagle 1, head south, further into the railyard. You’ll pass the “Find the Harbour Master” objective marker. In the stockyard located in the southwest corner of the map, look out into the forest (to the right of the house on the outside of the map) and you’ll find your second Stone Eagle perched on an outcropping of rock.
Stone Eagle #3
From Stone Eagle 2, head east, toward the docks and the “Destroy Guns” objective located in the southeastern section of the map. Be wary of the sniper and battalion of Nazi soldiers in this area. Once you get to the area, stop at the top of the stairs on the left-hand side of the fortification (between the ship on your left and the gun emplacement on your right). Look out toward the lighthouse in the distance. Just at the top of the stairs, underneath a lamp post, you’ll find your third and final Stone Eagle of the Lorino Dockyard mission.
Abrunza Monastery Stone Eagle Locations
Stone Eagle #1
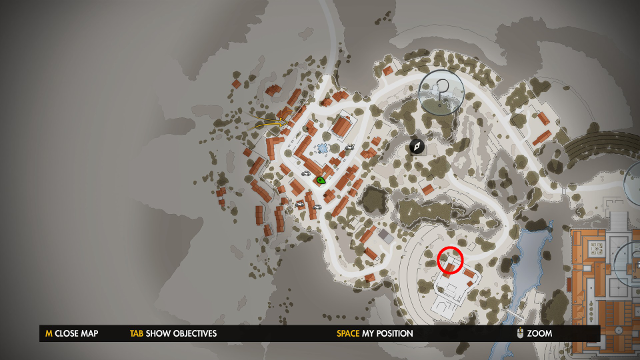
As you begin the mission, come down off the roof and head right and around the corner, minding the two patrolling guards along the way. As you come around the corner, take an immediate left, passing under the portico connecting two buildings and go right and up the stairs. You’ll be in the center courtyard here, so be careful of more Nazi guards.
At the top of the stairs go right (into the building), then immediately left. There will be a ladder in the room you’ve just entered. Go up the ladder and onto the roof. Stop and look straight ahead. In the distance, you’ll see the ruins of a castle (which is the “Kill Soldiers” objective marker). If you look just to the left of the radio tower, on the parapets of the castle, you’ll find your first deadeye target of the mission.
Stone Eagle #2
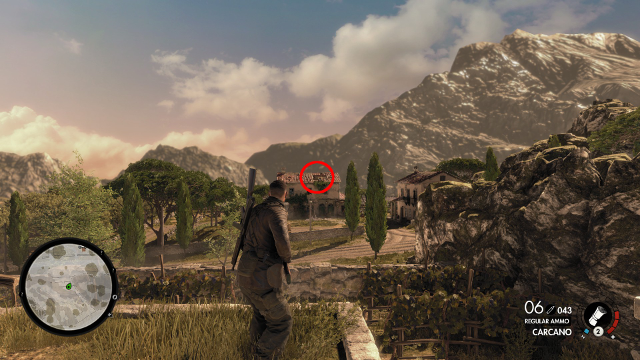
From Stone Eagle 1, drop down onto the road below and take a left, then take your first right, heading into the woods. Go straight, past the blue cart and past the house up ahead. The path will force you to turn left here, do so and cross the road ahead. There will be soldiers to your right patrolling the road, but you can ignore them. Instead, continue across the road and up the set of large stairs. At the top of the stairs, stop. Look straight ahead. You will see your next Stone Eagle in the rafters of the house directly in front of you.
Stone Eagle #3
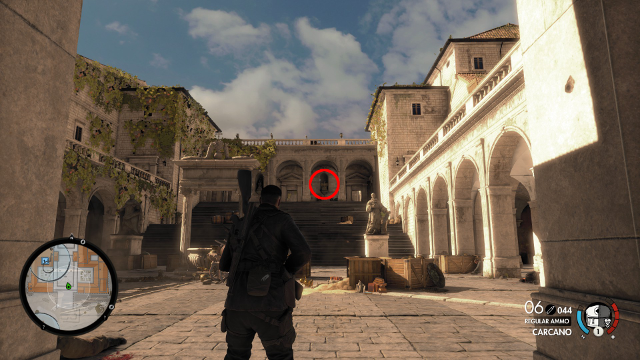
From Stone Eagle 2, go down onto the main road and take a right. Head toward the villa on the hill, where you’ll find you main objective, “Kill Capo.” If you haven’t already cleared this area out, you’ll have dozens of Nazi guards and soldiers to contend with. But when you do clear them out, the next Stone Eagle is arguably the easiest to find in the game.
Go to the top of the villa’s main stairs from the road. Stop at the top and look straight across the courtyard. At the top of the next set of stairs across the courtyard, look to the left of the right entryway. There, in a nook, is your final deadeye target of the mission.
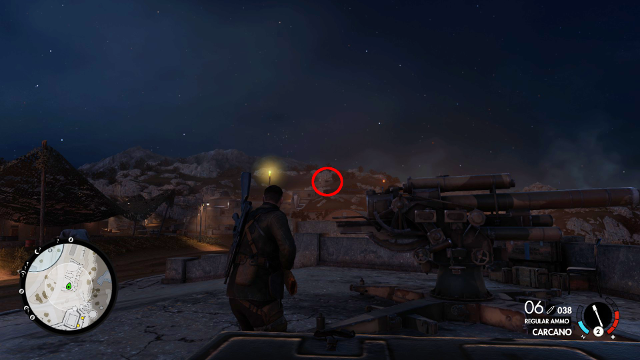
Magazzeno Facility Stone Eagle Locations
Stone Eagle #1
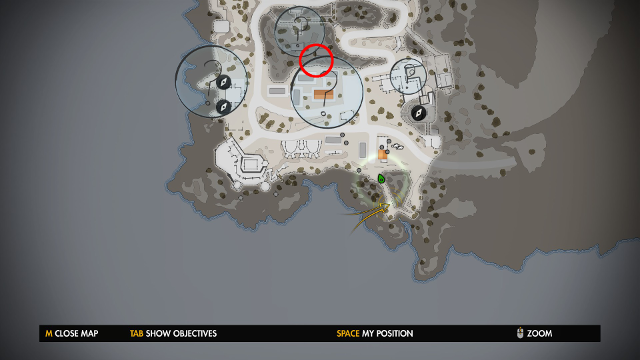
At the start of the mission, go left and up the two earthworks ahead of you. At the top of the second one, stop. Look straight ahead, over the barracks in front of you, and at the top of the gray bunker on the hill in the distance. At the top of this, you will find your first Stone Eagle of the Megazzeno Facility mission.
Stone Eagle #2
From Stone Eagle 1, go left. You can either go down along the coast and climb up the yellow pipe halfway down, or you can chance going along the top behind the barracks. Whichever route you choose, you’re going to want to go to the second gun emplacement (just before the radio tower in the map’s southwest corner) and turn directly around.
Look toward the huge naval gun on the hill, which is firing out to sea near where you began the mission. Above it (and to the right of the radio tower there), you’ll see the second Stone Eagle perched on top of a bunker.
Stone Eagle #3
From Stone Eagle 2, head toward the huge radar dish in the northern part of the map. Sticking along the main road, which travels along the western side of the map, you’ll come to a large open area full of nazi soldiers, a huge naval gun, the radar dish, and a tank or two that might like to kill you.
But you don’t have to take these guys out right now to get your next deadeye target. Instead, stop at the top of the road and look to the bunker just ahead of you. To the left of the sniper, perched on top of the bunker, you’ll find your third and final Stone Eagle for this mission.
Giovi Fiorini Mansion Stone Eagle Locations
Stone Eagle #1
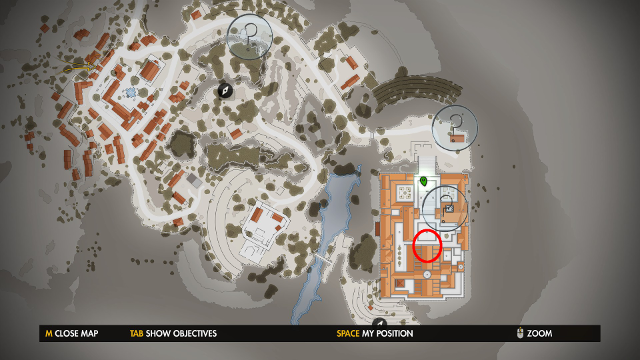
From the beginning of the mission, go straight ahead and cross the bridge onto the island between you and the “Kill Rothbauer” objective marker. Kill the guard patrolling near the center statue and move to the other side of the statue. Once on the other side (but before you cross the second bridge), stop. Looks straight ahead to Rothbauer’s mansion. Above the door, but below the Italian flag, you’ll find your first deadeye target of the mission.
Stone Eagle #2

From Stone Eagle 1, backtrack across the bridge and go left, preferably on the upper level — you’ll need to be there to see your next target. Go toward the northeastern point of the map, where one of your “Destroy Encampment” objectives is. When you come to a bridge on the upper level, stop and look out over the city.
Look to the right of the city’s main tower and the houses on fire in the distance. You’ll see a building with an Italian flag waving at its pinnacle. Just below that flag — on the roof — you’ll find your second Stone Eagle.
Stone Eagle #3
The third Stone Eagle is the easiest to find in the Giovi Fiorini mission. From Stone Eagle 2, go through the town and to “Kill Sniper” objective. But don’t kill the sniper yet! Doing so will automatically end the mission if you’re standing in the square below his position. Also, killing the sniper anytime before that (even from a distance) automatically triggers the end of the mission once you reach the square.
Instead, head to the square and look beneath the flag below the sniper. Underneath, you’ll find the third and final deadeye target. Kill the sniper and finish the mission.
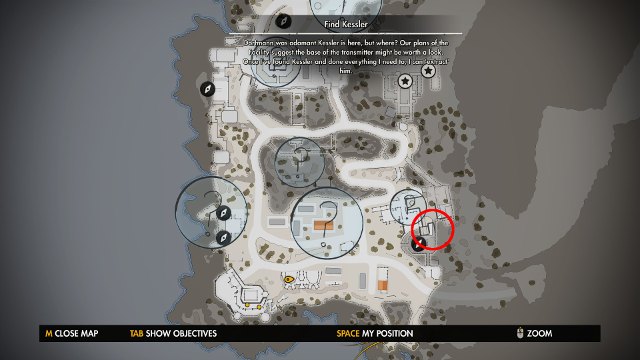
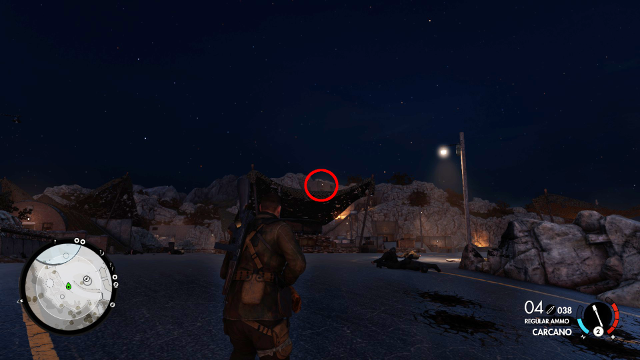
Allagra Fortress Stone Eagle Locations
Stone Eagle #1
From mission start, climb up the earthworks in front of you to reach the map’s main level. From there, go immediately right, toward the bridge that connects to the main facility. After fighting through the troops there stop on the far side of the bridge and look right. There, perched on a stone outcropping, is your first Stone Eagle of the Sniper Elite 4‘s last mission.
Stone Eagle #2

To bag your second Stone Eagle, turn directly around and look west. You’ll find this second deadeye target perched, again, atop a rock outcropping on the right mountain face.
Stone Eagle #3
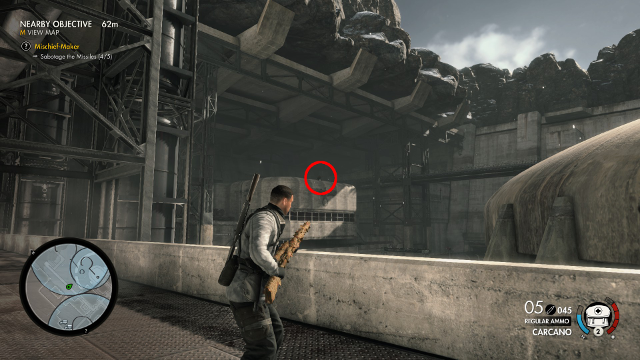
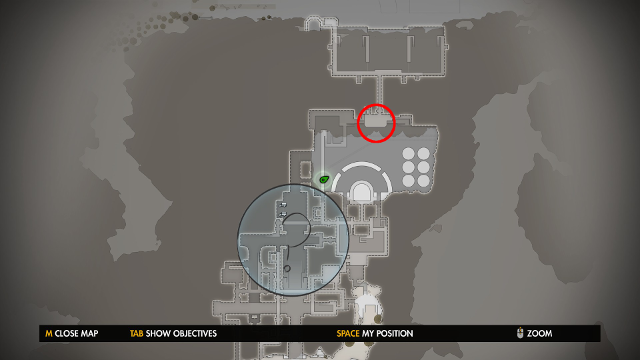
For Stone Eagle number three, you’ll have to fight through Allagra Fortress. Eventually, you’ll reach an open area inside the fortress (this will be in the map’s northern section, where you’ll find multiple missiles to disarm). When you’re first crossing the catwalk into the area, stop. Look to the top of the massive bunker near the back of the area and you’ll find your third and final Stone Eagle of SE4.
Compound Co-Op Stone Eagle Locations
Stone Eagle #1
As the sniper, look straight ahead once the mission begins, toward the southernmost section of the map. Your first deadeye collectible will be on the roof of the house there, just left of the third story.
Stone Eagle #2

As the sniper, turn immediately around from Stone Eagle one and continue down the path provided. Once you’re past the minefield, you will come to a set of stairs. To your left is a sniper. Take him out. Move over to his position and turn around. Look up at the ruin front of you. Perched on top is the second deadeye collectible.
Stone Eagle #3
From Stone Eagle two, continue along the provide path on the map’s eastern edge. Move toward the “Search Area” objective on the western edge of the map. As you move along, you will come to a cavern system to your left. Take it to move west, but keep right when it forks and you’ll come to an opening overlooking the “Search Area” objective.
Look to the house just behind the bright green light of the radio tower. There, just to the left of the chimney, you’ll find your third and final deadeye collectible for this co-op mission.
Railyard Co-Op Stone Eagle Locations
Stone Eagle #1
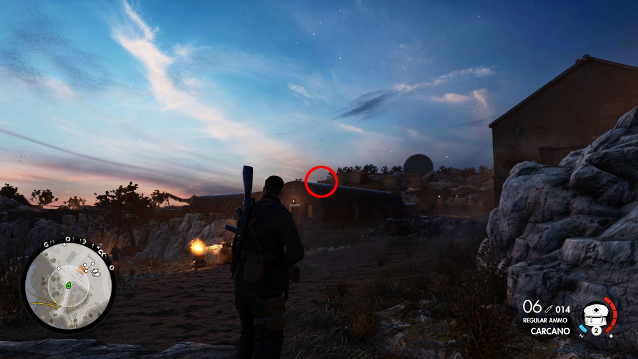
From mission start, turn around and head east. As you come into the open area, make your first left, wrapping around to the barbed-wire fence that overlooks the lake. Using the moored boat as a landmark, look left — just beyond the dock. On a rock outcropping just at the water’s edge, you’ll see your first Stone Eagle of the Railyard mission.
Stone Eagle #2

From Stone Eagle one, turn around and head back toward mission start. At the crates, make a left into a rock-covered pathway that goes downward. At the bottom, turn right just a bit and then turn around. Look up at the castle ruins behind you. In the window, you’ll see your second Stone Eagle of the Railyard mission.
Stone Eagle #3
From Stone Eagle number two, go straight ahead, up the earthworks in front of you. At the top, turn right and then keep left, avoiding the minefield. You’ll eventually come upon an encampment to the right of a bridge. Once you eliminate the enemies here, go through the encampment and take a left at the roadblock. Go down two earthworks.
You’ll be overlooking the railyard proper now. Look out to the farthest crane (left of the radio tower in the distance). You’ll find the final deadeye collectible resting on top of the crane.
Kill Hitler DLC Stone Eagle Locations
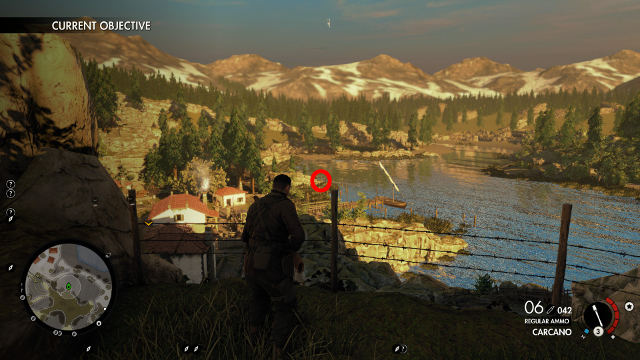
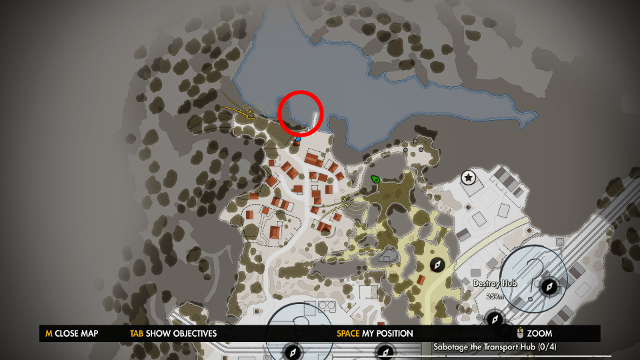
Stone Eagle #1
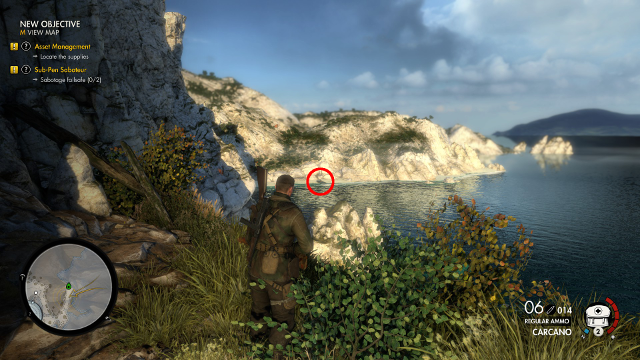
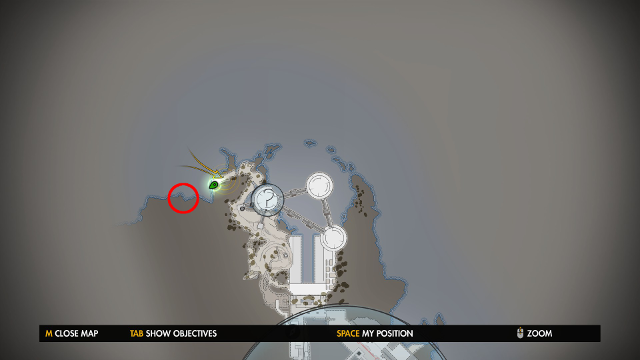
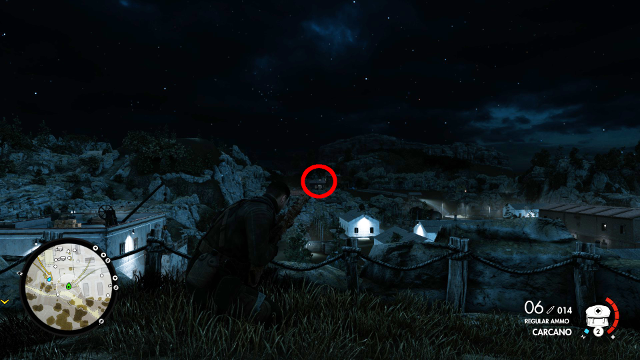
At mission start, immediately make a 180 and look out over the bay behind you. Across the water, on the far side, look for a blue boat along the water’s edge. Inside the boat you’ll find your first Stone Eagle of the Kill Hilter DLC mission.
*Big shout out to the community for helping find this one.*
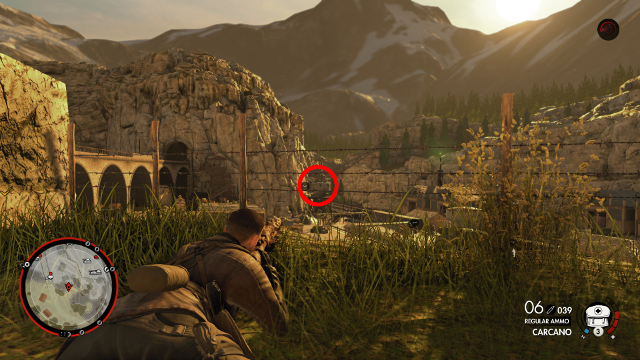
Stone Eagle #2
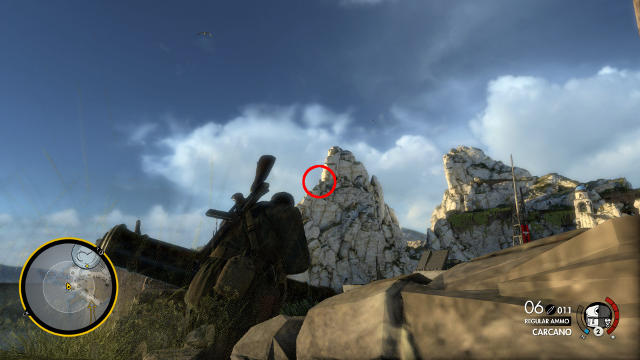
From Stone Eagle one, head along the cliffside and cross the wooden bridge. Just across the bridge, you’ll see an old cannon on the left side. Stand next to that and look toward the base. Up on the cliff, behind the sniper, you’ll find your second deadeye collectible of Sniper Elite 4’s first DLC mission.
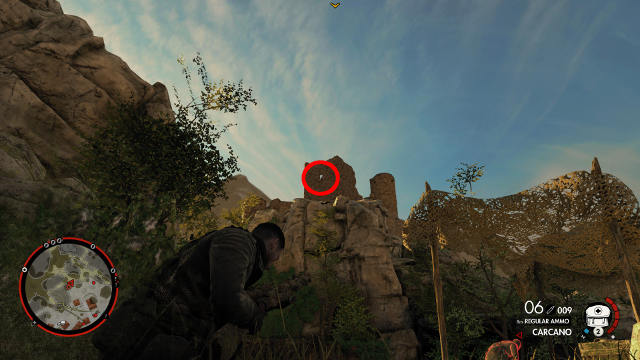
Stone Eagle #3
Don’t move from the position in which you found your first deadeye collectible in this mission. Instead, just pivot right, looking to the mountains to the right of the church steeple. There in the back, hidden cleverly in the rocks, you’ll find your third and final Stone Eagle of the mission.
—
Congratulations! You’re done. Not only have you stopped Hitler’s war machine, you’ve done it in style. Keep an eye out for our other Sniper Elite 4 guides.


Published: Feb 16, 2017 07:02 pm