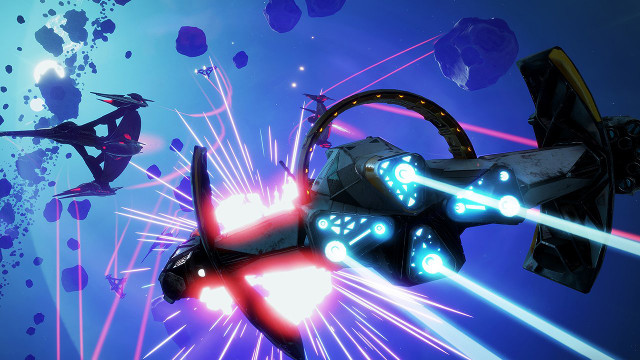
One of the most appealing aspects of Starlink: Battle for Atlas is the depth of customization it offers. With mods, players can tweak their ships and weapons to perform how they like, and hunting down new and powerful mods is what gives Starlink‘s open-world exploration a purpose.
However, players may feel overwhelmed by the lack of instruction the game provides as mods rapidly enter their inventory.
With this guide, we hope to give players a better overall understanding of Starlink‘s modification system and how to use it most effectively.
Terms
To state the obvious, mods affect the different aspects of the myriad of ships and weapons Starlink offers.
While it seems unnecessary to fully elaborate on the most straightforward of these aspects — speed references a ship’s speed and handling references how well a ship handles, as examples — there are a few terms often seen in mods that players may feel have not been adequately explained by the game.
Let us have a look at these terms before getting deeper into the mods themselves:
Energy: Each time a weapon is fired, a designated amount of energy is subtracted from a ship’s overall energy. When a ship has less energy than the amount required to fire a weapon, players have to pause briefly for energy to recharge and firing to resume.
Pilot Ability: Each pilot has their own special ability, ranging from temporal distortion to invulnerability, with its own recharge time. As time passes, a meter in the bottom-left corner fills. When filled, an icon will illuminate and the pilot ability is ready for use.
Elemental Combo: Fully articulating the different elemental combos is a task for another guide, but it is sufficient to say that these combos are achieved by hitting enemies with weapons of two element types (heat and cold, for example).
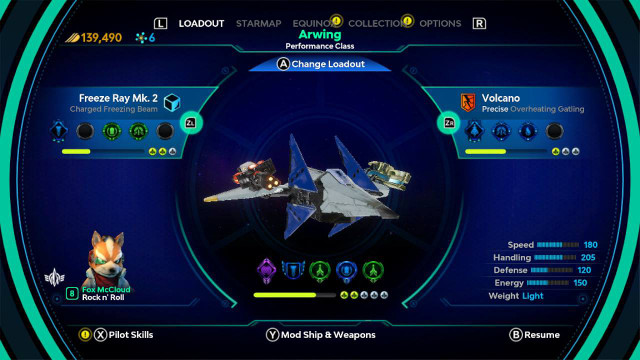
How to Equip Mods
Mods are accessed by entering the loadout menu and pressing the button designated as “Mod Ship & Weapons” at the bottom of the screen (Y on Switch).
This will bring you to the ship modification screen, and pressing the button designated as “Change” (A on Switch) will allow you to add any appropriate mods to that slot.
Using the directional pad will allow you to insert mods in any slots you have unlocked, and L and R can be used to switch from the ship modifications to those of the weapons you currently have equipped.
How to Get Mods
From the beginning of the game, players will begin to acquire common mods from almost every task they complete (destroying hives, hacking wrecked cargo shuttles, looting chests, etc.).
However, here are a few tips for players wanting to hunt for higher rarity modifications:
Visit outlaw hideouts in space
As players begin exploring planets, confrontations with outlaws will arise. Defeating these outlaws will sometimes trigger dialogues with other pilots, indicating that they have marked an outlaw hideout on your map.
These hideouts are located in space, are visible on your starmap, and offer higher rarity rewards (along with a lot of cores and Electrum).
Upgrade workshops
Beginning with the third of the story mission’s planets, Sonatus, players will have access to workshops.
Workshops allow you to buy mods directly, and the more you upgrade the workshop, the higher rarity the available mods will be.
Additionally, workshops will send you mods, and the more you have upgraded them, the more frequent the deliveries will be (and the higher the rarity the contents).
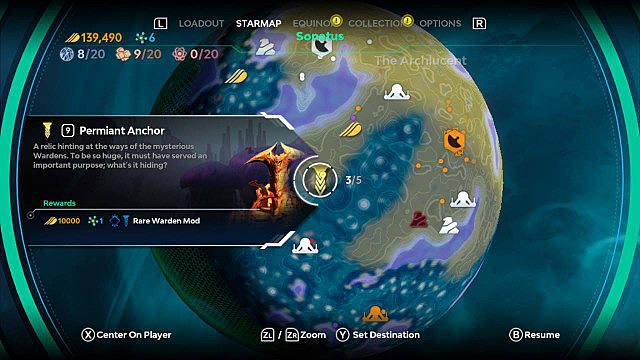
Focus on Warden Spires
Warden Spires are quick puzzles located on the planets.
Make sure to complete as many as possible, as they reward special, higher rarity Warden modifications that are quite strong.
Check the map
The rarity of the mods you will receive from completing tasks are indicated on their icons on the starmap.
If you are not interested in 100% exploration, it is easy enough to skip anything that is only awarding common rarity modifications.
How to Unlock More Mod Slots
Initially, not all of the possible mod slots for ships and weapons will be accessible – a small lock indicates that a player is not yet able to add a modification to the designated slot.
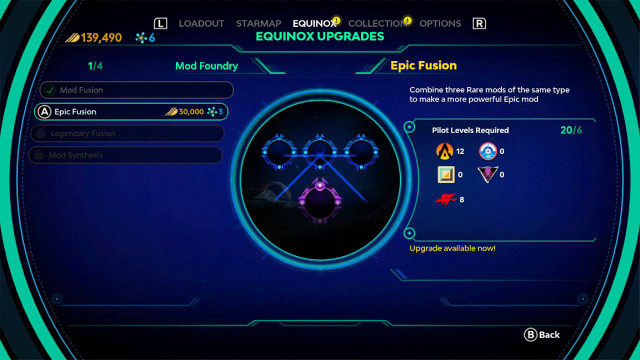
These slots are unlocked through upgrading the Equinox.
From the Equinox menu (in the same interface as your loadout and starmap), navigate to Equinox and select the Modding Bay. Each upgrade will require your pilots to meet a certain experience level, a number of cores (obtained from Warden Spires), and an amount of Electrum.
Combining Mods
Upgrades through the Equinox also allows you to combine three mods of the same type to make a more powerful mod. For example, three common Cold Amplifiers can be combined to create one rare Cold Amplifier.
Further, when fully upgraded, players are able to duplicate any mod they posses, including one-of-a-kind Relics.
These upgrades are preformed in the Mod Foundry accessed in the Equinox menu.
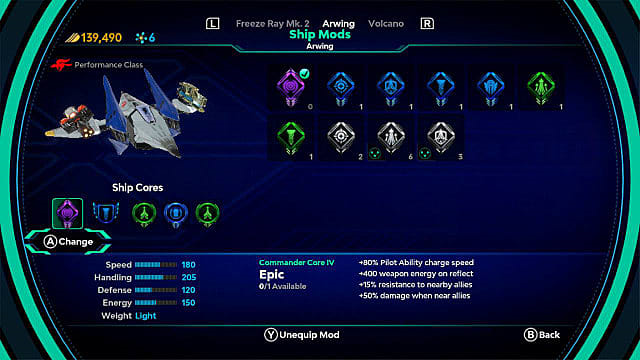
Ship Mods
There are two categories of mods — those you equip to your Ship and those that you equip your Weapons — and, within these categories, there are different types.
We will begin by examining the three types of Ship modifications:
Core Mods
Each ship has one slot for a core mod. These are diamond-shaped mods with diagonal hash marks underneath.
Core mods offer the largest array of powerful effects:
- Boosts to a ship’s base speed, handling, and energy
- Damage increases when specified conditions are met (when nearby to allies, for examples)
- Stat increases for nearby allies
- Decreases to the cool-down of pilot abilities
- Special abilities (including things like target assist)
Armor Mods
Each ship has one slot for an armor mod. These are shield-shaped mods.
Armor mods provide direct increases to a ship’s overall defense as well percentage-based resistance to elemental damage.
These mods also offer defensive abilities (such as healing) and abilities triggered by defense-baed scenarios (increased damage when you are on fire, for example).
Booster Mods
When fully upgraded, each ship has three slots for booster mods. These are circle-shaped mods with diagonal hash marks underneath.
Booster mods each have a single effect and allow you to focus on developing very specific aspects of your ship. These mods are what allow you to fine tune the overall feel of your spacecraft.
Additionally, booster mods can bump your resilience or add effects to your ship like increasing the XP gained from using the vessel.
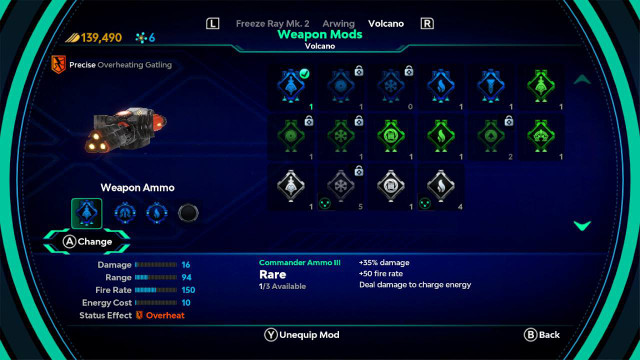
Weapon Mods
There are two types of Weapon modifications:
Ammo Mods
Each weapon has one slot for a weapon mod. These are diamond-shaped mods with triangles underneath.
These offensive mods offer boosts to a weapon’s base damage, range, and fire rate as well as decreasing the amount of energy weapons consume.
Additionally, some ammo mods can only be equipped to weapons of a specified element type, and they come with bonus abilities. For example, Heat-exclusive mods heal you as you deal damage.
Amplifier Mods
Each weapon has three or four slots for amplifier mods. These are circle-shaped mods.
Amplifier mods are the weapon equivalent of the ship’s booster mods, allowing you to target very specific aspects of a weapon and ultimately decide how each weapon functions.
Additionally, amplifier mods can add additional effects to weapons like increasing how much Electrum or XP is gained when using the modified weapon.
Strategies for Assigning Mods
There are two approaches to assigning mods.
One is to min-max, focusing on a ship or weapon’s strengths and bolstering those stats. For instance, if you want to maximize the speed of a fast-flying ship, mods are how to push it to the limit.
The other option is to target their shortcomings, making balanced ships and weapons with higher consistency but lower overall power. This may mean focusing on the energy consumption of a high damage, low efficiency weapon rather than maximizing its damage output.
As an example, the Iron Fist is a high damage, low range kinetic weapon.
Using the first method, you might assign strictly damage increasing mods to the weapon; its functionality remains essentially the same, but it becomes more powerful.
With the alternative, you might boost the range instead, giving it added functionality at the expense of maximum damage.
The most exciting part of this flexibility is that optimal modification is entirely contingent upon play-style.
Perhaps you prefer to hold down both triggers and watch high fire rate, low damage guns ping your enemies until they explode. Or maybe you are better at charging and executing big damage precision shots from long range.
Whatever suits you best, you can use mods to tinker and tailor your gear until it meets your specific needs.
Mod List
Note: This list is being updated. Last update: October 21.
To close, here is a compiled list of modifications you can expect to encounter in Starlink (with how much it costs to purchase them from workshops, when possible):
Ship Mods
Cores
Commander Core III (Rare)
+65% Pilot Ability charge speed
+400 weapon energy on reflect
+15% resistance to nearby allies
E 50,000
Commander Core IV (Epic)
+80% Pilot Ability charge speed
+400 weapon energy on reflect
+15% resistance to nearby allies
+50 damage when near allies
E 75,000
Elemental Core I (Common)
+15 energy
+100 energy on Elemental Combo
Elemental Core III (Rare)
+35 energy
+100 energy on Elemental Combo
Target assist
E 40,000
Elemental Core IV (Epic)
+40 energy
+100 energy on Elemental Combo
Target assist
Stuns nearby units when health becomes critical
E 60,000
Fighter Core I (Common)
+20 speed
+10 handling
Fighter Core II (Uncommon)
+35 speeding
+13 handling
Precision shots charge Boost
Tank Core I (Common)
+20% Pilot Ability charge speed
+100 health on successful reflect
+5% resistance to nearby allies
Tank Core III (Rare)
+60% Pilot Ability charge speed
+100 health on successful reflect
+15% resistance to nearby allies
Group repair
Warden Core II (Uncommon)
+45 energy
+25% damage for 5s after Elemental Combo
Warden Core III (Rare)
+60 energy
+25% damage for 5s after Elemental Combo
+25% damage while near Electrum
Warrior Core III (Rare)
+35 speed
+35 handling
Precision hits charge weapon energy
Armor
Champion Armor I (Common)
+15 defense
Lighten the ship’s weight
Cold Armor I (Common)
+20 defense
+25% Cold damage resist | -20% Heat damage resist
More durable while Frosted or Frozen
Cold Armor III (Uncommon)
+45 defense
+35% Cold damage resist | -20% Heat damage resist
More durable while Frosted or Frozen
Cold Armor III (Rare)
+60 defense
+45% Cold damage resist | -20% Heat damage resist
More durable while Frosted or Frozen
Chance to Frost on collision
E 40,000
Cold Armor IV (Epic)
+85 defense
+55% Cold damage resist | -20% Heat damage resist
More durable while Frosted or Frozen
Chance to Frost on collision
E 60,000
Commander Armor III (Rare)
+60 defense
+25% damage resistance near allies
More durable when health is critical
Increases ship’s weight
E 50,000
Commander Armor IV (Epic)
+85 defense
+25% damage resistance near allies
More durable while health is critical
Increase ship’s weight
E 75,000
Deflection Armor I (Common)
+15 defense
+5% chance to Ricochet projectiles
Reflect deals 500 damage
Deflection Armor II (Uncommon)
+30 defense
+10% chance to Ricochet projectiles
Reflect deals 1000 damage
Heat Armor I (Common)
+10 defense
+25% resistance to Heat damage
-20% resistance to Cold damage
Heat Armor III (Rare)
+20 defense
+45% resistance to Heat damage
-20% resistance to Cold damage
Deal extra damage when on Fire
E 40,000
Heat Armor IV (Epic)
+27 defense
+55% resistance to Heat damage
-20% resistance to Cold damage
Deal extra damage when on Fire or Overheated
E 60,000
Prospector Armor II (Uncommon)
+45 defense
+25% damage resist
Reflects stuns for longer | Stun on impact
Equip on Prospector ships only
Prospector Armor III (Rare)
+60 defense
+30% damage resist
Reflects stuns for longer | Stun on impact
Knock units back on impact
Equip on Prospector ships only
E 50,000
Prospector Armor IV (Epic)
+85 defense
+35% damage resist
Reflect stuns for longer | Stun on impact
Knock units back on impact
Equip on Prospector ships only
E 75,000
Scrapper Armor I (Common)
+20% Kinetic resist
+10 defense
Stasis Armor II (Uncommon)
Chance to Lift on impact | -20% Gravity resist
Warden Armor II (Uncommon)
+17 defense
+25% resistance to all Elemental damage
Explosive damage when health becomes critical
Warden Armor III (Rare)
+20 defense
+30% resistance to all Elemental damage
Explosive damage when health becomes critical
Constant heal near Electrum Veins
Boosters
Antifreeze Booster I (Common)
+20% resistance to Cold
Antifreeze Booster II (Uncommon)
+25% resistance to Cold
Antigrav Booster I (Common)
+20% resistance to Gravity
Antigrav Booster III (Rare)
+30% resistance to Gravity
E 20,000
Antigrav Booster IV (Epic)
+35% resistance to Gravity
E 30,000
Defense Booster I (Common)
+10 defense
Defense Booster II (Uncommon)
+15 defense
Energy Booster I (Common)
+10 energy
Energy Booster III (Rare)
+20 energy
Handling Booster I (Common)
+10 handling
Handling Booster II (Uncommon)
+15 handling
Handling Booster III (Rare)
+20 handling
E 20,000
Handling Booster IV (Epic)
+25 handling
E 30,000
Heatsink Booster I (Common)
+20% resistance to Heat
Recharge Booster I (Common)
+10% weapon energy recharge speed
Recharge Booster II (Uncommon)
+15% weapon energy recharge speed
Recharge Booster III (Rare)
+20% weapon energy recharge speed
E 20,000
Recharge Booster IV (Epic)
+25 weapon energy recharge speed
E 30,000
Regen Booster I (Common)
+5% shield recharge speed
Speed Booster II (Uncommon)
+15 speed
Survival Booster I (Common)
+10% durability when the ship is critically damaged
Survival Booster III (Rare)
+20% durability when the ship is critically damaged
E 20,000
Survival Booster IV (Epic)
+25% durability when the ship is critically damaged
E 30,000
Warden Booster II (Uncommon)
+20% Elemental resistance
XP Booster I (Common)
+10% XP earned with this ship
XP Booster II (Uncommon)
+15% XP earned with this ship
XP Booster III (Rare)
+20% XP earned with this ship
E 20,000
XP Booster IV (Epic)
+25% XP earned with this ship
E 30,000
Weapon Mods
Ammo
Commander Ammo I (Common)
+15% damage
Deal damage to charge energy
Commander Ammo II (Uncommon)
+20% damage
+25 fire rate
Deal damage to charge energy
Commander Ammo III (Rare)
+35% damage
+50 fire rate
Deal damage to charge energy
E 50,000
Commander Ammo IV (Epic)
+40% damage
+50 fire rate
+25% damage near allies
Deal damage to charge energy
E 75,000
Crushing Ammo II (Uncommon)
+35% damage | +10 range
+25% damage to targets in Gravity Effects
Equip to Gravity weapons only
Crushing Ammo III (Rare)
+60% damage | +20 range
+25% damage to targets in Gravity Effects
Equip to Gravity weapons only
Frost Ammo I (Common)
+20% damage
+25% damage to Frosted targets
Equip on Cold weapons only
Frost Ammo II (Uncommon)
+35% damage
+25% damage to Frosted targets
+15 fire rate
Equip on Cold weapons only
Frost Ammo III (Rare)
+60% damage
+25% damage to Frosted targets
+30 fire rate
Equip on Cold weapons only
E 40,000
Frost Ammo IV (Epic)
+75% damage
+25% damage to Frosted targets
+35 fire rate
Freeze weapons can cause Shatter Combo
Equip on Cold weapons only
E 60,000
Rapid Ammo I (Common)
+20 fire rate
+25% damage to targets within 50m
Rapid Ammo II (Uncommon)
+35 fire rate
+25% damage to targets within 50m
-20% energy cost
Scorching Ammo I (Common)
+10% damage
Heals for 10% of damage done
Equip to Heat weapons only
Scorching Ammo II (Uncommon)
+13% damage
-25% energy cost
Heals for 10% of damage done
Equip to Heat weapons only
Scorching Ammo III (Rare)
+20% damage
-30% energy cost
Heals for 10% of damage done
Equip on Heat weapons only
E 40,000
Scorching Ammo IV (Epic)
+23% damage
-35% energy cost
Heals for 10% of damage done
Apply Fire & Overheat
Equip on Heat weapons only
E 60,000
Stasis Ammo II (Uncommon)
+35% damage
+25% damage against Lifted targets
+10 weapon range
Equip on Stasis weapons only
Support Ammo I (Common)
+10% damage
Heals for 1% of damage done
Support Ammo II (Uncommon)
+13% damage
+10% damage to targets within 50m
Heals for 1% of damage done
Warden Ammo III (Rare)
+35% damage
+25% damage to targets under Status Effect
+25% damage when using a target’s Elemental weakness
Amplifiers
Alliance Amplifier (Legendary)
+20% damage
+20 fire rate
E 300,000
Cold Amplifier I (Common)
+10% Cold damage
Equip on Cold weapons only
Cold Amplifier II (Uncommon)
+15% Cold damage
Equip on Cold weapons only
Efficiency Amplifier I (Common)
-20% energy cost to fire this weapon
Efficiency Amplifier II (Uncommon)
-25% energy cost to fire this weapon
Efficiency Amplifier III (Rare)
-30% energy cost to fire this weapon
E 20,000
Efficiency Amplifier IV (Epic)
-35% energy cost to fire this weapon
E 30,000
Electrum Amplifier I (Common)
+50 Electrum from ships & Legion destroyed with this weapon equipped
Electrum Amplifier II (Uncommon)
+100 Electrum from ships & Legion destroyed with this weapon equipped
Electrum Amplifier III (Rare)
+200 Electrum from ships & Legion destroyed with this weapon equipped
E 20,000
Electrum Amplifier IV (Epic)
+150 Electrum from ships & Legion destroyed with this weapon equipped
E 23,000
Gravity Amplifier I (Common)
+10% Gravity damage
Equip on Gravity weapons only
Gravity Amplifier II (Uncommon)
+15% Gravity damage
Equip on Gravity weapons only
Gravity Amplifier III (Rare)
+20% Gravity damage
Equip on Gravity weapons only
E 20,000
Gravity Amplifier IV (Epic)
+25% Gravity damage
Equip on Gravity weapons only
E 30,000
Heat Amplifier I (Common)
+10% Heat damage
Equip on Heat weapons only
Heat Amplifier II (Uncommon)
+15% Heat damage
Equip on Heat weapons only
Heat Amplifier III (Rare)
+20% Heat damage
Equip on Heat weapons only
Impact Amplifier I (Common)
+10% chance to knock back or stumble targets
Impact Amplifier II (Uncommon)
+12% chance to knock back or stumble targets
Quickshot Amplifier II (Uncommon)
+15 rate of fire
Range Amplifier II (Uncommon)
+15 range
Range Amplifier III (Rare)
+20 range
E 20,000
Range Amplifier IV (Epic)
+25 range
E 30,000
Stability Amplifier II (Uncommon)
-12% kick-back when firing this weapon
Warden Amplifier II (Uncommon)
+12% damage
+4% critical damage increase
XP Amplifier I (Common)
+10% XP earned with this weapon
XP Amplifier II (Uncommon)
+15% XP earned with this weapon
Take this knowledge into Starlink: Battle for Atlas with you and dominate the stars using your own combination of mods.


Published: Oct 21, 2018 10:42 pm