
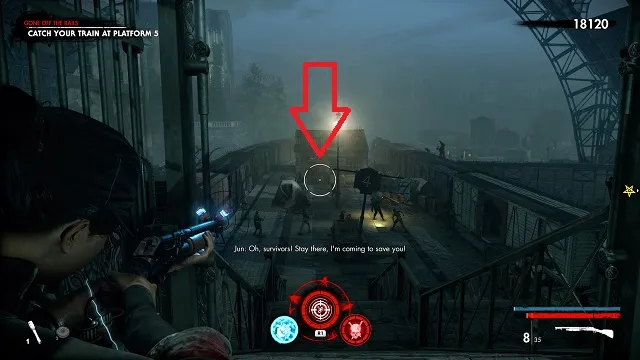
Like the Sniper Elite series, Zombie Army 4: Dead War is full of collectibles. Each chapter has one to four levels to clear, and each of those levels has a certain number of collectible to find: zombie hands, documents, comic books, upgrade kits, and heroic actions.
In the mission menu, you can keep track of how many collectibles are in each level. You can also see how many collectibles you’ve found and which you’re missing by looking at each level in the main campaign menu or pausing during a mission.
Also, you can quit a level after picking up a collectible; you don’t have to complete the level for it to count.
Below, we go over every collectible location in Zombie Army 4. We start with Chapter 1 and go through Chapter 9, breaking things up by each level within each chapter of the campaign mode.
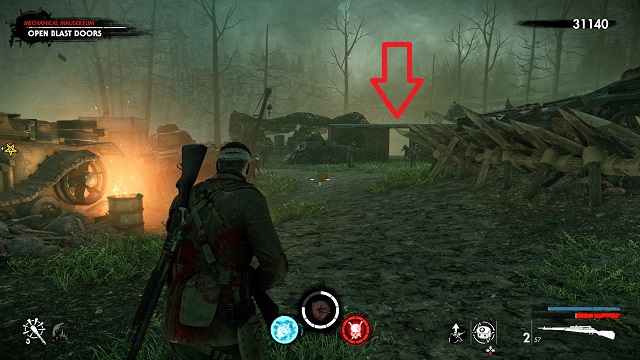
Dead Ahead Collectibles: Zombie Hands, Documents, Upgrade Kits, Comic Books, and Heroic Actions
Reporting In: Document
The first collectible is a document. After speaking with Bruno, turn right. There will be a desk to the left of the staircase in front of you. The document is on the desk.
Reporting In: Comic Book
From the last collectible, go up the stairs. Smash the boarded-up door at the top of the stairs. The comic book is on a shelf in the very back of the room, underneath the malfunctioning light.
Reporting In: Zombie Hand
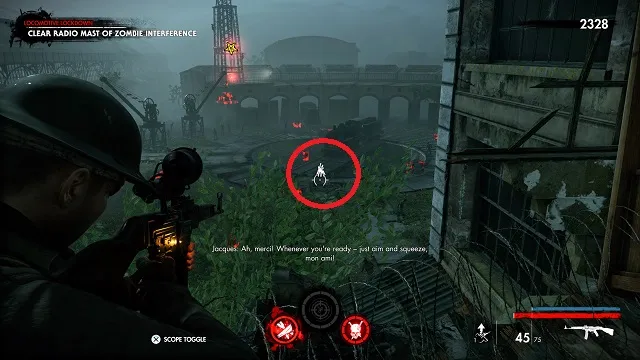
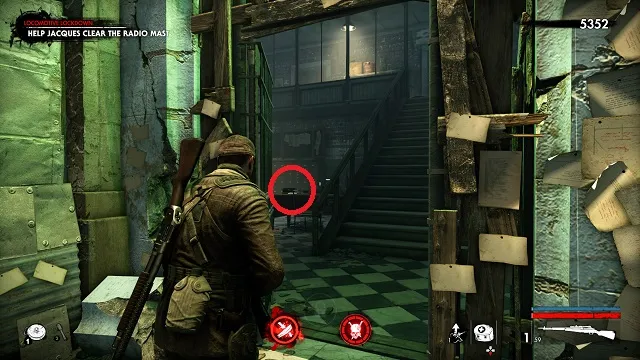
At the radio tower, look down to the area below that’s teeming with zombies. The hand is walking in the group of zombies from the cranes on the left-hand side to the train on the right-hand side.
Reporting In: Upgrade Kit
After clearing the radio tower of the zombies, go into the infirmary and turn right. There will be a boarded-up wall in front of you. Smash it with your melee attack and grab the upgrade kit off the table at the end of the hall.
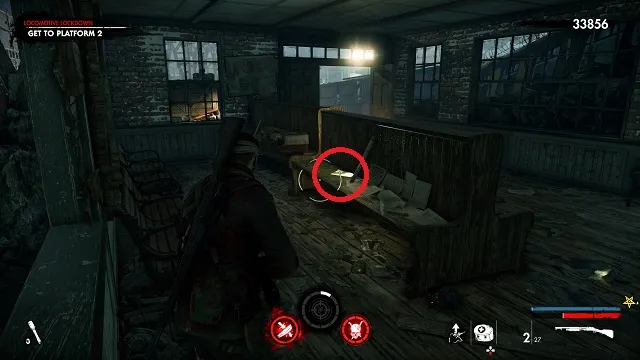
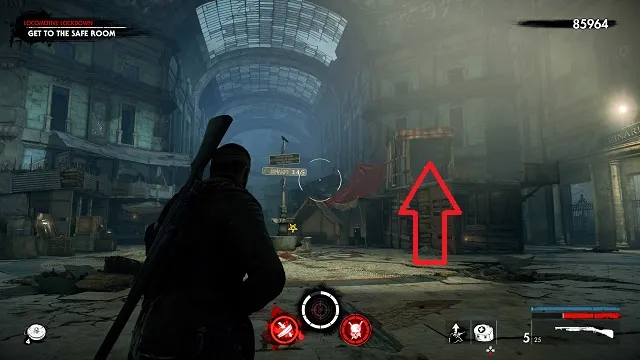
Locomotive Lockdown: Upgrade Kit 1
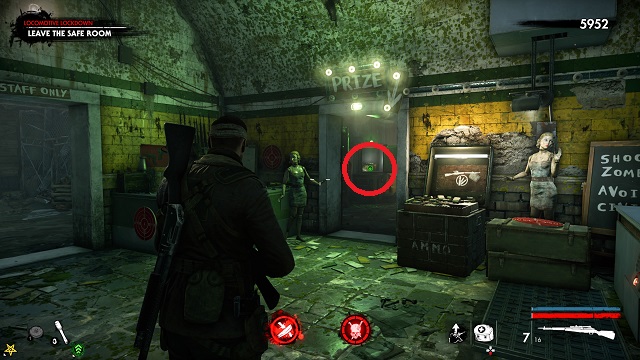
When you exit the saferoom, go left and down to the shooting range. Talk to the resistance fighter and complete his challenge. He will unlock another saferoom and safe, giving you the upgrade kit as a prize.
Locomotive Lockdown: Upgrade Kit 2
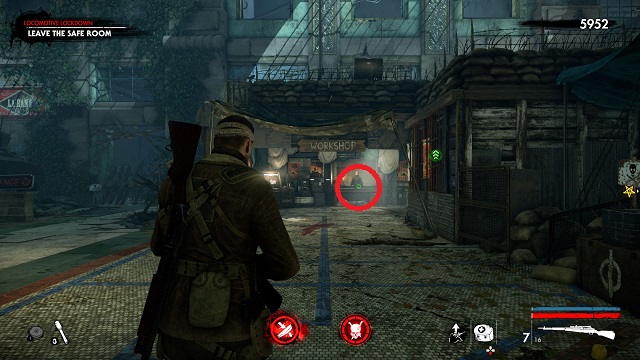
Go back upstairs and take a left to go to the Workshop. Grab the upgrade kit off of the table in front of Edie.
Locomotive Lockdown: Comic Book
After unlocking the first demonic seal, enter the wooden train terminal (it’s on the path to your next objective). There will be several benches to your right. The comic book is on one of them.
Locomotive Lockdown: Zombie Hand
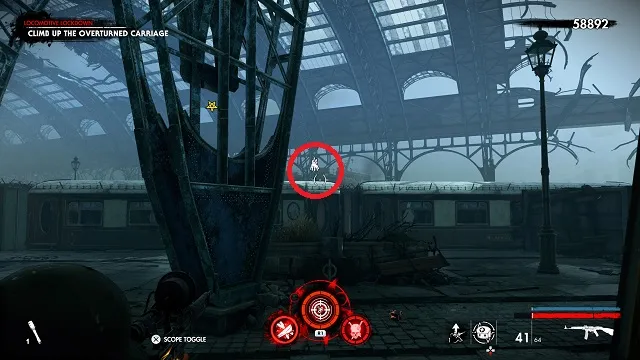
Grab the comic book and exit the train terminal. Go left through the train car. On the other side, stop and look to the top of the train car in front of you. The hand is crawling on the top.
Locomotive Lockdown: Upgrade Kit 3
The next collectible is where you encounter a huge number of suiciders. Near the entrance to the area, there is a building one the second level with a red and white pinstripe awning. It is to the right of the “Binario 345” sign. Climb up to the building to find the upgrade kit on a table in the back.
Locomotive Lockdown: Document
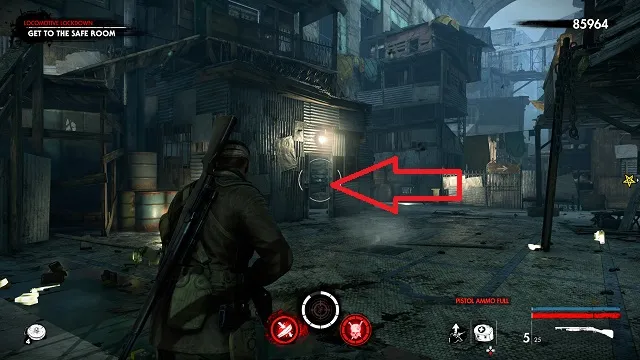
This document is in the same area as the suicider onslaught. Go to the back of the area, toward the objective. There will be a metal shack on the left. The document is on a bureau inside.
Off the Rails: Document
This collectible is in the first area. Go toward the back of the area on the right-hand side. Eventually, there will be a railcar with a teapot sign hanging from it. Just beyond that, the document is on a table on the right-hand side.
Off the Rails: Heroic Action
Eventually, you will come to an area where two resistance fighters in a shack ask for help. Defeat all of the zombies attacking them to complete this challenge. It’s easiest if you go inside the shack with them.
Off the Rails: Upgrade Kit

After saving the resistance fighters, go back up the stairs toward the objective. After the earthquake tremor, the platform will split into two sets of stairs: one going right and one going left. Go left. At the bottom of the stairs, turn right. The upgrade kit is at the end of the alley.
Off the Rails: Zombie Hand
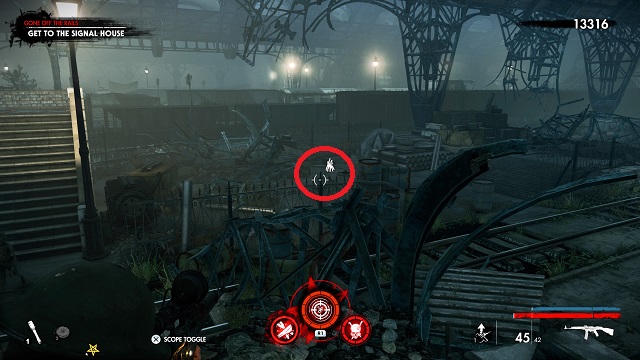
From the upgrade kit, go back up the stairs and cross over to the other side toward the objective. Go across the trains and kill the zombie horde on the slope. Climb to the top of the slope and stop before jumping across. Look to the area to your right. The zombie hand is crawling on the ground in the fenced area.
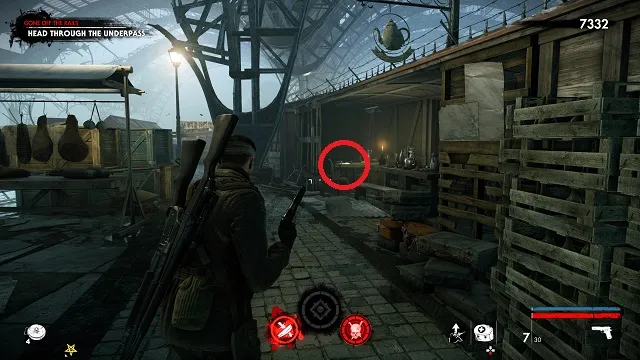
Off the Rails: Comic Book
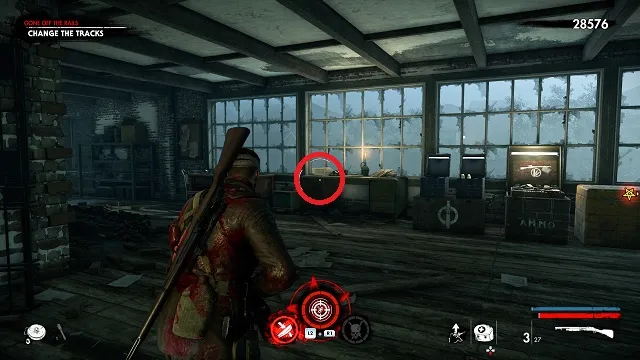
After you fight on the rooftop, go down into the room where you have to switch the train tracks. Turn left when you enter. The comic book is on the table in front of you. It is to the left of the ammo and items crates.
Death Canal Collectibles: Zombie Hands, Documents, Upgrade Kits, Comic Books, and Heroic Actions
Carnivorous Canal Cruise: Document
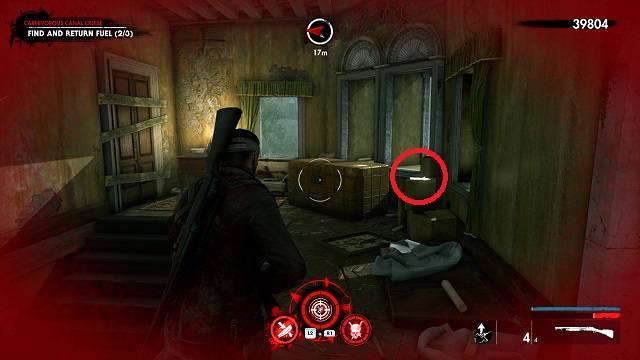
When you stop to refuel the boat, go to the right side of the boat and into the first building. Go to the third floor. The document is to the right of the big glowing chest.
Carnivorous Canal Cruise: Zombie Hand
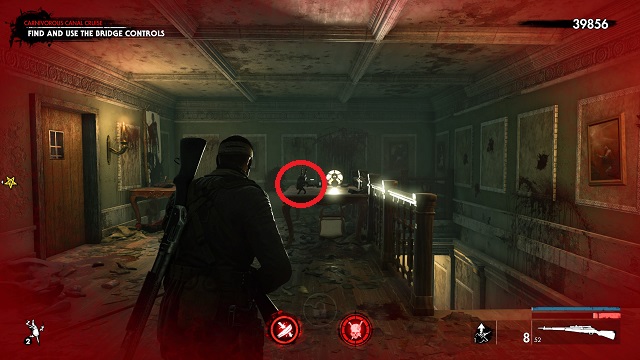
When you stop to work the bridge controls (after refueling the boat), exit the boat and go into the building straight ahead. Inside the building, go up the stairs to the left. Turn around at the top of the stairs and shoot the zombie hand on the table.
Carnivorous Canal Cruise: Upgrade Kit
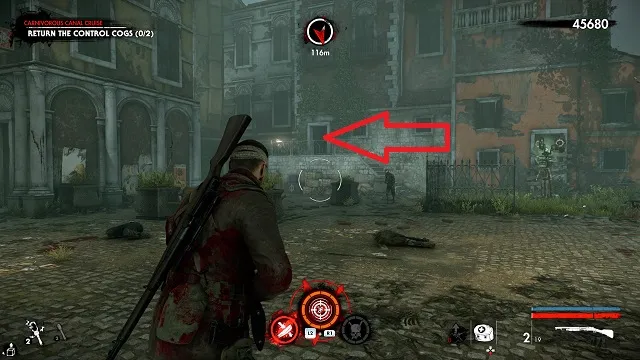
When you enter the area where you have to get the cogs, go straight and through the square. Cross the bridge and go right. Follow the path along the canal (which is on your right). Turn left when you enter the next open area. You will see a distraction device and a grey stone building to the left of it. The upgrade kit is on the floor in the grey stone building.
Carnivorous Canal Cruise: Comic Book
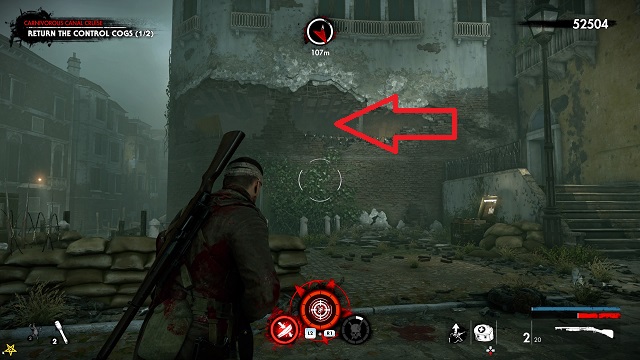
From the housing where you place the control cogs, turn right. You will see another grey stone building with the second-story walls blown out. Take the stairs on the right and go up. The comic book is on a chair on the right-hand side of the room, across from the glowing chest.
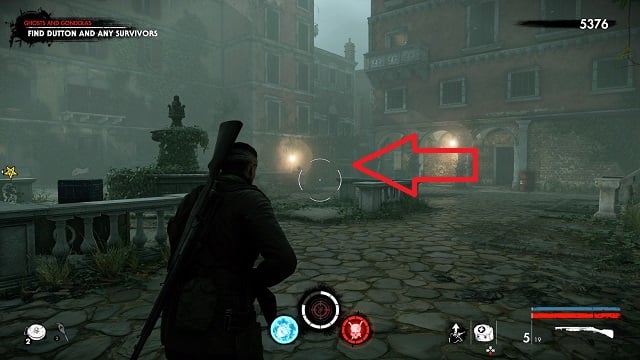
Ghosts and Gondolas: Upgrade Kit
From the start of the level, go left through the alleyway. When you enter the square with the fountain in the middle, go left. Go down into the water and through the chainlink fence. The kit is on a bench on the left-hand side of the walkway.
Ghosts and Gondolas: Document

This is after you fight the Flamer. There is a white arrow pointing to the left at the back of the square. There is a sink hanging from the wall just past it. Directly past that sink is a set of stairs to the right. Take those up and kill the zombie crawling through the window. Go through the window and turn left. The document is on a crate in the room ahead of you.
Ghosts and Gondolas: Zombie Hand

This is in the area where you first encounter commanders resurrecting zombies. From the start of the area, go to the back of the area and turn right. Go forward a short way and turn right again. There will be several beds in front of you as well as hanging sheets. The zombie hand is walking on the floor around the beds.
Ghosts and Gondolas: Comic Book
This is in the area just after the commander fight, where you meet Dutton. Go to the back of the area. There is a statue with vines on it. To the left is a staircase. Take that up, turn right, and climb up. There is a building with red shutters at the top. Climb through a window and turn left. The comic book is at the foot of one of the beds.
Ghost and Gondolas: Heroic Action
After surviving the zombie horde, go toward the safe room. Just before the bridge, turn left into an alley. Follow the path around. Save the resistance fighter from the zombies.
The Shadows of Venice: Upgrade Kit
Start the level and turn right. Cross the bridge. Go to the back of the area and turn left. There will be a fence in front of you with two zombies on the other side. Turn left and go up the steps into the back of the building. The upgrade kit is on a stool.
The Shadows of Venice: Document
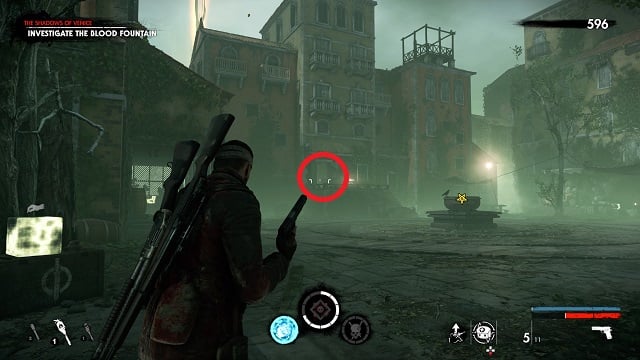
This is in the area with the blood fountain. There are three buildings on the left side of the area: one yellow and two red, with the yellow in the middle. Go up the steps into the yellow building. The document is on a crate on the floor in front of the bar.
The Shadows of Venice: Comic Book
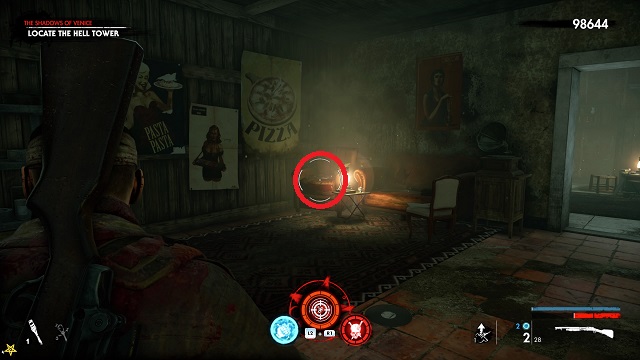
This is in the area with the poison-spitting zombies. When you enter the area, take an immediate right, then left at the green door. Go through the room with the rug and couch. Turn right in the next room. The comic book is on a leather chair under the pizza poster.
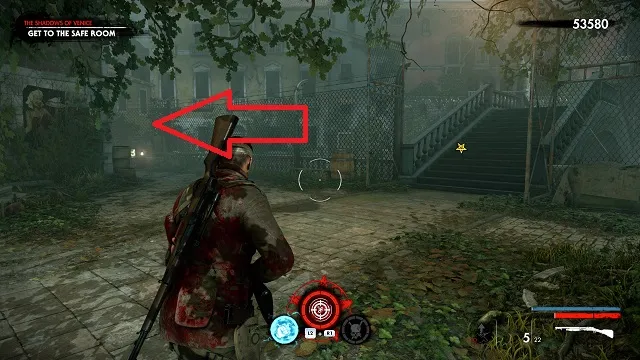
The Shadows of Venice: Zombie Hand
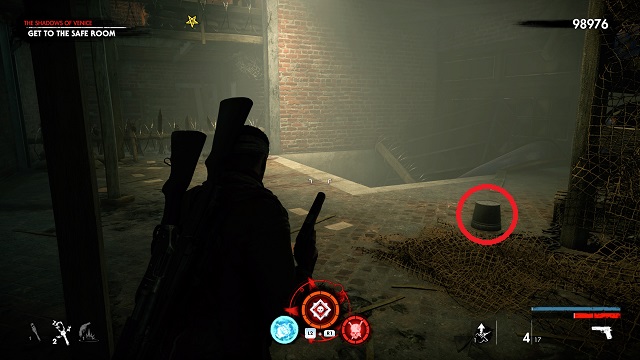
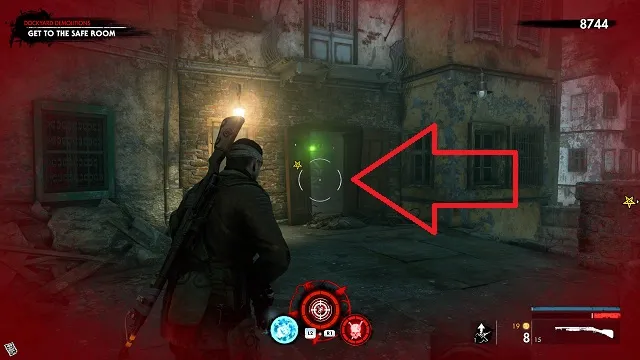
Continue toward the objective past the room with the Christmas lights hanging on the wall. In the next room, your objective will change to “Get to the Safe Room.” Take a right just before the stairs There will be a metal bucket moving on the ground. Shoot the bucket to reveal the hand.
Gates of Hell: Upgrade Kit
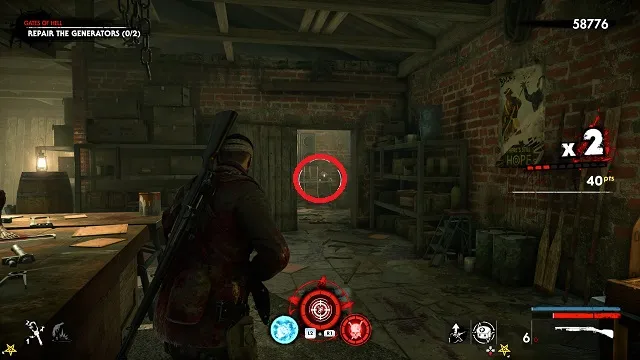
After releasing the charge on the first generator, a door will open to your left. Go through it and down the stairs. Turn left at the bottom. There is a small room on the left side with the upgrade kit inside.
Gates of Hell: Zombie Hand
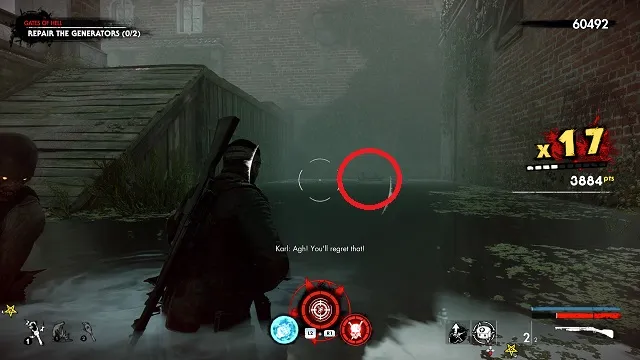
Exit that room and go out into the big open area. Turn right and go down to the boat slip. Go into the water. The zombie hand is on a small boat circling in the area.
Gates of Hell: Document
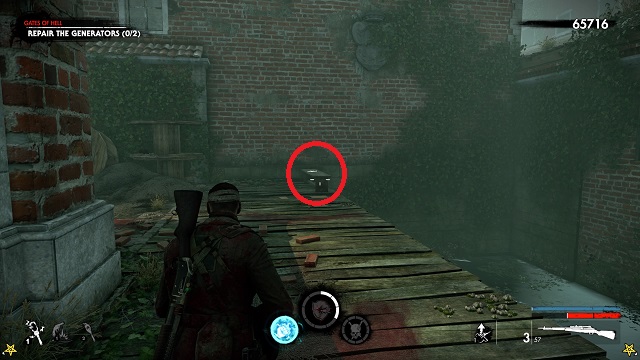
Exit the water on the left-hand side via the wooden ramp. There will be a wooden bench at the top of the ramp with the document on it.
Gates of Hell: Comic Book
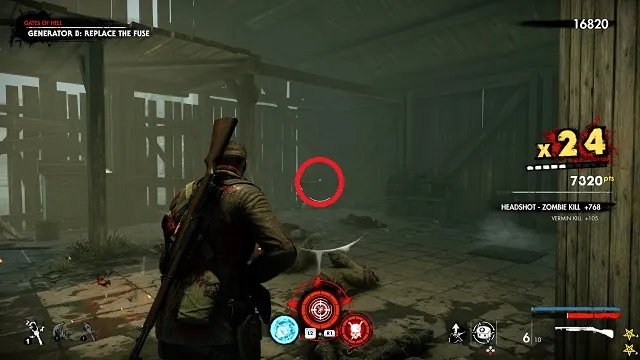
Go to Generator B near the giant hanging shark. There’s a wooden boathouse across from the generator. The comic book is on a table in the back corner of the boathouse.
Meat Locker Collectibles: Zombie Hands, Documents, Upgrade Kits, Comic Books, and Heroic Actions
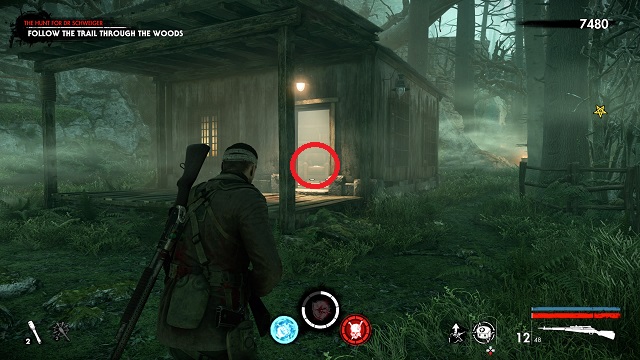
The Hunt for Dr. Schweiger: Comic Book
Cross through the checkpoint. Go past the truck and go right. Head toward the light. Enter the house. The comic book is on a bedside table.
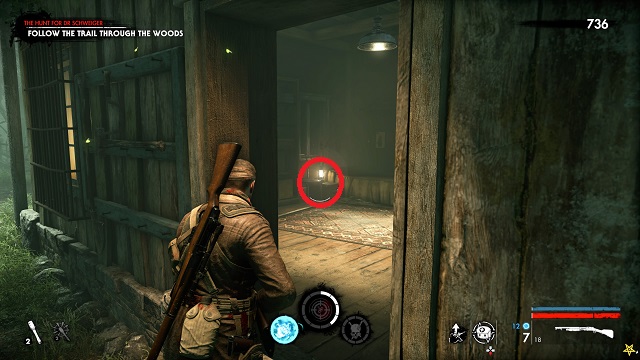
The Hunt for Dr. Schweiger: Document
When you enter the fortification in the woods (with the hanging and impaled zombies), there will be two small houses. Go in the left house. The document is on a chair.
The Hunt for Dr. Schweiger: Zombie Hand
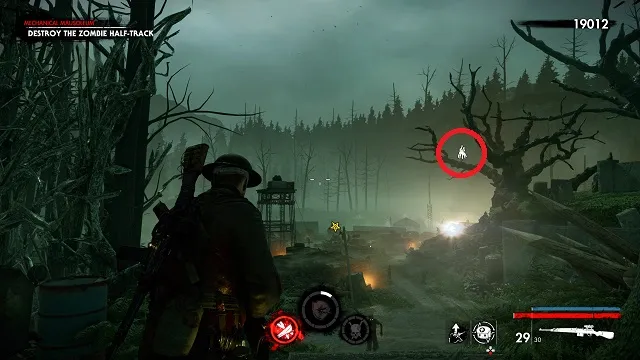
This is in the area with the undead half-track. As soon as you enter the area, stop and look to the right side of the area. The hand is crawling on a tree branch that’s hanging out over the spotlight.
The Hunter for Dr. Schweiger: Upgrade Kit
From there, go into the middle of the area with the crates and old tank and vehicle chassis. There are also several railroad cars. The upgrade kit is in one of the train cars.
Into Darkness: Comic Book
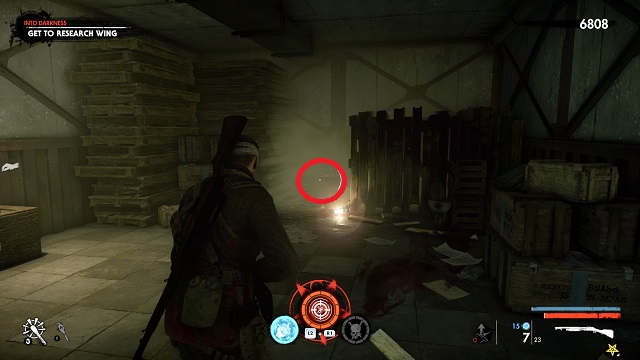
After turning on the lights, go toward the research wing. Take the first right before going up the stairs. The comic book is to the right, in the back.
Into Darkness: Upgrade Kit
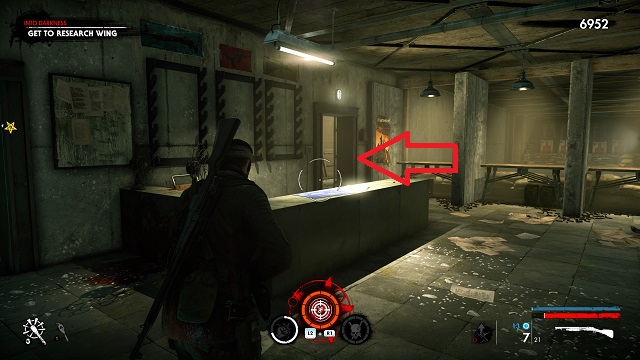
Go up the stairs toward the research wing. Take a right at the top. Enter the room marked “Ameria.” This is a shooting range and armory. Go past the shooting range and enter the next room. Immediately turn right. The kit is at the bottom of a metal rack.
Into Darkness: Zombie Hand
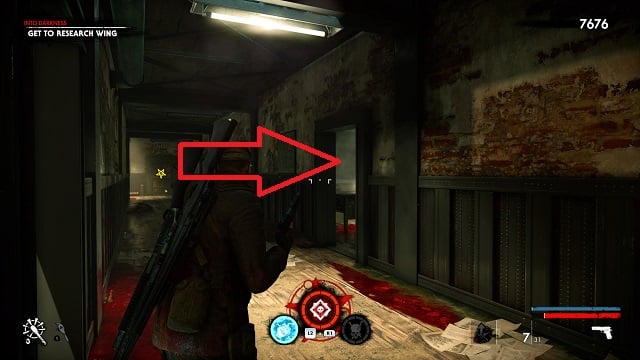
Exit the boxing ring area toward the objective. Take the first door on the right in the hallway. The zombie hand is crawling on the whiteboard.
Into Darkness: Document
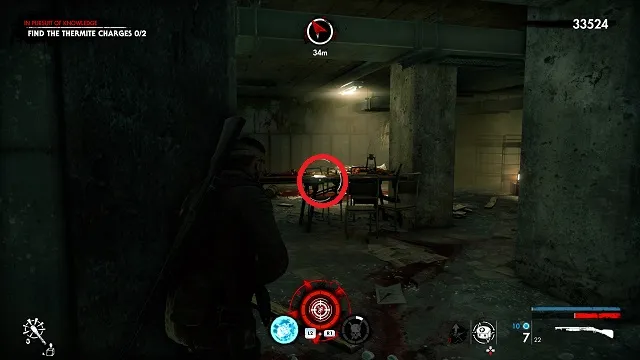
After resetting the fuses a second time, you will need to find thermite charges. In the square mess hall with the Nazi flags, go upstairs and stay to the right. Go through the opening and turn left into a room. The document is on the table closest to you.
Supernatural Superweapon: Zombie Hand
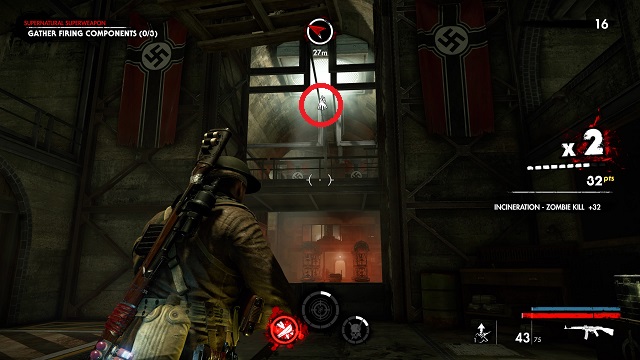
Exit the safe room and follow the path until you reach the main area with the flags hanging on the walls. Follow the stairs down to the bottom floor. There will be a rocket on your left and a red area with Tesla towers in front of you. Look up. The zombie hand is crawling on a wire above.
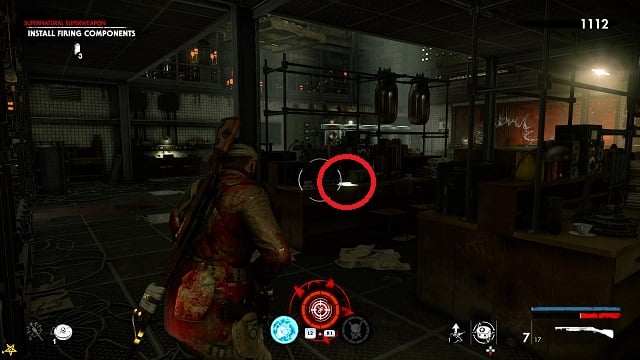
Supernatural Superweapon: Comic Book
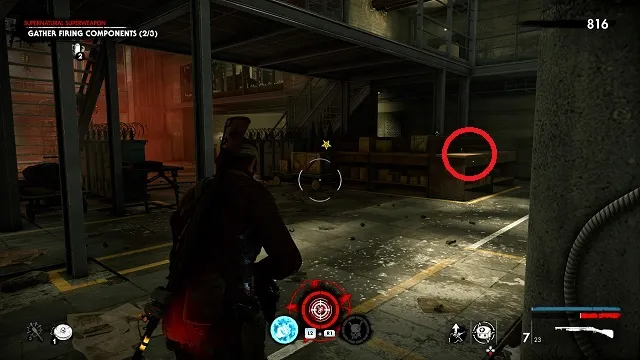
Now go forward into the red area. Go to the far right side. There will be wooden crates and a small chest of drawers. The comic book is on the table.
Supernatural Superweapon: Upgrade Kit
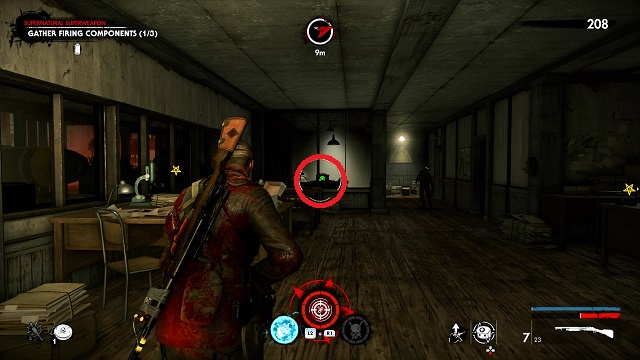
From the comic book, turn around and go straight back. At the end of the path, turn left into a somewhat hidden room. The upgrade kit is in an interior room with light illuminating it from above.
Supernatural Superweapon: Document
This is to the left of the red Tesla coil area. There will be a room with five cryotubes with zombies inside them. Enter the room and turn right. Turn left at the first desk. The document is on the desk.
Schweiger’s Revenge: Zombie Hand
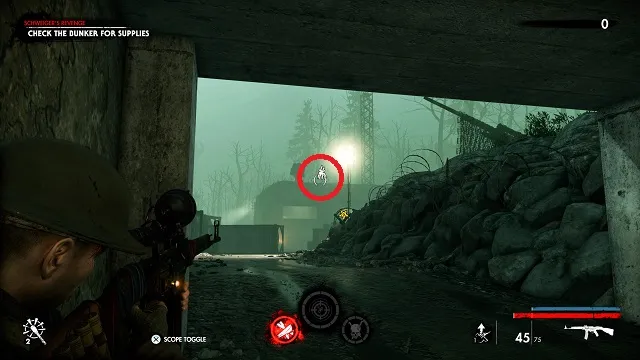
Exit the safe room and look at the top of the bunker in front of you. The zombie hand is crawling on the top.
Schweiger’s Revenge: Heroic Action
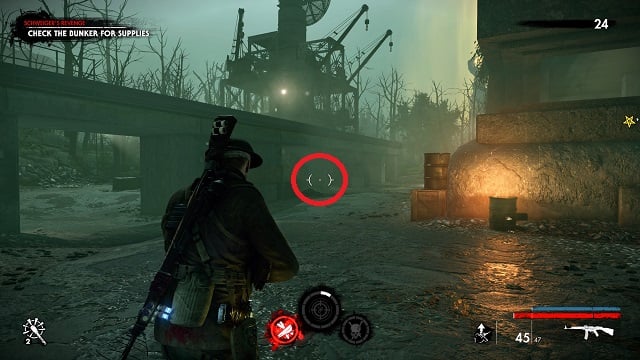
Now move into the area proper. There will be a resistance fighter to your left being attacked by an armored zombie. Kill the zombie before it attacks him.
Schweiger’s Revenge: Comic Book
Continue toward the left-hand side of the area. Go under the raised train track. Go left again toward the ammo and item crates. There will be sandbags on the right with the comic book on top of them.
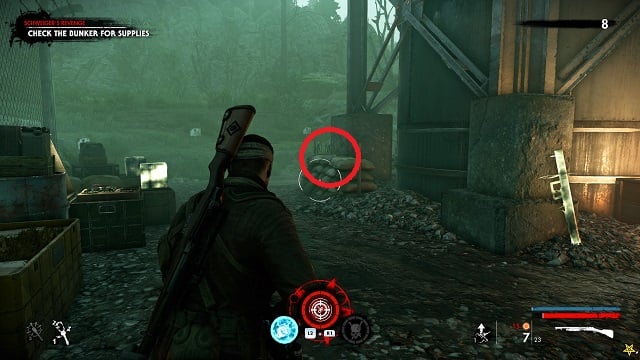
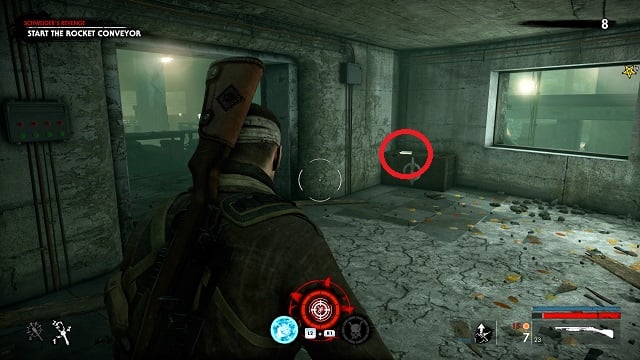
Schweiger’s Revenge: Upgrade Kit
Continue around the path from the sandbags. There will be a burning half-track in the next open area. The upgrade kit is on a barrel under the overpass to your right.
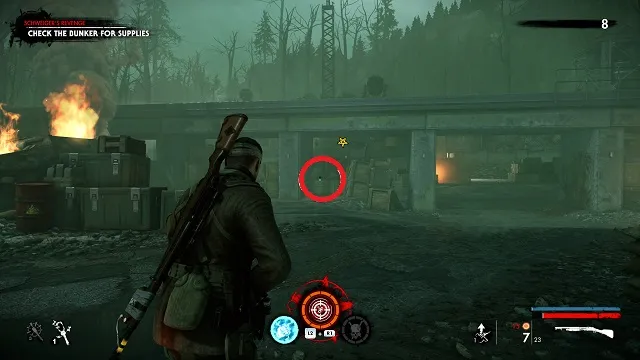
Schweiger’s Revenge: Document
Now go into the bunker and find the pillbox that juts out from the bunker. There is a heavy machine gun in the room. The upgrade kit is in the left corner.
Zombie Zoo Collectibles: Zombie Hands, Documents, Upgrade Kits, Comic Books, and Heroic Actions
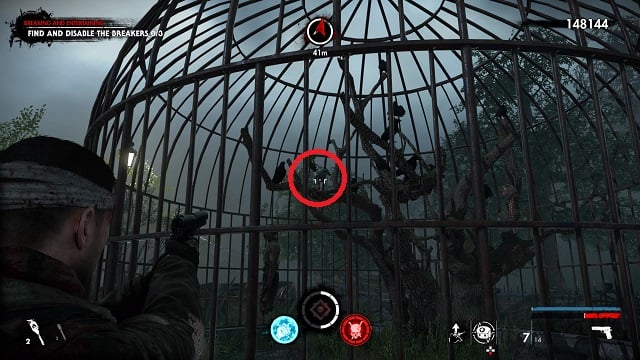
Trouble at the Zoo: Zombie Hand
Enter the area with the electric fences and turn right. The zombie hand is in the birdcage. The hand is on the left side of the tree on a branch walking like a bird. It has flowers/foliage on the back.
Trouble at the Zoo: Comic Book
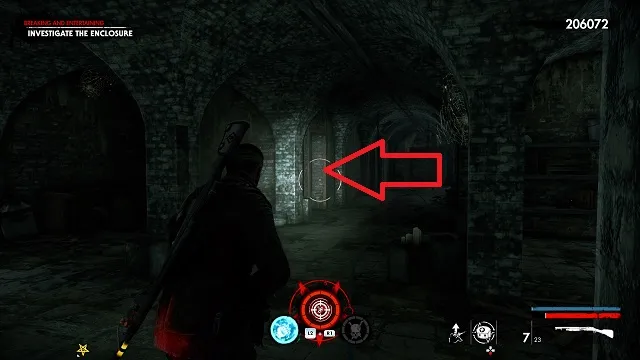
When you defuse the second breaker, the doors on either side of the hall behind you will open, spilling zombies out. Kill them and enter the first door on the left. The comic book is in the back.
Trouble at the Zoo: Upgrade Kit

On the way to disable the third breaker, go into the cages leading toward the objective. Follow the path through the first cage and unlock the next cage in front of you to grab the upgrade Kit.
Trouble at the Zoo: Document
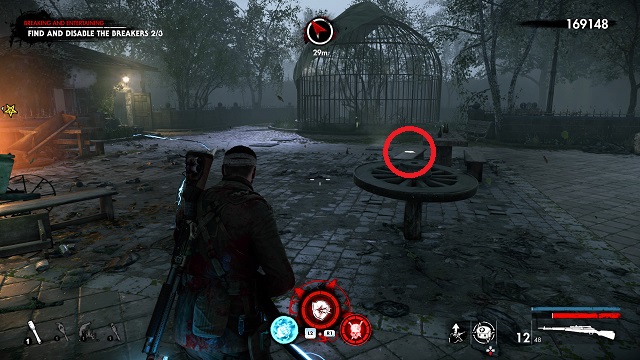
Once through the cages, there will be a wheel sticking straight up out of the ground and a picnic table behind it. The document is on the left side of the table.
Welcome to the Jungle: Upgrade Kit
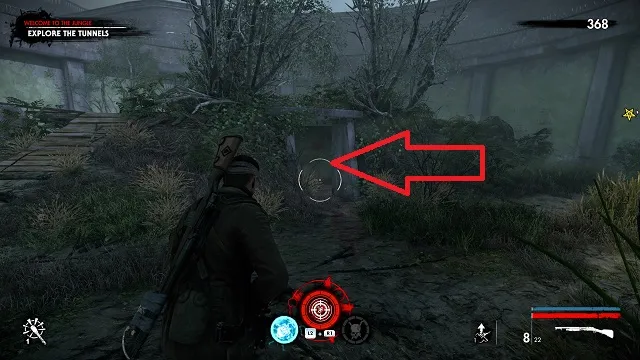
There is a bunker in the second enclosure with the second screamer. The upgrade kit is on the floor to the right inside.
Welcome to the Jungle: Zombie Hand
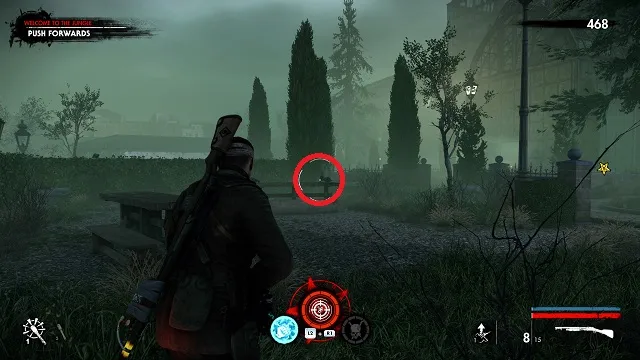
When you enter the area with the two armored giants and the grenadier, head to the end of the area and turn right into a small Grove with picnic tables. Turn right again when entering to see the zombie hand on a picnic table with three rats.
Welcome to the Jungle: Document

At the creeper nest, go to the far-left back corner of the area. The document is on a bench near a dead body and some crates.
Welcome to the Jungle: Comic Book

After the creeper nest, fight the three armored zombies and two grenadiers. Behind them is the area with the hutch to go underground. Looking at the hutch (objective) there is a table to the right with the comic book on it.
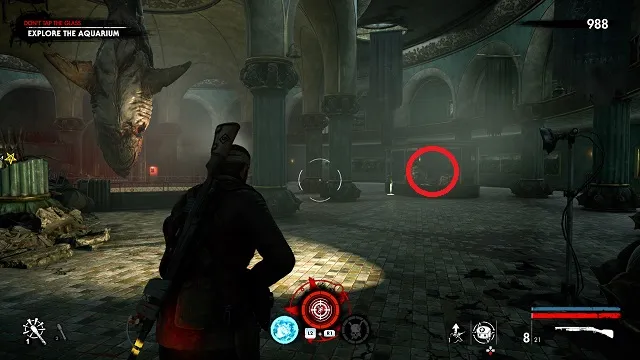
Don’t Tap the Glass: Document
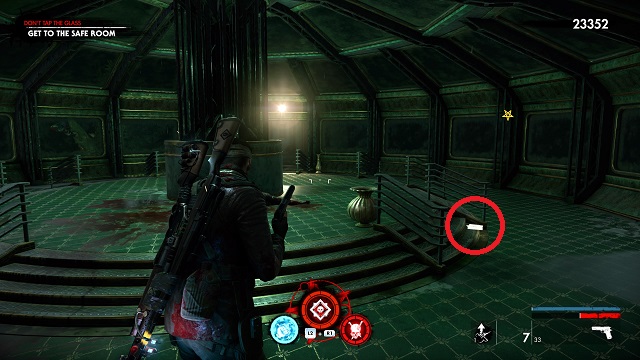
This is on the ground in the first circular area (technically a shark tank). The document is on the right side when you enter. It’s one of the only documents on the ground instead of a desk, crate, etc.
Don’t Tap the Glass: Zombie Hand
When you enter the area with the resistance fighters, there is a medium-sized terrarium to the right of the hanging shark. The zombie hand is on a rock inside it … fishing.
Don’t Tap the Glass: Comic Book
From the zombie hand, follow the path directly across to the opposite side of the room. The comic book is on the edge of another terrarium. It’s across from an ammo box on that side of the room.
Don’t Tap the Glass: Document: Heroic Action

Eventually, you’ll need to open the door to exit this area. The heroic action is protecting the two resistance fighters on the balcony.
Grab the flame thrower and bring lots of explosives and grenades. Stand at the foot of the stairs leading up to their side of the balcony. You’ll face waves of crawlers and half a dozen armored zombies, among other demons. This is a hard fight alone, even on easy.
Don’t Tap the Glass: Upgrade Kit
Exit the room with the heroic action. The upgrade kit is in front of you to the right. It’s in an open safe.
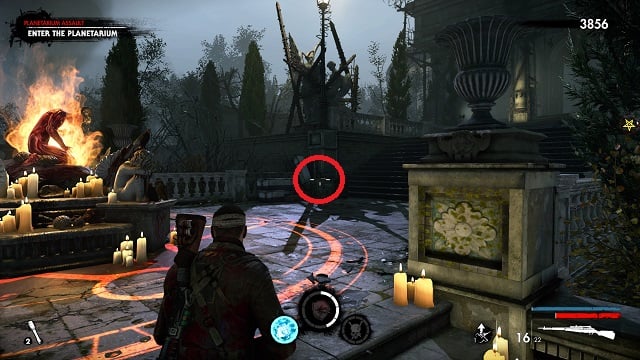
Planetarium Assault: Zombie Hand
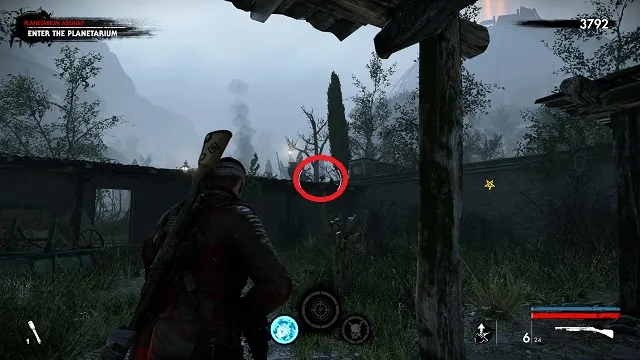
After the battle with the snipers and necromancers, head toward the objective. After going up some stairs and passing through a long hallway, you’ll come to a small grove. Stop and look at the birds perched on the awning of the building in front of you. One is not a bird.
Planetarium Assault: Comic Book

Continue toward the objective and kill the grenadiers. Go past the rift (the shrine is on your right). There is a kiosk with a green awning and a bench in front of it. Grab the comic book off the bench.
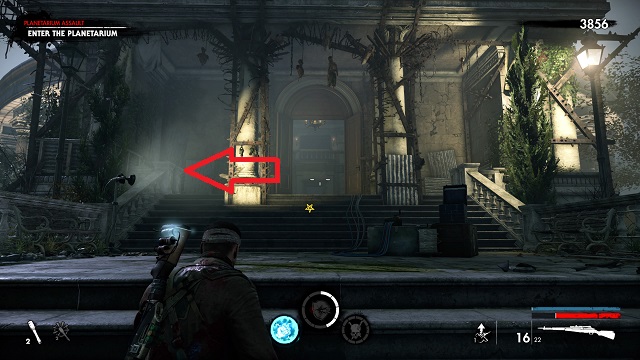
Planetarium Assault: Document
Now go up the steps. With the glowing shrine to your back and the objective in front of you, look left and grab the document off of the green box.
Planetarium Assault: Upgrade Kit
Go to the top of the stairs but don’t go through the door to the objective yet. Turn left and grab the upgrade kit.
Rotten Coast Collectibles: Zombie Hands, Documents, Upgrade Kits, Comic Books, and Heroic Actions
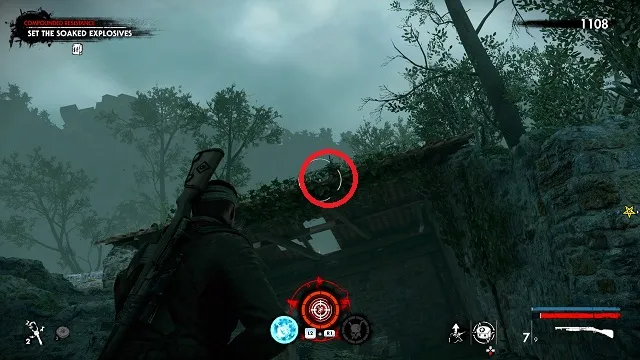
Compound Resistance: Document
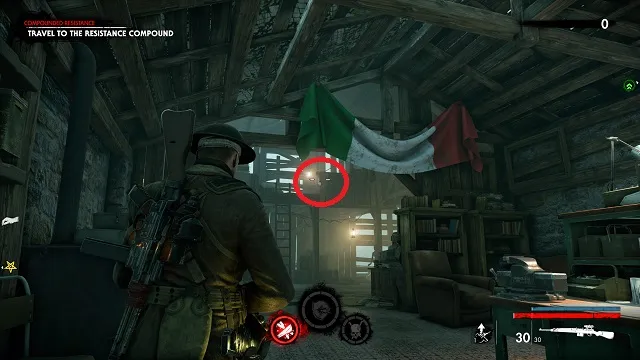
Spawn and go right, past the upgrade bench. Climb the ladder. Grab the document off of the bed at the top.
Compound Resistance: Comic Book
Drop down into the main area and go left. Pass the electrified gate and turn left past the tank. Go through the archway and past the barn (where the hay explodes on you). Go to the right. There will be a small shack by some big logs. The comic book is inside.
Compound Resistance: Zombie Hand
After defending the detonator, turn around and put the Mounted MG42 to your back. Go straight toward the stone ruins in front of you. Turn right and look up at the roof of the stone building to see the hand scampering across.
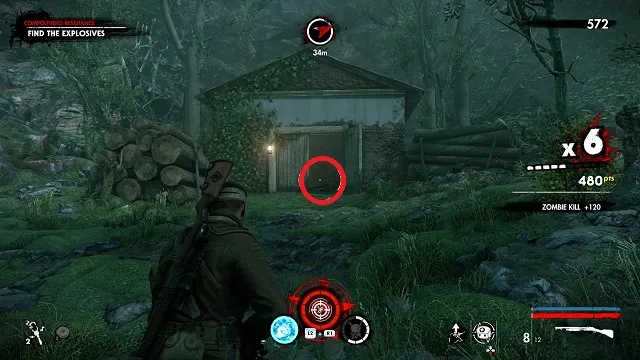
Compound Resistance: Upgrade Kit

Climb down toward the resistance compound. When you reach the bottom, go all the way to the right (past the tank). At the end, there’s a small house with a rooster weather vane. The upgrade Kit is inside on a bench near a stove.
Village of Darkness: Comic Book
Go down into the cellar, turn left and then turn right. The comic book is in the back of the area on a crate.
Village of Darkness: Heroic Action
Kill the suicider summoner and immediately run to the belltower. There is a sniper at the top you must protect for the entire duration of the horde wave. Alone, the best thing to do is simply stay on the second or third level of the belltower and kill zombies as they come in.
Village of Darkness: Upgrade Kit 1
Save the resistance fighter with the heroic action and he opens his safe with the upgrade kit inside.
Village of Darkness: Zombie Hand

Exit the belltower and turn left (past the red building with the “Aim for their Heads” poster on it). Turn right directly past that building (at the Enzo sign) then take a left at the car wreckage. Look up and left to the barbed wire fence. The hand is running on a railing behind it.
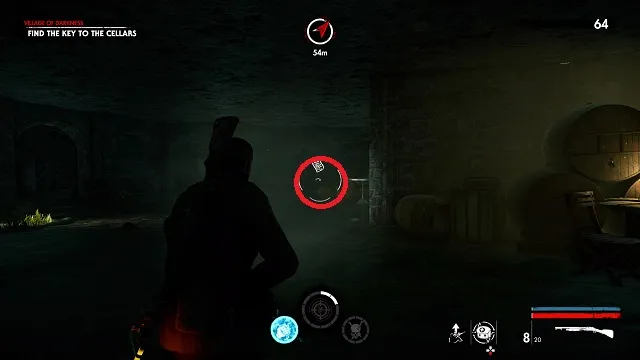
Village of Darkness: Document
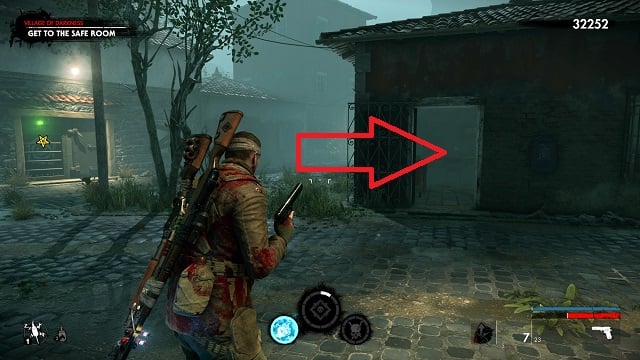
There is a house just before the safe room. It’s on the right-hand side of the street across from the statue. The document is inside on a table.
Village of Darkness Upgrade Kit 2
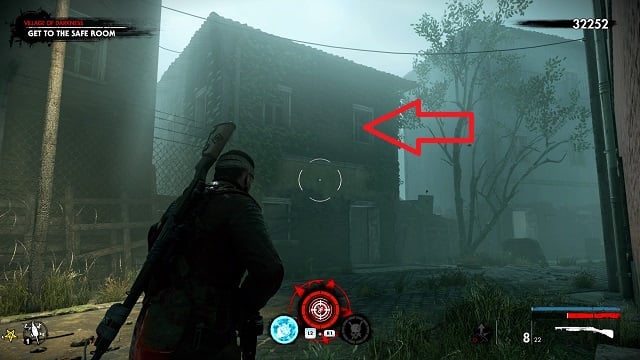
To the right of the safe room is a two-story house with ivy on it. Go to the second floor to get the upgrade Kit at the top of the stairs.
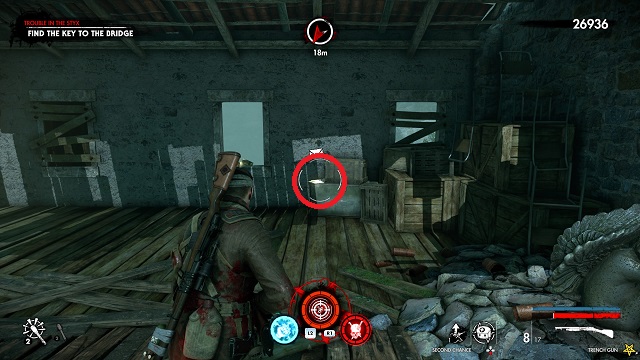
Trouble in the Styx: Comic Book
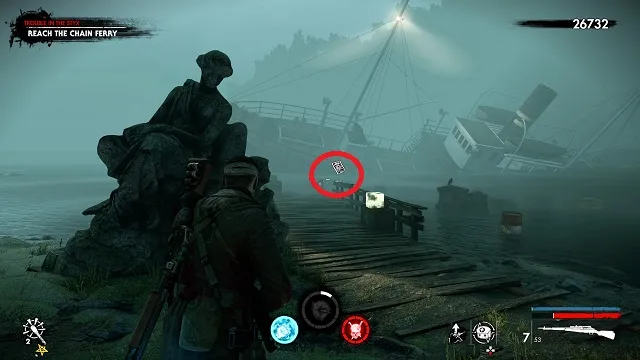
Cross the broken bridge and go through the water toward the ferry. Once you get to the other side, you’ll trigger a fight in the graveyard. Finish that and go through the graveyard toward the ship run aground in the bay. The comic book is on the right railing of the small pier.
Trouble in the Styx: Zombie Hand
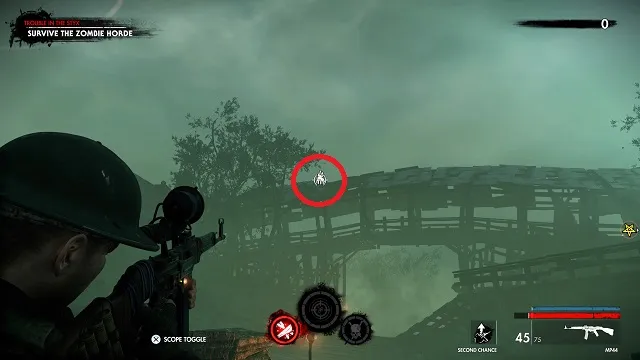
After grabbing the comic book, go toward the objective. Before crossing under the bridge in the graveyard, look up. The hand is crawling on top of the bridge.
Trouble in the Styx: Document
Now go to the new objective near the church. Climb up the wooden scaffolding leading to the second story of the church (or use the ladder inside one of the rooms) to get the document on the third story.
Trouble in the Styx: Upgrade Kit

Once you get to the signal tower, go past it and to the left. There is a small house in the distance. Go inside for the upgrade kit.
The Best Laid Plans: Upgrade Kit

Once you enter the catacomb sewers, you’ll fight a buzzsaw zombie. After defeating him, continue toward the objective by going through the open doorway and left. Then left again. The upgrade kit is on the left-hand side. Impossible to miss.
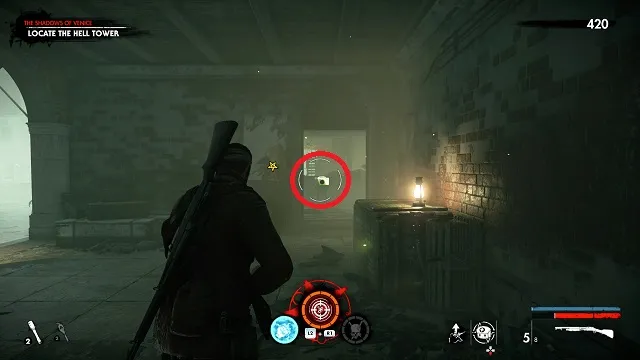
The Best Laid Plans: Document
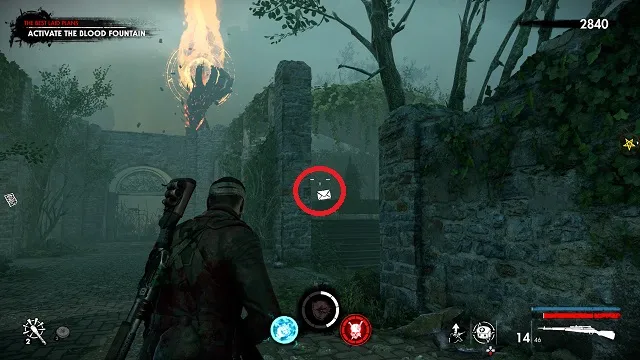
Continue through the underground hallway covered in roots. When you emerge, go past the altar and down the path. The document is through the right opening, up the left steps behind the tree.
The Best Laid Plans: Comic Book
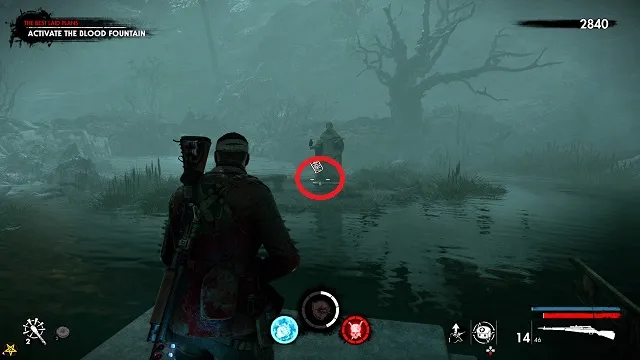
Go back out to the path and go to the left side. The comic book is at the base of a statue in the water.
The Best Laid Plans: Zombie Hand
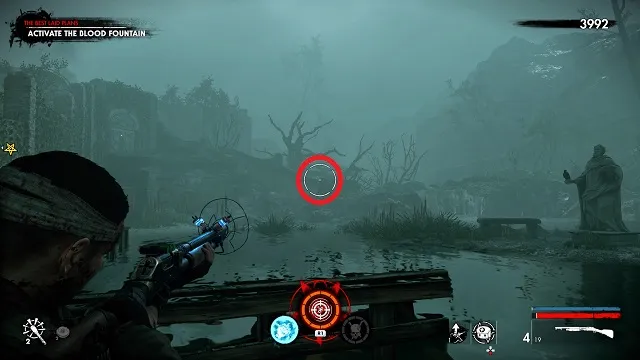
From the statue, look to the left side of the area (opposite of the hell tower). The hand is running along a fallen tree to the right of the iron gate.
Molten Nightmare Collectibles: Zombie Hands, Documents, Upgrade Kits, Comic Books, and Heroic Actions
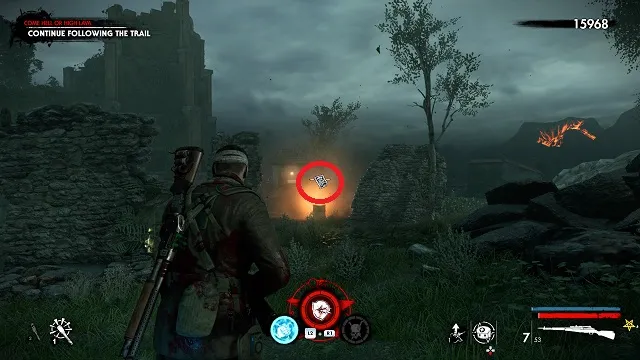
Come Hell or High Lava: Document
Exit the safe room and go straight. Climb the stairs and go right. Continue past the armored zombie. Turn right when you come to a break in the railing on the right. Jump across and grab the document off the bed.
Come Hell or High Lava: Comic Book
Continue down the path along the mountainside. When you come to the top, turn left toward the ruined Abby. Next to it is a small house overlooking the town below. The comic book is on a table inside.
Come Hell or High Lava: Upgrade Kit
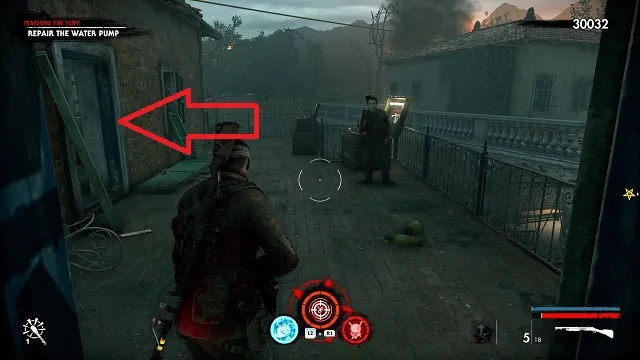
When you enter the area where you repair the water pump, turn right immediately. Go into the house with the blue doors right next to the ammo crate. Go upstairs. Go left and out on the balcony with the resistance fighter. Turn left and go in the room next to him. Grab the kit off the floor just inside the door.
Come Hell or High Lava: Zombie Hand
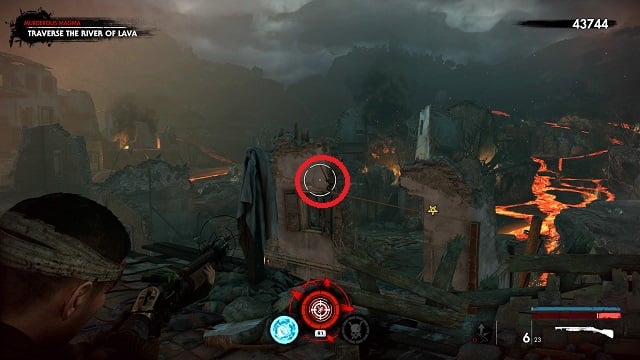
After defending the water pump, follow the objective to the two-story building. Go inside to change your objective to “Traverse the river of lava.” The hand is walking on a rope overlooking the lava right in front of you.
Hot on the Trail: Zombie Hand
After killing the cultist, go through the newly opened door and across the bridge. Go through the doorway and stop. Scan the floor from the room you’re in to the next room and the lattice out in the courtyard. The hand is walking a patrol route through this area.
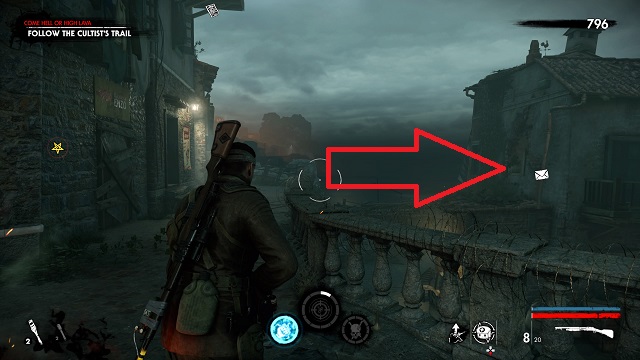
Hot on the Trail: Document
From the hand, continue to the objective and go down the stone stairs. Go left and go into the first doorway on the left. The document is on the couch. Note: you’ll have to fight a good amount of zombies first.
Hot on the Trail: Upgrade Kit
Continue along the objective path. You’ll quickly come to a room with an ammo box and item crates. Drop down to the docks and go down the wooden stairs to your left. Turn left at the bottom and vault over the small stone wall. The upgrade Kit is on the other side to the left.
Hot on the Trail: Comic Book
Now turn around and go toward the red yellow and blue boats on the rack on the dock. The comic book is on the rack.
Hot on the Trail: Heroic Action
After your battle on the boat, take the explosives to open the way to the safe room. Instead of ending the level, escort the resistance fighter back to the boat.
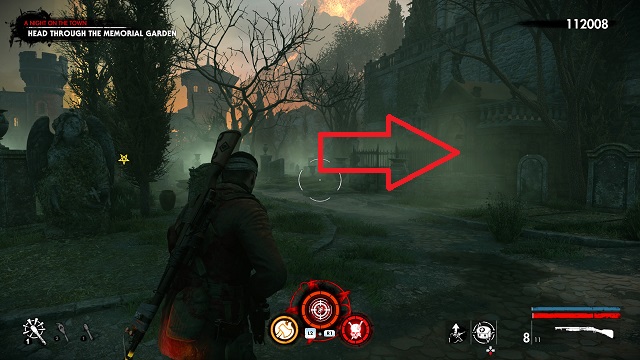
Night on the Town: Zombie Hand
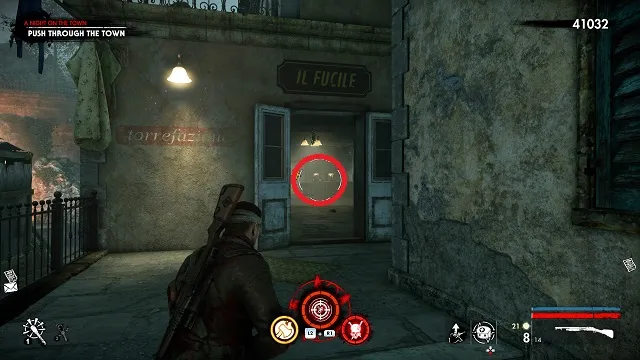
It’s a long time before you get a collectible here. Eventually, you’ll come upon some dead demolition crew. There’s a fortified base around a statue to your left. Continue up the steps and go into an old restaurant called “Il Fucile.” The zombie hand is on the bar.
Night on the Town: Comic Book
After defeating the zombies in the fort/camp, follow the path to the objective. Go up the stone steps and keep straight. Turn right into the room at the end of the path (near the metal gate and sandbags). “Hell Awaits” is written on a wall. The comic book is on a sofa.
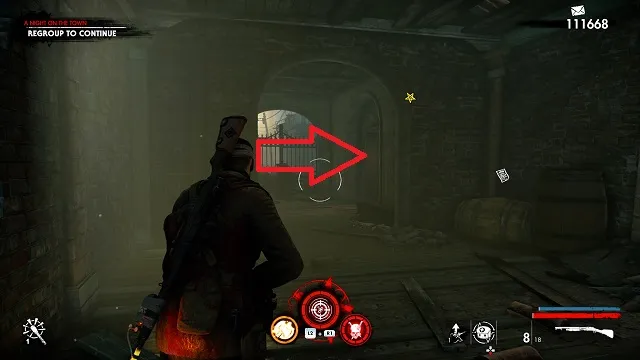
Night on the Town: Document
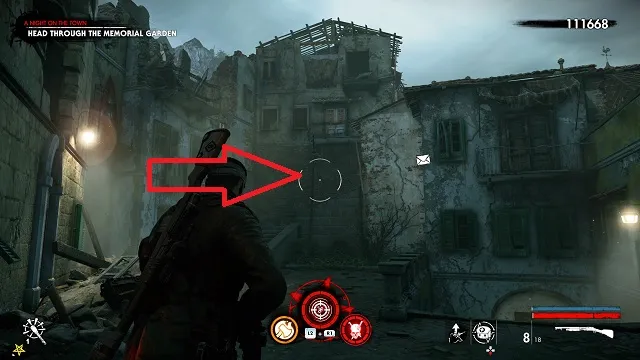
Go through that room and up the next set of stairs. At the top of those stairs, turn around and go up the stairs in the back of the area. The document is on a small table near item crates.
Night on the Town: Upgrade Kit
When you enter the graveyard, stay right and enter the first crypt on the right. Once inside, turn right and go into the small alcove. The kit is next to a skull on the bottom right-hand shelf.
The Final Hell Tower: Comic Book
As soon as you get outside, turn left into the house. Go to the back to get the comic book.
The Final Hell Tower: Document

When you enter the castle, turn right. Go into the stone building in front of you. Enter and turn left. Go through to the next room and turn right. The document is on a crate next to a gold glowing crate.
The Final Hell Tower: Zombie Hand
Exit out of the window and go left along the outside of the area. Pass the ammo box and go through the next entryway on your right. Look on the floor as you walk toward the back. The zombie hand is walking around on the floor. This is the room next to the area’s left staircase.
The Final Hell Tower: Upgrade Kit

Once you make it up to the castle ramparts after defeating the forces in the first fight, go into the room the armored giants come out of. The upgrade kit is inside in the right corner.
All Roads Lead to Hell Collectibles: Zombie Hands, Documents, Upgrade Kits, Comic Books, and Heroic Actions
Reaching the War Room: Comic Book
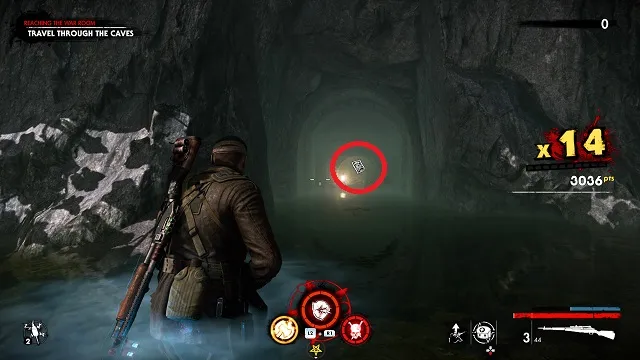
As soon as you drop down into the water, turn left and go to the end of the water-filled corridor. The comic book is at the end.
Reaching the War Room: Zombie Hand
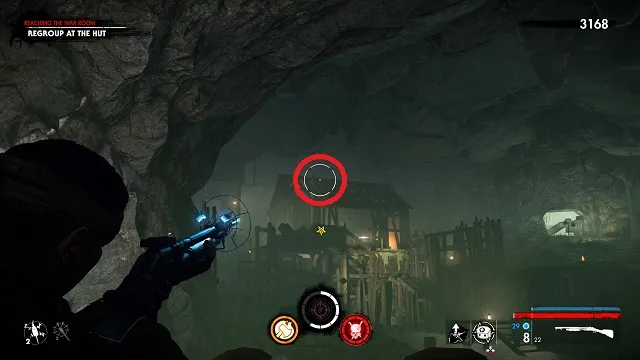
Turn around and head toward the objective. You will need to regroup at the hut. On the roof of the hut (the one marked with the objective marker) is the zombie hand.
Reaching the War Room: Upgrade Kit
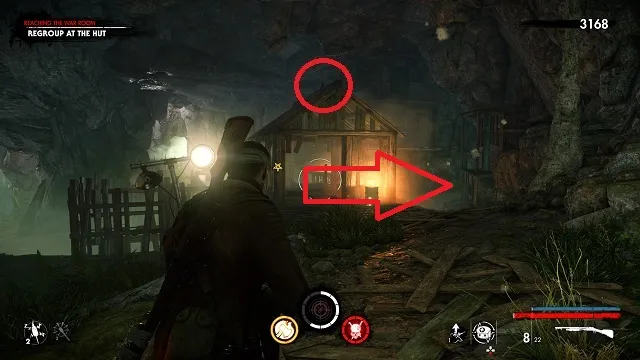
Directly behind the hut, there is an entryway and a small room. The upgrade kit is inside with a glowing gold box.
Reaching the War Room: Document
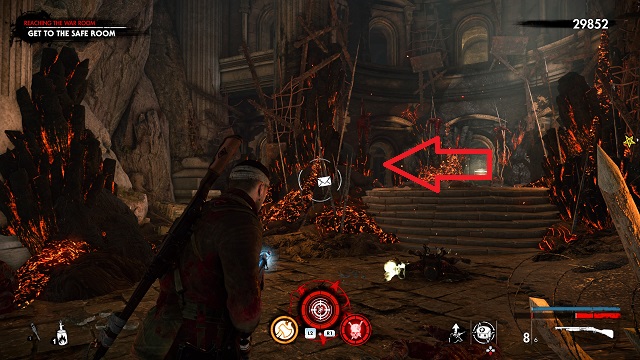
After you fight the Flamer near the end of the level, you’ll get access to the safe room. Instead of going right, go left into the flaming ruins instead. Stay to the far left to get the document in a pool of blood on the ground.
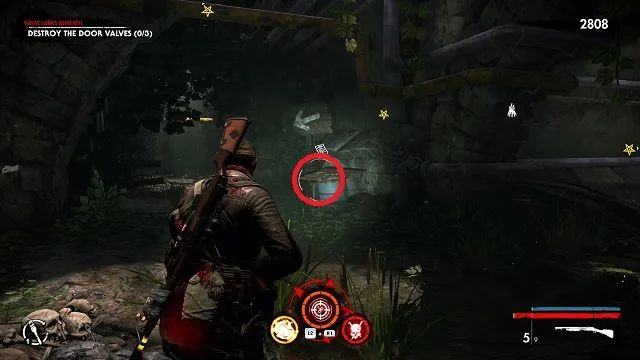
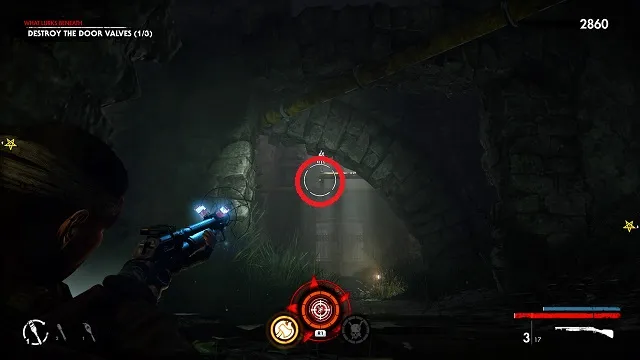
What Lurks Beneath: Document
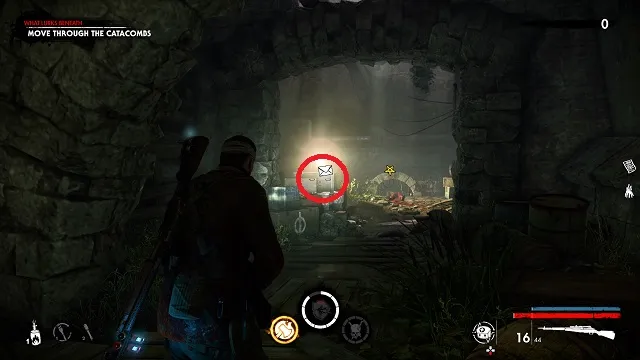
Leave the safe room and follow the path. Drop down the first time and grab the document off of the crates on the right-hand side. It’s in the room with the screamer.
What Lurks Beneath: Upgrade Kit
Go past the screamer and turn right. Wade through the water and go up the wooden stairs on the other side. Turn left at the top for the upgrade kit.
What Lurks Beneath: Comic Book
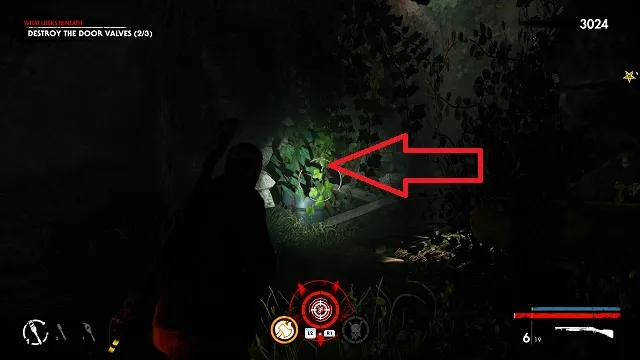
Turn around after destroying the door valve. Go straight across to the other side of the main corridor. Wade through the water and turn right. Grab the comic book off of two blue barrels.
What Lurks Beneath: Zombie Hand
Continue past the comic book and follow the path right. When you wade into the water again, turn left and go straight through the stone archway (a white arrow will be to your left). After passing through, turn right and look up at the pipes in the next room
City of the Dead: Comic Book
After filling the blood fountain, go into the newly-opened room on the right side of the area (to the right of the machine gun nest if you’re facing it). The comic book is on a small table inside.
City of the Dead: Zombie Hand
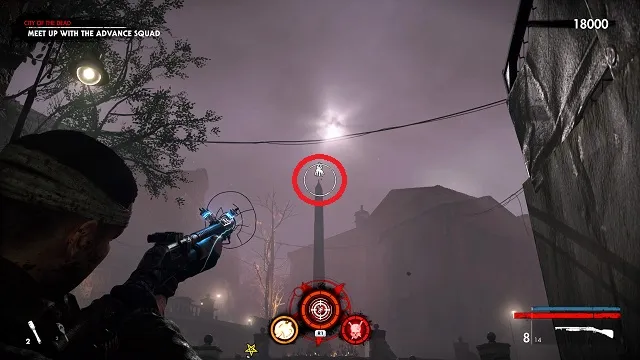
Enter the next area with the armored zombies and grenadiers. The hand is at the top of the obelisk in the center of the area.
City of the Dead: Heroic Action
As you approach the next area, fight alongside the resistance fighters. I’m not sure what triggers this action as I got it before I even made it to the area
City of the Dead: Document
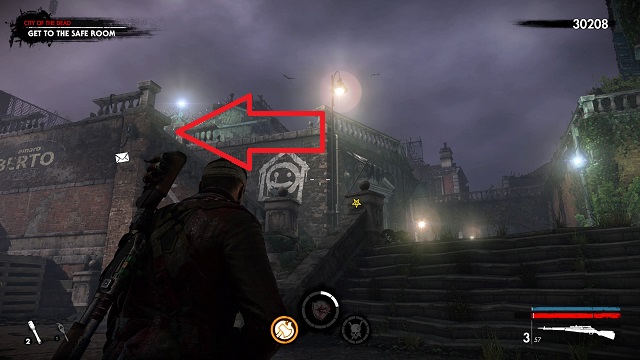
After the fight with the resistance fighters, go up the stone steps toward the safe room. Take a left at the top and ascend the stairs with the white smiley face painted next to them. The document is on a crate between an ammo crate and an item crate.
City of the Dead: Upgrade Kit
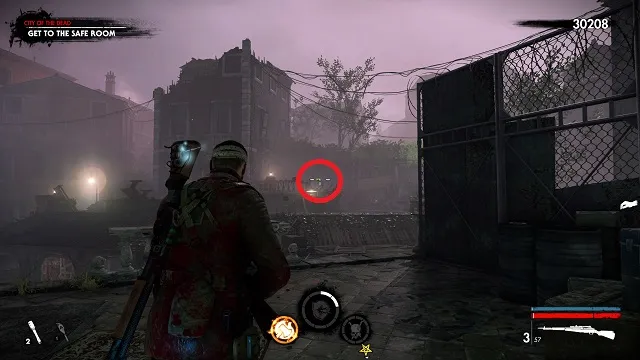
From the document, turn left and cross over to the other side of the rooftop area. The upgrade kit is right out in the open.
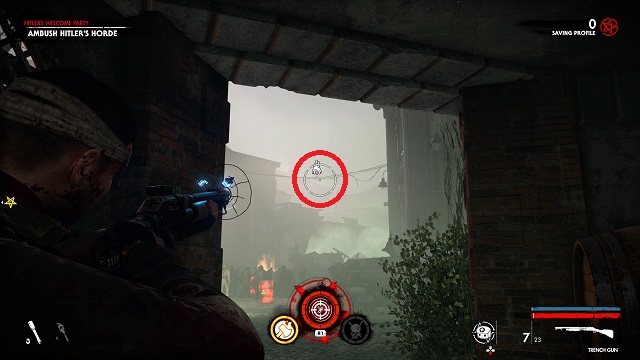
Hitler’s Welcome Party: Upgrade Kit
Exit the safe room and descend the stairs. Turn right. And go into the first entryway in front of you. It’s to the right of the car. The upgrade kit is just inside the entryway, on the left side.
Hitler’s Welcome Party: Document
In the same room, go forward a few dozen feet and turn right. The document is on a crate in a nook.
Hitler’s Welcome Party: Comic Book

Follow the path around, past the ammo crate and the item crates. The comic book is on the right-hand side on a barrel.
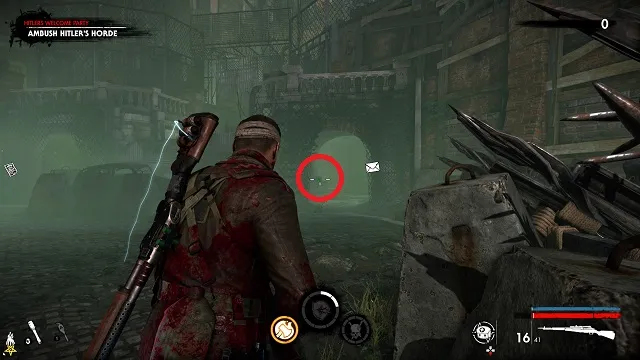
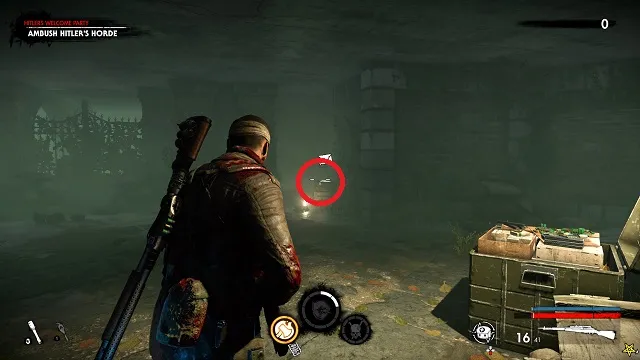
Hitler’s Welcome Party: Zombie Hand
Grab the comic book and look up. There is a power line connecting two buildings. The zombie hand is crawling on it.
Hell Base Collectibles: Zombie Hands, Documents, Upgrade Kits, Comic Books, and Heroic Actions
Not in Kansas Anymore: Heroic Action
After filling the blood fountain, go through the gates. You’ll hear someone come over the radio for help. Go to the cliff edge overlooking the complex below. Kill the zombies attacking the resistance fight on the bridge between the two circular buildings
Not in Kansas Anymore: Comic Book
Go down the slope and toward the base. After breaking the seal, go across the short bridge and into the first round building directly in front of you. Go up to the second floor. The comic book is on a table near an artillery gun.
Not in Kansas Anymore: Zombie Hand
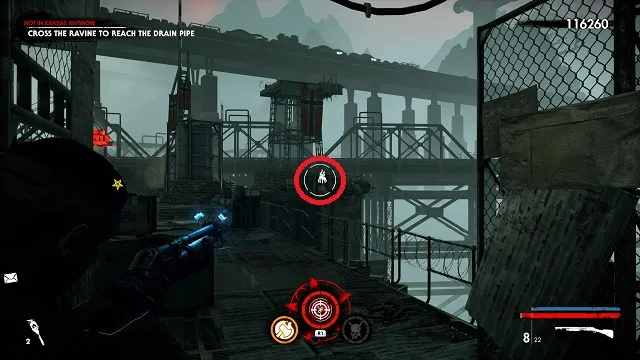
Move toward the objective and turn on the power to the gate. After opening the gate and surviving the zombie horde, cross the small bridge toward the objective. On the other side, turn right to find the zombie hand running around a small wooden crate on a metal platform.
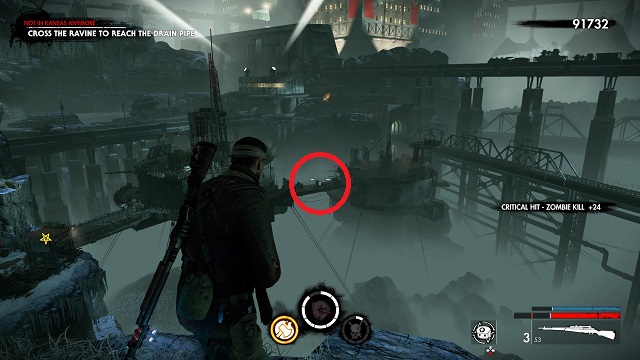
Not in Kansas Anymore: Document
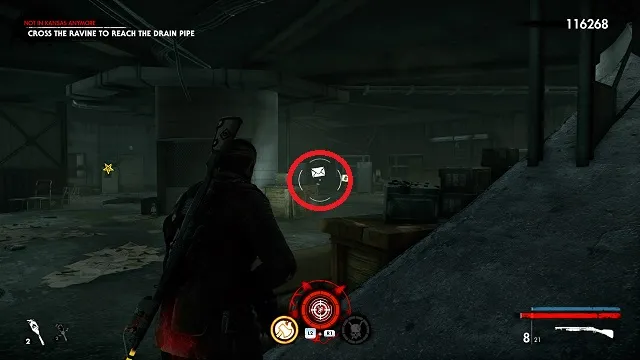
Now go toward the objective and then down the ramp. At the bottom, turn right. The document is on the lower bunk of a bunk bed on the far side.
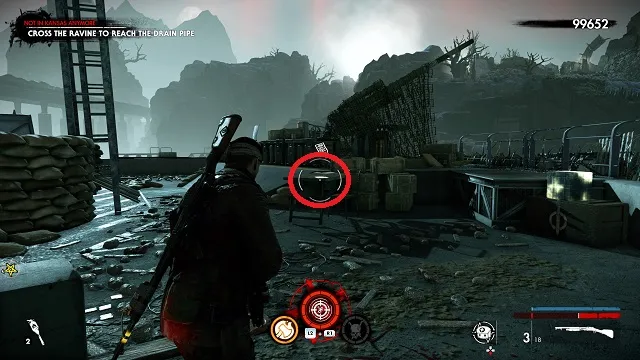
Not in Kansas Anymore: Upgrade Kit
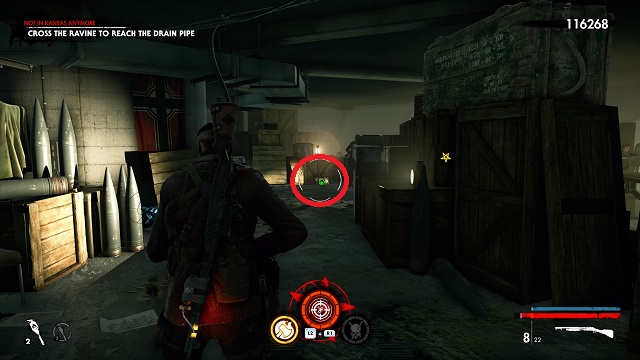
Now activate the switch to open the door and go outside. Go down toward the drainpipe but instead of turning left to go to it, turn right and go around the bottom of the building you just left. You’ll come to a wooden door, open it and turn right inside. The upgrade kit is next to a resistance soldier.
War Machines: Upgrade Kit
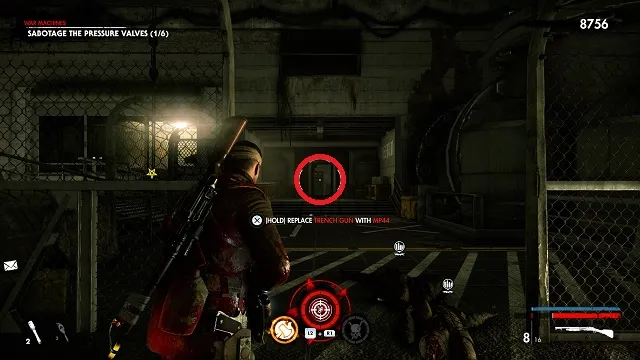
After killing the butcher and the horde sealing the gate, go past the gate (with it on your left) and into the holding cells (the doorway is glowing red). Go to the back of the area, past the cell with the zombie, to get the upgrade Kit.
War Machines: Document
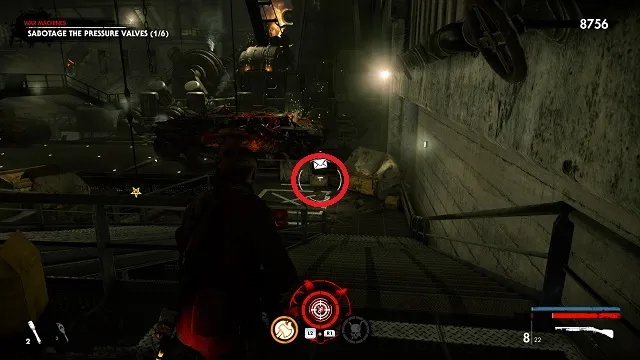
Now go back out and through the gate toward the objective. Follow the path around and go down the second set of stairs. Grab the document off of the wooden crate at the bottom.
War Machines: Comic Book
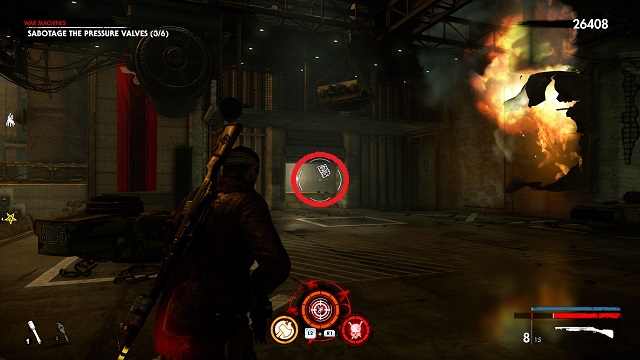
After clearing the creepers and going down into the flooded area beneath the factory, you’ll fight another horde of zombies guarding a demonic seal. Take them out, but instead of going toward the objective, go into the room in the back of the area. Grab the comic book off of a table.
War Machines: Zombie Hand
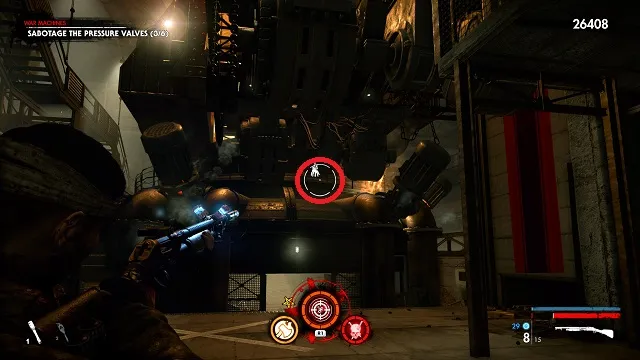
Now exit the room and turn right toward the objective. Stop and look up, above the objective marker, for the zombie hand crawling around the machine in circles.
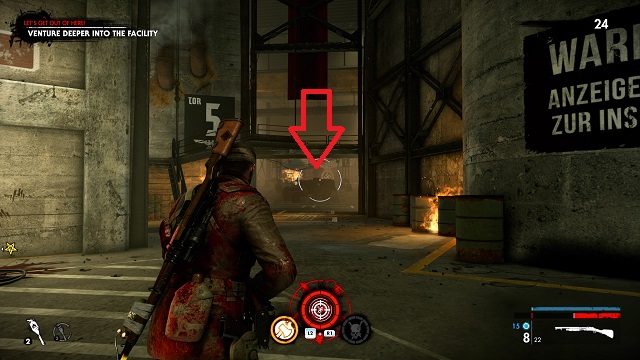
Let’s Get Out of Here: Document

Exit the safe room and go up the ramp. Cross under the hanging flag and toward the silo in front of you. Grab the document off the crate.
Let’s Get Out of Here: Zombie Hand
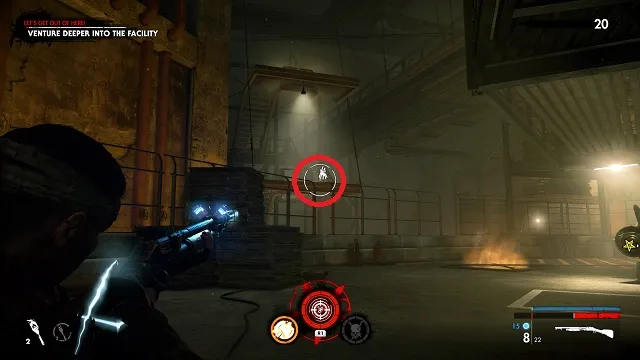
Turn left and look out toward the stairs and platforms over the fencing. The zombie hand is running around on the one under the light.
Let’s Get Out of Here: Comic Book
Now turn right and go toward the objective marker. Keep right and go through the area to the other side, toward the huge eagle symbol drawn on the far wall behind the fuel truck. The comic book is on a crate behind the fuel truck and just before the eagle mural.
Let’s Get Out of Here: Upgrade Kit
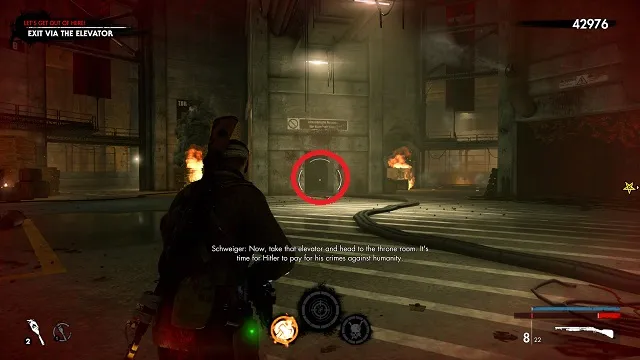
Call the elevator to spawn the zombies. Take out the commanders to spawn armored zombies. When these break out, they will open two small rooms on either side of the elevator. Facing the elevator, go in the left one all the way to the back for the upgrade kit.
Steal the Relic: Upgrade Kit

After surviving the insane onslaught in the throne room, go to the control area on the side of the throne room. If the throne is to your back, it’s on the left-hand side with the wall-covering computers. To the right of those computers, in a small nook, is the kit.
Steal the Relic: Document
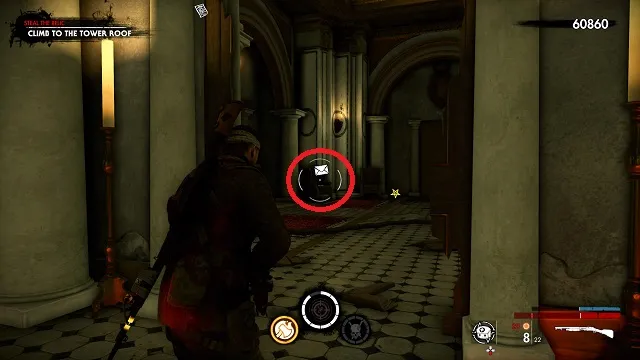
Now go toward the objective and climb the stairs. In the next room, grab the document off the chair in the back left corner.
Steal the Relic: Zombie Hand

Now continue toward the objective and open the sealed gate. Pass through the gate. Schweiger will be to your right, but look out over the left side. The zombie hand is running around a platform level with you. There is an overturned barrel on the platform.
Steal the Relic: Comic Book
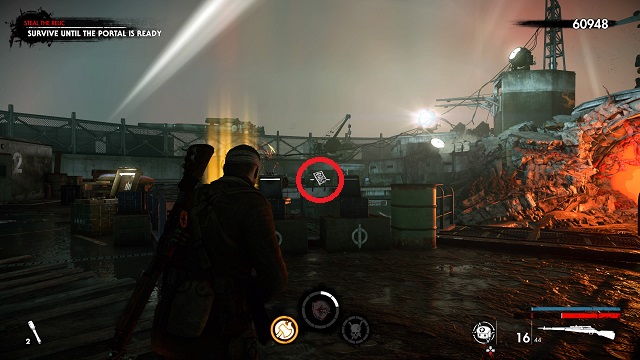
Now go to the far side of the platform. When you get to the dead end, turn left . There is a door and to the left of that is the comic book on the ground by a barrel.
Hell Machine Collectibles: Zombie Hands, Documents, Upgrade Kits, Comic Books, and Heroic Actions
Obliterate Hitler’s Army: Document

Spawn and turn around immediately. There is a small area to your diagonal right. Go in there and open the wooden door. Turn left to grab the document from the table in the room.
Obliterate Hitler’s Army: Heroic Action

Exit the safe room and turn left immediately. There is a resistance fighter on the cliff. Protect him to get the action.
Obliterate Hitler’s Army: Zombie Hand
Enter Hitler’s sandcrawler and use the first switch to reveal the second heart. Climb the stairs to your right. Stop at the top and look at the pipes in the distance. The zombie hand is crawling on them.
Obliterate Hitler’s Army: Comic Book
Enter the sewer and go straight ahead. The comic book is on the very far side of the open area you come to. It is on a crate tucked in a pipe drain.
Obliterate Hitler’s Army: Upgrade Kit
Exit the pipe and turn right into another pipe that cuts through the upper platform. Go down until you see a ladder on your right going up. Climb it and look left when you get to the top. The kit is on the ground.
—
And there you have it. The location all of the collectibles in Zombie Army 4: Dead War, including zombie hands, documents, upgrade kits, comic books, and heroic actions. For more on Rebellion’s latest shooter, which is currently available on PS4 and Xbox One, as well as PC through the Epic Games Store, be sure to check our Zombie Army 4: Dead War review.


Published: Feb 2, 2020 02:11 pm